Page 3 - Contents
3 EN Contents 1 Important 4 Safety 4 Notice 4 2 Your camcorder 6 Introduction 6 What’s in the box 6 Functional over view 7 3 Get started 9 Load the Micro SD card 9 Turn on 9 First-time setup 9 Charge the built-in batter y 10 4 Use your water and drop proof camcorder 12 Record video 12 Take pictures ...
Page 4 - Notice; Important; Safety
4 n Do not use this camcorder in water deeper than 3 meters (10 feet) or for longer than 30 minutes. Any changes or modifications made to this device that are not expressly approved by Philips Consumer Lifestyle may void the user’s authority to operate the equipment. Notice This product complies with...
Page 6 - Introduction; What’s in the box
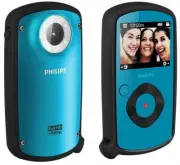
6 2 Your camcorder Introduction With this portable camcorder, you can: take full HD (1080P), spor ts HD (720P • with 60 FPS) or VGA movies take pictures • take the camcorder underwater (up to 3 • meters, 10 feet)take with you anywhere thanks to the • rugged and drop-proof design (1.5-meter drop-proo...
Page 7 - Functional overview; l m
7 During video play, change the volume. • Perform the specific function as • shown on the display panel. f Shutter button In viewfinder mode, take a picture or • star t/stop video recording.In play mode, switch to viewfinder • mode. g Fastener Secure the protective cover. • h Protective cover i Mini US...
Page 9 - Turn on; started; Load the Micro SD card
9 Turn on Press • . For first-time users, a menu for OSD » language selection is displayed (See ‘Get star ted - Set the OSD language’). The camcorder switches to viewfinder » mode. To turn off the camcorder: Press and hold • . The backlight on the display panel » turns off. Tip To save energy, the cam...
Page 10 - Charge the built-in battery; Select a scene
10 Charge the built-in battery 1 Unlock the fastener to flip open the protective cover at the bottom of the camcorder. 2 Connect the camcorder to a PC through the supplied USB cable. The status indicator on the shutter » button star ts flashing in orange. 3 Wait until the status indicator stops flashin...
Page 12 - Take pictures; Play; Delete a file; Use your water; Record video
12 Take pictures 1 Press MODE once or twice until is displayed at the upper right corner of the display panel. The file size and remaining number » of pictures that can be taken are displayed on the display panel. 2 Hold the camcorder steadily and aim the lens as needed. 3 Press the shutter button do...
Page 13 - Options during video play
13 Tag a file 1 In play mode, press / to select a file. 2 Press + to enter the edit window. 3 Press - to tag the file. To untag the file, press • - again. 4 Repeat steps 1 to 3 to tag other files. Preview In play mode, press • - . The thumbnails of 6 files are displayed » on each page. To select a file, pr...
Page 14 - Adjust settings
14 Settings menu option Description [Date] Set the date. [Time] Set the time. [Language] Select your desired menu language. [Format SD card] Clear contents from the micro SD card. [TV system] Change this setting if the output video does not appear correctly on your TV. Adjust settings 1 In viewfinder...
Page 15 - Install the camcorder software; Use more of; View video or pictures on TV
15 Install and use the camcorder software Warning If you remove the supplied software, you will not be • able to get one from ArcSoft for free. With the software (ArcSoft MediaImpression HD Edition) available in the internal memor y of the camcorder, you can impor t, edit, archive or upload your pic...
Page 18 - Frequently
18 During video capture, do not move the • camcorder too fast.Use a tripod (not supplied) if necessar y. • Why do my video/pictures look distorted on a TV screen? Select the correct TV system. • How do I charge the camcorder? You can charge the camcorder via • the suppor ted USB cable. When you conn...