Philips 8FF3FPW/27 - Manuals
User Manual Philips 8FF3FPW/27


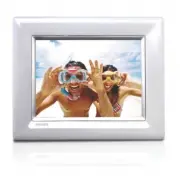
Summary
ENGLISH 1 Content Content Introduction1. Important Information 1.1 Safety precautions and maintenance1.2 Care of the PhotoFrame1.3 Recycling 2. Your PhotoFrame 2.1 What’s in the Box2.2 Control Buttons and Menu Navigation2.3 Connections2.4 Product Highlights 3. Getting started 3.1 Placing the Product...
1.1 Safety precautions and maintenance Read and follow these instructions when connecting and using your PhotoFrame:• To protect your display from possible damage, do not put excessive pressure on the LCD panel. When moving your PhotoFrame, grasp the frame to lift; do not lift the it by placing your...
5 Keep the stand clear from cables Make sure the stand of your PhotoFrame is clear from cables as cables could pull the stand out of PhotoFrame to the floor. 6 Temperature and humidity limitations Operating temperature: 0° ~ 40° (Celsius) / 32° ~ 113° (Fahrenheit) Humidity: 20% ~ 80% 1.3 Recycling •...
Philips Manuals
-
 Philips 50PFL5907/F7
User Manual
Philips 50PFL5907/F7
User Manual
-
Philips 50PFL5907/F7
Quick Guide
-
 Philips 32PFL4508/F7
User Manual
Philips 32PFL4508/F7
User Manual
-
Philips 32PFL4508/F7
Quick Guide
-
 Philips 39PFL2908/F7
User Manual
Philips 39PFL2908/F7
User Manual
-
Philips 39PFL2908/F7
Quick Guide
-
Philips 55PFL5907/F7
User Manual
-
Philips 55PFL5907/F7
Quick Guide
-
Philips 46PFL5907/F7
User Manual
-
Philips 46PFL5907/F7
Quick Guide
-
Philips 40PFL4908/F7
User Manual
-
Philips 40PFL4908/F7
Quick Guide
-
Philips 40PFL4708/F7
User Manual
-
Philips 40PFL4708/F7
Quick Guide
-
Philips 40PFL1708/F7
User Manual
-
Philips 29PFL4908/F7
User Manual
-
Philips 29PFL4908/F7
Quick Guide
-
Philips 42PFL5907/F7
User Manual
-
Philips 42PFL5907/F7
Quick Guide
-
 Philips 32PFL5708/F7
User Manual
Philips 32PFL5708/F7
User Manual