Page 5 - Italiano
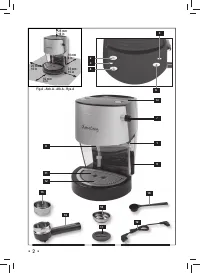
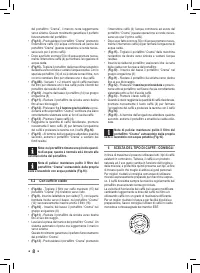
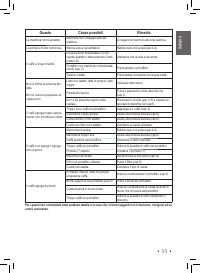
• 5 • Italiano 1 GENERALITÀ La macchina per caffè è indicata per la preparazione di 1 o 2 tazze di caffè espresso ed è dotata di un tubo orientabile per l’erogazione del vapore e dell’acqua calda. I co man di sulla parte superiore del l’ap pa rec chio sono contrassegnati con simboli di facile in ter...
Page 9 - QUA
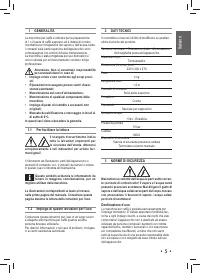
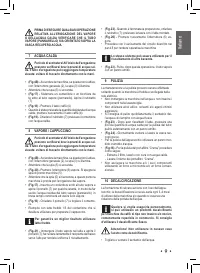
• 9 • Italiano PRIMA DI ESEGUIRE QUALSIASI OPERAZIONE REL ATIVA ALL’EROGA ZIONE DEL VAPORE O DELL’ACQUA CALDA VERIFICARE CHE IL TUBO VAPORE (PANNARELLO) SIA ORIENTATO SOPRA LA VASCA RECUPERO ACQUA. 7 AC QUA CALDA Pericolo di scottature! All’inizio dell’erogazione posso no ve ri fi car si brevi spruz...
Page 10 - 1 SMALTIMENTO
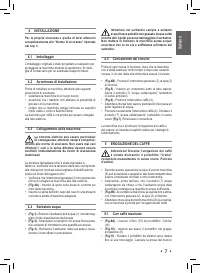
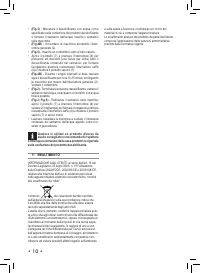
• 10 • • (Fig.2) - Miscelare il decalci fi cante con acqua come speci fi cato sulla confezione del prodotto decalci fi cante e riempire il serbatoio dell’acqua; inserire il serbatoio nella macchina. • (Fig.4B) - Accendere la mac chi na pre men do l’in ter - rut to re ge ne ra le (2). • (Fig.5) - Ins...
Page 11 - Guasto
• 11 • Italiano Guasto Cause possibili Rimedio La macchina non si ac cen de. Macchina non collegata alla rete elettrica. Collegare la macchina alla rete elettrica. La pompa è molto ru mo ro sa. Manca acqua nel ser ba to io Rabboccare con acqua.(par.4.4). Il caffè é troppo freddo. La spia pronto temp...
Page 12 - Saeco International Group; Ing. Andrea Castellani
• 12 • DICHIARAZIONE DI CONFORMITA' CE EC 2006/95, EC 2004/108, EC 1992/31, EC 1993/68 Noi : Saeco International Group Via Torretta , 240 40041 GAGGIO MONTANO (BO) dichiariamo sotto la nostra responsabilità che il prodotto : MACCHINA PER CAFFE' SINGOLA TIPO : SIN 24XN al quale si riferisce questa di...
Page 13 - English; IMPORTANT SAFEGUARDS; Read all instructions.; SAVE THESE INSTRUCTIONS
• 13 • English IMPORTANT SAFEGUARDS When using electrical appliances, basic safety precautions should always be followed, including the following: 1. Read all instructions. 2. Do not touch hot surfaces. Use handles or knobs. 3. To protect against fire, electric shock and injury to person do not imme...
Page 14 - If a long detachable power-supply cord or extension cord is used,
• 14 • INSTRUCTIONS FOR THE POWER SUPPLY CORD A. A short power-supply cord (or detachable power-supply cord) is to be provided to reduce risks resulting from becoming entangled in or tripping over a longer cord. B. Longer detachable power-supply cords or extension cords are available and may used if...
Page 18 - Using Coffee Pods; TIPS FOR CHOOSING COFFEE; WATER
• 18 • press the brew button again (4) to stop the coffee brewing and remove the cups of coffee (Fig. 14) . • (Fig.15) - Wait a few seconds after brewing, then remove the porta fi lter and empty the coffee grounds. Note: If a small quantity of water remains in the porta fi lter; this is normal and i...
Page 19 - CLEANING THE MACHINE; 1 MACHINE DISPOSAL
• 19 • English • Wait until the machine ready light (5) turns on again. The machine is now ready to dispense steam. • (Fig.17) - Insert a container below the steam spout and open the knob (7) for a few seconds, so that any residual water fl ows out of the steam spout (Pannarello). Wait until there i...
Page 23 - Deutsch
• 23 • Deutsch tenz verwendet zu werden, es sei denn, sie werden von einer Person überwacht, die für ihre Sicherheit verant- wortlich ist oder sie werden im Gebrauch der Maschine geschult. Stromversorgung Die Kaffeemaschine darf ausschließlich an eine geeig- nete Steckdose angeschlossen werden. Die ...
Page 24 - AUFSTELLUNG
• 24 • Legende der Maschinenbestandteile (S. 2) 1 Wassertank 2 Hauptschalter 3 Kontrolllampe Maschine ein 4 Taste für die Kaffeeausgabe 5 Kontrolllampe Maschine bereit 6 Dampftaste 7 Drehknopf Heißwasser/Dampf 8 Kaffeebrühgruppe 9 Dampfdüse (Pannarello) 10 Netzkabel 11 Wasserauffangschale + Gitter 1...
Page 25 - KAFFEEAUSGABE; Betrieb mit gemahlenem Kaffee
• 25 • Deutsch 5 KAFFEEAUSGABE Achtung! Das Herausnehmen des Filterhalters “Crema” durch Drehung im Uhrzeigersinn von Hand während der Ausgabe des Kaffees ist verboten. Verbrennungsgefahr. • Während dieses Vorgangs kann sich die Kontrolllampe Maschine bereit (5) ein- und ausschalten. Dieser Betrieb ...
Page 26 - DAMPF / CAPPUCCINO
• 26 • • (Abb. 13) - Die Taste für die Kaffeeausgabe (4) drük- ken. • Nachdem die gewünschte Kaffeemenge ausgegeben wurde, erneut die Taste für die Kaf feeausgabe (4) drücken, um die Ausgabe des Kaffees zu stoppen und die Tasse mit dem Kaffee entnehmen (Abb. 14) . • (Abb. 15) - Zum Abschluss der Aus...
Page 27 - REINIGUNG
• 27 • Deutsch • Die Vorgehensweise für die Ladung des Systems, die im Abschn. 4.5 beschrieben wird, ausführen, um die Maschine betriebsbereit zu machen. Auf dieselbe Weise können auch andere Flüs- sigkeiten erhitzt werden. • (Abb. 23) - Nach diesem Vorgang die Dampfdüse mit einem feuchten Tuch rein...
Page 31 - FrançaisFrançais; INSTRUCTIONS SUR LE CORDON ELECTRIQUE
• 31 • FrançaisFrançais INSTRUCTIONS SUR LE CORDON ELECTRIQUE A. Votre appareil est muni d’un cordon électrique court ou d’un cordon d’alimentation détachable, afin d’éviter de trébucher ou de s’emmêler avec un câble plus long. B. Des cordons détachables plus longs ou bien des rallonges sont disponi...
Page 33 - Français
• 33 • Français enfants) ayant de faibles capacités physiques, mentales ou sensorielles, sans expérience et/ou aux compéten- ces insuf fi santes, à moins qu'elles ne soient sous la supervision d’une personne responsable de leur sécurité ou formées par cette personne en ce qui concerne l’utilisation ...
Page 35 - Avec du café moulu
• 35 • Français 5.1 Avec du café moulu • (Fig.8A) - Introduire le fi ltre (15) dans le porte- fi ltre « Crema » (14). • (Fig.10) - Introduire le porte- fi ltre par le bas dans le groupe de distribution (8). • (Fig.11) - Tourner le porte- fi ltre de gauche à droite jusqu’à ce qu’il se bloque. Laisser...
Page 37 - 1 ÉLIMINATION
• 37 • Français avec un chiffon humide. • (Fig.24) - Vider et laver tous les jours le bac d'égoutte- ment. • Pour le nettoyage de l’appareil, utiliser un chiffon doux légèrement imbibé d’eau. • (Fig.16) - Pour nettoyer le porte- fi ltre « Crema », procéder comme suit : - Retirer le f iltre, le laver...
Page 41 - Español
• 41 • Español les enseñe a usarlo. Alimentación de corriente eléctrica Conectar la máquina de café sólo a una toma de co- rriente adecuada. La tensión debe corresponder al valor indicado en la placa del aparato. Cable de alimentación Nunca usar la máquina de café si el cable de alimen- tación es de...
Page 43 - SUMINISTRO DE CAFÉ
• 43 • Español vapor; para los detalles de funcionamiento consultar los capítulos correspondientes. 5 SUMINISTRO DE CAFÉ ¡Atención! Nunca quitar el porta fi ltro “Crema” girándolo manualmente en el sentido de las agujas del reloj durante el suministro de café. Riesgo de quemaduras. • Durante esta op...
Page 45 - LIMPIEZA
• 45 • Español 9 LIMPIEZA El mantenimiento y la limpieza pueden ser realizados sólo cuando la máquina está fría y desconectada de la red eléctrica. • No sumergir la máquina en el agua ni introducir sus componentes en el lavavajillas. • No usar alcohol etílico, disolventes y/o productos quími- cos ag...
Page 49 - Portugal
• 49 • Portugal ensinadas por ela sobre o uso do aparelho. Alimentação de corrente Ligue a máquina de café só numa tomada de corrente adequada. A tensão deve corresponder àquela indicada na plaqueta do aparelho. Cabo de alimentação Nunca use a máquina de café se o cabo de alimentação estiver defeitu...
Page 51 - Com café em pastilhas
• 51 • Portugal • (Fig.11) - Rode o porta- fi ltro de esquerda para direita até bloquear-se. Solte a pega do porta- fi ltro “Crema”, a pró- pria pega rodará levemente à esquerda. Este movimento garante o perfeito funcionamento do porta- fi ltro. • (Fig.13) - Pré-aqueça o porta- fi ltro “Crema” press...
Page 53 - 1 DESMANTELAMENTO
• 53 • Portugal • Tire e esvazie o reservatório de água. • (Fig.2) - Misture o descalci fi cante com água como especi fi cado na embalagem do produto descalci fi cante e encha o reservatório de água; introduza o reservatório na máquina. • (Fig.4B) - Ligue a máquina pressionando o interruptor geral (...
Page 57 - Nederlands
• 57 • Nederlands van wie ze instructies verkrijgen aangaande het gebruik van het apparaat. Stroomvoeding Sluit de kof fi emachine alleen aan op een geschikt stopcontact. De spanning moet overeenstemmen met de spanning die op het plaatje van het apparaat staat vermeld. Voedingskabel Gebruik de kof f...
Page 59 - kof
• 59 • Nederlands de fi lterhouder. • (Afb.13) - Verwarm de “Crema” fi lterhouder voor. Als op de kof fi eschakelaar (4) wordt gedrukt, stroomt het water uit de “Crema” fi lterhouder (deze handeling is alleen noodzakelijk voor het eerste kopje kof fi e). • Laat 50cc water uit het apparaat stromen en...
Page 65 - Polski
• 65 • Polski ciach fi zycznych, umys ł owych oraz o ograniczonych zdolno ś ciach zmys ł owych, lub w przypadku niewystar- czaj ą cego do ś wiadczenia lub odpowiedniego przygoto- wania; mo ż e si ę to odbywa ć jedynie pod nadzorem osoby odpowiedzialnej za bezpiecze ń stwo wy ż ej wymienionych osób o...
Page 66 - łą
• 66 • 4 INSTALACJA Dla w ł asnego bezpiecze ń stwa oraz bezpiecze ń stwa innych osób zastosowa ć si ę skrupulatnie do „Norm bezpiecze ń stwa” opisanych w rozdz. 3. 4.1 Opakowanie Oryginalne opakowanie zosta ł o zaprojektowane i wyprodukowane w celu ochrony urz ą dzenia podczas transportu. Zaleca si...
Page 67 - yciu kawy w saszetkach
• 67 • Polski • (Rys.11) - Obraca ć uchwyt fi ltra od lewej do prawej strony, a ż do momentu zablokowania. Wypu ś ci ć r ą czk ę uchwytu fi ltra „Crema”, r ą czka obraca si ę lekko w lewym kierunku. Ten ruch gwarantuje poprawne funkcjonowanie uchwytu fi ltra. • (Rys.13) - Ogrza ć wst ę pnie uchwyt f...
Page 68 - CA WODA; CZYSZCZENIE
• 68 • P R Z E D W Y KO N A N I E M J A K I E J KO LW I E K CZYNNO Ś CI DOT YCZ Ą CEJ W Y T WAR Z ANIA PARY LUB GOR Ą CEJ WODY SPRAWDZI Ć CZY RURKA WYLOTU PARY (PANNARELLO) JEST ZWRÓCONA W KIERUNKU TACY OCIEKOWEJ. 7 GOR Ą CA WODA Niebezpiecze ń stwo popar ze ń ! Na pocz ą tku par zenia mog ą w yst ą...
Page 69 - 1 POZBYWANIE SI
• 69 • Polski • (Rys.2) - Wymiesza ć odwapniacz z wod ą zgodnie ze wskazówkami na opakowaniu produktu i nape ł ni ć pojemnik na wod ę ; w ł o ż y ć pojemnik do urz ą dzenia. • (Rys.4B) - W ł ą czy ć ur z ą dzenie pr zez naci ś ni ę cie g ł ównego wy łą cznika (2). • (Rys.5) - Ustawi ć pojemnik pod r...