Page 2 - Table of Contents
2 Table of Contents Important Safety Information .........................................................................................................3 Safety Symbols................................................................................................................................3 ...
Page 3 - Important Safety Information; using our fine products.; Safety Symbols
3 Important Safety Information Thank you for your purchase of our BBQ Gas Grill. We sincerely wish you will enjoy using our fine products. • Please read this User’s Manual in its entirety before using the grill. • Please contact our customer service at (888)-287-0735 if you have any questions. • Ple...
Page 4 - Installation / Safety Precautions; Propane & Gas Warning
4 Installation / Safety Precautions WARNING READ THIS SECTION FIRST BEFORE INSTALLING THE GRILL • This grill is designed to use LP gas only. Please use the grill with the regulator supplied by PermaSteel. • The installation of this appliance must conform with local codes or, in the absence of local ...
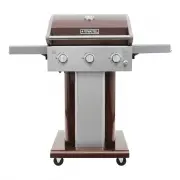
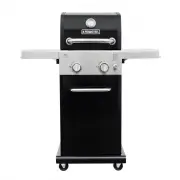
Page 5 - Exploded View
Page 6 - Parts List
6 Parts List Key Description Part No. Qty Key Description Part No. Qty A01 Rotated Rod, Lid 50300207 2 C04 Gas Valve 30400050 3 A02-A Lid (color: Black) 30400G32-1 1 C05 Side Shelf Bracket 30400G17 2 A02-B Lid (color: Azure) 30400G32-2 1 C06 Control Panel 30400G18P 1 A02-C Lid (color: Mocha) 30400G3...
Page 7 - Before Assembly
7 Before Assembly READ AND FOLLOW THE INSTRUCTIONS BELOW TO CORRECTLY UNPACK GRILL PARTS FROM SHIPPING BOX. Step 1: Carefully open the top of the carton with a box cutter, take out all the grill parts, and packing material above the grill.
Page 10 - Hardware; Tools
10 Hardware The following hardware is provided in a blister pack for convenient use. M4X10 Screw: 26 pcs M6 x12 Shoulder Bolt: 8 pcs M6X13 Screw: 36 pcs Battery (AA): 1 pc Tools The following tools are required for assembly: Adjustable wrench (not provided) Screwdriver (not provided) 7/16” Combinati...
Page 12 - Step 2
12 Step 2 Attach the panel support angle bar to left side panel with (2) M4x10 screws. Attach the front panel to left side panel with (4) M4x10 screws as shown. Attach another panel support angle bar to right side panel with (2) M4x10 screws. Attach the front panel to right side panel with (4) M4x10...
Page 13 - Step 3
13 Step 3 Use (8) M6x13 screws as shown to attach pedestal panels to bottom shelf. Use (4) M4x10 screws as shown to attach each panel support angle bar to bottom shelf. Use (4) M4x10 screws as shown to attach back bracket to pedestal panels. Back Bracket
Page 14 - Step 4
14 Step 4 Caution: To avoid possible injury, two people are required to perform this step. Remove any wire ties holding the regulator and gas hose under the grill head, making sure the hose hangs freely. With the aid of an assistant, carefully lower the grill head onto the pedestal. While your assis...
Page 15 - Step 5
15 Step 5 Pre-install (2) M4x10 screws into the right drip tray bracket but don’t fully tighten. Leave a 1/8” gap beneath screw heads for attachment to right side panels. Slide screws through and down into keyhole slots in right side panel. Insert (1) M4x10 screw through back of tray bracket and tig...
Page 16 - Step 6; Step 7
16 Step 6 Attach the 4 side shelf support brackets to firebox with (8) M6x13 screws . There is a location label on each bracket. Note: Attach the front brackets so that the flanges face to the front of the grill. Attach the back brackets so that the flanges face to the back of the grill. Right Front...
Page 18 - Step 8
18 Step 8 Install the drip tray into the cart from back. Install the drip cup into the drip tray from back.
Page 19 - Step 9
19 Step 9 Place heat diffusers over burners. Diffusers will fit in firebox in either direction. Fit tabs in firebox front through slots in diffuser tips. Fit diffuser tips between tabs in firebox rear. Place cooking grates onto grate rests. Insert the two attachment tips at the back of the warming r...
Page 21 - Gas Connection
21 Gas Connection ONLY USE THE REGULATOR AND HOSE ASSEMBLY PROVIDED WITH THIS GRILL. REPLACEMENT PRESSURE REGULATORS AND HOSE ASSEMBLIES MUST BE THOSE SUPPLIED BY THE MANUFACTURER This is a LP (Liquefied Petroleum Gas) configured grill. Do not attempt to use a natural gas supply unless the grill has...
Page 23 - Leak Testing
23 Leak Testing GENERAL Although all gas connections on the grill are leak tested at the factory prior to shipment, a complete gas tightness check must be performed at the installation site due to possible mishandling in shipment, or excessive pressure unknowingly being applied to the unit. Periodic...
Page 24 - Final Installation Check List
24 SAFETY TIPS: 1) ALWAYS CHECK FOR LEAKS AFTER EVERY LP TANK CHANGE. 2) ALWAYS CHECK FOR LEAKS BEFORE EACH USE. 3) USE LONG BBQ TOOL TO AVOID BURNS. 4) CHECK ALL GAS SUPPLY FITTINGS FOR LEAKS BEFORE EACH USE. IT IS HANDY TO KEEP A SPRAY BOTTLE OF SOAPY WATER NEAR THE SHUT-OFF VALVE OF THE GAS SUPPL...
Page 25 - Lighting Instruction
25 Lighting Instruction VERY IMPORTANT: ALWAYS INSPECT THE HOSE PRIOR TO EACH USE. BEFORE LIGHTING: Inspect the gas supply hose before turning the gas “ON”. If there is evidence of cuts, wear, or abrasion, it must be replaced before use. The replacement hose assembly must be that specified by the ma...
Page 26 - Operating Instruction
26 Operating Instruction CAUTION Clean the grill often. A grease fire that may damage the grill may occur if the grill has not been cleaned frequently. NEVER leave the grill unattended while using. Do not use water to extinguish the grease fire, it may cause body injury. Turn knobs off and LP tank o...
Page 28 - Food Safety
28 - Clean the exterior of the burner with a wire brush. Clear stubborn scale with a metal scraper. Clear any clogged ports with a straightened paper clip. Never use a wooden toothpick as it may break off and clog the port. - Please note that if insects or other obstructions are blocking the flow of...
Page 29 - Trouble Shooting
29 Trouble Shooting Please check the following problems/solutions before contact our service center. PROBLEMS POSSIBLE CAUSE SOLUTIONS Burner won’t light after turning and pushing the knobs Electrode deposited with cooking residues Use clean swab and alcohol to clean. Electrode damaged Replace it. E...
Page 30 - Warranty Information
30 Warranty Information PERMASTEEL INC . Warranties that this Product shall be free from defects in workmanship and materials, for a period of 1 Year from the date of original purchase. Our obligation under this warranty shall be limited to replacement of parts during the warranty period. Our liabil...
Page 31 - Distributed by Permasteel Inc.; Made in
31 Distributed by Permasteel Inc. 100 Exchange Place Pomona, CA 91768 Made in China Need Assistance? Visit us at: www.permasteel.net Customer Service: 888-287-0735 Email: [email protected]