Page 2 - Contents
2 Contents Before Use z Safety Instructions ································································································································································· 3 z Accessories/Parts Identification ·························································...
Page 3 - Safety Instructions; Warning
3 Safety Instructions Please make sure to follow these instructions. In order to prevent accidents or injuries to the user, other people, and damage to property, please follow the instructions below. Q The following charts indicate the degree of damage caused by wrong operation. Warning: Indicates s...
Page 5 - Caution; Important Information
5 Caution Unplug the power plug when the appliance is not in use. (Otherwise it may cause an electric shock, or fire due to electric leakage.) Please unplug and allow the appliance to cool down before cleaning it. (It may cause a burn.) Do not allow the power cord to hang over the edge of the table ...
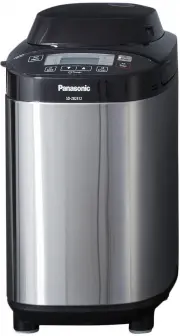
Page 6 - Raisin nut dispenser; Accessories/Parts Identification; Main Unit; Accessories
6 Raisin nut dispenser The ingredients placed in the raisin nut dispenser will drop into the bread pan automatically upon selecting the menu with raisin (3, 4, 7, 16, 20, 21, 23 and 31). Turn to P. 14 for ingredients which may be placed in the raisin nut dispenser. Never operate the Bread Maker with...
Page 7 - Control Panel
7 Control Panel This picture shows all words and symbols, but during operation only those relevant will be displayed. Menu Press this pad to choose menu. Menu number will display and each time this pad is pressed, menu number will change to the next choice. (Hold the pad to advance more quickly) See...
Page 8 - Bread-making Ingredients
8 Bread-making Ingredients Flour Main ingredient of bread, produces gluten. (helps the bread to rise, gives it a firm texture) z Use strong flour. Do not use soft or plain flour. z Flour must be weighed on scales. Strong flour is milled from hard wheat and has a high content of protein which is nece...
Page 10 - List of Bread Types and Baking Options; Function Availability and Time Required
10 List of Bread Types and Baking Options Q Function Availability and Time Required • Time required for each process will differ according to room temperature. Options Processes Menu Number Menu Size Crust Timer Rest Knead Rise Bake Total Bake 1 Basic O O O 30 min– 60 min 15–30 min ½ 4 1 hr 50 min– ...
Page 12 - Place the ingredients in the bread pan; set the kneading blade; Baking Bread
12 Place the ingredients in the bread pan Kneading blade Yeast dispenser 1 Remove the bread pan and set the kneading blade ➀ Twist the bread pan round. ➁ Remove the bread pan. ➂ Place the kneading blade firmly into the shaft. Check around the shaft and inside the kneading blade and ensure that they ...
Page 13 - Set the programme and start; Press ‘Start’
13 How to Use Set the programme and start Remove the bread 5 Select a bake menu (The display shows when menu ‘1’ is selected.) Q To change the size Q To change the crust colour O Turn to P. 10 for menu, availability of size and crust. Q To set the timer e e.g. It is 9:00 PM now, and you want the bre...
Page 14 - When adding extra ingredients
14 When adding extra ingredients Adding extra ingredients to bread or dough By selecting a menu with Raisin (3, 4, 7, 16, 20, 21, 23 or 31), you can mix your favourite ingredients into the dough to make all kinds of flavoured breads. Simply place the extra ingredients in the dispenser or the bread p...
Page 15 - Baking Brioche; Select menu ‘13’
15 Baking Brioche 1 4 2, 3 Bread flour 400 g Salt 1 tsp Sugar 3 tbsp Butter (Cut into 2 cm cubes and keep in refrigerator) 50 g Powdered milk 2 tbsp Eggs (Medium) 2 (100 g ) Water 180 mL Dry yeast 1½ tsp * Butter for added later (Cut into 1–2 cm cubes and keep in refrigerator) 70 g • For addition of...
Page 16 - Baking Savoury; Select menu ‘4’
16 Baking Savoury 1 4 2, 3 Q To cancel/stop once started (hold for more than 1 second) Preparations(P. 12) ➀ Set the kneading blade into the bread pan. ➁ Place the ingredients in the bread pan in the order listed in the recipe. ➂ Set the bread pan into the main unit, and plug the machine into the so...
Page 18 - Rustic Sourdough/Rustic Sourdough Dough; STAGE 1 Making Sourdough starter
18 Rustic Sourdough/Rustic Sourdough Dough STAGE 1 Making Sourdough starter 1 3 2 Turn to P. 42 for sourdough starter recipe Q To cancel/stop once started (hold for more than 1 second) Preparations(P. 12) ➀ Mix all the ingredients well in the sourdough cup. (Remove the kneading blade) ➁ Put the lid ...
Page 19 - STAGE 2 Baking Rustic Sourdough; Select menu ‘10’
19 STAGE 2 Baking Rustic Sourdough 1 3 2 Turn to P. 32 for bread recipes Q To cancel/stop once started (hold for more than 1 second) Preparations(P. 12) ➀ Set the kneading blade into the bread pan. ➁ Tip the sourdough starter in the bread pan. ➂ Place the ingredients in the bread pan in the followin...
Page 20 - STAGE 2 Making Rustic Sourdough Dough; Select menu ‘26’
20 Rustic Sourdough/Rustic Sourdough Dough STAGE 2 Making Rustic Sourdough Dough 1 3 2 Turn to P. 35 for dough recipes Q To cancel/stop once started (hold for more than 1 second) Preparations(P. 12) ➀ Set the kneading blade into the bread pan. ➁ Tip the sourdough starter in the bread pan. ➂ Place th...
Page 21 - Making Dough; Select dough menu
21 Making Dough 1 3 2 Turn to P. 35 for dough recipes Q To cancel/stop once started (hold for more than 1 second) Preparations(P. 12) ➀ Place the kneading blade into the bread pan. ➁ Place the ingredients in the bread pan in the order listed in the recipe. ➂ Set the bread pan into the main unit, and...
Page 22 - Making Brioche Dough; Select menu ‘29’
22 Making Brioche Dough 1 4 2, 3 Turn to P. 41 for dough recipes Q To cancel/stop once started (hold for more than 1 second) Preparations(P. 12) ➀ Cut the butter for adding later for 1–2 cm cubes and keep them in refrigerator. ➁ Set the kneading blade into the bread pan. ➂ Place the ingredients in t...
Page 23 - Making Savoury Dough; Select menu ‘21’
23 Making Savoury Dough 1 4 2, 3 Turn to P. 35 for dough recipes Q To cancel/stop once started (hold for more than 1 second) Preparations(P. 12) ➀ Set the kneading blade into the bread pan. ➁ Place the ingredients in the bread pan in the order listed in the recipe. ➂ Set the bread pan into the main ...
Page 24 - Baking Rustic Scone; Select menu ‘17’; Press ‘Start’ again
24 Baking Rustic Scone 1 7 2, 4, 6 Turn to P. 32 for bread recipes Q To cancel/stop once started (hold for more than 1 second) Preparations(P. 12) ➀ Set the kneading blade into the bread pan. ➁ Place the ingredients in the bread pan in the following order: mixture of eggs and milk ĺ yoghurt ĺ other ...
Page 26 - Baking Cake; Select menu ‘18’; check that baking is complete, and
26 Baking Cake 1 4 2 3 Turn to P. 43 for cake recipe Q To cancel/stop once started (hold for more than 1 second) Preparations ➀ Prepare the ingredients according to the recipe. ➁ Line the bread pan with greaseproof paper and pour in the mixed ingredients. ➂ Set the bread pan into the main unit, and ...
Page 27 - Making Jam; Select menu ‘32’
27 Making Jam 1 4 2 3 Turn to P. 44 for jam recipes Q To cancel/stop once started (hold for more than 1 second) Preparations ➀ Prepare the ingredients according to the recipe. ➁ Put the kneading blade into the bread pan. ➂ Place the ingredients into the bread pan in the following order: KDOIRIWKHIUX...
Page 28 - Making Compote; Select menu ‘33’
28 Making Compote 1 4 2 3 Turn to P. 44 for compote recipes Q To cancel/stop once started (hold for more than 1 second) Preparations ➀ Prepare the ingredients according to the recipe. (Remove the kneading blade.) ➁ Place the ingredients into the bread pan in the following order: IUXLWVĺVXJDUĺOLTXLG ...
Page 29 - Bread Recipes
29 Bread Recipes Turn to P. 35–42 for dough recipes [1 Basic][2 Basic Rapid][3 Basic Raisin] (bread or brown flour) : Timer can be used for recipes with this symbol (4–13 hours) White Loaf Menu ‘1’ (4hr) M L XL Bread flour 420 g 520 g 620 g Salt 1 tsp 2 tsp 2 tsp Powdered milk 2 tsp 1½ tbsp 1¾ tbsp ...
Page 33 - Before making gluten free bread; Gluten Free Recipes
33 Wheat and gluten free bread Menu ‘14’ (1hr 50min) Water (chilled) 450 mL Vagetable oil 3 tbsp ORGRAN Easy Bake bread mix 450 g For more information on ORGRAN’s gluten free bread mixes, please contact the address below: NATURAL FOODS Division of Roma Food Products, 47-53 Aster Avenue, Carrum Downs...
Page 35 - Dough Recipes
35 Dough Recipes [19 Basic] [20 Basic Raisin] [21 Savoury] [22 Whole wheat] [23 Whole wheat Raisin] [24 Rye] [25 French] [26 Rustic Sourdough] [27 Sourdough starter] [28 Pizza] [29 Brioche] [30 Speciality] The Dough setting mixes and gives the dough it’s first rising before you shape and bake it in ...
Page 43 - Cake Recipes
43 Butter Cake Menu ‘18’ (50min) Butter 100 g Sugar 100 g Egg, medium 2 Plain flour 275 g Baking powder 2½ tsp Milk 90 mL Vanilla essence 1 tsp Fruit & Walnut Cake Menu ‘18’ (50min) Butter 90 g Brown Sugar ¾ cup Egg, medium 2 Whole wheat flour 150 g Baking powder ½ tsp Cinnamon ½ tsp Nutmeg ½ ts...
Page 46 - To protect the non-stick finish
46 To protect the non-stick finish Bread pan and kneading blade are coated with a non-stick finish to avoid stains and to make it easier when removing bread. To avoid damaging it, please follow the instructions below. • Do not use hard utensils such as a knife or a fork when removing the bread from ...
Page 47 - Troubleshooting
47 Problem Cause e Action My bread does not rise The top of my bread is uneven [All bread] z The quality of the gluten in your flour is poor, or you have not used strong flour. (Gluten quality can vary depending on temperature, humidity, how the flour is stored, and the season of harvest) e Try anot...
Page 51 - Panasonic Warranty; Panasonic Australia Pty. Limited
51 Home Appliance 12 Month Warranty from Date of Purchase 1. Subject to the conditions of this warranty Panasonic or it’s Authorised Service Centre will perform necessary service on the product without charge for parts or labour, if in the opinion of Panasonic, the product is found to be faulty with...
Page 52 - Specification
Panasonic Taiwan Co., Ltd. http://www.panasonic.com © Panasonic Taiwan Co., Ltd. 2016 DZ50R1871 MX0716E10816 Printed in China ◩ Specification Power supply 230 – 240 V 50 Hz Power consumed 505 – 550 W Capacity (Flour) max. 620 g min. 330 g (Dry yeast) max. 7.0 g min. 2.1 g Capacity of raisin nut disp...