Page 2 - Finally, making great coffee doesn’t have to be a grind.; CONGRATULATIONS
Don’t forget to register your product at OXO.com/registration.aspx for updates and other relevant information. Although greatly appreciated, product registration is not required to activate any warranty. The right grind, every time. Because the best coffee starts from the grounds up, we created the ...
Page 3 - A Note About Safety; IMPORTANT SAFEGUARDS; always be followed to reduce the risk of fire, electric shock, and/or; Save THeSe INSTRUCTIONS.; SHOCK HAZARD
• Read all Instructions. Use this product only as described in this manual. • Keep the packaging material (cardboard, plastic, etc.) out of the reach of children (danger of asphyxiation or injury). • To protect against electrical shock, do not immerse the power plug, power cord or Grinder in water o...
Page 4 - Before We Begin; Grinder in the dishwasher.; Grinding time depends; Meet Your Coffee Grinder
1. Remove and recycle or discard all stickers, descriptive labels, cable ties and packing materials. 2. Wipe Grinder body with a soft, damp cloth. Rinse hopper and grounds container and dry thoroughly. Before We Begin CAUTION: Do not use abrasive pads, harsh chemicals or spray cleaner chemicals to c...
Page 5 - TO SeT GRINd SIze; GRINd SIze SeTTING ReCOmmeNdaTIONS; Using Your Grinder; TO GRINd COFFee
• Never overfill the grounds container past fill line, grounds can back up and block the grounds chute, and jam or burn out the motor. If the hopper empties before the timer stops, the motor will continue to run. If this happens, manually stop the Grinder by pressing the OXO button. • To prevent ove...
Page 6 - Cleaning and Care; TO RemOve/RepLaCe HOppeR; Good Tips
Cleaning and Care Before cleaning, OXO recommends running the Grinder for 10 seconds with an empty bean hopper to help clear beans/grounds from the burrs and grounds chute. Do not wash any part of your Grinder in the dishwasher. 1. Always unplug power cord from power outlet before cleaning. 2 . Unlo...
Page 7 - Troubleshooting
Problem Solution Possible Cause Troubleshooting Grinder does not start after pressing the OXO button Grinder starts but produces no coffee grounds One type of roast continuously clogs Grinder Grounds container overfills and coffee grounds back up into chute more static than usual Grinder is louder t...
Page 8 - Our Guarantee; Hours
Our Guarantee TWO-YEAR WARRANTY: We guarantee everything we make! Starting from the date of purchase, your OXO Conical Burr Coffee Grinder is guaranteed by OXO for two years in the case of any manufacturing defects in materials or workmanship. This OXO warranty is only offered on OXO appliances sold...
Page 9 - MOULIN À CAFÉ À MEULES CONIQUES
©2017 OXO International Ltd. 1 Helen of Troy Plaza El Paso, TX 79912 Printed in China IB-8717000-00 MOULIN À CAFÉ À MEULES CONIQUES INSTRUCTIONS D’UTILISATION
Page 10 - L’importance d’une bonne mouture.; Préparer un excellent café devient une tasse de thé!; N’oubliez pas d’enregistrer votre produit sur; FÉLICITATIONS
L’importance d’une bonne mouture. Une mouture homogène est la première étape pour une bonne tasse de café. Le moulin à café à meules coniques OXO est l’outil idéal pour une mouture consistante. Il suffit de placer les grains de café et de choisir la finesse de la mouture (allant de fine pour l’espre...
Page 11 - La sécurité avant tout; CONSIGNES DE SÉCURITÉ IMPORTANTES; CONSeRvez CeS INSTRUCTIONS.; risQUe d’ÉleCTroCUTion
• Veuillez lire toutes les instructions. Utilisez cet appareil uniquement de la façon décrite dans ce manuel. • Tenez les matériaux d’emballage (carton, plastique, etc.) hors de portée des enfants (risque d’asphyxie ou de blessure). • Afin d’éviter les chocs électriques, n’immergez pas la prise, le ...
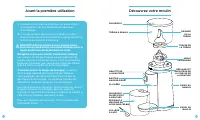
Page 12 - Avant la première utilisation; l’appareil. Ne mettez aucune pièce du moulin dans le lave-vaisselle.; Le temps; Découvrez votre moulin
1. Enlevez et recyclez ou jetez tous les autocollants, les étiquettes, les élastiques et les matériaux d’emballage. 2. Essuyez le corps du moulin à l’aide d’un chiffon doux et humide. Rincez et séchez soigneusement la trémie et le récipient à mouture. Avant la première utilisation AVERTISSEMENT : N’...
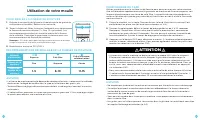
Page 13 - POUR RÉGLER LA FINESSE DE MOUTURE; ReCOmmaNdaTIONS de RÉGLaGe de La FINeSSe de mOUTURe; Utilisation de votre moulin; pOUR mOUdRe dU CaFÉ; aTTenTion
• Assurez-vous que la mouture ne dépasse jamais le repère MAX dans le récipient. Elle pourrait remonter dans le moulin, bloquer la glissière et endommager le moteur définitivement. Si la trémie se vide avant que le temps sélectionné ne soit écoulé, le moteur continuera à tourner jusqu’à la fin du te...
Page 14 - Nettoyage et entretien; Pour retirer la trémie :; Pour remplacer la trémie :; POUR RETIRER/REMPLACER LA TRÉMIE; Astuces
Nettoyage et entretien Avant le nettoyage, OXO recommande de faire fonctionner le moulin pendant 10 secondes avec la trémie à grains vide pour faciliter l’évacuation des grains/résidus de mouture des meules et de la glissière. Ne mettez aucune pièce du moulin dans le lave-vaisselle. 1. Débranchez to...
Page 16 - Notre garantie; Moudre n’a jamais; ENREGISTREMENT DU PRODUIT :; Adresse électronique
Notre garantie Moudre n’a jamais été aussi plaisant ! GARANTIE DE 2 ANS : Nous garantissons tout ce que nous créons ! Votre moulin à café conique OXO est garanti par OXO pendant deux ans à compter de la date d’achat, en cas de défaut de fabrication des matériaux ou de vices de construction. Cette ga...