Page 3 - A Note About Safety; IMPORTANT SAFEGUARDS; always be followed to reduce the risk of fire, electric shock, and/or; SAVE THESE INSTRUCTIONS.; SHOCK HAZARD; This symbol alerts you to important operating
• Read All Instructions . Use this product only as described in this manual. • Keep the packaging material (cardboard, plastic, etc.) out of the reach of children (danger of asphyxiation or injury). • To protect against electrical shock, do not immerse the power plug, power cord or Grinder in water ...
Page 4 - CAUTION; your Grinder in the dishwasher.; Before We Begin
1. Remove and recycle or discard all stickers, descriptive labels, cable ties and packing materials, including static stickers and hangtags with ties. 2. Wipe body of appliance with a soft, damp cloth. Rinse hopper and ground coffee container and dry thoroughly. CAUTION : Do not use abrasive pads, h...
Page 5 - Meet Your Coffee Grinder
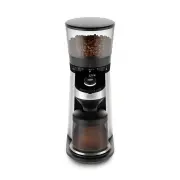
Meet Your Coffee Grinder POWERFUL DC MOTOR High torque/low speed (400 rpm) Grinder will not overheat beans, protecting flavor even during extended grinding, and generates minimal static to reduce mess STAINLESS STEEL CONICAL BURRS Durable 40mm burrs create a precise, uniform grind for optimal brewin...
Page 6 - TO SET GRIND SIZE; GRIND SIZE SETTING RECOMMENDATIONS; The Particulars of Grinding; ICONS; Around OXO Button
TO SET GRIND SIZE Optimal grind size depends on many factors including brewing method, roast darkness, bean type and freshness, and more. Experiment with different grind settings to achieve the brew that best suits your taste. If your cof fee tastes too bitter, try a coarser grind size. If your brew...
Page 7 - Grams Mode; Manual/Portafilter Mode; TO GRIND COFFEE; To Switch Between Modes
Grams Mode If you already know how many grams you need for your favorite brewing method, you can grind by grams by selecting your desired quantity, from 1 to 125 grams. 1. Press the OXO button once to wake up your Grinder. Press and hold the OXO button for ~3 seconds to enter the mode selection menu...
Page 8 - TO REMOVE/REPLACE HOPPER; Underside of hopper; TO ADJUST COFFEE STRENGTH
TO REMOVE/REPLACE HOPPER Always unplug power cord from outlet before removing or replacing bean hopper. To Remove Hopper: 1 . Press down on and hold hopper release lever on back of Grinder with one hand. 2 . Keep pressing lever and twist hopper counter- clockwise with other hand until the arrow line...
Page 9 - ELECTRICAL SHOCK HAZARD:; NEVER IMMERSE THIS APPLIANCE, POWER CORD OR
Good Tips • Freshly ground coffee is key to making better coffee. OXO recommends grinding coffee immediately before brewing. • If you don’t grind regularly, make sure to clear the ground coffee from the chute before each use, as some older coffee dust may be sitting inside your Grinder and will affe...
Page 10 - Troubleshooting
Problem Solution Possible Cause Troubleshooting Grinder does not start after pressing the OXO button Grinder starts but produces no coffee grounds Grinder won’t let me select the number of cups/grams I want Grinder display is not showing “0” when empty container is on the base/scale Grinder is loude...
Page 11 - Hours; Please contact your local distributor or email
Notes Our Guarantee TWO-YEAR WARRANTY: We guarantee everything we make! Starting from the date of purchase, your OXO On Conical Burr Cof fee Grinder with Integrated Scale is guaranteed by OXO for two years in the case of any manufacturing defects in materials or workmanship. This OXO warranty is onl...
Page 12 - Notes
Page 13 - It’s On
For over 25 years, OXO’s mission has been to provide innovative consumer products that make everyday living easier. How do we do it? We study people – lefties and righties, male and female, young and old – interacting with products and we identify opportunities for meaningful improvement. Our “quest...