Page 2 - CONTENTS; TECHNICAL SPECIFICATIONS
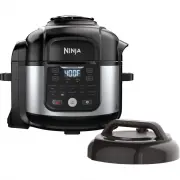
1 ninjakitchen.com ENGLISH CONTENTS THANK YOU for purchasing the Ninja® Foodi® 11-in-1 6.5-Qt. Pro Pressure Cooker Important Safeguards . . . . . . . . . . . . . . . . . . . . . . . . . . . . . . . . . 2Parts & Accessories . . . . . . . . . . . . . . . . . . . . . . . . . . . . . . . . . . . 6Us...
Page 3 - IMPORTANT SAFEGUARDS; HOUSEHOLD USE ONLY • READ ALL INSTRUCTIONS BEFORE USE; WARNING
2 3 ninjakitchen.com ninjakitchen.com ENGLISH IMPORTANT SAFEGUARDS HOUSEHOLD USE ONLY • READ ALL INSTRUCTIONS BEFORE USE WARNING 1 This appliance can be used by persons with reduced physical, sensory or mental capabilities or lack of experience and knowledge if they have been given supervision or in...
Page 4 - SAVE THESE INSTRUCTIONS
4 5 ninjakitchen.com ninjakitchen.com ENGLISH 36 Caution should be used when searing meats and sautéing. Keep hands and face away from the removable cooking pot, especially when adding new ingredients, as hot oil may splatter. 37 When unit is in operation, hot steam is released through the air exhau...
Page 6 - USING THE CONTROL PANEL; FUNCTION BUTTONS; INSTALLING THE
8 9 ninjakitchen.com ninjakitchen.com ENGLISH USING THE CONTROL PANEL BEFORE FIRST USE 1 Remove and discard any packaging material, promotional labels, and tape from the unit. 2 Please pay particular attention to operational instructions, warnings, and important safeguards to avoid any injury or pro...
Page 7 - SWAP THE TOP
10 11 ninjakitchen.com ninjakitchen.com ENGLISH 4 Add ingredients to the pot. Close the lid and press the START/STOP button to begin cooking. 5 During cooking, you can open the lid and toss ingredients with silicone-tipped tongs for even browning as needed. When done, close lid. Cooking will automat...
Page 8 - FAMILIARIZING YOURSELF
12 13 ninjakitchen.com ninjakitchen.com ENGLISH Dehydrate 1 Place the ingredients on the bottom of the Cook & Crisp™ Plate. 2 Press the DEHYDRATE button. The default temperature setting will display. Use the up and down TEMP arrows to choose a temperature between 105°F and 195°F. 3 Use the up an...
Page 12 - CLEANING & MAINTENANCE
ENGLISH Sous Vide 1 Install the cooking pot in the cooker base. Add 12 cups of room-temperature water to the pot. 2 Press the SOUS VIDE button. The default temperature setting will display. Use the up and down TEMP arrows to set a temperature between 120°F and 190°F. 3 The cook time will default to ...
Page 13 - TROUBLESHOOTING GUIDE
22 23 ninjakitchen.com ninjakitchen.com ENGLISH Why is my unit taking so long to come to pressure? How long does it take to come to pressure? • Cooking times may vary based on the selected temperature, current temperature of the cooking pot, and temperature or quantity of the ingredients. • Check to...
Page 14 - REPLACEMENT PARTS; HELPFUL TIPS
ENGLISH To order additional parts and accessories, visit ninjaaccessories.com or contact Customer Service at 1-877-646-5288 . We ask that you register your product online at registeryourninja.com and have the product on hand when you call, so we may better assist you. 24 25 ninjakitchen.com ninjakit...
Page 15 - TABLE DES MATIÈRES; d’avoir acheté le Ninja® Foodi® 11 en 1, 6,5 pte Autocuiseur Pro
26 ninjakitchen.com 27 ninjakitchen.com FR ANÇ AIS FR ANÇ AIS TABLE DES MATIÈRES MERCI d’avoir acheté le Ninja® Foodi® 11 en 1, 6,5 pte Autocuiseur Pro Consignes de sécurité importantes . . . . . . . . . . . . . . . . . . . . . 28Pièces et accessoires . . . . . . . . . . . . . . . . . . . . . . . . ...
Page 16 - CONSIGNES DE SÉCURITÉ IMPORTANTES; POUR USAGE DOMESTIQUE UNIQUEMENT • VEUILLEZ LIRE TOUTES LES; AVERTISSEMENT
28 29 ninjakitchen.com ninjakitchen.com FR ANÇ AIS 28 29 ninjakitchen.com ninjakitchen.com FR ANÇ AIS CONSIGNES DE SÉCURITÉ IMPORTANTES POUR USAGE DOMESTIQUE UNIQUEMENT • VEUILLEZ LIRE TOUTES LES INSTRUCTIONS AVANT UTILISATION AVERTISSEMENT 1 Cet appareil peut être utilisé par des personnes dont les...
Page 17 - CONSERVEZ CES INSTRUCTIONS; Pour usage intérieur et domestique seulement.
30 31 ninjakitchen.com ninjakitchen.com FR ANÇ AIS FR ANÇ AIS FR ANÇ AIS 36 Faites preuve de prudence lorsque vous saisissez des viandes et faites sauter des aliments. Gardez les mains et le visage éloignés de la marmite de cuisson amovible, plus particulièrement lorsque vous ajoutez des ingrédients...
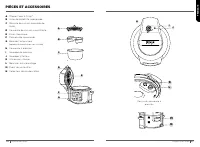
Page 18 - PIÈCES ET ACCESSOIRES
32 33 ninjakitchen.com ninjakitchen.com FR ANÇ AIS FR ANÇ AIS PIÈCES ET ACCESSOIRES A Plaque Cook & Crisp™ B Grille de lèchefrite superposée C Marmite de cuisson amovible de 5 pte D Couvercle de cuisson croustillante E Écran thermique F Panneau de commande G Base de l’autocuiseur (cordon d’alime...
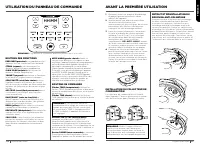
Page 19 - UTILISATION DU PANNEAU DE COMMANDE
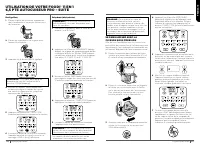
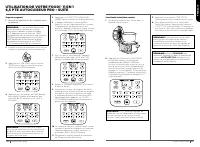
34 35 ninjakitchen.com ninjakitchen.com FR ANÇ AIS FR ANÇ AIS UTILISATION DU PANNEAU DE COMMANDE AVANT LA PREMIÈRE UTILISATION 1 Retirez et jetez tout matériel d'emballage, étiquettes promotionnelles et ruban adhésif de l'appareil. 2 Veuillez porter une attention particulière aux directives d’utilis...
Page 20 - UTILISATION DE VOTRE FOODI® 11 EN 1
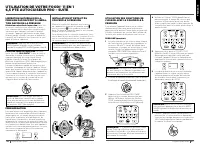
36 37 ninjakitchen.com ninjakitchen.com FR ANÇ AIS FR ANÇ AIS 4 Ajoutez les ingrédients à la marmite. Fermez le couvercle et appuyez sur le bouton START/STOP (marche/arrêt) pour commencer la cuisson. 5 Pendant la cuisson, vous pouvez ouvrir le couvercle et mélanger les ingrédients avec des pinces à ...
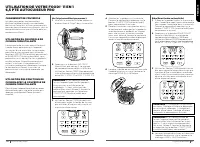
Page 21 - SE FAMILIARISER AVEC LA
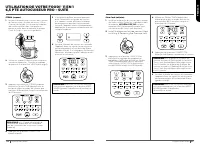
38 39 ninjakitchen.com ninjakitchen.com FR ANÇ AIS FR ANÇ AIS Dehydrate (déshydrater) 1 Placez vos ingrédients dans le fond de la plaque Cook & Crisp™. 2 Appuyez sur le bouton DEHYDRATE (déshy- drater). Le réglage de température par défaut s’affichera. Utilisez les flèches TEMP (tempé- rature) h...
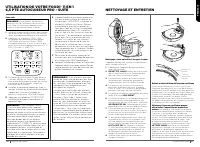
Page 25 - NETTOYAGE ET ENTRETIEN
46 47 ninjakitchen.com ninjakitchen.com FR ANÇ AIS FR ANÇ AIS Nettoyage : Lave-vaisselle et lavage à la main L’appareil devrait être nettoyé complètement après chaque utilisation. 1 Débranchez l’appareil de la prise murale avant de nettoyer. 2 NE METTEZ JAMAIS la base de l’autocuiseur dans le lave-v...
Page 26 - GUIDE DE DÉPANNAGE
48 49 ninjakitchen.com ninjakitchen.com FR ANÇ AIS FR ANÇ AIS FR ANÇ AIS Pourquoi mon autocuiseur prend-il autant de temps à faire monter la pression? Combien de temps faut-il pour atteindre la bonne pression? • Le temps de cuisson peut varier selon la température sélectionnée, la température réelle...
Page 27 - PIÈCES DE RECHANGE; CONSEILS UTILES
50 51 ninjakitchen.com ninjakitchen.com FR ANÇ AIS ESP AÑOL GARANTIE LIMITÉE D’UN (1) AN La garantie limitée d’un an s’applique aux achats effectués auprès de détaillants autorisés de SharkNinja Operating LLC. La garantie s’applique uniquement au premier propriétaire et au produit original et n’est ...
Page 28 - CONTENIDO; ESPECIFICACIONES TÉCNICAS
52 53 ninjakitchen.com ninjakitchen.com ESP AÑOLESP AÑOLESP AÑOL CONTENIDO GRACIAS por comprar la Olla a Presión Pro. Ninja® Foodi® 11-en-1 de 7 L. Medidas de seguridad importantes . . . . . . . . . . . . . . . . . . . . . 54Partes y accesorios . . . . . . . . . . . . . . . . . . . . . . . . . . . ....
Page 29 - MEDIDAS DE SEGURIDAD IMPORTANTES; SOLO PARA USO DOMÉSTICO • LEA TODAS LAS INSTRUCCIONES ANTES DE; ADVERTENCIA
54 55 ninjakitchen.com ninjakitchen.com ESP AÑOLESP AÑOLESP AÑOL MEDIDAS DE SEGURIDAD IMPORTANTES SOLO PARA USO DOMÉSTICO • LEA TODAS LAS INSTRUCCIONES ANTES DE USAR EL PRODUCTO. ADVERTENCIA 1 Las personas con capacidades físicas, sensoriales o mentales disminuidas o que carecen de experiencia y con...
Page 30 - GUARDE ESTAS INSTRUCCIONES; Solo para uso doméstico y en interiores.
56 57 ninjakitchen.com ninjakitchen.com ESP AÑOLESP AÑOLESP AÑOL 36 Tenga cuidado cuando selle y saltee carnes. Mantenga las manos y el rostro alejados de la olla de cocción removible, especialmente cuando añada nuevos ingredientes, ya que el aceite caliente podría salpicar. 37 Cuando la unidad se e...
Page 31 - PARTES Y ACCESORIOS
58 59 ninjakitchen.com ninjakitchen.com ESP AÑOLESP AÑOLESP AÑOL PARTES Y ACCESORIOS A Plancha Cook & Crisp™ B Parrilla insertable para dorar C Olla de cocción removible de 5 L D Tapa para freír E Protector térmico F Panel de control G Base de la unidad de cocción (el cable de alimentación no se...
Page 32 - USO DEL PANEL DE CONTROL
60 61 ninjakitchen.com ninjakitchen.com ESP AÑOLESP AÑOLESP AÑOL USO DEL PANEL DE CONTROL ANTES DEL PRIMER USO 1 Retire y descarte cualquier material de embalaje, etiquetas promocionales y cinta adhesiva de la unidad. 2 Preste especial atención a las instrucciones de funcionamiento, advertencias y m...
Page 33 - CÓMO UTILIZAR SU OLLA A PRESIÓN; USO DE LA TAPA PARA FREÍR
62 63 ninjakitchen.com ninjakitchen.com ESP AÑOLESP AÑOL 4 Agregue los ingredientes a la olla. Cierre la tapa y presione el botón START/STOP (iniciar/detener) para comenzar a cocinar. 5 Durante la cocción, puede abrir la tapa y mover los ingredientes con unas pinzas con puntas de silicona para obten...
Page 34 - FAMILIARÍCESE CON LA COCINA
64 65 ninjakitchen.com ninjakitchen.com ESP AÑOLESP AÑOL Dehydrate (deshidratar) 1 Coloque los ingredientes en la plancha Cook & Crisp™. 2 Presione el botón DEHYDRATE (deshidratar). Se mostrará el ajuste de temperatura predeterminado. Use las flechas arriba y abajo de la función TEMP (temperatur...
Page 35 - CÓMO UTILIZAR SU OLLA DE PRESIÓN
66 67 ninjakitchen.com ninjakitchen.com ESP AÑOLESP AÑOL COMPARACIÓN ENTRE LA LIBERA- CIÓN DE PRESIÓN NATURAL Y RÁPIDA Liberación natural de presión: Una vez que la cocción a presión haya finalizado, la presión comenzará a liberarse de manera natural hasta que la unidad se enfríe. Durante este tiemp...
Page 38 - LIMPIEZA Y MANTENIMIENTO
72 73 ninjakitchen.com ninjakitchen.com ESP AÑOL 72 73 ninjakitchen.com ninjakitchen.com ESP AÑOLESP AÑOL Limpieza: En lavavajillas o a mano Debe limpiar la unidad a fondo después de cada uso. 1 Desconecte la unidad de la toma de corriente antes de limpiarla. 2 NUNCA coloque la base de la olla a pre...
Page 39 - GUÍA DE SOLUCIÓN DE PROBLEMAS
74 75 ninjakitchen.com ninjakitchen.com ESP AÑOL 74 75 ninjakitchen.com ninjakitchen.com ESP AÑOLESP AÑOL ¿Por qué a mi unidad le toma tanto tiempo generar presión? ¿Cuánto tiempo le tomará generarla? • Los tiempos de cocción pueden variar según la temperatura seleccionada, la temperatura actual de ...
Page 40 - PARTES DE REPUESTO; CONSEJOS ÚTILES
77 ninjakitchen.com ESP AÑOL 76 ninjakitchen.com 76 77 ninjakitchen.com ninjakitchen.com ESP AÑOL GARANTÍA LIMITADA DE UN (1) AÑO La garantía limitada de 1 año se aplica a las compras realizadas a los vendedores minoristas autorizados de SharkNinja Operating LLC. La cobertura de garantía se aplica s...