Page 3 - Contents
Contents Chapter 1 Overview Router hardware and LED overview...................................................8 Router hardware features................................................................8Router LED behavior........................................................................9 Satel...
Page 7 - Overview
1 Overview The Mesh WiFi 6 router (model MR60) connects to your modem or gateway. The MeshWiFi 6 satellite (model MS60) connects to the Mesh WiFi 6 router and extends the WiFisignal throughout your home. This manual describes how to manage your Mesh WiFi 6 system from your router webinterface. You c...
Page 8 - Router hardware and LED overview; Router hardware features
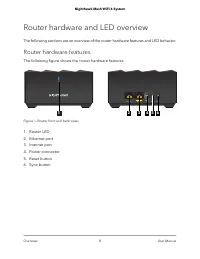
Router hardware and LED overview The following sections are an overview of the router hardware features and LED behavior. Router hardware features The following figure shows the router hardware features. 1 2 3 4 5 6 Figure 1. Router front and back views 1. Router LED 2. Ethernet port 3. Internet por...
Page 9 - Router LED behavior
Router LED behavior The following table describes the LED behavior for the LED that is on the front of therouter. Table 1. Router LED behavior Description LED color The router LED pulses white for one of the following reasons:• You connected the power adapter to the router. Now the router is booting...
Page 10 - Satellite hardware and LED overview; Satellite hardware features
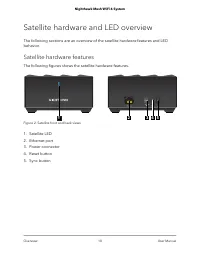
Satellite hardware and LED overview The following sections are an overview of the satellite hardware features and LEDbehavior. Satellite hardware features The following figures shows the satellite hardware features. 1 2 3 4 5 Figure 2. Satellite front and back views 1. Satellite LED 2. Ethernet port...
Page 11 - Satellite LED behavior; Router and Satellite labels
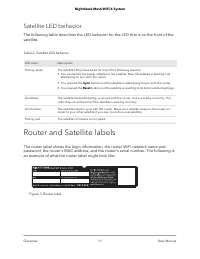
Satellite LED behavior The following table describes the LED behavior for the LED that is on the front of thesatellite. Table 2. Satellite LED behavior Description LED color The satellite LED pulses white for one of the following reasons:• You connected the power adapter to the satellite. Now the sa...
Page 12 - Connect your router
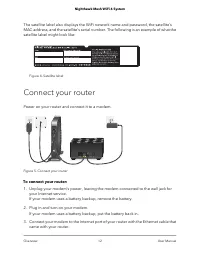
The satellite label also displays the WiFi network name and password, the satellite’sMAC address, and the satellite’s serial number. The following is an example of what thesatellite label might look like: Figure 4. Satellite label Connect your router Power on your router and connect it to a modem. F...
Page 13 - Place your satellite; Sync your satellite with your router
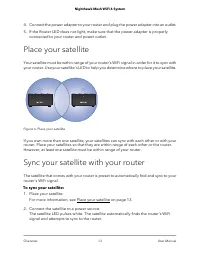
4. Connect the power adapter to your router and plug the power adapter into an outlet. 5. If the Router LED does not light, make sure that the power adapter is properly connected to your router and power outlet. Place your satellite Your satellite must be within range of your router’s WiFi signal in...
Page 16 - Connect to the network; Connect to the network using a wired connection; Find and connect to the WiFi network; WiFi connection using WPS
Connect to the network You can connect to the router’s network through a wired or WiFi connection. If you setup your computer to use a static IP address, change the settings so that it uses DynamicHost Configuration Protocol (DHCP). Connect to the network using a wired connection You can connect you...
Page 17 - Types of logins; Use a web browser to access the router; Automatic Internet Setup
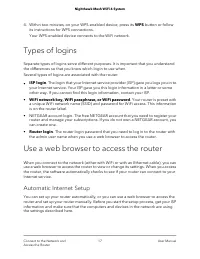
4. Within two minutes, on your WPS-enabled device, press its WPS button or follow its instructions for WPS connections.Your WPS-enabled device connects to the WiFi network. Types of logins Separate types of logins serve different purposes. It is important that you understandthe differences so that y...
Page 19 - Log in to the router
• If the computer is set to a static or fixed IP address (this setting is uncommon), change it to obtain an IP address automatically from the router. 6. If the router does not connect to the Internet, do the following: a. Review your settings. Make sure that you selected the correct options and type...
Page 20 - Change the language
firmware, allows you to personalize your WiFi network, and even helps register yourmesh system with NETGEAR. The Nighthawk app is available for iOS and Android mobile devices. Note: If you own any satellites, make sure they are powered on before installing yourmesh system with the Nighthawk app. To ...
Page 21 - Specify Your Internet Settings
3 Specify Your Internet Settings Usually, the quickest way to set up the router to use your Internet connection is to allowyour router to detect the Internet connection automatically when you first access therouter web interface. You can also customize and manually specify your Internet settings. Th...
Page 22 - Use the Internet Setup Wizard; Manually set up the Internet connection; Specify an Internet connection without a login
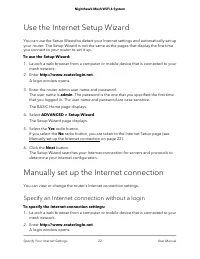
Use the Internet Setup Wizard You can use the Setup Wizard to detect your Internet settings and automatically set upyour router. The Setup Wizard is not the same as the pages that display the first timeyou connect to your router to set it up. To use the Setup Wizard: 1. Launch a web browser from a c...
Page 24 - Specify an Internet connection that uses a login
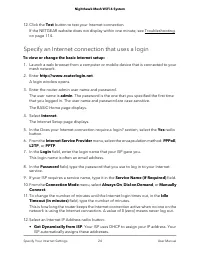
12. Click the Test button to test your Internet connection. If the NETGEAR website does not display within one minute, see Troubleshootingon page 114. Specify an Internet connection that uses a login To view or change the basic Internet setup: 1. Launch a web browser from a computer or mobile device...
Page 25 - Specify IPv6 Internet connections
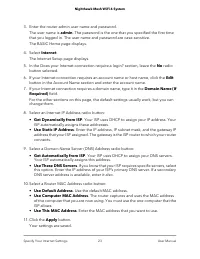
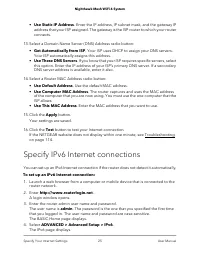
• Use Static IP Address. Enter the IP address, IP subnet mask, and the gateway IP address that your ISP assigned. The gateway is the ISP router to which your routerconnects. 13. Select a Domain Name Server (DNS) Address radio button: • Get Automatically from ISP. Your ISP uses DHCP to assign your DN...
Page 27 - Set up an IPv6 6to4 tunnel Internet connection
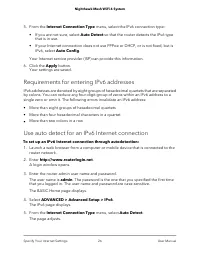
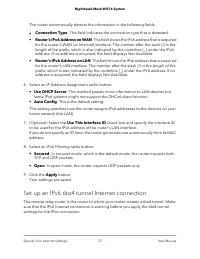
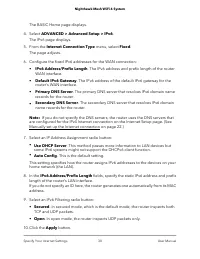
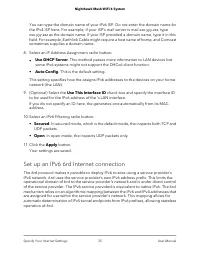
The router automatically detects the information in the following fields: • Connection Type. This field indicates the connection type that is detected. • Router’s IPv6 Address on WAN. This field shows the IPv6 address that is acquiredfor the router’s WAN (or Internet) interface. The number after the...
Page 29 - Set up an IPv6 pass-through Internet connection; Set up an IPv6 fixed Internet connection
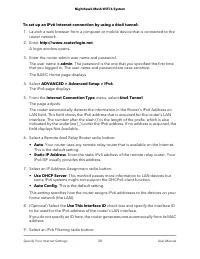
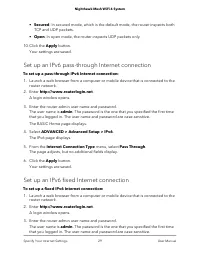
• Secured. In secured mode, which is the default mode, the router inspects both TCP and UDP packets. • Open. In open mode, the router inspects UDP packets only. 10. Click the Apply button. Your settings are saved. Set up an IPv6 pass-through Internet connection To set up a pass-through IPv6 Internet...
Page 31 - Set up an IPv6 DHCP Internet connection
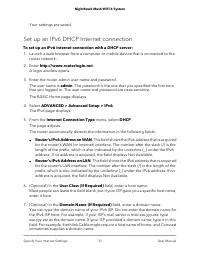
Your settings are saved. Set up an IPv6 DHCP Internet connection To set up an IPv6 Internet connection with a DHCP server: 1. Launch a web browser from a computer or mobile device that is connected to the router network. 2. Enter http://www.routerlogin.net. A login window opens. 3. Enter the router ...
Page 32 - Set up an IPv6 PPPoE Internet connection
8. Select an IP Address Assignment radio button: • Use DHCP Server. This method passes more information to LAN devices but some IPv6 systems might not support the DHCv6 client function. • Auto Config. This is the default setting. This setting specifies how the router assigns IPv6 addresses to the de...
Page 34 - Use auto config for an IPv6 Internet connection
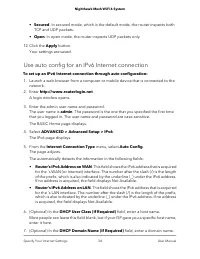
• Secured. In secured mode, which is the default mode, the router inspects both TCP and UDP packets. • Open. In open mode, the router inspects UDP packets only. 12. Click the Apply button. Your settings are saved. Use auto config for an IPv6 Internet connection To set up an IPv6 Internet connection ...
Page 35 - Set up an IPv6 6rd Internet connection
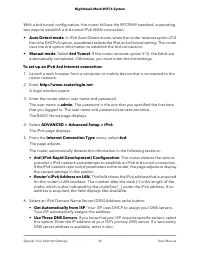
You can type the domain name of your IPv6 ISP. Do not enter the domain name forthe IPv4 ISP here. For example, if your ISP’s mail server is mail.xxx.yyy.zzz, typexxx.yyy.zzz as the domain name. If your ISP provided a domain name, type it in thisfield. For example, Earthlink Cable might require a hos...
Page 37 - Manage the MTU size; MTU concepts
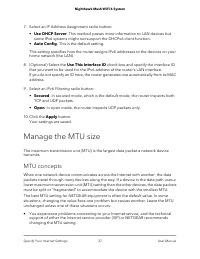
7. Select an IP Address Assignment radio button: • Use DHCP Server. This method passes more information to LAN devices but some IPv6 systems might not support the DHCPv6 client function. • Auto Config. This is the default setting. This setting specifies how the router assigns IPv6 addresses to the d...
Page 38 - Change the MTU size
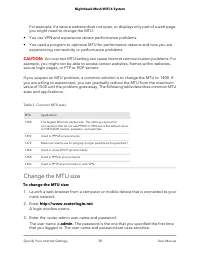
For example, if a secure website does not open, or displays only part of a web page,you might need to change the MTU. • You use VPN and experience severe performance problems. • You used a program to optimize MTU for performance reasons and now you areexperiencing connectivity or performance problem...
Page 40 - Control Access to the Internet
4 Control Access to the Internet The router comes with a built-in firewall that helps protect your home network fromunwanted intrusions from the Internet. This chapter contains the following sections: • Activate and manage NETGEAR Armor using the Nighthawk app • Enable access control to allow or blo...
Page 42 - Manage network access control lists
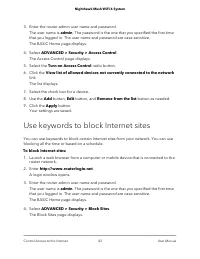
5. Select the Turn on Access Control check box. You must select this check box before you can specify an access rule and use theAllow and Block buttons. When this check box is cleared, all devices are allowedto connect, even if a device is in the blocked list. 6. Select an access rule: • Allow all n...
Page 43 - Use keywords to block Internet sites
3. Enter the router admin user name and password. The user name is admin. The password is the one that you specified the first timethat you logged in. The user name and password are case-sensitive. The BASIC Home page displays. 4. Select ADVANCED > Security > Access Control. The Access Control...
Page 44 - Block services from the Internet
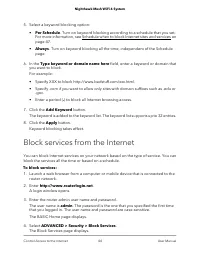
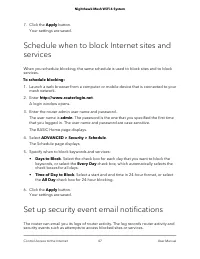
5. Select a keyword blocking option: • Per Schedule. Turn on keyword blocking according to a schedule that you set.For more information, see Schedule when to block Internet sites and services onpage 47. • Always. Turn on keyword blocking all the time, independent of the Schedulepage. 6. In the Type ...
Page 45 - Delete keywords from the blocked list
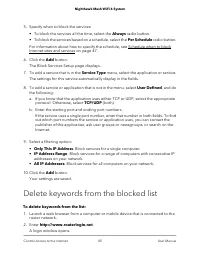
5. Specify when to block the services: • To block the services all the time, select the Always radio button.• To block the services based on a schedule, select the Per Schedule radio button. For information about how to specify the schedule, see Schedule when to blockInternet sites and services on p...
Page 46 - Prevent blocking on a trusted computer
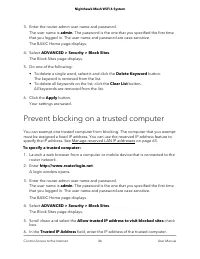
3. Enter the router admin user name and password. The user name is admin. The password is the one that you specified the first timethat you logged in. The user name and password are case-sensitive. The BASIC Home page displays. 4. Select ADVANCED > Security > Block Sites. The Block Sites page ...
Page 47 - Set up security event email notifications
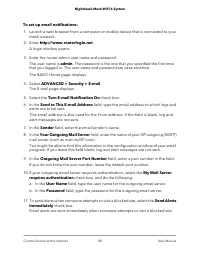
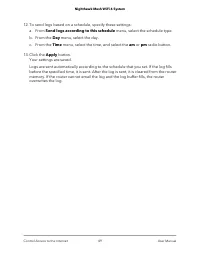
7. Click the Apply button. Your settings are saved. Schedule when to block Internet sites andservices When you schedule blocking, the same schedule is used to block sites and to blockservices. To schedule blocking: 1. Launch a web browser from a computer or mobile device that is connected to your me...
Page 50 - Optimize Performance
5 Optimize Performance You can set up the router to optimize performance for applications such as Internetgaming, high-definition video streaming, and VoIP communication. By default, the routeruses Wi-Fi Multimedia Quality of Service (WMM QoS). This chapter contains the following sections: • Use Dyn...
Page 51 - Enable Dynamic QoS
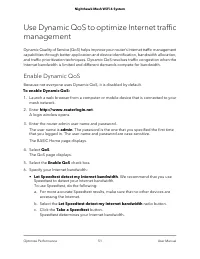
Use Dynamic QoS to optimize Internet trafficmanagement Dynamic Quality of Service (QoS) helps improve your router’s Internet traffic managementcapabilities through better application and device identification, bandwidth allocation,and traffic prioritization techniques. Dynamic QoS resolves traffic c...
Page 52 - Enable or disable the automatic QoS database update; Manually update the dynamic QoS database
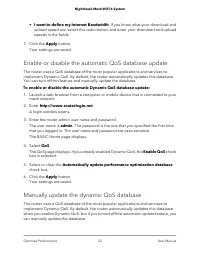
• I want to define my Internet Bandwidth. If you know what your download and upload speed are, select this radio button and enter your download and uploadspeeds in the fields. 7. Click the Apply button. Your settings are saved. Enable or disable the automatic QoS database update The router uses a Qo...
Page 54 - Enable or disable AX WiFi
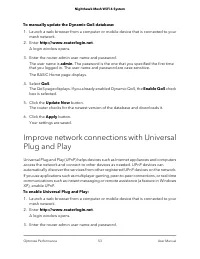
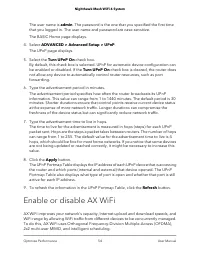
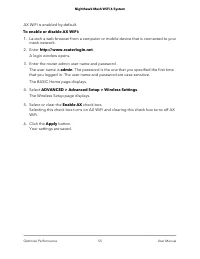
The user name is admin. The password is the one that you specified the first timethat you logged in. The user name and password are case-sensitive. The BASIC Home page displays. 4. Select ADVANCED > Advanced Setup > UPnP. The UPnP page displays. 5. Select the Turn UPnP On check box. By default...
Page 56 - Manage Network Settings
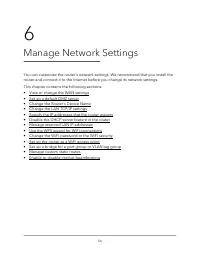
6 Manage Network Settings You can customize the router’s network settings. We recommend that you install therouter and connect it to the Internet before you change its network settings. This chapter contains the following sections: • View or change the WAN settings • Set up a default DMZ server • Ch...
Page 57 - View or change the WAN settings
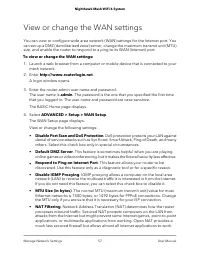
View or change the WAN settings You can view or configure wide area network (WAN) settings for the Internet port. Youcan set up a DMZ (demilitarized zone) server, change the maximum transmit unit (MTU)size, and enable the router to respond to a ping to its WAN (Internet) port. To view or change the ...
Page 58 - Set up a default DMZ server
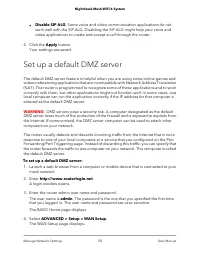
• Disable SIP ALG. Some voice and video communication applications do notwork well with the SIP ALG. Disabling the SIP ALG might help your voice andvideo applications to create and accept a call through the router. 5. Click the Apply button. Your settings are saved. Set up a default DMZ server The d...
Page 59 - Change the Router’s Device Name; Change the LAN TCP/IP settings
5. Select the Default DMZ Server check box. 6. Type the IP address. 7. Click the Apply button. Your settings are saved. Change the Router’s Device Name The router’s default device name is based on its model number. This device namedisplays in the file manager when you browse your network. To change ...
Page 62 - Disable the DHCP server feature in the router
6. Specify the range of IP addresses that the router assigns: a. In the Starting IP Address field, type the lowest number in the range. This IP address must be in the same subnet as the router. b. In the Ending IP Address field, type the number at the end of the range of IP addresses.This IP address...
Page 63 - Manage reserved LAN IP addresses; Reserve an IP address
The LAN Setup page displays. 5. Clear the Use Router as DHCP Server check box. 6. Click the Apply button. Your settings are saved. 7. (Optional) If this service is disabled and no other DHCP server is on your network, set your computer IP addresses manually so that the computers can access the route...
Page 64 - Edit a reserved IP address; Delete a reserved IP address entry
8. Click the Apply button. The reserved address is entered into the table. The reserved address is not assigned until the next time the computer contacts therouter’s DHCP server. Reboot the computer, or access its IP configuration and force aDHCP release and renew. Edit a reserved IP address To edit...
Page 65 - Use the WPS wizard for WiFi connections
The user name is admin. The password is the one that you specified the first timethat you logged in. The user name and password are case-sensitive. The BASIC Home page displays. 4. Select ADVANCED > Setup > LAN Setup. The LAN Setup page displays. 5. Select the radio button next to the reserved...
Page 67 - Set up the router as a WiFi access point
• WPA-PSK [TKIP] + WPA2-PSK [AES]. This type pf security allows clients to useeither WPA-Personal [TKIP] or WPA2-Personal [AES]. • WPA3-Personal. This type of security enables WiFi devices that support WPA3to join the router's WiFi network. WPA3 is the latest security standard and is moresecure than...
Page 68 - Set up a bridge for a port group
Note: To avoid interference with other routers or gateways in your network, werecommend that you use different WiFi settings on each router. You can also turnoff the WiFi radio on the other router or gateway and use this router only for WiFiclient access. 8. Click the Apply button. The IP address of...
Page 69 - Set up a bridge for a VLAN tag group
The BASIC Home page displays. 4. Select ADVANCED > Advanced Setup > VLAN/Bridge Settings. The VLAN/Bridge Settings page displays. 5. Select the Enable VLAN/Bridge Setup check box. The page expands. 6. Select the By bridge group radio button. The page expands. 7. Select the Port1 check box. 8. ...
Page 70 - Set up an IPTV port
The page expands. 6. Select the Enable VLAN Tag radio button. The page expands. 7. Click the Add button. The Add VLAN Rule page displays. 8. Specify the following settings for the VLAN tag group: • Name. Enter a name for the VLAN tag group.The name can be up to 10 characters. • VLAN ID. Enter a valu...
Page 71 - Manage custom static routes
The BASIC Home page displays. 4. Select ADVANCED > Advanced Setup > VLAN/Bridge Settings. The VLAN/Bridge Settings page displays. 5. Select the Enable VLAN/Bridge Setup check box. The page expands. 6. Select the By bridge group radio button. The page expands. 7. Select the Port1 check box: 8. ...
Page 72 - Set up a static route
• The Private check box is selected only as a precautionary security measure in caseRIP is activated. Set up a static route To set up a static route: 1. Launch a web browser from a computer or mobile device that is connected to your mesh network. 2. Enter http://www.routerlogin.net. A login window o...
Page 73 - Edit a static route; Delete a static route
This value represents the number of routers between your network and thedestination. Usually, a setting of 2 or 3 works, but if this is a direct connection,set it to 1. 10. Click the Apply button. Your settings are saved. The static route is added to the table on the Static Routespage. Edit a static...
Page 74 - Enable or disable implicit beamforming
3. Enter the router admin user name and password. The user name is admin. The password is the one that you specified the first timethat you logged in. The user name and password are case-sensitive. The BASIC Home page displays. 4. Select ADVANCED > Advanced Setup > Static Routes. The Static Ro...
Page 75 - Manage your network
7 Manage your network This chapter describes the router settings for administering and maintaining your routerand mesh network. The chapter contains the following sections: • Update the router and satellite firmware • Change the admin password • Enable admin password reset • Reset the admin password...
Page 76 - Update the router and satellite firmware; Check for firmware updates; Manually update the firmware
Update the router and satellite firmware You can use the router web interface to check if new firmware is available and updateyour router and satellite, or you can manually update the firmware for your router andsatellite. Check for firmware updates To check for new firmware and update your and sate...
Page 77 - Manually update satellite firmware
WARNING: We recommend that you always update the firmware on your satellite first, and then update your router. Also, do not update the firmware on your router andsatellite at the same time, and do not update more than one mesh device (router orsatellite) at a time. If you need to update more than o...
Page 78 - Manually update router firmware; Change the admin password
The firmware file name ends in .img or .chk . 8. Click the Upload button. The firmware on your satellite is updated. It takes a few minutes to complete the process. 9. After satellite finishes updating, on the satellite web interface, select Status and double-check the firmware version on the Status...
Page 79 - Enable admin password reset
Note: The ideal password contains no dictionary words from any language and containsuppercase and lowercase letters, numbers, and symbols. It can be up to 30 characters. To change the password for the admin user name: 1. Launch a web browser from a computer or mobile device that is connected to your...
Page 80 - Reset the admin password
4. Select ADVANCED > Administration > Set Password. The Set Password page displays. 5. Select the Enable Password Reset check box. 6. Select two security questions and provide answers to them. 7. Click the Apply button. Your settings are saved. Reset the admin password If you set up the passwo...
Page 82 - Display the statistics of the Internet port
Display the statistics of the Internet port To display the statistics of the Internet port: 1. Launch a web browser from a computer or mobile device that is connected to your mesh network. 2. Enter http://www.routerlogin.net. A login window opens. 3. Enter the router admin user name and password. Th...
Page 83 - Check the Internet connection status
6. To change the polling frequency, enter a time in seconds in the Poll Interval field and click the Set Interval button.To stop the polling entirely, click the Stop button. Check the Internet connection status To check the Internet connection status: 1. Launch a web browser from a computer or mobil...
Page 84 - View and manage logs of router activity
6. To release (stop) the Internet connection, click the Release button. 7. To renew (restart) the Internet connection, click the Renew button. 8. To exit the screen, click the Close Window button. View and manage logs of router activity The logs are a detailed record of the websites you accessed or ...
Page 85 - View devices currently on the network; Monitor Internet traffic
You must set up email notifications in order to receive the logs. The router to emailsthe logs to the address that you specified when you set up email notifications. Formore information, see Set up security event email notifications on page 47. 9. Click the Apply button. Your settings are saved. Vie...
Page 87 - Manage the router configuration file; Back up the settings; Erase the settings
10. Click the Apply button. The Internet Traffic Statistics section helps you to monitor the data traffic. 11. To update the Traffic Statistics section, click the Refresh button. 12. To display more information about the data traffic on your router and to change the poll interval, click the Traffic ...
Page 88 - Restore the settings
To erase the settings: 1. Launch a web browser from a computer or mobile device that is connected to your mesh network. 2. Enter http://www.routerlogin.net. A login window opens. 3. Enter the router admin user name and password. The user name is admin. The password is the one that you specified the ...
Page 89 - Manage remote access; Set up remote management
The file is uploaded to the router and the router restarts. WARNING: Do not interrupt the restoration process. Manage remote access You can access your router over the Internet to view or change its settings. You mustknow the router’s WAN IP address to use this feature. Note: Be sure to change the p...
Page 90 - Use remote access
• Only This Computer. Allow access from a single IP address on the Internet. Enter the IP address to be allowed access. • IP Address Range. Allow access from a range of IP addresses on the Internet. Enter a beginning IP address and an ending IP address to define the allowedrange. • Everyone. Allow a...
Page 91 - Use the Reset button
Return the router or satellite to its factorydefault settings Under some circumstances (for example, if you lost track of the changes that you madeto the router or satellite settings or you move the router to a different network), youmight want to erase the configuration and reset the router or sate...
Page 94 - Manage Port Forwarding to a Local Server; Set Up Port Forwarding to a Local Server
Manage Port Forwarding to a Local Server If your home network includes a server, you can allow certain types of incoming trafficto reach the server. For example, you might want to make a local web server, FTP server,or game server visible and available to the Internet. The router can forward incomin...
Page 95 - Add a Custom Port Forwarding Service
11. Click the Add button. The service displays in the menu. Add a Custom Port Forwarding Service The router lists default services and applications that you can use in port forwardingrules. If the service or application is not predefined, you can add a port forwarding rulewith a custom service or ap...
Page 96 - Edit a Port Forwarding Service
You can enter a port range and fixed ports in one rule, for example, external (30–50,78, 100–102), internal (40–60, 99, 200–202). With this rule, external ports 30–50 areforwarded to internal ports 40–60. 12. In the Internal IP address field, type the IP address or select the radio button for an att...
Page 97 - Delete a Port Forwarding Entry; Application Example: Make a Local Web Server Public
Delete a Port Forwarding Entry To delete a port forwarding entry: 1. Launch a web browser from a computer or mobile device that is connected to your mesh network. 2. Enter http://www.routerlogin.net. A login window opens. 3. Enter the router admin user name and password. The user name is admin. The ...
Page 98 - How the Router Implements the Port Forwarding Rule; Port Triggering
How the Router Implements the Port Forwarding Rule The following sequence shows the effects of a port forwarding rule: 1. When you type the URL www.example.com in your browser, the browser sends a web page request message with the following destination information: • Destination address. The IP addr...
Page 99 - Add a Port Triggering Service
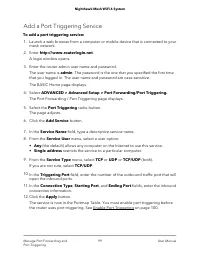
Add a Port Triggering Service To add a port triggering service: 1. Launch a web browser from a computer or mobile device that is connected to your mesh network. 2. Enter http://www.routerlogin.net. A login window opens. 3. Enter the router admin user name and password. The user name is admin. The pa...
Page 100 - Enable Port Triggering
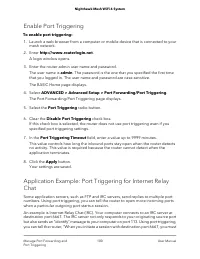
Enable Port Triggering To enable port triggering: 1. Launch a web browser from a computer or mobile device that is connected to your mesh network. 2. Enter http://www.routerlogin.net. A login window opens. 3. Enter the router admin user name and password. The user name is admin. The password is the ...
Page 102 - Use VPN to Access Your Network
9 Use VPN to Access Your Network You can use OpenVPN software to remotely access your router using virtual privatenetworking (VPN). This chapter explains how to set up and use VPN access. The chapter contains the following sections: • Set up a VPN connection • Specify VPN Service in the Router • Ins...
Page 104 - Install OpenVPN Software; Install OpenVPN Software on Your Windows Computer
6. To change the service type, scroll down and select the TCP radio button. 7. To change the port, scroll down to the Service Port field, and type the port number that you want to use. 8. Click the Apply button. Your changes are saved. VPN is enabled in the router, but you must install and setup Ope...
Page 107 - Install OpenVPN Software on Your Mac Computer
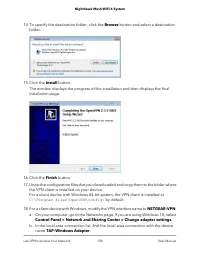
c. Select the local area connection and change its name (not its device name) to NETGEAR-VPN. If you do not change the VPN interface name, the VPN tunnel connection will fail. For more information about using OpenVPN on your Windows computer, visithttps://openvpn.net/index.php/open-source/documentat...
Page 108 - Install OpenVPN Software on an iOS Device; Install OpenVPN Software on an Android Device
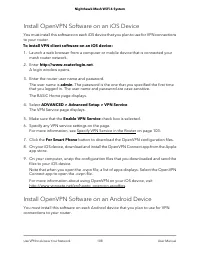
Install OpenVPN Software on an iOS Device You must install this software on each iOS device that you plan to use for VPN connectionsto your router. To install VPN client software on an iOS device: 1. Launch a web browser from a computer or mobile device that is connected your mesh router network. 2....
Page 111 - Set Up VPN Client Internet Access in the Router
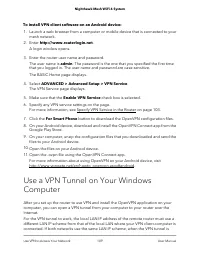
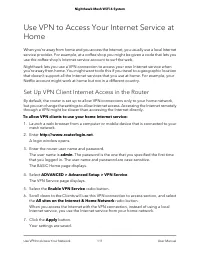
Use VPN to Access Your Internet Service atHome When you’re away from home and you access the Internet, you usually use a local Internetservice provider. For example, at a coffee shop you might be given a code that lets youuse the coffee shop’s Internet service account to surf the web. Nighthawk lets...
Page 112 - Block VPN Client Internet Access in the Router
8. Click the For Windows or For Non Windows button and download the configuration files for your VPN clients. 9. Unzip the configuration files and copy them to the folder where the VPN client is installed on your device.For a client device with Windows 64-bit system, the VPN client is installed at C...
Page 113 - Use a VPN Tunnel to Access Your Internet Service at Home
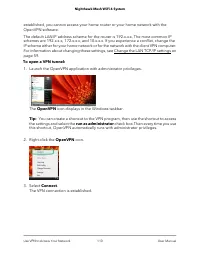
For a client device with Windows 64-bit system, the VPN client is installed at C:\Program files\OpenVPN\config\ by default. Use a VPN Tunnel to Access Your Internet Service at Home To access your Internet service: 1. Set up the router to allow VPN access to your Internet service. See Set Up VPN Clie...
Page 114 - Troubleshooting
10 Troubleshooting This chapter provides information to help you diagnose and solve problems you mightexperience with your router or satellite. If you do not find the solution here, check theNETGEAR support site at support.netgear.com for product and contact information. This chapter includes the fo...
Page 115 - Quick Tips; Sequence to Restart Your Network; WiFi Settings; The Router and Satellite Do Not Sync
Quick Tips This section describes tips for troubleshooting some common problems. Sequence to Restart Your Network When you restart your network, follow this sequence: 1. Turn off and unplug the modem. 2. Turn off the router. 3. Plug in the modem and turn it on. Wait two minutes. 4. Turn on the route...
Page 116 - Cannot Log In to the Router
To sync the router and the satellite: 1. Place the satellite in the same room as the router. Use this satellite location only during the sync process. 2. Connect the satellite to a power source. 3. Press the Sync button on the router and then within two minutes, press the Sync button on the satellit...
Page 117 - Cannot Access the Internet
Cannot Access the Internet Check your network and Internet connections: 1. Make sure that your WiFi-enabled computer or mobile device is connected to your mesh network. 2. If you are connected to your mesh network but you cannot access the Internet, check to see if your Internet connection is workin...
Page 118 - Troubleshoot Internet Browsing
• Your ISP might check for your computer’s host name. Assign the computer hostname of your ISP account as the account name on the Internet Setup page. • If your ISP allows only one Ethernet MAC address to connect to Internet and checksfor your computer’s MAC address, do one of the following: - Infor...
Page 119 - Troubleshoot WiFi Connectivity
To troubleshoot a PPPoE connection: 1. Launch a web browser from a computer or WiFi device that is connected to the network. 2. Enter http://www.routerlogin.net. A login window opens. 3. Enter the router admin user name and password. The user name is admin. The password is the one that you specified...
Page 120 - Test the LAN Path to Your Router
• To view the WiFi settings for the router, use an Ethernet cable to connect a computerto the Ethernet port on the router. Then log in to the router, and select BASIC >Wireless. Note: Be sure to click the Apply button if you change settings. • If you are trying to connect to the 5 GHz WiFi band, ...
Page 121 - Test the Path From Your Computer to a Remote Device
If the path is not functioning correctly, you might be experiencing one of the followingproblems: • Wrong physical connectionsCheck that the appropriate LEDs are on for your network devices. If your router andcomputer are connected to a separate Ethernet switch, make sure that the link LEDson the sw...
Page 123 - Supplemental Information
11 Supplemental Information This appendix covers the following topics: • Factory Settings • Technical Specifications 123
Page 124 - Factory Settings; Factory Settings for Router Model MR60
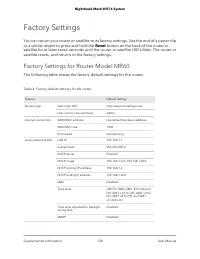
Factory Settings You can return your router or satellite to its factory settings. Use the end of a paper clipor a similar object to press and hold the Reset button on the back of the router orsatellite for at least seven seconds until the router or satellite LED blinks. The router orsatellite resets...
Page 125 - Factory Settings for Satellite Model MS60
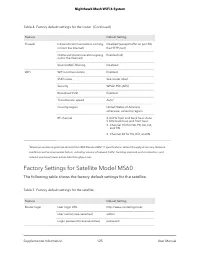
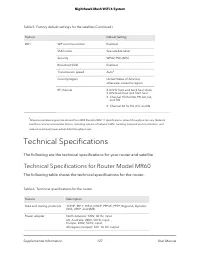
Table 4. Factory default settings for the router (Continued) Default Setting Feature Disabled (except traffic on port 80,the HTTP port) Inbound (communications comingin from the Internet) Firewall Enabled (all) Outbound (communications goingout to the Internet) Disabled Source MAC filtering Enabled ...
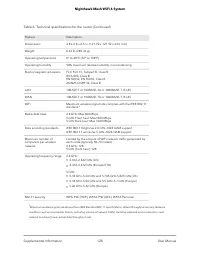
Page 127 - Technical Specifications; Technical Specifications for Router Model MR60
Table 5. Factory default settings for the satellite (Continued) Default Setting Feature Enabled WiFi communication WiFi See satellite label SSID name WPA2-PSK (AES) Security Enabled Broadcast SSID Auto 2 Transmission speed United States of America;otherwise, varies by region Country/region 2.4 GHz f...
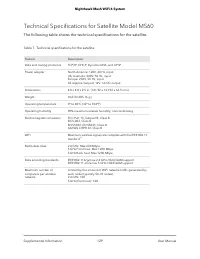
Page 129 - Technical Specifications for Satellite Model MS60
Technical Specifications for Satellite Model MS60 The following table shows the technical specifications for the satellite. Table 7. Technical specifications for the satellite Description Feature TCP/IP, DHCP, Dynamic DNS, and UPnP Data and routing protocols North America: 120V, 60 Hz, inputUK, Aust...