Page 2 - Table of Contents; Technical Specifications
English Français Table of Contents IMPORTANT SAFEGUARDS .......................................................................................................... 1NESCO ® Introduction ......................................................................................................................
Page 3 - English; IMPORTANT SAFEGUARDS; SAVE THESE INSTRUCTIONS
1 English - This product is designed for household use only - When using electrical appliances, basic safety precautions should always be followed, including the following: IMPORTANT SAFEGUARDS 1. READ ALL INSTRUCTIONS BEFORE USING THIS APPLIANCE. 2. To protect against electric shock, do not immerse...
Page 4 - NESCO; With your own NESCO; Before First Use
2 English NESCO ® Food Grinder - Introduction With your own NESCO ® Food Grinder, you control the ingredients. You control the amount of fats, salts and other additives, for a healthier diet. Chunky sandwich spreads, savory appetizers, hearty soups, relishes and homemade sausage. These and other dis...
Page 5 - Parts List; Setting for reversing the auger.
3 English 1 7 5 4 3 2 8 9 10 11 12 13 14 6 15 16 14 Parts List 1 Hopper 9 Power Dial 2 Food Pusher 10 Ring Nut 3 Hopper Cover/Meat Tray 11 MEDIUM Grinding Plate 4 Cutting Blade 12 COARSE Grinding Plate 5 Auger 13 Sausage Attachment 6 Grinding Head 14 Kebbe Attachments 7 Head Lock/Release Lever 15 Di...
Page 6 - Assembly & Operating Instructions; Place the hopper into the barrel of
4 English Assembly & Operating Instructions 1. Place the unit on a flat and stable work surface and insert the grinding head into the base. Figure 1 2. Lock the grinding head into place using the head lock/release lever. Figure 2 3. Insert the auger into the grinding head, the drive end first. F...
Page 7 - GRINDER PREPARATION FOR SAUSAGE MAKING:; Figure 1
5 English Assembly & Operating Instructions GRINDER PREPARATION FOR SAUSAGE MAKING: 1. Insert the grinding head to the base and lock into place using the head lock/release lever. 2. Insert the auger into the grinding head, the drive end first. 3. Place the cutting blade and coarse disc onto auge...
Page 8 - Cleaning Instructions
6 English Cleaning Instructions • Before cleaning, turn off any dials or switches and ensure the power cord is removed from the electrical outlet and allow appliance to cool. • Wipe the outside area of appliance with a damp cloth and dry with a lint free cloth. • Never place appliance in water or ot...
Page 9 - - Ce produit est conçu pour un usage domestique uniquement -; MESURES DE PRÉCAUTION IMPORTANTES; CONSERVER CES DIRECTIVES; Directives relatives au cordon court:; ançais
7 - Ce produit est conçu pour un usage domestique uniquement - Lors de l’utilisation d’appareils électriques, les précautions de sécurité de base doivent toujours être suivies, y compris les suivantes: MESURES DE PRÉCAUTION IMPORTANTES 1. LISEZ TOUTES LES INSTRUCTIONS AVANT D’UTILISER CET APPAREIL. ...
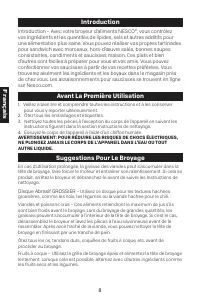
Page 10 - Introduction; Introduction – Avec votre broyeur d’aliments NESCO; Avant La Première Utilisation; Disque Abrasif GROSSIER
8 Introduction Introduction – Avec votre broyeur d’aliments NESCO ® , vous contrôlez vos ingrédients et les quantités de lipides, sels et autres additifs pour une alimentation plus saine. Vous pouvez réaliser vos propres tartinades pour sandwich avec morceaux, hors-d’œuvre salés, bonnes soupes consi...
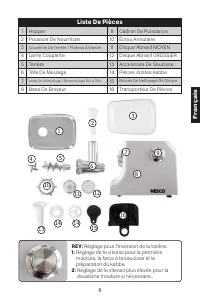
Page 11 - Liste De Pièces; Réglage pour l’inversion de la tarière.
9 Fr ançais 1 7 5 4 3 2 8 9 10 11 12 13 14 6 15 16 14 Liste De Pièces 1 Hopper 9 Cadran De Puissance 2 Poussoir De Nourriture 10 Écrou Annulaire 3 Couvercle De Trémie / Plateau À Viande 11 Disque Abrasif MOYEN 4 Lame Coupante 12 Disque Abrasif GROSSIER 5 Tarière 13 Accessoire De Saucisse 6 Tête De M...
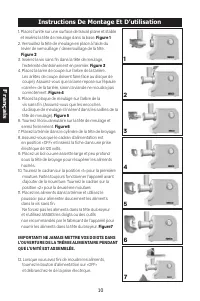
Page 12 - Instructions De Montage Et D’utilisation
10 Français Instructions De Montage Et D’utilisation 1. Placez l’unité sur une surface de travail plane et stable et insérez la tête de meulage dans la base. Figure 1 2. Verrouillez la tête de meulage en place à l’aide du levier de verrouillage / déverrouillage de la tête. Figure 2 3. Insérez la vis...
Page 13 - PRÉPARATION DU MOULIN POUR LA FABRICATION DE SAUCISSES:; FABRICATION DE KEBBE:
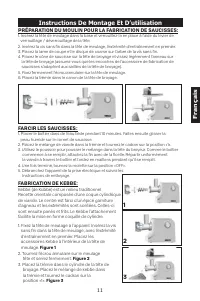
11 Fr ançais Instructions De Montage Et D’utilisation PRÉPARATION DU MOULIN POUR LA FABRICATION DE SAUCISSES: 1. Insérez la tête de meulage dans la base et verrouillez-la en place à l’aide du levier de verrouillage / déverrouillage de la tête.2. Insérez la vis sans fin dans la tête de meulage, l’ext...
Page 14 - Conseils D’entretien Et De Nettoyage
12 Français Conseils D’entretien Et De Nettoyage • Avant de procéder au nettoyage, mettez tous les interrupteurs en position arrêt, assurez-vous que le cordon d’alimentation est débranché et laissez l’appareil refroidir. • Essuyez l’extérieur de l’appareil à l’aide d’un chiffon humide et séchez-le à...