Page 3 - Meet Your Neato Robot; Important: Read Before Continuing With Setup
1 Meet Your Neato Robot Congratulations on your new home robot – now “connected” in your smart home so you can manage your floor cleaning from a smartphone or tablet. This guide will help get your robot set up and connected via the Neato app. You’ll also find some important information on operating...
Page 4 - Table of Contents; Setting Up Your Robot With Wi-Fi and
2 Table of Contents Overview ............................................................................................. 3 Important Items and Tips ............................................................ 4 Preparation and Set Up ...................................................................
Page 5 - Overview
3 Overview 4 5 10 9 2 8 3 1 7 6 1 Dirt Bin and Filter 2 Top 3 Laser Cover 4 Start Button 5 Info LED 6 Battery LED 7 Handle 8 Front Bumper 9 Boundary Marker (included in some models) 10 Charge Base 11 Brush 12 Wall Following Sensor Window 13 Side Brush (available on specific models only) 14 Drop Sens...
Page 6 - TIPS; Important Items and Tips; IMPORTANT ITEMS
4 TIPS To keep your robot out of places you don’t want it to go, set down boundary markers (included in specific models, however Neato Boundary Markers are compatible with all Neato robots). You can use scissors to cut boundary markers to a shorter length. You can use removable tape to keep boundary...
Page 7 - BATTERY LED
5 Start Button & LED Lights EN ROBOT IS: LED COLOR WHAT IT MEANS Cleaning Solid Green Battery level is normal Solid Amber Battery level is low. Battery must be charged before a new cleaning can be started Charging Pulsing Green Battery is charging and robot can start cleaning Pulsing Amber Robot...
Page 8 - NOTE; Preparation and Set Up
6 IMPORTANT Remove all protective films and shipping material from the robot and charge base. If they are not removed, your Neato robot will not operate correctly. Place the rounded side of your Neato robot against the metal charging contacts on the charge base until the contacts are pushed all of t...
Page 9 - PAIRING ISSUES; Setting Up Your Robot With Wi-Fi Connection and the Neato App
7 It is recommended that you setup your robot to work with the Neato app to get the best experience and access to all of the features. The Neato app is the optimal way to control your robot and receive notifications via your smartphone or tablet. Benefits of using the Neato app: • Easy access & ...
Page 11 - PUSH NOTIFICATIONS; SMART WATCH CAPABLE; Using Your Robot With the Neato App
9 SCHEDULING YOUR NEATO ROBOT Set up a schedule for regular vacuuming. You can set your preferences based on cleaning days and times. NOTE If you are going away, you can turn OFF Enable Schedule to put the schedule on hold. PUSH NOTIFICATIONS By turning on push notifications in the app, your robot c...
Page 12 - Using Your Neato Robot Without the Neato App
10 SPOT CLEANING You can initiate Spot Cleaning by pressing the Start Button twice. During Spot Cleaning, if you press the Start Button, the robot will pause. If you press it again, it will resume. To cancel the Spot Cleaning, press the Start Button and hold it down for 5 seconds. HOUSE CLEANING You...
Page 13 - HOUSE CLEANING; AUTO CHARGE AND RESUME; How Neato Works
11 HOUSE CLEANING In normal operation, Neato comes off of its base, explores its surroundings and starts cleaning. It starts cleaning in sections approximately 15’x15’ depending on layout and furniture in the room. It will continue to clean section by section until the entire area is cleaned. Your N...
Page 14 - SENSORS; DIRT BIN AND FILTERS; BRUSHES; Maintaining Your Neato Robot
12 IMPORTANT Your robot needs regular maintenance to operate reliably. This means checking/cleaning the brushes and emptying the dirt bin after every use or as needed, depending on your environment. Failure to do this may cause problems with your robot and impact your robot’s performance and void yo...
Page 15 - GETTING HELP; More Info
13 ACCESSORIES You can find information about accessories and replacement parts for your Neato robot at NeatoRobotics.com. Always purchase Neato Genuine accessories and parts: • Batteries • Filters • Brushes • Boundary Markers• Cleaning Tool• Dirt Bin• Charge Base Using unauthorized or 3rd party acc...
Page 16 - Troubleshooting
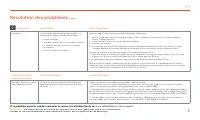
14 Battery LED What it means Info LED What it means What to do What to do Blinking Red The robot battery has experienced an error. Please contact Customer Care. For local contact information: www.NeatoRobotics.com/Contact-Us Blinking Red Your robot needs to be cleaned to operate at best performance....
Page 18 - Help your robot and your robot will help you.; You and Your Neato Robot
16 Congratulations on your new Neato robot. You will soon experience the joy of having clean floors without ever pushing a vacuum. Observe your robot during the first few cleaning runs. You may find that a few small adjustments in your home (moving a chair or lamp a few inches, picking up cords) wil...
Page 19 - Voici votre robot Neato; Important : Lire avant de poursuivre la configuration
17 Voici votre robot Neato Félicitations pour l’acquisition de votre nouveau robot domestique, désormais « connecté » à votre maison intelligente pour vous permettre de gérer le nettoyage de vos sols depuis votre smartphone ou votre tablette.Ce guide vous aidera à installer votre robot et à le conne...
Page 20 - Table des matières; Configuration de votre robot avec le réseau Wi-Fi et
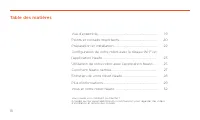
18 Table des matières Vue d’ensemble .............................................................................. 19 Points et conseils importants .................................................. 20 Préparation et installation ......................................................... 22 Configur...
Page 21 - Vue d’ensemble
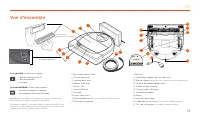
19 Vue d’ensemble 4 5 10 9 2 8 3 1 7 6 1 Bac à poussière et filtre 2 Partie supérieure 3 Couvercle du laser 4 Bouton Démarrer 5 Voyant Info 6 Voyant Batterie 7 Poignée 8 Pare-chocs avant 9 Balise de délimitation (incluse dans certains modèles) 10 Base de chargement 11 Brosse 12 Fenêtre du capteur de...
Page 22 - CONSEILS; Points et conseils importants; POINTS IMPORTANTS
20 CONSEILS Si vous ne voulez pas que votre robot accède à certaines zones, configurez des balises de délimitation (les balises de délimitation Neato sont compatibles avec tous les robots Neato, mais sont fournies avec certains modèles uniquement). Vous pouvez utiliser des ciseaux pour réduire les b...
Page 23 - Bouton Démarrer et voyants lumineux; VOYANT BATTERIE; VOYANT INFO
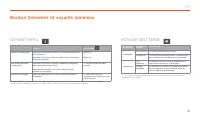
21 Bouton Démarrer et voyants lumineux FR LE ROBOT EST EN COURS DE : COULEUR DU VOYANT SIGNIFICATION Nettoyage Vert continu Le niveau de batterie est normal. Orange fixe Le niveau de batterie est faible. La batterie doit être chargée avant de démarrer le nettoyage. Chargement Vert clignotant La batt...
Page 24 - Préparation et installation
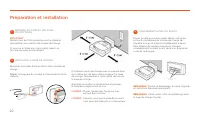
22 IMPORTANT Retirez tous les films protecteurs et le matériel d’expédition du robot et de la base de charge. Si vous ne le faites pas, votre robot Neato ne fonctionnera pas correctement. Placez le côté arrondi du robot Neato contre les contacts métalliques de la base de charge de manière à ce qu’il...
Page 25 - INSTALLATION DE L’APPLICATION; PROBLÈMES D’ASSOCIATION
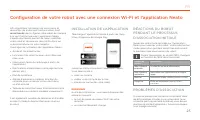
23 Afin d’optimiser l’utilisation de votre robot et de profiter de toutes ses fonctionnalités, il est recommandé de configurer votre robot de manière à ce qu’il fonctionne avec l’application Neato. L’application Neato permet de mieux contrôler votre robot et de recevoir des notifications sur votre s...
Page 26 - Configuration du robot avec le réseau Wi-Fi
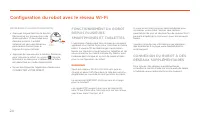
24 FONCTIONNEMENT DU ROBOT DEPUIS PLUSIEURS SMARTPHONES ET TABLETTES L’application Neato peut être utilisée sur plusieurs appareils d’un même foyer pour contrôler le même robot. Il vous suffit de télécharger l’application Neato sur d’autres smartphones ou tablettes et de vous connecter au même compt...
Page 27 - NOTIFICATIONS INSTANTANÉES; NETTOYAGE DE VOTRE MAISON; Utilisation de votre robot avec l’application Neato
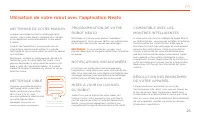
25 PROGRAMMATION DE VOTRE ROBOT NEATO Définissez un horaire pour passer l’aspirateur régulièrement. Vous pouvez définir vos préférences en fonction des jours et heures de nettoyage. REMARQUE : Si vous partez en voyage, vous pouvez désactiver la programmation pour la mettre en pause. NOTIFICATIONS IN...
Page 28 - NETTOYAGE CIBLÉ; Utilisation de votre robot sans l’application Neato
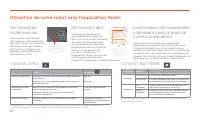
26 NETTOYAGE CIBLÉ Vous pouvez démarrer le nettoyage ciblé en appuyant deux fois sur le bouton Démarrer. Au cours du nettoyage ciblé, si vous appuyez sur le bouton Démarrer, le robot se mettra en pause. Si vous appuyez de nouveau sur le bouton, il reprendra sa tâche. Pour annuler le nettoyage ciblé,...
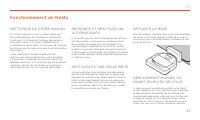
Page 29 - NETTOYAGE D’UNE SEULE PIÈCE; RETOUR À LA BASE; Fonctionnement de Neato
27 NETTOYAGE DE VOTRE MAISON En fonctionnement normal, le robot Neato sort de sa base, explore les alentours et commence à nettoyer. Il commence à nettoyer des sections d’environ 4 m sur 4 m, selon la disposition et l’ameublement de la pièce. Il continuera de nettoyer section par section jusqu’à ce ...
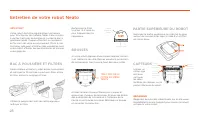
Page 30 - CAPTEURS; BAC À POUSSIÈRE ET FILTRES; Entretien de votre robot Neato
28 IMPORTANT Votre robot doit être régulièrement entretenu pour fonctionner de manière fiable. Cela consiste à vérifier/nettoyer les brosses et à vider le bac à poussière après chaque utilisation ou au besoin, en fonction de votre environnement. Dans le cas contraire, cela peut entraîner des problèm...
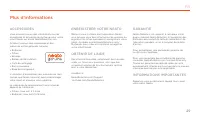
Page 31 - ACCESSOIRES; ENREGISTRER VOTRE NEATO; GARANTIE; INFORMATIONS IMPORTANTES; Plus d’informations
29 ACCESSOIRES Vous pouvez trouver des informations sur les accessoires et les pièces de rechange pour votre robot Neato sur le site NeatoRobotics.com. Achetez toujours des accessoires et des pièces de rechange Neato Genuine : • Batteries• Filtres • Brosses• Balises de délimitation• Outil de nettoya...
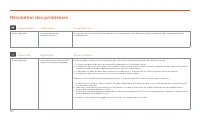
Page 32 - Résolution des problèmes
30 Voyant Batterie Voyant Info Ce qu’il faut faire Ce qu’il faut faire Rouge clignotant Il y a un problème avec la batterie du robot. Contactez le service à la clientèle. Pour obtenir les coordonnées du service dans votre région, consultez la page : www.NeatoRobotics. com/Contact-Us Rouge clignotant...
Page 34 - Aidez votre robot et votre robot vous aidera.; Vous et votre robot Neato
32 Félicitations pour l’acquisition de votre nouveau robot Neato ! Vous allez bientôt découvrir la joie d’avoir des sols propres sans jamais passer l’aspirateur. Observez votre robot pendant les premières sessions de nettoyage. Vous constaterez peut-être que quelques petits ajustements dans votre ma...
Page 35 - Conozca a su robot Neato
33 Conozca a su robot Neato ¡Enhorabuena por la adquisición de su nuevo robot doméstico! Ahora está “conectado”, de forma que puede controlar la limpieza del suelo desde cualquier lugar utilizando su smartphone o tableta. Esta guía le ayudará a configurar y conectar su robot a través de la app de ...
Page 36 - Índice; Configuración del robot mediante una conexión Wi-Fi
34 Índice Descripción general ...................................................................... 35 Aspectos y consejos importantes ......................................... 36 Preparación y conexión .............................................................. 38 Configuración del robot median...
Page 37 - Descripción general
35 Descripción general 4 5 10 9 2 8 3 1 7 6 1 Contenedor de suciedad y filtros 2 Parte superior 3 Cubierta láser 4 Botón Inicio 5 LED de información 6 LED de la batería 7 Asa 8 Parachoques frontal 9 Delimitador (incluido en algunos modelos) 10 Base de carga 11 Escobilla 12 Ventana del sensor de segu...
Page 38 - CONSEJOS; Aspectos y consejos importantes; ASPECTOS IMPORTANTES
36 CONSEJOS Para que el robot no pase por zonas por las que no quiere que vaya, utilice los limitadores (incluidos en algunos modelos, aunque los delimitadores Neato son compatibles con todos los robots Neato). Puede usar tijeras para acortar los delimitadores. Puede usar cinta adhesiva removible pa...
Page 39 - Botón Inicio y luces LED; LED DE LA BATERÍA
37 Botón Inicio y luces LED ES EL ROBOT ESTÁ: COLOR DEL LED SIGNIFICADO Limpiando Verde fijo Nivel de batería normal Ámbar fijo Nivel de batería bajo. Es necesario cargar la batería antes de iniciar un nuevo ciclo de limpieza Cargando Verde intermitente La batería se está cargando y el robot puede e...
Page 40 - Preparación y conexión
38 IMPORTANTE Quite todas las películas protectoras, materiales de transporte y la base de carga. Si no las quita, el robot Neato no funcionará correctamente. Coloque el lado redondo del Neato en los contactos metálicos de la base de carga hasta que estos se contraigan completamente. Para lograr un ...
Page 41 - CONEXIÓN A LA APP; PROBLEMAS DE EMPAREJAMIENTO
39 Le recomendamos que configure su robot con la app de Neato para tener acceso a todas sus funciones y disfrutar aún más de la experiencia. La app de Neato es la forma más eficaz de controlar el robot, además de permitirle recibir notificaciones a través de su smartphone o tableta. Ventajas de usar...
Page 42 - Configuración de la conexión Wi-Fi del robot
40 MANEJO DEL ROBOT DESDE DIFERENTES SMARTPHONES Y TABLETAS La app de Neato permite manejar el robot desde diferentes dispositivos de una misma casa. Solo tiene que descargar la app de Neato en otros smartphones o tabletas e iniciar sesión en la misma cuenta Mi Neato con el correo electrónico y la c...
Page 43 - LIMPIEZA DE CASA; Uso del robot con la app de Neato
41 PROGRAMACIÓN DEL ROBOT NEATO Configure un horario para un aspirado con carácter periódico. Incluso puede seleccionar sus días y horas preferidos para la limpieza. NOTA: si se marcha de casa, puede apagar el comando Activar programación y dejar el horario en espera. RECEPCIÓN DE NOTIFICACIONES Act...
Page 44 - Uso del robot sin la app de Neato
42 LIMPIEZA DE MANCHAS Inicie la limpieza de manchas con solo pulsar el botón Inicio dos veces. Si pulsa el botón Inicio durante la limpieza de manchas, el robot se parará. Si lo vuelve a pulsar, reanudará la limpieza. Si desea cancelar la limpieza de manchas, mantenga pulsado el botón Inicio durant...
Page 45 - VUELTA A LA BASE; Cómo funciona el robot Neato
43 LIMPIEZA DE CASA Durante el funcionamiento normal, Neato sale de la base, explora su entorno e inicia la limpieza. Primero empieza por secciones de aproximadamente 4 x 4 m, en función de la distribución y del mobiliario que haya en la habitación. Luego continúa sección por sección hasta que toda ...
Page 46 - SENSORES; ESCOBILLAS; Mantenimiento de su robot Neato
44 IMPORTANTE El robot necesita un mantenimiento regular para funcionar correctamente. Esto significa que hay que comprobar/limpiar las escobillas y vaciar el contenedor de suciedad después de cada limpieza o cuando lo necesite, según la situación. Si esto no se cumple, se pueden producir problemas ...
Page 47 - Más información
45 ACCESORIOS Puede encontrar más información y piezas de recambio para su robot Neato en NeatoRobotics.com/es Adquiera siempre accesorios y piezas originales de Neato. • Baterías • Filtros • Escobillas• Delimitadores• Herramienta de limpieza • Contenedor de suciedad• Base de carga El uso de accesor...
Page 48 - Solución de problemas
46 LED DE LA BATERÍA LED DE INFORMACIÓN Qué hay que hacer Qué hay que hacer Rojo intermitente Se ha producido un error en la batería del robot. Póngase en contacto con Atención al cliente. Información de contacto de su zona: www.neatorobotics.com/es/ Contact-Us/ Rojo intermitente Es necesario limpia...
Page 50 - Ayude a su robot y su robot lo ayudará.; Usted y su robot Neato
48 ¡Enhorabuena por la adquisición de su nuevo robot Neato! Pronto experimentará la felicidad de tener limpio todo el suelo sin volver a pasar la aspiradora. Observe a su robot en las primeras limpiezas. Puede que descubra que unos pequeños cambios en su casa (mover una silla o una lámpara unos cent...