Page 2 - CONTENTS
CONTENTS IMPORTANT SAFETY INSTRUCTIONS…………………………….....………….........…...……1 Important safeguards…………………………………………………………...........…………........…………1 Electrical requirements……………....................……………………………………...………..............3 PARTS AND FEATURES…………………………….........................………………………......…...
Page 3 - lems can be found in the chart of Troubleshooting Tips.; using this appliance.; instructions before its use.; IMPORTANT SAFETY INSTRUCTIONS
Inside you will find helpful information on how to use and maintain your dishwasher properly. Following these guidelines can save you a great deal of time and money over the life of your dishwasher. Additional answers to common prob- lems can be found in the chart of Troubleshooting Tips. WARNING! T...
Page 5 - ELECTRICAL REQUIREMENTS; GROUNDING INSTRUCTIONS; remove or bypass the
appliance to rust.• This dishwasher is an automatic appliance, do not add water manually when the appliance is working. It will cause overflow and is dangerous. • To reduce the risk of injury, immediately replace work power cords, loose plugs and/or power outlets. • Disconnect electrical power and w...
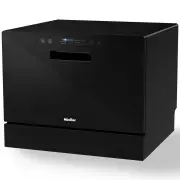
Page 6 - PARTS AND FEATURES; ATTEMPTING ANY MAINTENANCE OR CLEANING; CONTROL PANEL
PARTS AND FEATURES Avoid the use of an extension cord because it may overheat and cause a risk of fire. However, if it is necessary to use an extension cord: A) Use only a 3-prong extension cord with a 3-prong grounding plug. B) The marked rating of the extension cord must be equal to or greater tha...
Page 8 - INSTALLATION; UNPACKING AND PROPER PLACEMENT; are disposed of safely and kept out of the reach of children.; powering on your appliance.
INSTALLATION UNPACKING AND PROPER PLACEMENT UNPACKING: WARNING: Ensure that any packing material, including any plastic bags or film, are disposed of safely and kept out of the reach of children. 1. Inspect and remove any remains of packaging, tape, or printed materials before powering on your appli...
Page 9 - COUNTERTOP LAYOUT DIAGRAMS:; the position of the sewer
BUILT-IN INSTALLATION DIAGRAM: COUNTERTOP LAYOUT DIAGRAMS: Water valve Inlet hose Drain hose Dishwasher sink Hole size: The counter Dishwasher side Dishwasher side Cupboard door ≥ ≥ ≥ ≥ The direction of perforation 2.4 x 2.4in (60x60mm) according to the position of the sewer 17.7in 450mm 17.9in 455m...
Page 10 - INLET WATER HOSE CONNECTION:; connector located at the back side of the dishwasher.
Quick connector Inlet water hose Inlet water connector Tap Connect Inlet water hose to the Inlet hose connector 8 INLET WATER HOSE CONNECTION: Connecting the Inlet water hose to the Tap: 1. Connect the Quick connector to the Tap.2. Connect one end of the Inlet water hose to the Quick connector.3. Co...
Page 11 - Connecting the Inlet water hose to the Water supply pipe:; Attach
Connecting the Inlet water hose to the Water supply pipe: Angle valve Water supply hose Valve Inlet water hose Inlet water connector Attach inlet water hose to the Inlet hose connector 9
Page 13 - USING YOUR ULTRA COMPACT; IMPORTANT! To get the best performance from your dishwasher,; LOADING THE DISHWASHER:
USING YOUR ULTRA COMPACT IMPORTANT! To get the best performance from your dishwasher, read all operating instructions. PRIOR TO USE: LOADING THE DISHWASHER: The following should be checked before starting the dishwasher. 1. The dishwasher is level. 2. The water supply is open. 3. There are no leaks ...
Page 18 - CARE AND MAINTENANCE:; HOW TO MAINTAIN YOUR DISHWASHER:; odor are not trapped inside the appliance.; CLEANING THE DISHWASHER:; use a spray cleaner of any kind.; WARNING; : Never run the dishwasher without the filter in place!
CARE AND MAINTENANCE: HOW TO MAINTAIN YOUR DISHWASHER: After each use, leave the dishwasher door slightly ajar so that any moisture and odor are not trapped inside the appliance. CLEANING THE DISHWASHER: To clean the exterior and rubber parts of the dishwasher, do not use solvents or abrasive cleani...
Page 20 - Error
PREPARATION FOR STORAGE: It is recommended you run a wash cycle with the dishwasher empty. Disconnect from power and turn off the water supply. Remove any water remaining in the sump area with a sponge. Leave the door slightly open, this will help the door seals to last longer and prevent odors from...
Page 23 - Inlet Water Temperature; TECHNICAL SPECIFICATIONS:
Outline Size W 21.6 x H 17.7 x D 21.6 in Water Pressure 5.8 – 145PSI Inlet Water Temperature ≤ 120°F Nominal Voltage 120V Frequency 60Hz Rated Power 870W Waterproof IPX1 Capacity 6 Place Settings + 6 Serving Pieces TECHNICAL SPECIFICATIONS: CIRCUIT DIAGRAM POWER PLUG: 10A 250V~ 21
Page 24 - Your purchase comes with a 100%; satisfaction guarantee from Müeller; Müeller USA
If you are not happy with the product for any reason, please contact us at [email protected] or 888-632-9981 with your feedback or questions, and we will do our best to make things right for you! Your purchase comes with a 100% satisfaction guarantee from Müeller 168 Mason Way Unit #4A, City of Indu...