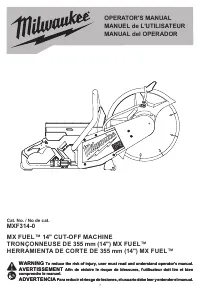
Page 2 - WARNING
GENERAL POWER TOOL SAFETY WARNINGS WARNING Read all safety warnings, instruc- tions, illustrations and specifica - tions provided with this power tool. Failure to follow all instructions listed below may result in electric shock, fire and/or serious injury. Save all warnings and instructions for fut...
Page 4 - SYMBOLOGY; CAUTION; SPECIFICATIONS
4 • Always use common sense and be cautious when using tools. It is not possible to anticipate every situation that could result in a dangerous outcome. Do not use this tool if you do not understand these operating instructions or you feel the work is beyond your capability; contact Milwaukee Tool o...
Page 5 - Removing/Inserting the Battery; Installing and Removing Cut-Off Wheels
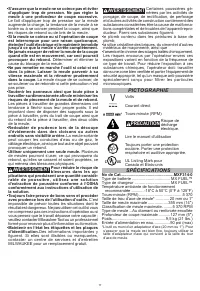
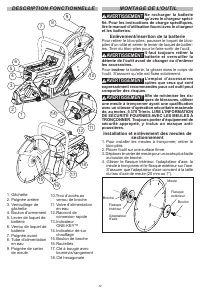
5 FUNCTIONAL DESCRIPTION 1 2 4 7 9 14 13 12 15 16 17 18 3 8 5 6 11. Water supply valve 12. Quick connect fitting 13. ONE-KEY ™ indicator 14. Overheat indicator 15. Spindle bolt 16. Roller wheels 17. Scrench/storage 18. Hex wrench 1. Trigger 2. Rear handle 3. Trigger lock 4. Arm button 5. Battery lat...
Page 6 - OPERATION; Water Connection; MAINTENANCE; battery pack from the charger or machine before; Maintaining Machine
6 ONE-KEY™ To learn more about the ONE-KEY™ functional- ity for this machine, please reference the Quick Start guide included with this machine or go to milwaukeetool.com/One-Key. To download the ONE-KEY™ app, visit the App Store or Google Play from your smart device. ONE-KEY™ Indicator Solid Blue W...
Page 7 - This device contains a; Internal Battery; To reduce the risk of personal in-; Cleaning; ACCESSORIES; Use only recommended accesso-; SERVICE - UNITED STATES
7 ONE-KEY™ WARNING Chemical Burn Hazard. This device contains a lithium button/coin cell battery. A new or used battery can cause severe in - ternal burns and lead to death in as little as 2 hours if swallowed or enters the body. Always secure the battery cover. If it does not close securely, stop u...
Page 8 - AVERTISSEMENT
8 LIMITED WARRANTY - MEXICO, CENTRAL AMERICA & CARIBBEAN TECHTRONIC INDUSTRIES' warranty is for 2 years since the original purchase date. This warranty card covers any defect in material and workmanship on this Product. To make this warranty valid, present this warranty card, sealed/ stamped by ...
Page 10 - pièces à travailler.
10 • Toujours utiliser des brides de meule non endom - magées ayant le diamètre convenable pour la meule choisie. Les brides de meule adéquates soutiennent la meule, ce qui minimise les risques de bris de celle-ci. • Ne pas utiliser de meules renforcées usées qui proviennent d’outils électriques de ...
Page 11 - PICTOGRAPHIE; PRÉCAUTION; SPÉCIFICATIONS
11 • S’assurer que la meule ne se coince pas et éviter d’appliquer trop de pression. Ne pas régler la meule à une profondeur de coupe excessive. Le fait d’appliquer trop de pression sur la meule augmente la charge, la tendance de la meule à se tordre ou à se coincer pendant la coupe, ainsi que les r...
Page 12 - DESCRIPTION FONCTIONNELLE; Enlèvement/insertion de la batterie; Il faut toujours retirer la; DE SÉCURITÉ FOURNIES AVEC LES MEULES À; Installation et enlèvement des meules de
12 DESCRIPTION FONCTIONNELLE 15 16 17 18 1 2 4 7 9 14 13 12 3 8 5 6 1. Gâchette 2. Poignée arrière 3. Verrouillage de gâchette 4. Bouton d’armement 5. Levier de loquet de batterie 6. Verrou de loquet de batterie 7. Poignée avant 8. Tube d’alimentation en eau 9. Poignée de carter de meule 10 11 10.Tr...
Page 13 - MANIEMENT; poussière conforme aux normes OSHA.; Connexion à eau; REMARQUE
13 5. Pendant que le verrou de broche est en place à l’aide d’une clé hexagonale (1), installer et serrer fermement le boulon d’axe à l’aide d’une clé à bougie avec tournevis. 1 2 6. Pour retirer les meules à tronçonner, maintenir le verrou de broche en place et desserrer le boulon de broche à l’aid...
Page 14 - Indicateur de surchauffage; ENTRETIEN; Entretien de l’outil; graves entraînant la mort en seulement 2 heures; Pile interne; Nettoyage; ACCESOIRES
14 Indicateur de surchauffage Pour protéger l’outil contre les dommages, la pro- tection de surchauffage éteindra automatiquement l’outil lors du surchauffage de l’outil. L’indicateur de surchauffage clignotera pendant 5 secondes. L’outil pourra surchauffer lors de la coupe trop rapide de matériaux....
Page 15 - ADVERTENCIA; Lea todas las advertencias; descarga eléctrica, un incendio o lesiones graves.; Guarde todas las advertencias e instrucciones; idas más abajo se refiere a su herramienta operada; • Mantenga a los niños y a los espectadores ale-
15 SERVICE - CANADA Milwaukee Tool (Canada) Ltd 1.800.268.4015 Monday-Friday, 7:00 AM - 4:30 PM CST www.milwaukeetool.ca GARANTIE LIMITÉE - AUX ÉTATS-UNIS ET AU CANADA Chaque produit, bloc-pile, et chargeur MX FUEL™ de MILWAUKEE sont garantis à l’acheteur d’origine d’être exempts de vice du matériau...
Page 19 - SIMBOLOGÍA; PRECAUCIÓN; ESPECIFICACIONES; DESCRIPCION FUNCIONAL
19 • ADVERTENCIA Algunos polvos generados por el lijado eléctrico, aserrado, pulido, taladrado y otras actividades de construcción contienen químicos identificados como causantes de cáncer, defectos congénitos u otros daños repro- ductivos. Algunos ejemplos de estos químicos son: • plomo de pintura ...
Page 20 - ENSAMBLAJE; Retirar/insertar la batería; OPERACION; Selección de disco
20 ENSAMBLAJE ADVERTENCIA Recargue la batería sólo con el cargador especificado para ella. Para instrucciones específicas sobre cómo cargar, lea el manual del operador sumin - istrado con su cargador y la batería. Retirar/insertar la batería Para retirar la batería, oprima el pestillo de la batería ...
Page 21 - MANTENIMIENTO; Para reducir el riesgo de una; Mantenimiento de las herramientas; tan solo en 2 horas si se ingiere o entra al cu-
21 Armado de la herramienta Las herramientas MX Fuel™ deben armarse antes de su uso. Incluso con la batería insertada, el gatillo y las funciones de la herramienta no operarán hasta que se arme la herramienta. Para armar la herramienta: 1. Inserte la batería. 2. Oprima y sostenga el botón de armado ...
Page 22 - Batería interna; Para reducir el riesgo de le-; Limpieza; ACCESORIOS; Utilice sólo los accesorios; SOPORTE DE SERVICIO - MEXICO; CENTRO DE ATENCION A CLIENTES
22 Batería interna Se usa una batería interna para facilitar toda la funcionalidad de ONE-KEY™. Para reemplazar la batería: 1. Retire el paquete de baterías. 2. Retire el tornillo y abra la tapa de la batería. 3. Saque el panel de las baterías y retire la batería vieja. Mantenga fuera del alcance de...
Page 24 - MILWAUKEE TOOL
58140152d2 961013036-02(A) 08/19 Printed in China MILWAUKEE TOOL 13135 West Lisbon Road Brookfield, WI 53005 USA