Page 2 - WARNING
2 GENERAL POWER TOOL SAFETY WARNINGS WARNING Read all safety warnings, instruc- tions, illustrations and specifica - tions provided with this power tool. Failure to follow all instructions listed below may result in electric shock, fire and/or serious injury. Save all warnings and instructions for f...
Page 3 - that can make a connection from one terminal to; Shorting the battery terminals together may; • Under abusive conditions, liquid may be ejected; Liquid; • Do not use a battery pack or tool that is dam; Damaged or modified batteries; SERVICE; SYMBOLOGY; SPECIFICATIONS; switch
3 keys, nails, screws or other small metal objects, that can make a connection from one terminal to another. Shorting the battery terminals together may cause burns or a fire. • Under abusive conditions, liquid may be ejected from the battery; avoid contact. If contact ac - cidentally occurs, flush ...
Page 4 - ASSEMBLY; Removing/Inserting the Battery; Attaching and Removing Accessories; OPERATION; Using the Drive Control
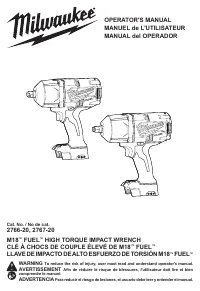
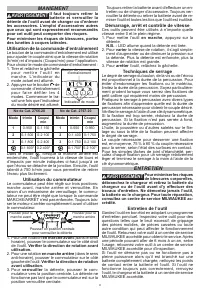
4 Cat. No. 2766-20 Cat. No. 2767-20 Mode RPM IPM Mode RPM IPM 1 0-950 0-1150 1 0-550 0-950 2 0-1500 0-2100 2 0-1400 0-1750 3 0-1800 0-2400 3 0-1750 0-2100 0-1800* 0-2400* 0-1750* 0-2100* In mode, when run in reverse, the tool will spin at the above RPM and IPM until the nut breaks free from the join...
Page 5 - MAINTENANCE; battery pack from the charger or tool before; Maintaining Tool; your tool, battery pack or charger in liquid or; Cleaning; ACCESSORIES; SERVICE - UNITED STATES
5 Oil, dirt, rust or other matter on the threads or under the head of the fastener affects the degree of tightness. The torque required to loosen a fastener averages 75% to 80% of the tightening torque, depending on the condition of the contacting surfaces. On light gasket jobs, run each fastener do...
Page 6 - AVERTISSEMENT
6 EXPENSES, LOSSES OR DELAYS ALLEGED TO BE AS A CONSE - QUENCE OF ANY DAMAGE TO, FAILURE OF, OR DEFECT IN ANY PRODUCT INCLUDING, BUT NOT LIMITED TO, ANY CLAIMS FOR LOSS OF PROFITS. SOME STATES DO NOT ALLOW THE EX - CLUSION OR LIMITATION OF INCIDENTAL OR CONSEQUENTIAL DAMAGES, SO THE ABOVE LIMITATION...
Page 8 - DESCRIPTION FONCTIONNELLE; Insertion/Retrait de la batterie; Installation et retrait d’accessoires
8 • Porter des protège-oreilles avec un marteau per- forateur. Une exposition au bruit peut provoquer une perte auditive. • N’utilisez que des douilles ou des accessoires spécifiquement conçus pour les clés à chocs et les visseuses. D’autres douilles ou accessoires pourraient • Maintenir en l’état l...
Page 9 - MANIEMENT; Utilisation de la commande d’entraînement; Utilisation du commutateur; ENTRETIEN; Entretien de l’outil
9 MANIEMENT AVERTISSEMENT Il faut toujours retirer la batterie et verrouiller la détente de l’outil avant de changer ou d’enlever les accessoires. L’emploi d’accessoires autres que ceux qui sont expressément recommandés pour cet outil peut comporter des risques. Pour minimiser les risques de blessur...
Page 10 - Nettoyage; ACCESOIRES; L’utilisation d’autres ac-; GARANTIE LIMITÉE -
10 AVERTISSEMENT Pour minimiser les risques de blessures ou de dom - mages à l'outil, n'immergez jamais l'outil, la bat - terie ou le chargeur et ne laissez pas de liquide s'y infiltrer. Nettoyage Débarrassez les évents des débris et de la poussière. Gardez les poignées propres, à sec et exemptes d’...
Page 11 - ADVERTENCIA
11 ADVERTENCIAS DE SEGURIDAD GENERALES PARA LA HERRAMIENTA ELÉCTRICA ADVERTENCIA Lea todas las advertencias de seguridad, instrucciones, ilustraciones y especificaciones con esta her - ramienta eléctrica. Si no sigue todas las adverten- cias e instrucciones, se pueden provocar una des- carga eléctri...
Page 13 - Como se inserta/quita la batería en la; Cómo Colocar y Desmontar Accesorios; OPERACION; Uso del accionador Drive Control
13 ESPECIFICACIONES Voltios ........................................................... 18 CD Tipo de batería ............................................. M18™ Tipo de cargador .......................................... M18™ Ambiente recomendado Temperatura de operación .............. 0 °F a 125 °F...
Page 14 - MANTENIMIENTO; Mantenimiento de las herramientas; Limpieza; ACCESORIOS
14 Utilización del interruptor de control El interruptor de control se puede colocar en tres posiciones diferentes: avance, retroceso y bajo se - guro. Debido a un mecanismo de traba, el interruptor de control se puede cambiar de posición únicamente cuando el interruptor de ENCENDIDO/APAGADO no esté...
Page 15 - SOPORTE DE SERVICIO - MEXICO; CENTRO DE ATENCION A CLIENTES; Av. Presidente Masarik 29 Piso 7; PÓLIZA DE GARANTÍA - VALIDA
15 SOPORTE DE SERVICIO - MEXICO CENTRO DE ATENCION A CLIENTES Techtronic Industries Mexico, S.A. de C.V. Av. Presidente Masarik 29 Piso 7 11560 Polanco V Seccion Miguel Hidalgo, Distrito Federal, México 01 (800) 030-7777 o (55) 4160-3540 Lunes a Viernes (9am a 6pm) O contáctanos en www.milwaukeetool...
Page 16 - MILWAUKEE TOOL
58140070d3 961012206 03(C) 06/17 Printed in China MILWAUKEE TOOL 13135 West Lisbon Road Brookfield, WI 53005 USA