Page 2 - WARNING; READ ALL INSTRUCTIONS; WORK AREA SAFETY
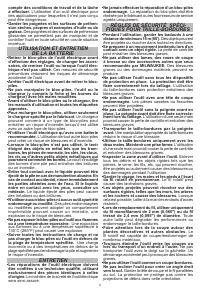
2 IMPORTANT SAFETY INSTRUCTIONS WARNING Read all safety warnings, instruc- tions, illustrations and specifica - tions provided with this power tool. Failure to follow all instructions listed below may result in electric shock, fire and/or serious injury. Save all warnings and in- structions for futu...
Page 3 - READ AND SAVE ALL
3 •Turn off power tool before removing battery pack. • Do not handle battery pack, tool, or charger (including charger plug and terminals) with wet hands. •Before using the battery pack or charger read the operator’s manuals, and any labels on the battery pack, charger and tool. • Recharge only with...
Page 4 - SYMBOLOGY; FUNCTIONAL DESCRIPTION; guard in place. The guard must be; Installing the Guard; handle must be attached properly for use when; Installing the Front Handle
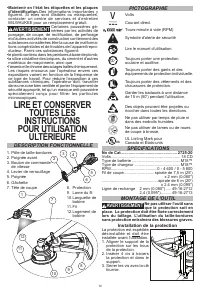
4 SYMBOLOGY Volts Direct Current RPM Safety Alert Symbol Read Operator's Manual Always wear eye protection and hearing protection. Always wear gloves and personal protective equipment. Always wear protective clothing and footwear Minimum 50’ 15m Keep bystanders 50' away during use. Objects may be th...
Page 5 - Adjusting the Cutting Diameter; Recharge only with the charger; Removing/Inserting the Battery; remove; changing or removing accessories.; MILWAUKEE. Serious injury or product damage; Replacing the Cutting Line; Selecting the Speed
5 Adjusting the Cutting Diameter 14” 16” 14” 16” To change the cutting diameter from 14" to 16": 1. Remove the battery pack. 2. Remove the two screws holding the line cut-off blade. 3. Rotate the blade 180° and reinstall the screws. Tighten securely. WARNING Recharge only with the charger sp...
Page 6 - OPERATION; MAINTENANCE; Gearcase Lubrication; ACCESSORIES
6 OPERATION WARNING To reduce the risk of injury, always wear safety goggles or glasses with side shields. Do not operate the tool without the guard in place. The guard must be attached properly when trim - ming. Operating the trimmer without the guard will cause serious injury. Use both hands when ...
Page 7 - SERVICE - UNITED STATES; or visit; LIMITED WARRANTY; CENTRAL AMERICA & CARIBBEAN
7 SERVICE - UNITED STATES 1-800-SAWDUST (1.800.729.3878) Monday-Friday, 7:00 AM - 6:30 PM CST or visit www.milwaukeetool.com Contact Corporate After Sales Service Technical Support with technical, service/repair, or warranty questions. Email: [email protected]B e c o m e a H e a v y D u t y C l u b ...
Page 8 - AVERTISSEMENT
8 RÈGLES DE SÉCURITÉ GÉNÉRALES RELATIVES AUX OUTILS ÉLECTRIQUES AVERTISSEMENT Lire toutes les consignes de sécurité, consignes, illustrations et spécifications fournies avec cet outil électrique. Ne pas suivre l’ensemble des règles et instructions peut entraîner une électrocution, un incendie ou des...
Page 10 - Maintenir en l’état les étiquettes et les plaques; LIRE ET CONSERVER; DESCRIPTION FONCTIONNELLE; SPECIFICATIONS; Ne pas utiliser l'outil sans; Installation de la protection
10 • Maintenir en l’état les étiquettes et les plaques d’identification. Des informations importantes y figurent. Si elles sont illisibles ou manquantes, contacter un centre de services et d’entretien MILWAUKEE pour un remplacement gratuit. • AVERTISSEMENT Certaines poussières gé - nérées par les ac...
Page 11 - Installation de la poignée avant; Insertion/Retrait de la batterie; Remplacement du fil de coupe; Sélection de la vitesse
11 AVERTISSEMENT Ne pas utiliser l'outil sans la poignée avant en place. La poignée avant doit être fixée correctement lors du taillage. L'utilisation d’une seule main pourrait causer la perte de contrôle de l'outil et entraîner des blessures graves. Installation de la poignée avant La poignée avant...
Page 12 - MANIEMENT; Coupe; ENTRETIEN; Entretien de l’outil
12 MANIEMENT AVERTISSEMENT Pour minimiser les risques de blessures, portez des lunettes à coques latérales. Ne pas utiliser l'outil sans que la protection soit en place. La protection doit être fixée correctement lors du taillage. L'utilisation du taille-bordures sans protection entraînera des bless...
Page 13 - Nettoyage; Gardez les poignées propres, à sec et exemptes; Réparations; Pour les réparations, retournez outil, batterie et; L’utilisation d’autres ac-
13 Nettoyage Débarrassez les évents des débris et de la poussière. Gardez les poignées propres, à sec et exemptes d’huile ou de graisse. Le nettoyage doit se faire avec un linge humide et un savon doux. Certains nettoyants tels l’essence, la térébenthine, les dilu- ants à laque ou à peinture, les so...
Page 14 - ADVERTENCIA
14 ADVERTENCIAS DE SEGURIDAD GENERALES PARA LA HERRAMIENTA ELÉCTRICA ADVERTENCIA Lea todas las advertencias de seguridad, instrucciones, ilus- traciones y especificaciones con esta herramienta eléctrica. Si no sigue todas las advertencias e instruc - ciones, se pueden provocar una descarga eléctrica...
Page 16 - SIMBOLOGÍA; ESPECIFICACIONES; No opere la herramienta sin; Instalar el protector; debe
16 • plomo de pintura basada en plomo • dióxido de silicio de los ladrillos y el cemento y otros productos de albañilería y • arsénico y cromo de madera con tratamiento químico. Su riesgo por estas exposiciones varía, dependiendo de la frecuencia con que realice este tipo de trabajo. Para reducir su...
Page 17 - Instalar el mango frontal; Como se inserta/quita la batería en la; Reemplazar la línea de corte
17 ADVERTENCIA No opere la herramienta sin el mango frontal en su sitio. El mango frontal debe estar sujetado correcta - mente a la hora de bordear. Usar una mano podría causar la pérdida de control y resultar en lesiones graves. Instalar el mango frontal El mango frontal se envía sin instalar y deb...
Page 18 - Seleccionar la velocidad; OPERACION; Bordeado; MANTENIMIENTO; Mantenimiento de las herramientas
18 Seleccionar la velocidad Use el botón de control de velocidad para seleccionar velocidades Baja (1) o Alta (2). Use velocidad baja para trabajos más grandes donde se necesita la vida extendida de la batería. Use la velocidad alta para aplicaciones de vegetación densa. OPERACION ADVERTENCIA Para r...
Page 19 - ACCESORIOS; Utilice sólo los accesorios; SOPORTE DE SERVICIO - MEXICO; CENTRO DE ATENCION A CLIENTES; PÓLIZA DE GARANTÍA - VALIDA
19 Limpieza Limpie el polvo y suciedad de las ventilas. Man - tenga los mangos limpios, secos y libres de aceite o grasa. Use solo jabón neutro y un trapo húmedo para limpiar, ya que algunos substancias y solventes limpiadores son dañinos a los plásticos y partes aislantes. Algunos de estos incluyen...
Page 20 - MILWAUKEE TOOL
58140064d2 961016146-02(A) 10/16 Printed in China MILWAUKEE TOOL 13135 West Lisbon Road Brookfield, WI 53005 USA