Page 3 - Contents
Contents 3 Notes about these instructions ................................................................................. 6 Operating steps .............................................................................................................. 6 IMPORTANT SAFETY INSTRUCTIONS ..................
Page 4 - Timer
Contents 4 Operation ........................................................................................................................ 49 Turning on the dishwasher ............................................................................................ 49 Selecting a program ................
Page 5 - Language
Contents 5 INSTALLATION INSTRUCTIONS .............................................................................. 85 Electrical connection .................................................................................................... 86 Plumbing .................................................
Page 6 - Notes about these instructions; Warnings; Select the setting you want and press; Display; or
Notes about these instructions 6 Warnings Warnings important for safety are highlighted like this. This alerts you to the potential danger of injury to people or damage to property.Read the warnings carefully and follow the instructions and directions. Notes Notes contain information that is parti...
Page 7 - IMPORTANT SAFETY INSTRUCTIONS; APPROPRIATE USE
IMPORTANT SAFETY INSTRUCTIONS 7 APPROPRIATE USE This Commercial Dishwasher complies with all current local andnational safety requirements. Inappropriate use can, however, leadto personal injury and material damage.WARNING:When using your dishwasher, follow basic precautions, includingthe following:...
Page 8 - This dishwasher can only be used by people with reduced physical,
IMPORTANT SAFETY INSTRUCTIONS 8 This dishwasher can only be used by people with reduced physical, sensory or mental capabilities, or lack of experience or knowledge, ifthey are supervised while using it or have been shown how to use itin a safe way and understand and recognize the consequences of ...
Page 9 - Proper installation
IMPORTANT SAFETY INSTRUCTIONS 9 Proper installation Do not install the machine in an area where a danger of explosion or of freezing temperatures may be present. Be careful when installing the dishwasher. Wear protective gloves to avoid injury on any sharp metal components. To ensure the stabi...
Page 12 - Correct use
IMPORTANT SAFETY INSTRUCTIONS 12 Correct use This dishwasher is designed for operation with water and cleaning agents suitable for use in dishwashers only. Organic solvents andflammable liquid agents must not be used. This could cause an explosion, damage rubber or plastic componentsin the dishwas...
Page 14 - Children in the vicinity
IMPORTANT SAFETY INSTRUCTIONS 14 Children in the vicinity Children should be supervised in the vicinity of the dishwasher. Never allow children to play with the dishwasher. There is a dangerthat children might shut themselves in the dishwasher. Children must be kept away from the dishwasher unle...
Page 15 - Accessories; SAVE THESE INSTRUCTIONS
IMPORTANT SAFETY INSTRUCTIONS 15 Accessories Only use original Miele accessories. Using parts or accessories from other manufacturers will invalidate the warranty, and Miele can-not accept liability. Miele will guarantee to supply functional spare parts for a mini- mum of 10 years and up to 15 y...
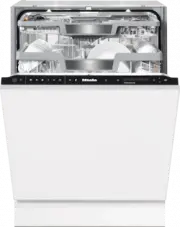
Page 16 - Machine description; Machine overview
Machine description 16 Machine overview a Upper spray arm b 3D MultiFlex Tray c Upper basket d Middle spray arm e Ventilation f Bottom spray arm g Filter combination h Salt reservoir i Data plate j Rinse aid reservoir k Detergent compartment
Page 17 - Control field; OK
Machine description 17 Control field a On/Off sensor button For turning the dishwasher on and off. b In-operation indicator lightFor indicating an ongoing wash pro-gram when the door is closed. c Remote start sensor button For activating /deactivating the Re-mote start option. d Program selec...
Page 18 - Display functions
Machine description 18 Display functions The display is used to select or set thefollowing: - the program- the timer- the Settings The display can show the following: - the program stage- the estimated time left for the pro- gram to run - the water consumption (EcoFeed- back) - any relevant fault ...
Page 19 - Caring for the environment; Disposal of the packing material
Caring for the environment 19 Disposal of the packing material The cardboard box and packing materi-als protect the appliance during ship-ping. They have been designed to bebiodegradable and recyclable.Ensure that any plastic wrappings, bags,etc. are disposed of safely and kept outof the reach of ch...
Page 20 - Initial commissioning; Basic settings; Turning on the dishwasher; Setting up Miele@home
Initial commissioning 20 Basic settings Turning on the dishwasher Open the door. Turn the dishwasher on using the sensor button. The welcome screen will appear whenthe dishwasher is turned on and thewelcome melody will sound. For further information about the dis-play functionality, see “Disp...
Page 21 - Setting the time; Setting water hardness
Initial commissioning 21 Setting the time The time is updated automatically if aconnection is established with theWiFi network. The display will then change to thescreen for setting the time.The current time of day must be set be-fore you can use the timer option. Use the sensor buttons to ent...
Page 23 - Availability of the WiFi connection; Miele app
Initial commissioning 23 Availability of the WiFi connection The Wi-Fi connection shares a fre-quency range with other appliances (in-cluding microwave ovens and remotecontrol toys). This can cause sporadic oreven complete connection failures.Therefore, the availability of featuredfunctions cannot b...
Page 24 - Opening the door; The door will open a little.
Initial commissioning 24 Every dishwasher is tested at the fac-tory. There will be residual water in themachine from this test. It is not an in-dication that the dishwasher has beenused previously. Opening the door In some programs, the door automati-cally opens slightly to assist the dryingprocess....
Page 25 - Closing the door
Initial commissioning 25 Door-opening aid If the door will not open when knockedor if there is a power failure, the doorcan be opened manually with the door-opening aid supplied with the dish-washer. 1 2 Push the door-opening aid into thegap between the dishwasher frontand the neighboring unit doo...
Page 26 - Reactivation salt; Damage caused by using unsuit-; not
Initial commissioning 26 Reactivation salt In order to achieve good cleaning re-sults, the dishwasher needs to operatewith soft water. Hard water results inthe build-up of calcium deposits ondishes and on the inner surfaces of themachine. Tap water with a water hardness levelhigher than 5.2 gr/gal (...
Page 27 - Filling the salt reservoir; When the refill reminder; Confirm with
Initial commissioning 27 Filling the salt reservoir Before filling the salt reservoir for thefirst time, you must fill it with approx.2 l of water to enable the salt to dis-solve.Once the dishwasher has been usedonce, there is always sufficient waterin the salt reservoir. Remove the lower basket f...
Page 28 - Rinse aid; Liquid dish soap or detergent can
Initial commissioning 28 Rinse aid Rinse aid is necessary to ensure thatwater does not cling and leave marks ondishes during the drying phase, andhelps dishware dry faster after it hasbeen washed. Rinse aid is poured into the containerand the amount set is dispensed auto-matically. Liquid dish soa...
Page 29 - Adding rinse aid
Initial commissioning 29 Adding rinse aid Press the yellow button on the lid of the rinse aid reservoir. The lid will spring open. Fill with rinse aid until the filling levelindicator (arrow) changes to a darkcolor while the door is horizontallyopen. The rinse aid reservoir holds approxi-mate...
Page 30 - Energy-saving dishwashing; Economy
Caring for the environment 30 Energy-saving dishwashing This dishwasher is exceptionally eco-nomical in its use of water and electric-ity. You can make the most of your machineby following these tips: - Washing in a dishwasher generally uses less water and energy thanwashing by hand. - There is no n...
Page 31 - Estimated consumption
Caring for the environment 31 EcoFeedback consumption dis-play The “Consumption” function is used forcalling up information about the waterconsumption of your dishwasher (see“Consumption” under “Settings”).The following information can be shownon the display: - an estimate of the consumption be- for...
Page 32 - Loading the dishwasher; General information; Damage can be caused by ash,
Loading the dishwasher 32 General information Remove coarse food residues fromdishes.There is no need to pre-rinse items un-der running water. Damage can be caused by ash, sand, wax, lubricating grease, orpaint.These substances will contaminatethe dishwasher and can then nolonger be removed.Do not...
Page 33 - Silver
Loading the dishwasher 33 Wash items not suitable for dishwash-ers: - Wooden cutlery and dishes or items with wooden parts. These may dis-color and fade. The glue used in theseitems is not dishwasher-safe andwooden handles may come loose af-ter being washed in a dishwasher. - Craft items, antiques, ...
Page 34 - Upper basket; Loading the upper basket; Risk of damage due to water; Loading the FlexCare cup rack; Lower the cup rack to do so.
Loading the dishwasher 34 Upper basket See “Loading examples” under “Load-ing the dishwasher ” for examples ofhow to load dishware and utensils. Loading the upper basket Risk of damage due to water leakage.If you run the dishwasher without theupper basket, water can leak out ofthe dishwasher.Only ...
Page 35 - Adjusting the FlexCare cup rack
Loading the dishwasher 35 Adjusting the FlexCare cup rack You can set the height and depth of thecup rack at 2 different levels so that itcan accommodate larger cups and sothat taller items can be placed under-neath it. Pull the cup rack upwards and click itinto the desired position (see arrow). L...
Page 36 - Lowering the spikes; Press the yellow lever downwards
Loading the dishwasher 36 Lowering the spikes On both right-hand rows of spikes, youcan lower every other spike to make iteasier to arrange larger dishes, like ce-real bowls. 1 2 Press the yellow lever downwards , and then lower the dark grayspikes . Place the bowls vertically in the rowof...
Page 37 - Adjusting the upper basket; Pull out the upper basket.; To raise the upper basket:; Lift the basket until it clicks into place.; To lower the upper basket:
Loading the dishwasher 37 Adjusting the upper basket In order to gain more space for talleritems, the upper basket can be adjustedon 3 levels with 3/4 inches (2 cm) be-tween each level.The upper basket can also be set at anangle so that water can run off freelyfrom recesses. Make sure, however, that...
Page 38 - Lower basket; Loading the lower basket; When tilted, plates up to
Loading the dishwasher 38 Lower basket See “Loading examples” under “Load-ing the dishwasher ” for examples ofhow to load dishware and utensils. Loading the lower basket Place larger and heavier items such asplates, serving platters, saucepans,bowls, etc., in the lower basket. Glasses, cups, and s...
Page 39 - Fold up the MultiClips.
Loading the dishwasher 39 Loading the FlexCare glass holder withMultiClips The silicone elements in the glassholder provide a stable and secure holdfor delicate stemware. Stemware such as wine glasses,champagne flutes, and beer glassescan be leaned against the glass holderor suspended from it. T...
Page 40 - Loading the glassware rail; and fold
Loading the dishwasher 40 Loading the glassware rail This rail is designed to hold tall glassesand glasses with stems securely. Lower the rail and lean tall glassesagainst it. Lowering the bottle holder The bottle holder can be used to keepnarrow items such as milk and babybottles secure during a ...
Page 41 - Cutlery tray; Loading the 3D MultiFlex Tray
Loading the dishwasher 41 Cutlery tray See “Loading examples” under “Load-ing the dishwasher ” for examples ofhow to load dishware and utensils. Load the utensils into the 3D Multi-Flex Tray. Loading the 3D MultiFlex Tray To make unloading easier, cutlery shouldbe grouped in zones, one for knives,...
Page 42 - Loading examples; Dishwashers with cutlery tray
Loading the dishwasher 42 Loading examples Dishwashers with cutlery tray Upper basket Lower basket
Page 44 - Loading for 10 standard place settings with cutlery tray
Loading the dishwasher 44 Loading for 10 standard place settings with cutlery tray Upper basket Lower basket Cutlery tray (depending on model)
Page 45 - Loading for 16 standard place settings with cutlery tray
Loading the dishwasher 45 Loading for 16 standard place settings with cutlery tray Upper basket Lower basket Cutlery tray (depending on model)
Page 46 - Detergents; Risk of chemical burns from de-
Detergents 46 Risk of chemical burns from de- tergent.Dishwasher detergents can causeburning on the skin and in the eyes,nose, mouth, and throat.Avoid contact with detergents. Do not inhale or ingest powder deter-gents. Do not swallow dishwasherdetergents. Seek medical attentionimmediately if dete...
Page 47 - Dispensing detergent
Detergents 47 Powder detergents and deter-gent tabs Use powder detergent or detergenttabs only in the door dispenser com-partment. Only use detergent tabs that arequick-dissolving.Suitable detergent tabs are availablefrom the Miele range. When usingcombination detergents (tabs that of-fer rinse aid ...
Page 48 - Adding detergent; Press the yellow button
Detergents 48 Adding detergent Press the yellow button on the lid of the detergent compartment. The lid will spring open. The lid will also open at the end of aprogram. Add the detergent to the detergentcompartment. Push the lid shut until you hear it clickinto place. The detergent must not...
Page 49 - Operation; Touch the; Selecting a program; Program overview; later on in this booklet.
Operation 49 Turning on the dishwasher Turn on the water supply if it is turnedoff. Open the door. Make sure the spray arms can rotatefreely. Touch the sensor button. If the dishwasher has been turned offfor longer than 1 minute, you will needto hold the sensor button for a bit longer ...
Page 50 - Display of program cycle time
Operation 50 Display of program cycle time The estimated duration of the selectedprogram appears on the display beforethe program begins. If the door isopened during the program, the timeleft until the end of the program is dis-played.Each program phase is indicated by asymbol: Pre-rinse/Soak Ma...
Page 51 - Program end; Risk of damage due to steam.; Energy management; sensor button for a bit longer
Operation 51 Program end At the end of a program, the in-opera-tion indicator light will be flashing slowlywith the door shut. The audible signalmay also be sounding.The in-operation indicator light will goout 10 minutes after the end of the pro-gram if the door is closed.The program has ended when ...
Page 52 - Turning off the dishwasher; Unloading the dishwasher
Operation 52 Turning off the dishwasher Open the door. The dishwasher can be turned off atany time using the sensor button. Confirm the query Turn appliance off with OK . Turning the dishwasher off during a pro-gram stops the program.You can also do this to stop an ongoingtimer. If you ha...
Page 53 - Interrupting a program
Operation 53 Interrupting a program A program will be interrupted as soon asthe door is opened.If the door is closed again within 4 sec-onds, the program will continue fromthe point it was at before the door wasopened after a few seconds.4 seconds after the door was opened,the following will appear ...
Page 54 - Options; Start; Time left
Options 54 Options Options can be selected and deselectedusing the appropriate buttons and thedisplay before starting the program. Open the door. Turn the dishwasher on by touchingthe sensor button. The Start sensor button flashes. Select a program. Press the button for the option youwan...
Page 55 - Activating the timer
Options 55 Timer The timer gives you several options for starting a program at a later time.The start or finish time of a program canbe delayed. You can also use the EcoStart or SmartStart functions to bene- fit from lower electricity rates at night. During manual detergent dispensing,the deter...
Page 56 - Setting “Start at”; Setting “Finish at”
Options 56 Setting “Start at” With the Start at function, you set the exact time at which you want the pro-gram to start. Use the sensor buttons to enter the hour and confirm your entry with OK . The hour will be saved and the minutenumber block will be highlighted. Use the sensor button...
Page 57 - Setting EcoStart; Setting SmartStart
Options 57 Setting EcoStart The EcoStart function enables you to benefit from cheaper electricity rates atnight. Before you can use this option,you need to set up to 3 electricity-ratetime zones (see “EcoStart” under “Set-tings”). Then set the time by which the selectedprogram has to be finished.The...
Page 58 - Changing or deleting set times
Options 58 Set the time by which the selected pro-gram has to be finished. Use the sensor buttons to enter the hour and confirm your entry with OK . The hour will be saved and the minutenumber block will be highlighted. Use the sensor buttons to enter the minutes and confirm your entrywi...
Page 59 - Activating Remote start
Options 59 Activating Remote start You can start your dishwasher remotelyusing the Miele@mobile app. To do this,you first need to install the app on yourmobile device, connect the dishwasherto your WiFi network (see“Miele@home” under “Settings”), and,if applicable, activate the Remote control opt...
Page 60 - Program chart
Program chart 60 Program Application Detergents The following dosages are based on Miele detergents. Please follow manufacturer’s instructions. Detergent compartment 1) QuickIntense-Wash For fresh, non-sticky food residues. 20–25 g or 1 detergent tab Universal For normal, slightly dried food ...
Page 63 - Cleaning and care; at least once a year; Cleaning the wash cabinet
Cleaning and care 63 USER MAINTENANCE IN-STRUCTIONS To prolong the service life of the dish-washer, maintenance should be carriedout at least once a year by Miele Cus- tomer Service. Maintenance covers the following: - Electrical safety according to national regulations - Door mechanism and door sea...
Page 64 - Cleaning the control panel; The control panel should; only; be; Cleaning the reflector panel; Damage due to soiling.
Cleaning and care 64 Cleaning the door and the doorseal The door seal and the sides of the dish-washer door are not accessed andcleaned by the spray arm jets. Wipe off any food or drink residueswhich may have dripped onto thesides and seals of the dishwasherdoor with a damp cloth on a regularbasis...
Page 65 - - cleaning agents containing lime scale
Cleaning and care 65 To avoid damaging the external sur-faces, do not use the following: - cleaning agents containing soda, am- monia, acids, or chloride - cleaning agents containing lime scale remover - abrasive cleaning agents, such as scouring powder, scouring liquid, orpumice stones - cleaning a...
Page 66 - Cleaning the spray arms; Damage due to soiling entering; Removing the lower spray arm; Remove the lower basket.
Cleaning and care 66 Cleaning the spray arms Particles of food can get stuck in thespray arm jets and bearings. The sprayarms should therefore be inspected reg-ularly (approx. every 2–4 months). Damage due to soiling entering the circulation system.Without filters, soiling can enter thecirculation...
Page 68 - Cleaning the filters
Cleaning and care 68 Checking the filters in the washcabinet The filter combination in the base of thewash cabinet retains coarse soil fromthe suds solution. This prevents soilinggetting into the circulation system andre-entering the wash cabinet throughthe spray arms. Damage due to soiling enteri...
Page 70 - Cleaning the water-inlet filter; Risk of electric shock from volt-; Never; forget to put the filter back in
Cleaning and care 70 Cleaning the water-inlet filter A filter is incorporated in the screw con-nection to protect the water-intakevalve. If the filter is soiled, insufficientwater flows into the wash cabinet. Risk of electric shock from volt- age.The plastic housing of the water con-nection contai...
Page 71 - Cleaning the drain pump
Cleaning and care 71 Cleaning the drain pump If water remains in the wash cabinet af-ter the end of a program, the water hasnot been pumped away. The drain pumpmay be blocked by foreign objects.These foreign objects are easy to re-move. Disconnect the dishwasher from thepower supply. To do this, t...
Page 72 - Risk of injury from glass splinters.
Cleaning and care 72 The drain pump (see arrow) is under-neath the cover. Risk of injury from glass splinters. It is especially difficult to see glasssplinters in the drain pump.Take care when cleaning the drainpump. Carefully remove all foreign objectsfrom the drain pump. Check the drainpump im...
Page 73 - Troubleshooting; Technical faults; Problem
Troubleshooting 73 With the aid of the following guide, most minor problems can be corrected withoutcontacting Miele. You can save time and money in many cases, as you do not needto contact Miele Customer Service.The following guide should help you to find the reason for a malfunction or fault,and t...
Page 74 - Fault messages
Troubleshooting 74 Fault messages Problem Possible cause and solution The in-operation indica-tor light is flashingquickly. The alarm tone is sound-ing. One of the followingfaults appears in the dis-play: Before remedying the fault: Turn off the dishwasher. Fault FXX There may be a technical f...
Page 75 - Door release; Before remedying the fault:
Troubleshooting 75 Door release Problem Possible cause and solution The in-operation indica-tor light is flashingquickly. The alarm tone is sound-ing. The following fault is in-dicated via the display: Before remedying the fault: Turn off the dishwasher. F33 The door does not open automaticall...
Page 76 - Water intake fault
Troubleshooting 76 Water intake fault Problem Possible cause and solution The in-operation indica-tor light is flashingquickly. The alarm tone is sound-ing. One of the followingmessages appears in thedisplay: Open water supply The water supply faucet is turned off. Open the water-supply faucet...
Page 77 - Water drainage fault
Troubleshooting 77 Water drainage fault Problem Possible cause and solution The in-operation indica-tor light is flashingquickly. The alarm tone is sound-ing. The following messageappears in the display: Drain Before remedying the fault: Turn off the dishwasher. Water-drainage fault.There migh...
Page 78 - General dishwasher problems
Troubleshooting 78 General dishwasher problems Problem Possible cause and solution The door will not openwhen knocked. The Knock2open function has been permanently dis- abled. Turn the door-opening function on again (see”Knock2open” under “Settings”). If the door still will not open or if there is...
Page 80 - Noises; A spray arm is knocking against a wash item.
Troubleshooting 80 Noises Problem Possible cause and solution There is a knockingnoise in the wash cabi-net. A spray arm is knocking against a wash item. Carefully open the door and rearrange the washitems that are obstructing the spray arm. There is a rattling noisein the wash cabinet. Wash items...
Page 81 - Poor cleaning results
Troubleshooting 81 Poor cleaning results Problem Possible cause and solution The dishes are not clean. The dishes were not loaded correctly. See notes under “Loading the dishwasher ”. The program was not powerful enough. Select a more powerful program (see “Programoverview”). Not enough detergen...
Page 82 - Ingredients from the detergent have formed a deposit.
Troubleshooting 82 Problem Possible cause and solution The dishware is not dryor utensils and glassesare flecked. The rinse-aid dosage is set too low or the rinse-aidreservoir is empty. Replenish the reservoir, increase the dosage, orchange the brand of rinse aid (see “Rinse aid” under“Before usin...
Page 84 - Miele Service; Contact in the event of a fault
Miele Service 84 Contact in the event of a fault In the event of a fault which you cannotremedy yourself, please contact yourMiele dealer or Miele Customer Service. You can book a Miele Customer Ser-vice call-out online at www.miele.com/service or www.miele.ca/service.Contact information for Miele C...
Page 85 - INSTALLATION INSTRUCTIONS
INSTALLATION INSTRUCTIONS 85 Please refer to the Installation Diagram supplied with these instructions.To comply with IEC sound testing protocols, please contact Miele for additionalinstructions. Information is subject to change. Please refer to our website to obtain the mostcurrent product specific...
Page 86 - Electrical connection; data plate
Electrical connection *INSTALLATION* 86 Electrical connection All work on the electrical connec- tion must be carried out by MieleCustomer Service, an authorizedMiele dealer, or a qualified electri-cian. - The electrical installation must be in compliance with current local and na-tional safety re...
Page 87 - Plumbing; The Miele Waterproof system; Water in the dishwasher must
Plumbing *INSTALLATION* 87 The Miele Waterproof system Provided your dishwasher has been in-stalled correctly, the Miele Waterproofsystem will provide extensive protectionagainst water damage throughout itslifetime. Water inlet Water in the dishwasher must not be used as drinking water. - The dish...
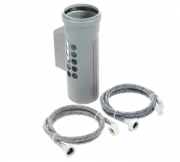
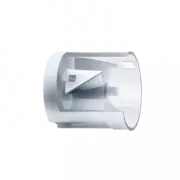
Page 88 - To avoid any damage to the ma-
Plumbing *INSTALLATION* 88 To avoid any damage to the ma- chine, the dishwasher must only beconnected to fully vented pipework. The intake hose must not be shortened or damaged in any way asit contains electrical components(see illustration).
Page 89 - Tall-unit installation
Plumbing *INSTALLATION* 89 Connecting the water drainagesystem - The machine drainage system has a non-return valve, which prevents dirtywater from flowing back into the dish-washer via the drain hose. - The dishwasher drainage hose should be connected to a separate on-sitedrain for the dishwasher o...
Page 90 - Technical details
Technical details 90 Imperial Metric Height of freestanding model - Height of built-in model 33 1/4"(adjustable + 2 9/16") 845 mm(adjustable + 65 mm)) Installation height From 33 1/4" (adjustable +2 9/16") From 845 mm(adjustable + 65 mm) Width 23 9/16" 598 mm Installation width 2...
Page 91 - Settings; Opening the Settings menu
Settings 91 You can alter the dishwasher ’s controlsto suit changing requirements by ad-justing the settings.The settings can be altered at anytime. Opening the Settings menu Turn the dishwasher on with the sensor button if it is turned off. Touch the Settings sensor button. The first op...
Page 92 - Time of day; Setting the clock format
Settings 92 Language The display can be set to appear in oneof several different languages.You can change the language used inthe display and also the country via the Language submenu. The flag after the word Language serves as a guide if a language that youdo not understand has been set.I...
Page 93 - Water hardness; - The dishwasher must be programmed
Settings 93 Water hardness Your dishwasher is fitted with a watersoftener. - The dishwasher must be programmed to the correct water hardness for yourarea. - Your local water authority will be able to advise you of the water hardnesslevel in your area. - Where the water hardness fluctuates, e.g., b...
Page 94 - Rinse Aid; High-temperature final rinse
Settings 94 Rinse Aid You can adjust the rinse-aid dosage forbest results. The rinse-aid dosage can be set from 0to 6 ml. 3 ml is the factory default setting.The rinse-aid dosage can turn out to behigher than the set value due to the au-tomatic adjustment of the program.If stains appear on dishwar...
Page 95 - Your WiFi router must support WPS.; with
Settings 95 Miele@home Your dishwasher is equipped with an in-tegrated WiFi module.You can connect your dishwasher toyour WiFi network. This will increase the energy consump-tion, even when the dishwasher isturned off.The Settings and Miele@home settingsmenus will be added as additional menuoption...
Page 98 - Network configuration; If you wish to permanently turn off the; option, you can do this; option is; RemoteUpdate; Activating /deactivating
Settings 98 Network configuration You can use this menu option to resetall WiFi module settings (if available) tothe factory default settings.The network configuration should be re-set whenever a dishwasher is being dis-posed of or sold, or if a used dishwasheris being put into operation. This is ...
Page 99 - Running a RemoteUpdate
Settings 99 Running a RemoteUpdate Information about the content andscope of a RemoteUpdate will be pro-vided in the Miele app. A message will appear in your dish-washer display if a software update isavailable.You can install the update immediatelyor postpone this until later. When themachine is ...
Page 100 - Setting the electricity-rate times
Settings 100 EcoStart In order to run your dishwasher in themost economical way, you can use the EcoStart option to take advantage of your electricity supplier ’s cheaper en-ergy tariffs (see “Timer ” under “Op-tions”). With this option selected, your dish-washer will start automatically at yourel...
Page 101 - Changing the electricity rate times
Settings 101 Changing the electricity rate times You can change the start, finish, or prior-ity of an electricity rate time. Use the sensor buttons to select an electricity tariff time T1–T3 thatyou wish to change and confirm with OK . Select the setting you want to changeand confirm with ...
Page 102 - Displaying Consumption; Displaying Total consumption; Display brightness
Settings 102 Consumption (EcoFeedback) You can set whether the water con-sumption is displayed for the selectedprogram. This function shows the esti-mated consumption before a programsequence and the actual consumptionafter the end of the program. In this menu you can also call up the to-tal consu...
Page 103 - Volume; Audible signals in the event of a fault; sensor; Welcome melody; Refill reminders
Settings 103 Volume A sequence of audible signals will soundat the end of the program or if there is afault, provided that the audible signalshave been activated. Audible signals in the event of a fault In the event of a fault, the alarm tonewill sound 4 times at intervals with ashort pause betwee...
Page 104 - AutoOpen; For demonstration purposes only.; Factory default; Machine settings
Settings 104 AutoOpen In some programs, the door automati-cally opens slightly to assist the dryingprocess.This function can be deactivated if youwish. Risk of damage due to steam. Steam from the dishwasher coulddamage the edges of delicate coun-tertops when you open the door atthe end of the pr...
Page 105 - Sound emission tests; Prerequisites for sound emission tests; Load the dishwasher with; 6 standard place settings; and use the; Setup for sound emission tests; XXL; Install the dishwasher into an analyzing unit.
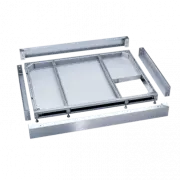
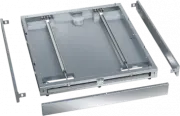
Sound emission tests 105 Prerequisites for sound emission tests Load the dishwasher with 16 standard place settings and use the ECO program. Setup for sound emission tests The dishwasher must be set up according to the following specifications. 81 0 mm 860 mm 5/1 6” 31 7/8” 33 7/8” 8 mm XXL Instal...
Page 107 - Push the insulating strip into the front top edge of the toe-kick
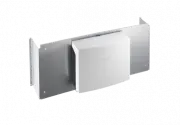
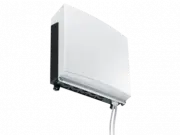
Sound emission tests 107 Remove the protective film from the provided insulating strip (depending onmodel) . Push the insulating strip into the front top edge of the toe-kick .
Page 108 - Canada; Technical Service & Support
Please have the model and serial numberof your machine available whencontacting Technical Service. U.S.A. Miele, Inc. National Headquarters ImporterMiele Limited Professional Division Miele ProfessionalTechnical Service Phone: 1-888-325-3957[email protected] Canada 161 Four Valley DriveVaughan, ON L...


 Miele APWM 063
Installation Manual
Miele APWM 063
Installation Manual
 Miele APWM 066
Installation Manual
Miele APWM 066
Installation Manual
 Miele UO 811-30
Installation Manual
Miele UO 811-30
Installation Manual
 Miele UO 413-30
Installation Manual
Miele UO 413-30
Installation Manual
 Miele UO 814-25
Installation Manual
Miele UO 814-25
Installation Manual
 Miele UO 818/418-25
Installation Manual
Miele UO 818/418-25
Installation Manual
 Miele APCL 043
User Manual
Miele APCL 043
User Manual
 Miele APWM 062
Installation Manual
Miele APWM 062
Installation Manual
 Miele APWM 065
Installation Manual
Miele APWM 065
Installation Manual
 Miele APWM 070
Installation Manual
Miele APWM 070
Installation Manual
 Miele APWM 069
Installation Manual
Miele APWM 069
Installation Manual
 Miele APWM 020
Installation Manual
Miele APWM 020
Installation Manual
 Miele SC
Installation Manual
Miele SC
Installation Manual
 Miele PR
Installation Manual
Miele PR
Installation Manual
 Miele FP 900
Installation Manual
Miele FP 900
Installation Manual
 Miele RP 900
Installation Manual
Miele RP 900
Installation Manual
 Miele APCL 046
User Manual
Miele APCL 046
User Manual
 Miele APCL 047
User Manual
Miele APCL 047
User Manual
 Miele APWM 019
Installation Manual
Miele APWM 019
Installation Manual