Page 2 - Contents
IMPORTANT SAFETY INSTRUCTIONS . . . . . . . . . . . . . . . . . . . . . . . . . . . . . . . . . 4 Guide to the Wine Storage Unit . . . . . . . . . . . . . . . . . . . . . . . . . . . . . . . . . . . . . . 7 Before use . . . . . . . . . . . . . . . . . . . . . . . . . . . . . . . . . . . . . . . . . ...
Page 4 - Electrical safety; IMPORTANT SAFETY INSTRUCTIONS
When using the appliance, follow basicsafety precautions, including thefollowing: Read all instructions before installationand use to prevent accidents andmachine damage. This appliance is intended forresidential use only. Use only asdescribed in this Operating manual. Only use the appliance for its...
Page 6 - Disposal of your old appliance
Disposal of your old appliance ~ Before disposing of an old appliance, first make the door latch orlock unusable. ~ Take off the doors. ~ Leave the shelves in place so that children may not easily climb inside. ~ Consult with your municipal policy on recycling. ~ Be careful not to damage any part of...
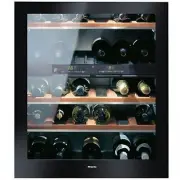
Page 7 - Guide to the Wine Storage Unit
a Interior lighting b Insulation shelf for thermal separation c Wooden shelf with decorative strip for descriptive labels d Active charcoal filter e Condensate channel and drain hole Guide to the Wine Storage Unit 7
Page 8 - Control panel
Control panel a On/Off s button b Temperature display for upper zone c Temperature selector buttons forupper zone( + for warmer; - for colder) d Constant humidity (Dynamic cooling)button and indicator light e Safety lock indicator light f Off button for Alarm g Temperature display for lower zone h T...
Page 9 - Turning the appliance off; Before use
Before using for the first time ^ Clean the inside of the appliance andthe accessories with a mild solutionof warm water and liquid dish soap.Dry with a soft cloth. If the appliance was transported orlaid horizontally for any reason, allowit to stand vertical for at least 8 hoursbefore turning it on...
Page 10 - Temperature; Safety feature; Optimum temperature and air quality
Wine will continue to mature dependingon the surrounding conditions. Thelength of time which wine can be keptin good condition will therefore dependnot only on the temperature but also onthe air quality. The wine storage unit provides aconstant temperature, increasedhumidity and an odor-free environ...
Page 11 - Setting the temperature; last
^ Press the temperature selector (+/-)buttons for the upper zone to selecteither Fahrenheit °F or Celsius °C : ^ To save the setting, press theconstant humidity button. ^ To exit the settings mode, press theOn/Off button. Otherwise, theelectronics will automatically return tonormal mode after approx...
Page 12 - Temperature display; temperature display will flash
Temperature display During normal operating, thetemperature displays indicate thetemperatures inside the unit. The temperature display will flash if: – a different temperature is being set, – the temperature in one section deviates from the set temperature bymore than 5 °. Setting the temperaturedis...
Page 13 - Humidity; Turning on
Humidity In a conventional refrigerator, thehumidity levels are too low for storingwines. High humidity levels (60 - 70 %)are very important for the storage ofwine, so that the corks remain moist.Under low humidity, the corks dry outfrom the outside and can no longer sealthe bottles properly. This i...
Page 15 - Interior lighting
Do not remove the light covers forthe display lighting. Should thelighting covers be damaged or needto be removed due to damage, donot look directly or with an opticalinstrument at the lighting. Turning on the interior lighting Generally, wine should be stored indark conditions. However, the interio...
Page 16 - Storing wine bottles
Storage tips – Always unpack bottles – do not store wine in crates or boxes. – Any vibration or movement of a wine bottle can interrupt the naturalbreathing process of the wine, whichaffects the taste. – Always lay bottles on their side for storage. This keeps the corks moistfrom the inside, prevent...
Page 17 - Temperature alarm; Door alarm; Alarm
The appliance is equipped with analarm system, to ensure that thetemperature does not rise or fallunnoticed because of energy loss or anopen door. The alarm system is alwaysoperational, it does not need to beturned on. Temperature alarm An alarm will sound if the temperaturein one of the zones rises...
Page 18 - Safety Lock
The safety lock can be activated toprevent the appliance from beingturned off inadvertently. Activating / Deactivating the safetylock ^ Press and hold the constant humiditybutton for approx. 5 seconds. The constant humidity indicator light willflash, and ; will flash in the right-hand temperature di...
Page 19 - Defrosting
During normal operation, condensateand frost can form on the rear wall ofthe refrigerator and drawers.You do not need to remove thisbuild-up, it will defrost and evaporateautomatically with the heat generatedby the appliance. Defrosting 19
Page 20 - Before cleaning; Cleaning and care
To reduce the risk of electricalshock, disconnect the appliancefrom the power supply by shuttingoff the power main, tripping thecircuit breaker or unplugging thepower cord before maintenance. Never use cleaning agentscontaining abrasive substancessuch as sand, soda, acids, chloridesor chemical solve...
Page 22 - Frequently asked questions
With the aid of the following guide minor problems can be corrected without aservice call. Repairs should only be carried out by a qualified and trained person in strictaccordance with local and national safety regulations. Unauthorized repairscould cause personal injury or machine damage and may vo...
Page 23 - What if a bar is lit up or flashing in the temperature display?; What if the appliance cannot be turned off?; What if the interior lighting is not working?
What if a bar is lit up or flashing in the temperature display? Only temperatures within the range of the appliance display can be shown. If thetemperature is not within this range, a bar will be displayed instead. " F0 " or " F1 " appears in the temperature display. A fault has occu...
Page 25 - MieleCare; MieleCare; MieleCare; After sales service
In the event of a fault which you cannoteasily fix yourself, please contact theMiele Technical Service Department atthe address on the back of this booklet. When contacting the Technical Servicedepartment, please quote the modeland serial number of your appliancegiven on the data plate inside theapp...
Page 27 - Installation instructions; before
Installation instructions To prevent accidentsand machine damageread these instructions before installation or use.
Page 28 - Caring for the environment
Disposal of packing materials The cardboard box and packingmaterials are biodegradable andrecyclable. Please recycle. Ensure that any plastic wrappings,bags, etc., are disposed of safely andkept out of the reach of babies andyoung children. Danger of suffocation! Disposal of an old appliance Old app...
Page 29 - Installation
In areas with a tropical climate (over100°F/38°C and more than 70% airhumidity) the wine cooler must onlybe operated in air conditionedlocations. Otherwise the function ofthe machine cannot be guaranteed. This appliance is top-heavy andmust be secured to prevent thepossibility of tipping forward. Lo...
Page 30 - Changing the door hinging
The appliance is supplied right-handhinged. If left-hand door hinging isrequired, follow the instructions below. ^ Close the door, and unscrew the tophinge pin from the door a . ^ Unscrew the bracket b from underneath the door. ^ Tip the door forward slightly c , and lift it up and off d . ^ Unscrew...
Page 32 - Under-counter installation
Appliance dimensions * The overall height can be increased by 2"(50 mm) by adjusting the feet. Adjustments ^ Use the provided wrench to adjustthe feet as needed. Preparing the appliance ^ Carefully tip the appliance backward. ^ Attach the toe-kick panel a , and loosely tighten the screws b . ^ A...
Page 33 - Fitting the appliance into place
Fitting the appliance into place ^ Slide the appliance into theinstallation niche.Ensure that the power cord does notget caught. Be sure the power outlet remainsaccessible. ^ Using the fixing strip and screws,secure the appliance into place. Under-counter installation 33
Page 34 - Electrical connection
, Avoid the risk of electrical shock- Plug into a grounded 3-prongoutlet.- Do not move the ground plug.- Do not use an adapter.- Do not use an extension cord. Failure to follow these instructionscan result in death, fire, or electricalshock. Improper connection of theequipment grounding conductormay...