Page 2 - Contents
Contents 2 Warning and Safety instructions ...................................................................... 5 Caring for the environment .............................................................................. 14 Installation .................................................................
Page 3 - Push2open
Contents 3 Initial commissioning ........................................................................................ 57 Before using for the first time .............................................................................. 57 Choosing the right door assistant ( Push2open / Pull2open ) ....
Page 5 - Warning and Safety instructions; Danger of injury and damage to the appliance due to the wine
Warning and Safety instructions 5 This wine conditioning unit complies with all current local and na-tional safety requirements. Inappropriate use can, however, lead topersonal injury and material damage. Read the operating and installation instructions carefully beforeusing the wine conditioning un...
Page 6 - Correct application; This wine conditioning unit is intended for use in the home and in
Warning and Safety instructions 6 Correct application This wine conditioning unit is intended for use in the home and in similar environments, for example– in shops, offices and similar work settings– by the guests in hotels, motels, bed & breakfasts and other typicalhome settings.This wine co...
Page 7 - Safety with children
Warning and Safety instructions 7 Safety with children Children under 8 years of age must be kept away from the wine conditioning unit unless they are constantly supervised. Children aged 8 and older may only use the wine conditioning unit without supervision if they have been shown how to use i...
Page 8 - Technical safety
Warning and Safety instructions 8 Technical safety The refrigerant circuit has been checked for leaks. The wine con- ditioning unit complies with statutory safety requirements and theappropriate EU directives. This wine conditioning unit contains the coolant Isobutane (R600a), a natural gas whic...
Page 11 - Correct use; Do not cover or block the air vents as this could impair the effi-
Warning and Safety instructions 11 This wine conditioning unit is supplied with a special lamp to cope with particular conditions (e.g. temperature, moisture, chemical res-istance, abrasion resistance and vibration). This lamp must only beused for the purpose for which it is intended. The lamp is ...
Page 12 - Accessories and spare parts; Only use original Miele accessories. If other parts are used, war-
Warning and Safety instructions 12 Accessories and spare parts Only use original Miele accessories. If other parts are used, war- ranty, performance and product liability claims will be invalidated. Miele will guarantee to supply functional spare parts for a min- imum of 10 years and up to 15 ye...
Page 13 - Cleaning and care
Warning and Safety instructions 13 Cleaning and care Do not use any oils or grease on the door seals, as these will cause the seals to deteriorate and become porous with time. Do not use a steam cleaning appliance to clean this wine condi- tioning unit. The steam could reach electrical component...
Page 14 - Caring for the environment
Caring for the environment 14 Disposal of the packing mater-ial The packaging is designed to protectthe wine conditioning unit from damageduring transportation. The packagingmaterials used are selected from mater-ials which are environmentally friendlyfor disposal and should be recycled. Recycling t...
Page 15 - Installation; Location; - The socket must be easily accessible
Installation *INSTALLATION* 15 Location This appliance should be installed in adry, well-ventilated room. When deciding where to install yourwine conditioning unit, please bear inmind that it will use more energy if in-stalled near to a heater, a cooker or an-other appliance that gives off heat. Dir...
Page 16 - Climate range
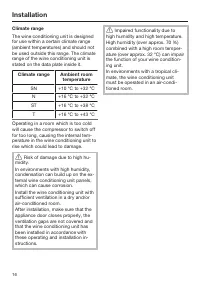
Installation *INSTALLATION* 16 Climate range The wine conditioning unit is designedfor use within a certain climate range(ambient temperatures) and should notbe used outside this range. The climaterange of the wine conditioning unit isstated on the data plate inside it. Climate range Ambient room te...
Page 17 - Installation notes; Risk of damage and injury from
Installation *INSTALLATION* 17 Installation notes Risk of damage and injury from the wine conditioning unit tippingover.The wine conditioning unit is veryheavy and can tip forwards when theappliance door is open.Keep the appliance door shut untilthe wine conditioning unit has beenbuilt in and secu...
Page 18 - Door hinge
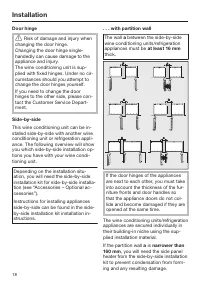
Installation *INSTALLATION* 18 Door hinge Risk of damage and injury when changing the door hinge.Changing the door hinge single-handedly can cause damage to theappliance and injury.The wine conditioning unit is sup-plied with fixed hinges. Under no cir-cumstances should you attempt tochange the do...
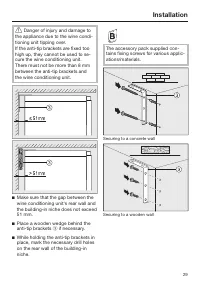
Page 19 - If the partition wall
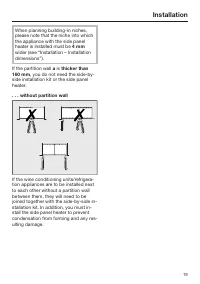
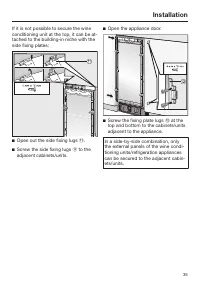
Installation *INSTALLATION* 19 When planning building-in niches,please note that the niche into whichthe appliance with the side panelheater is installed must be 4 mm wider (see “Installation – Installationdimensions”). If the partition wall a is thicker than 160 mm , you do not need the side-by- si...
Page 20 - Building-in dimensions
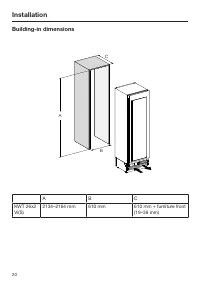
Installation *INSTALLATION* 20 Building-in dimensions A B C A B C KWT 26x2Vi(S) 2134–2164 mm 610 mm 610 mm + furniture front(19–38 mm)
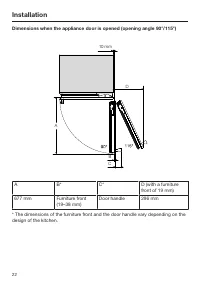
Page 22 - Dimensions when the appliance door is opened (opening angle 90°/115°)
Installation *INSTALLATION* 22 Dimensions when the appliance door is opened (opening angle 90°/115°) 10 mm D A B C A B* C* D (with a furniturefront of 19 mm) 677 mm Furniture front (19–38 mm) Door handle 296 mm * The dimensions of the furniture front and the door handle vary depending on thedesign o...
Page 23 - Dimensions of the furniture front
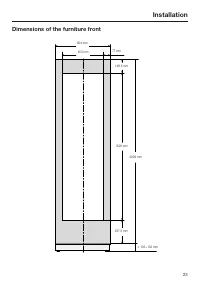
Installation *INSTALLATION* 23 Dimensions of the furniture front 604 mm 450 mm 77 mm 149 . 5 mm 1622 mm 2029 mm 257 . 5 mm ≥ 102−132 mm
Page 25 - Weight of the furniture front
Installation *INSTALLATION* 25 Weight of the furniture front Before fitting a furniture front, ensurethat the weight of the furniture frontdoes not exceed the maximum permit-ted weight: Wine conditioningunit Max. weight ofthe furniture front KWT 26x2 Vi(S) 73 kg If the furniture front is too heavy...
Page 26 - Checking the building-in niche
Installation *INSTALLATION* 26 Checking the building-in niche Check the installation dimensions(see “Installation – Installation dimen-sions”). Check the position of the electricalconnection. The length of the elec-trical connection cable is 3 m. The electrical socket must not beconcealed behind...
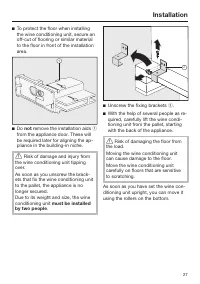
Page 27 - Do
Installation *INSTALLATION* 27 To protect the floor when installingthe wine conditioning unit, secure anoff-cut of flooring or similar materialto the floor in front of the installationarea. Do not remove the installation aids from the appliance door. These willbe required later for aligning t...
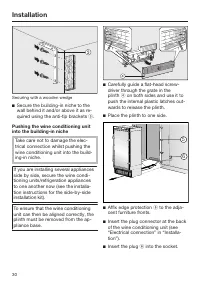
Page 28 - Preparing the building-in niche
Installation *INSTALLATION* 28 Preparing the building-in niche Risk of damage and injury from the wine conditioning unit tippingover.The wine conditioning unit is veryheavy and can tip forwards when theappliance door is open.The building-in niche must be se-cured to the wall behind it and/orabove ...
Page 29 - Danger of injury and damage to
Installation *INSTALLATION* 29 Danger of injury and damage to the appliance due to the wine condi-tioning unit tipping over.If the anti-tip brackets are fixed toohigh up, they cannot be used to se-cure the wine conditioning unit.There must not be more than 8 mmbetween the anti-tip brackets andthe ...
Page 30 - on both sides and use it to
Installation *INSTALLATION* 30 Securing with a wooden wedge Secure the building-in niche to thewall behind it and/or above it as re-quired using the anti-tip brackets . Pushing the wine conditioning unitinto the building-in niche Take care not to damage the elec-trical connection whilst pushing...
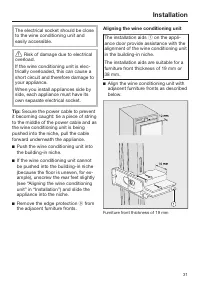
Page 31 - Aligning the wine conditioning unit
Installation *INSTALLATION* 31 The electrical socket should be closeto the wine conditioning unit andeasily accessible. Risk of damage due to electrical overload.If the wine conditioning unit is elec-trically overloaded, this can cause ashort circuit and therefore damage toyour appliance.When you ...
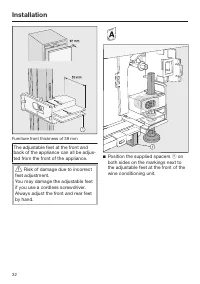
Page 32 - Risk of damage due to incorrect
Installation *INSTALLATION* 32 Furniture front thickness of 38 mm The adjustable feet at the front andback of the appliance can all be adjus-ted from the front of the appliance. Risk of damage due to incorrect feet adjustment.You may damage the adjustable feetif you use a cordless screwdriver.Alwa...
Page 33 - Proceed carefully when adjusting
Installation *INSTALLATION* 33 Adjust the rear feet with a ratchet (at-tachment: socket, 8 mm) or a TX 20screwdriver . Adjust the front feet with a ratchet (at-tachment: socket, 8 mm) or a TX 20screwdriver . Tip: Proceed carefully when adjusting the feet, alternating between the leftand ri...
Page 34 - only until
Installation *INSTALLATION* 34 Place a spirit level across the installa-tion aids on the appliance door to check the wine conditioning unit'salignment. Unscrew the adjustable feet and on both sides at least until the marking on the plinth has reached thespecified distance of 32 mm on th...
Page 36 - Unscrew the installation aids
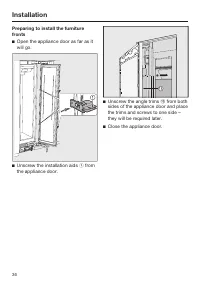
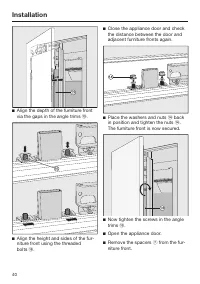
Installation *INSTALLATION* 36 Preparing to install the furniturefronts Open the appliance door as far as itwill go. Unscrew the installation aids from the appliance door. Unscrew the angle trims from both sides of the appliance door and placethe trims and screws to one side –they will b...
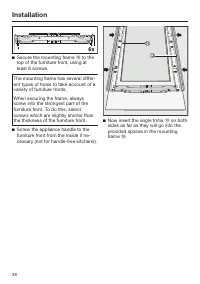
Page 38 - Secure the mounting frame
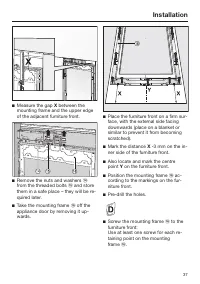
Installation *INSTALLATION* 38 Secure the mounting frame to the top of the furniture front, using atleast 6 screws. The mounting frame has several differ-ent types of holes to take account of avariety of furniture fronts. When securing the frame, alwaysscrew into the strongest part of thefurnit...
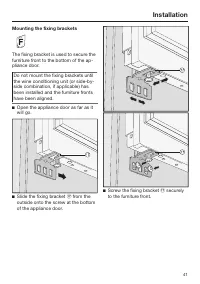
Page 41 - Mounting the fixing brackets
Installation *INSTALLATION* 41 Mounting the fixing brackets The fixing bracket is used to secure thefurniture front to the bottom of the ap-pliance door. Do not mount the fixing brackets untilthe wine conditioning unit (or side-by-side combination, if applicable) hasbeen installed and the furniture ...
Page 42 - Securing the covers
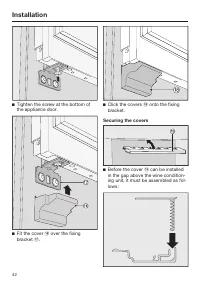
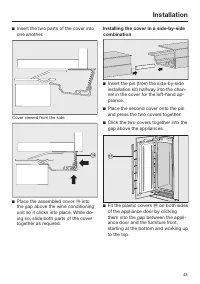
Installation *INSTALLATION* 42 Tighten the screw at the bottom ofthe appliance door. Fit the cover over the fixing bracket . Click the covers onto the fixing bracket. Securing the covers Before the cover can be installed in the gap above the wine condition-ing unit, it must be as...
Page 43 - Place the assembled cover
Installation *INSTALLATION* 43 Insert the two parts of the cover intoone another. Cover viewed from the side Place the assembled cover into the gap above the wine conditioningunit so it clicks into place. While do-ing so, slide both parts of the covertogether as required. Installing the cover...
Page 44 - Now attach the covers
Installation *INSTALLATION* 44 Secure both sides of the wine condi-tioning unit using at least 3 clips for the covers. Now attach the covers onto the re- taining clips on each side. In the case of side-by-side installa-tion, the covers are only required onthe outer side. Fit the cover...
Page 45 - Click the plinth ventilation grille
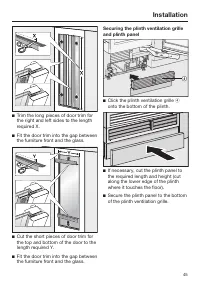
Installation *INSTALLATION* 45 Trim the long pieces of door trim forthe right and left sides to the lengthrequired X. Fit the door trim into the gap betweenthe furniture front and the glass. Cut the short pieces of door trim forthe top and bottom of the door to thelength required Y. Fit the ...
Page 46 - Open the appliance door.
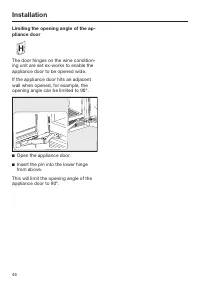
Installation *INSTALLATION* 46 Limiting the opening angle of the ap-pliance door The door hinges on the wine condition-ing unit are set ex-works to enable theappliance door to be opened wide. If the appliance door hits an adjacentwall when opened, for example, theopening angle can be limited to 90°....
Page 47 - Electrical connection; Risk of fire from overheating.
Installation *INSTALLATION* 47 Electrical connection The refrigeration appliance must only beconnected to an earthed socket usingthe mains connection cable supplied. The socket must be easily accessibleafter the refrigeration appliance hasbeen installed. If the socket is not easilyaccessible, ensure...
Page 49 - Saving energy; In a ventilated room.
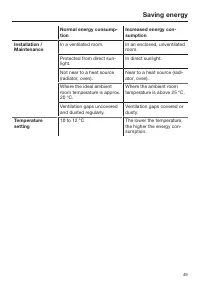
Saving energy 49 Normal energy consump-tion Increased energy con-sumption Installation /Maintenance In a ventilated room. In an enclosed, unventilatedroom. Protected from direct sun-light. In direct sunlight. Not near to a heat source(radiator, oven). Near to a heat source (radi-ator, oven). Where t...
Page 50 - Use
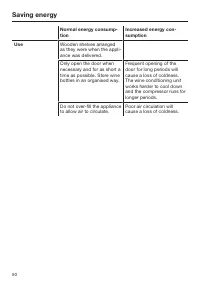
Saving energy 50 Normal energy consump-tion Increased energy con-sumption Use Wooden shelves arrangedas they were when the appli-ance was delivered. Only open the door whennecessary and for as short atime as possible. Store winebottles in an organised way. Frequent opening of thedoor for long period...
Page 51 - Guide to the appliance; Display
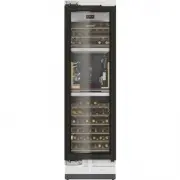
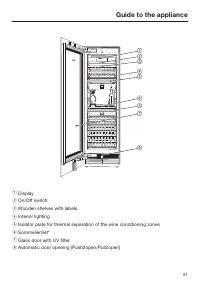
Guide to the appliance 51 a Display b On/Off switch c Wooden shelves with labels d Interior lighting e Isolator plate for thermal separation of the wine conditioning zones f SommelierSet* g Glass door with UV filter h Automatic door opening (Push2open/Pull2open)
Page 53 - Main screen; sensor control
Guide to the appliance 53 Main screen ° C 11 1 2 3 4 5 ° C 11 ° C 11 a Temperature display (target temperature) for the 3 wine conditioning zones b sensor control For setting the temperature and humidity c sensor control For switching the interior lighting on and off when the appl...
Page 54 - Settings mode; Symbol
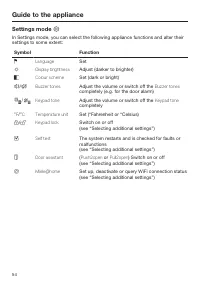
Guide to the appliance 54 Settings mode In Settings mode, you can select the following appliance functions and alter theirsettings to some extent: Symbol Function Language Set Display brightness Adjust (darker to brighter) Colour scheme Set (dark or bright) / Buzzer tones Adjust the volum...
Page 55 - see “Selecting additional settings”); Symbols in Settings mode; Scroll in Settings mode or select a setting
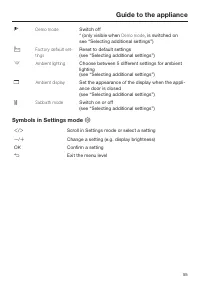
Guide to the appliance 55 * Demo mode Switch off * (only visible when Demo mode , is switched on see “Selecting additional settings”) Factory default set-tings Reset to default settings (see “Selecting additional settings”) Ambient lighting Choose between 5 different settings for ambientlighti...
Page 56 - Accessories; Accessories supplied; Appliance plug; Optional accessories; Multi-purpose microfibre cloth
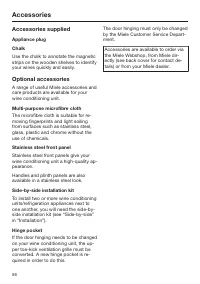
Accessories 56 Accessories supplied Appliance plug Chalk Use the chalk to annotate the magneticstrips on the wooden shelves to identifyyour wines quickly and easily. Optional accessories A range of useful Miele accessories andcare products are available for yourwine conditioning unit. Multi-purpose ...
Page 57 - Initial commissioning; Before using for the first time; Packaging material; Using the SommelierSet
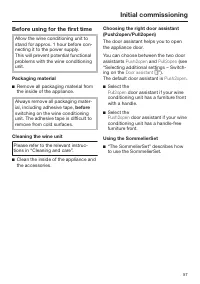
Initial commissioning 57 Before using for the first time Allow the wine conditioning unit tostand for approx. 1 hour before con-necting it to the power supply. This will prevent potential functionalproblems with the wine conditioningunit. Packaging material Remove all packaging material fromthe in...
Page 58 - - Call up information on the operating
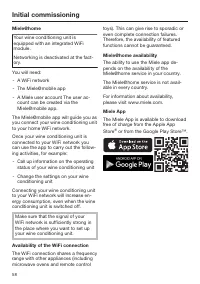
Initial commissioning 58 Miele@home Your wine conditioning unit isequipped with an integrated WiFimodule. Networking is deactivated at the fact-ory. You will need: - A WiFi network - The Miele@mobile app - A Miele user account The user ac- count can be created via theMiele@mobile app. The Miele@mobi...
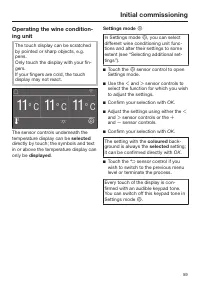
Page 59 - selected
Initial commissioning 59 Operating the wine condition-ing unit The touch display can be scratchedby pointed or sharp objects, e.g.pens.Only touch the display with your fin-gers. If your fingers are cold, the touchdisplay may not react. 39 °F 39 0 °F ° C 11 ° C 11 ° C 11 The sensor ...
Page 60 - Starting up for the first time; OK
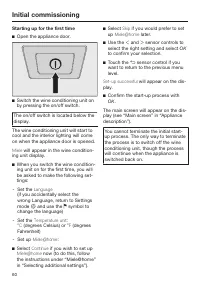
Initial commissioning 60 Starting up for the first time Open the appliance door. Switch the wine conditioning unit onby pressing the on/off switch. The on/off switch is located below thedisplay. The wine conditioning unit will start tocool and the interior lighting will comeon when the appliance...
Page 61 - Switching on and off; will appear, followed by the main
Switching on and off 61 Switching the wine condition-ing unit on Open the appliance door. Switch the wine conditioning unit onby pressing the On/Off switch. The wine conditioning unit will start tocool and the interior lighting will comeon when the appliance door is opened. Miele will appear, fo...
Page 62 - Switch the wine unit off.
Switching on and off 62 Switching off for longer peri-ods of time If the wine unit is not going to be usedfor a longer period of time: Switch the wine unit off. Switch off at the wall and withdrawthe plug from the socket, or discon-nect the fuse. Clean the wine unit. Leave the door ajar to a...
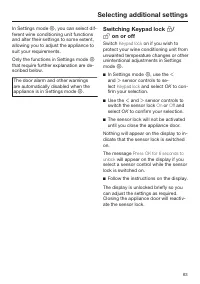
Page 63 - Selecting additional settings; Switching Keypad lock
Selecting additional settings 63 In Settings mode , you can select dif- ferent wine conditioning unit functionsand alter their settings to some extent,allowing you to adjust the appliance tosuit your requirements. Only the functions in Settings mode that require further explanation are de-scri...
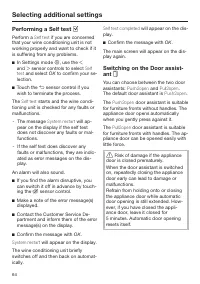
Page 64 - Performing a Self test; Switching on the; ant
Selecting additional settings 64 Performing a Self test Perform a Self test if you are concerned that your wine conditioning unit is notworking properly and want to check if itis suffering from any problems. In Settings mode , use the and sensor controls to select Self test and select...
Page 65 - Switching on Push2open
Selecting additional settings 65 Switching on Push2open In Settings mode , use the and sensor controls to select Door assistant and select OK to confirm your selection. Use the and sensor controls to select Mode and select OK to confirm your selection. Use the and sensor...
Page 66 - – Adjusting the intensity
Selecting additional settings 66 – Adjusting the intensity You can also adjust the intensity of the Pull2open function. The lower the set in- tensity, the less force required whenyou pull the appliance door. In Settings mode , use the and sensor controls to select Door assistant and sel...
Page 67 - Setting up Miele@home; Activating Miele@home; Checking the WiFi connection status
Selecting additional settings 67 Miele@home Setting up Miele@home The message Set up Miele@home only appears if the wine appliance has notyet been connected to a WiFi network. Connect your wine appliance as de-scribed in “Before using for the firsttime”. Deactivating Miele@home In Settings mode ...
Page 68 - Setting up Miele@home again
Selecting additional settings 68 Setting up Miele@home again If you have changed your WiFi network,you can set up Miele@home again foryour wine conditioning unit. In Settings mode , use the and sensor controls to se- lect Miele@home and select OK to confirm your selection. Use the ...
Page 69 - Resetting the settings to their default settings
Selecting additional settings 69 Resetting the settings to their default settings You can reset the wine conditioning unit‘s settings to their default settings. Reset the settings to the default settings when disposing of your wine condition-ing unit, selling it, or putting a used wine conditioni...
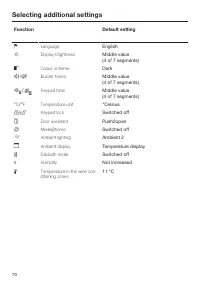
Page 70 - Function
Selecting additional settings 70 Function Default setting Language English Display brightness Middle value (4 of 7 segments) Colour scheme Dark / Buzzer tones Middle value (4 of 7 segments) / Keypad tone Middle value (4 of 7 segments) °C / °F Temperature unit °Celsius / Keypad lock Switc...
Page 71 - Switching Sabbath mode
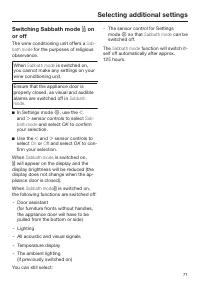
Selecting additional settings 71 Switching Sabbath mode on or off The wine conditioning unit offers a Sab- bath mode for the purposes of religious observance. When Sabbath mode is switched on, you cannot make any settings on yourwine conditioning unit. Ensure that the appliance door isproperly c...
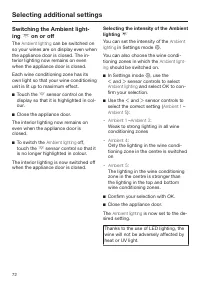
Page 72 - Switching the; ing; on or off; Selecting the intensity of the; Ambient
Selecting additional settings 72 Switching the Ambient light- ing on or off The Ambient lighting can be switched on so your wines are on display even whenthe appliance door is closed. The in-terior lighting now remains on evenwhen the appliance door is closed. Each wine conditioning zone has its...
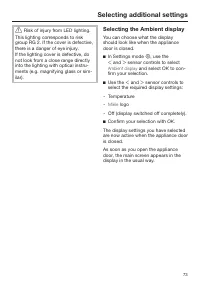
Page 73 - Selecting the
Selecting additional settings 73 Risk of injury from LED lighting. This lighting corresponds to riskgroup RG 2. If the cover is defective,there is a danger of eye injury.If the lighting cover is defective, donot look from a close range directlyinto the lighting with optical instru-ments (e.g. magn...
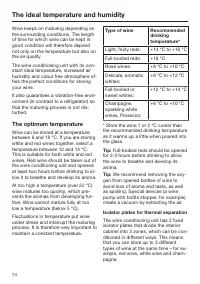
Page 74 - The ideal temperature and humidity; The optimum temperature; Type of wine
The ideal temperature and humidity 74 Wine keeps on maturing depending onthe surrounding conditions. The lengthof time for which wine can be kept ingood condition will therefore dependnot only on the temperature but also onthe air quality. The wine conditioning unit with its con-stant ideal temperat...
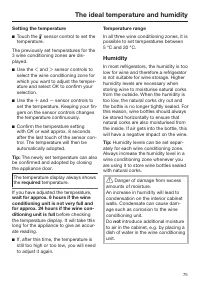
Page 75 - Setting the temperature; Humidity; not
The ideal temperature and humidity 75 Setting the temperature Touch the sensor control to set the temperature. The previously set temperatures for the3 wine conditioning zones are dis-played. Use the and sensor controls to select the wine conditioning zone forwhich you want to adjust th...
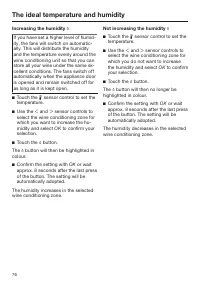
Page 76 - Increasing the humidity
The ideal temperature and humidity 76 Increasing the humidity If you have set a higher level of humid-ity, the fans will switch on automatic-ally. This will distribute the humidityand the temperature evenly around thewine conditioning unit so that you canstore all your wine under the same ex-cell...
Page 77 - Door alarm; Switching the door alarm off early
Door alarm 77 Door alarm An alarm will sound if the appliancedoor has been left open for longer than2 minutes.The message Close the door will also ap- pear on the display. As soon as the appliance door isclosed, the alarm tone will stop and themessage in the display will go out. Switching the door a...
Page 78 - Storing wine bottles; We also recommend increasing the
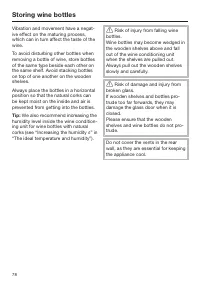
Storing wine bottles 78 Vibration and movement have a negat-ive effect on the maturing process,which can in turn affect the taste of thewine. To avoid disturbing other bottles whenremoving a bottle of wine, store bottlesof the same type beside each other onthe same shelf. Avoid stacking bottleson to...
Page 79 - Wooden shelves; Moving the wooden shelves
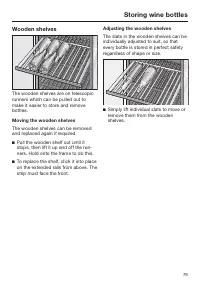
Storing wine bottles 79 Wooden shelves The wooden shelves are on telescopicrunners which can be pulled out tomake it easier to store and removebottles. Moving the wooden shelves The wooden shelves can be removedand replaced again if required. Pull the wooden shelf out until itstops, then lift it u...
Page 80 - Labelling wooden shelves
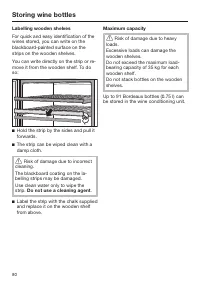
Storing wine bottles 80 Labelling wooden shelves For quick and easy identification of thewines stored, you can write on theblackboard-painted surface on thestrips on the wooden shelves. You can write directly on the strip or re-move it from the wooden shelf. To doso: Hold the strip by the sides an...
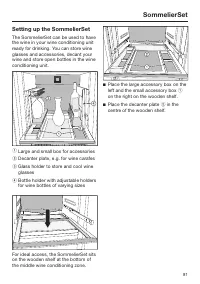
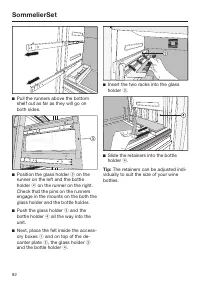
Page 81 - SommelierSet; Setting up the SommelierSet; Large and small box for accessories
SommelierSet 81 Setting up the SommelierSet The SommelierSet can be used to havethe wine in your wine conditioning unitready for drinking. You can store wineglasses and accessories, decant yourwine and store open bottles in the wineconditioning unit. a Large and small box for accessories b Decanter ...
Page 83 - Automatic defrosting
Automatic defrosting 83 The wine conditioning unit defrostsautomatically.
Page 84 - Cleaning agents; do not use
Cleaning and care 84 Do not let water get into the elec-tronic unit or the lighting. Risk of damage due to moisture ingress.The steam from a steam cleaner candamage plastic and and electricalcomponents.Do not use a steam cleaner to cleanthe wine conditioning unit. The data plate located inside the...
Page 86 - Cleaning the door seal; Risk of damage as a result of in-; Cleaning the ventilation gaps
Cleaning and care 86 Cleaning the door seal Risk of damage as a result of in- correct cleaning.If you treat the door seal with oils orgrease, it can become porous.Do not use any oils or grease on thedoor seal. The door seal should be cleaned reg-ularly with clean water, and thenwiped dry with a ...
Page 87 - Problem solving guide; Problem
Problem solving guide 87 Many malfunctions and faults that can occur in daily operation can be easilyremedied. Time and money will be saved because a service call will not beneeded. The following guide may help you to find the reason for a malfunction or a fault,and to correct it. To prevent cold fr...
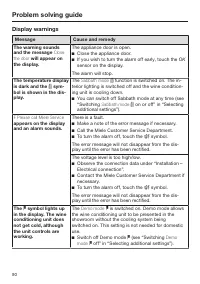
Page 90 - Display warnings; Message
Problem solving guide 90 Display warnings Message Cause and remedy The warning soundsand the message Close the door will appear on the display. The appliance door is open. Close the appliance door. If you wish to turn the alarm off early, touch the OK sensor on the display. The alarm will stop. ...
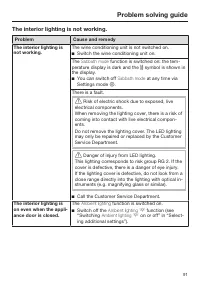
Page 91 - The interior lighting is not working.
Problem solving guide 91 The interior lighting is not working. Problem Cause and remedy The interior lighting isnot working. The wine conditioning unit is not switched on. Switch the wine conditioning unit on. The Sabbath mode function is switched on: the tem- perature display is dark and the ...
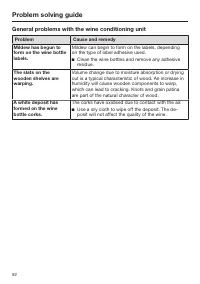
Page 92 - General problems with the wine conditioning unit
Problem solving guide 92 General problems with the wine conditioning unit Problem Cause and remedy Mildew has begun toform on the wine bottlelabels. Mildew can begin to form on the labels, dependingon the type of label adhesive used. Clean the wine bottles and remove any adhesiveresidue. The slats...
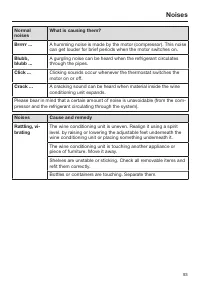
Page 93 - Noises; What is causing them?
Noises 93 Normalnoises What is causing them? Brrrrr ... A humming noise is made by the motor (compressor). This noisecan get louder for brief periods when the motor switches on. Blubb,blubb ... A gurgling noise can be heard when the refrigerant circulatesthrough the pipes. Click ... Clicking sounds ...
Page 94 - Service; Contact in the event of a fault; Warranty
Service 94 Contact in the event of a fault In the event of any faults which youcannot remedy yourself, please contactyour Miele dealer or the Miele CustomerService Department. You can book a Miele Customer Ser-vice Department call-out online atwww.miele.com/service. Contact information for the Miele...
Page 95 - EU Conformity declaration
EU Conformity declaration 95 Miele hereby declares that this wine unitcomplies with Directive 2014/53/EU. The complete text of the EU declarationof conformity is available from one ofthe following internet addresses: - Products, Download from www.miele.ie - For service, information, operating in- st...
Page 96 - UK Conformity declaration
UK Conformity declaration 96 Miele hereby declares that this wine unitcomplies with UK Radio EquipmentRegulations 2017, as amended. The complete text of the UK declarationof conformity is available from one ofthe following internet addresses: - Products, Download from www.miele.co.uk - For service, ...
Page 97 - Copyrights and Licences
Copyrights and Licences 97 Miele uses their own and third party software which is not subject to any so-calledOpen Source Licence for the operation and control of the appliance. This software/these software components are protected by copyright. The copyright powers ofMiele and third parties have to...
Page 99 - United Kingdom
United Kingdom Miele Co. Ltd., Fairacres, Marcham Road, Abingdon, Oxon, OX14 1TWTel: 0330 160 6600, Internet: www.miele.co.uk/service, E-mail: [email protected] Australia Miele Australia Pty. Ltd.ACN 005 635 398ABN 96 005 635 398Level 4, 141 Camberwell RoadHawthorn East, VIC 3123Tel: 1300 464 353Int...