Page 2 - Contents
Contents 2 Warning and Safety instructions ...................................................................... 6 Notes on the operating instructions ................................................................ 16 Notes on the layout ...............................................................
Page 3 - Caring for the environment
Contents 3 AutoOpen ............................................................................................................ 39Extra clean........................................................................................................... 40Extra dry .........................................
Page 4 - Express
Contents 4 Energy management ........................................................................................... 71Switching off the dishwasher .............................................................................. 72Unloading the dishwasher .............................................
Page 5 - Installation
Contents 5 Installation .......................................................................................................... 108 The Miele Waterproof system.............................................................................. 108Water intake ..............................................
Page 6 - Warning and Safety instructions
Warning and Safety instructions 6 This dishwasher complies with all current local and national safetyrequirements. However, inappropriate use can lead to personalinjury and damage to property. Please observe the installation sheet and read the operatinginstructions carefully before setting up the di...
Page 7 - Correct application
Warning and Safety instructions 7 Correct application This appliance is designed for domestic use and for use in similar environments by guests in hotel or motel rooms, bed & breakfasts,and other typical living quarters. This does not include common/shared facilities or commercial facilities w...
Page 8 - Safety with children
Warning and Safety instructions 8 Safety with children Young children must not be allowed to use this appliance. Older children may only use the dishwasher if its operation has been clearly explained to them and they are able to use it safely.They must be able to understand and recognise the pos...
Page 9 - Technical safety
Warning and Safety instructions 9 Technical safety Unauthorised installation, maintenance and repairs can cause considerable danger for the user. Installation, maintenance, andrepairs must only be carried out by a Miele authorised technician. Damage to the dishwasher can compromise your safety. ...
Page 12 - Correct installation
Warning and Safety instructions 12 During installation, maintenance, and repair work, the dishwasher must be disconnected from the electricity supply (switch it off andwithdraw the plug from the socket). If the mains connection cable is damaged, it must only be replaced with a specific mains con...
Page 13 - Correct use
Warning and Safety instructions 13 The door springs must be evenly adjusted on both sides. They are correctly adjusted when the door remains stationary when left halfopen (approx. 45° opening angle). The door must not fall open on itsown beyond this point. The appliance must only be operated with ...
Page 15 - Accessories and spare parts
Warning and Safety instructions 15 Accessories and spare parts Only use original Miele accessories. If other parts are used, warranty, performance, and, if applicable, product liability claims willbe invalidated. Miele will guarantee to supply functional spare parts for a minimum of 10 years and...
Page 16 - Notes on the operating instructions; Notes on the layout; Warnings
Notes on the operating instructions 16 These operating instructions apply toseveral different dishwasher models ofdifferent heights. The different dishwasher models will benamed as follows: Standard = dishwasher measuring80.5 cm high (built-in appliance) or84.5 cm high (freestanding appliance) XXL =...
Page 17 - Items supplied
Items supplied 17 The following items are supplied: - Dishwasher - Operating instructions for operating the dishwasher - Installation sheet for installing the dishwasher - Other installation accessories for installing the dishwasher (seeinstallation sheet) - Funnel for filling the dishwasher salt - ...
Page 18 - Guide to the appliance; Appliance overview
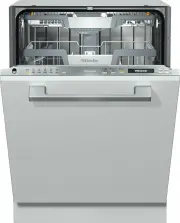
Guide to the appliance 18 Appliance overview a Door locking pin b Upper spray arm (not visible) c 3D MultiFlex cutlery tray (dependingon model) d Upper basket e Middle spray arm f Aeration valve g Lower spray arm h Filter combination i Salt reservoir j Data plate k Rinse aid reservoir l Detergent co...
Page 19 - Control panel; OK
Guide to the appliance 19 Control panel OK Timer Express Auto Dos 75 C ° 75 C ° 65 C ° 65 C ° 45 C ° 45 C ° Auto ECO 1 2 3 4 5 6 7 8 9 10 11 a In-operation indicator lightFor indicating an ongoing washprogramme when the door is closed. b DisplayFor further information, see “Guide tothe appliance - D...
Page 20 - Display functions
Guide to the appliance 20 Display functions The display is used to select or set thefollowing: - further programmes - the timer - the Settings The display can show the following: - the programme stage - the estimated time left for the programme to run - the energy and water consumption (EcoFeedbac...
Page 22 - Using for the first time; Opening the door; Pull the handle to open the door.; Closing the door; Push the baskets right in.
Using for the first time 22 Every dishwasher is tested at thefactory. There will be residual water inthe machine from this test. It is not anindication that the dishwasher hasbeen used previously. Opening the door In some programmes the doorautomatically opens slightly to assistthe drying process. T...
Page 23 - Standard settings; Switching on the dishwasher
Using for the first time 23 Standard settings Switching on the dishwasher Open the door. Switch the dishwasher on with the button. The welcome screen will appear whenthe dishwasher is switched on. For further information about thedisplay functionality, see “Guide to theappliance - Display fun...
Page 24 - Setting the water hardness
Using for the first time 24 Setting the water hardness The display will change to the screenfor setting the water hardness. - The dishwasher needs to be programmed to the correct waterhardness for your area. - Your local water authority will be able to advise you of the water hardnesslevel in your a...
Page 25 - After confirming these prompts with; and; Select
Using for the first time 25 Finally, prompts will appear in thedisplay. After confirming these prompts with OK , the messages Refill salt and Refill rinse aid may appear. Add salt and rinse aid if necessary(see “Using for the first time -Dishwasher salt” and “Rinse aid”). Select OK to co...
Page 26 - Dishwasher salt; you do
Using for the first time 26 Dishwasher salt In order to achieve good cleaningresults, the dishwasher needs tooperate with soft (low limescale) water.Hard water results in the build-up ofcalcium deposits on crockery and in theappliance. Water with a hardness level higher than0.9 mmol/l (5 °dH – Germa...
Page 27 - Filling the salt reservoir
Using for the first time 27 Filling the salt reservoir Before filling the salt reservoir for thefirst time, you must fill it with approx.2 litres of water to enable the salt todissolve. Once the dishwasher has been used,there is always sufficient water in thesalt reservoir. Remove the lower basket...
Page 28 - Replenishing salt
Using for the first time 28 Replenishing salt When Refill salt appears in the display wait until the end of theprogramme and then refill the saltreservoir. Confirm with OK . The salt refill indicator will go out. Risk of corrosion due to saline solution.Saline solution that runs out cancause...
Page 29 - Rinse aid; Damage caused by washing-up
Using for the first time 29 Rinse aid Rinse aid is necessary to ensure waterdoes not cling to and leave marks oncrockery during the drying phase, and ithelps crockery dry faster after it hasbeen washed. Rinse aid is poured into the storagereservoir and the amount set isdispensed automatically. Dam...
Page 30 - Adding rinse aid
Using for the first time 30 Adding rinse aid Lift the yellow catch on the lid of therinse aid container . The lid will spring open. Only add rinse aid until the fill levelindicator (see arrow) turns dark whenthe door is open horizontally. The rinse aid reservoir holds approx.110 ml. Close th...
Page 31 - Settings; Opening the Settings menu; Changing settings; Closing the Settings menu
Settings 31 You can alter the dishwasher’scontrols to suit changing requirementsby adjusting the settings. Settings can be altered at any time. Opening the Settings menu Switch the dishwasher on with the button if it is switched off. Use the programme selectionbutton to select the Further ...
Page 32 - Language; The flag after the word; Water hardness; - The dishwasher needs to be
Settings 32 Language The display can be set to appear in oneof several different languages. You can change the language used inthe display and also the country via the Language submenu. The flag after the word Language serves as a guide if a language thatyou do not understand has been set.In...
Page 33 - programme, the quantity is; menu; Rinse Aid
Settings 33 AutoDos (automaticdispensing) Automatic dispensing automaticallyadjusts the amount of detergent to theselected programme. In the Auto 45– 65 °C programme, the quantity is adjusted depending on the degree ofsoiling of the crockery. If you want to extend the service life ofthe PowerDisk, y...
Page 35 - Connect using WPS
Settings 35 Connect using WPS As an alternative to networking via theMiele App, you can connect yourdishwasher to your Wi-Fi network usingWPS (Wireless Protected Setup). Your Wi-Fi router must support WPS. Confirm the message Press WPS button with OK . Activate the WPS function on yourrouter wi...
Page 36 - Displaying Connection status
Settings 36 Displaying Connection status You can call up the current connectionstatus of your dishwasher. Select the Connection status menu option and confirm with OK . Use the sensors to consecutively call up the Wi-Fi signal strength, thename of your router, and theassociated IP address. ...
Page 37 - If you have switched on the option; is displayed under; will then no longer be; option is; RemoteUpdate; Activating/deactivating
Settings 37 Remote control This menu option will only bedisplayed if you have connected yourdishwasher to your Wi-Fi network (see“Settings - Miele@home”). If you have switched on the option Remote control , the menu item MobileStart is displayed under Further programmes/Settings. If you wish to p...
Page 38 - Running a RemoteUpdate
Settings 38 Running a RemoteUpdate Information about the content andscope of a RemoteUpdate will beprovided in the Miele App. A message will appear in yourdishwasher display if a software updateis available. You can install the update immediatelyor postpone this until later. When theappliance is swi...
Page 39 - Display brightness; Risk of damage due to steam.
Settings 39 Display brightness You can set the display brightness toone of seven different levels. Buzzer A sequence of signal tones will soundat the end of the programme or if thereis a fault, provided that the audiblesignals are activated. The signal tones at the end of aprogramme and the alarm to...
Page 40 - Extra clean; Extra dry; nd interim rinse; Hygiene cycle
Settings 40 Extra clean You can choose this function toincrease the cleaning performance ofthe programmes. If you activate this function, theprogramme cycle times and the mainwash temperatures will increase.Programmes normally without a pre-wash will incorporate a pre-washphase. The water and energy...
Page 41 - Software version; For demonstration purposes only.; Factory default; and confirm with
Settings 41 Software version You can display the electronic softwareversion of your dishwasher for technicalsupport purposes. Showroom For demonstration purposes only. The dishwasher is equipped with ademo mode for showroom use. Factory default You can reset all dishwasher settings tothe factory def...
Page 42 - Economical dishwashing
Caring for the environment 42 Economical dishwashing This dishwasher is exceptionallyeconomical in its use of water andelectricity. You can support the economicaloperation of your appliance by followingthese tips: - Washing in a dishwasher generally uses less water and energy thanwashing dishes by h...
Page 43 - Consumption estimate
Caring for the environment 43 EcoFeedback consumptiondisplay The "Consumption" function is used forcalling up information about the energyand water consumption of yourdishwasher (see "Settings -Consumption (EcoFeedback)"). The following information can beviewed in the display: - An e...
Page 44 - Loading the dishwasher; General information
Loading the dishwasher 44 General information Remove coarse food residues fromcrockery. There is no need to pre-rinse itemsunder running water. Damage can be caused by ash, sand, wax, lubricating grease, orpaint.These substances will contaminatethe dishwasher and can then nolonger be removed.Do no...
Page 45 - Silverware
Loading the dishwasher 45 Items not suitable for washing in thedishwasher: - Wooden cutlery and crockery or items with wooden parts. These maydiscolour and fade. Furthermore, theglue used in these items is notdishwasher safe. Wooden handlesmay come loose after being washedin the dishwasher. - Craft ...
Page 46 - Upper basket; Loading the upper basket; Loading the FlexCare cup rack
Loading the dishwasher 46 Upper basket See “Loading the dishwasher -Loading examples” for examples ofhow to load crockery and cutlery. Loading the upper basket Damage due to leaking water. If you run the dishwasher without theupper basket, water can leak out ofthe dishwasher.Only run the dishwashe...
Page 47 - Adjusting the FlexCare cup rack
Loading the dishwasher 47 Adjusting the FlexCare cup rack You can set the height and depth of thecup rack at two different levels so that itcan accommodate larger cups and sothat taller items can be placedunderneath it. Pull the cup rack upwards and click itinto the desired position (see arrows). ...
Page 48 - Adjusting the upper basket; Pull out the upper basket.
Loading the dishwasher 48 Adjusting the upper basket In order to gain more space for talleritems, the upper basket can beadjusted on three levels with 2 cmbetween each level. The upper basket can also be set at anangle so that water can run off freelyfrom recesses. However, make surethat the basket ...
Page 49 - Lower basket; Loading the lower basket
Loading the dishwasher 49 Lower basket See “Loading the dishwasher -Loading examples” for examples ofhow to load crockery and cutlery. Loading the lower basket Place larger and heavier items suchas plates, serving platters,saucepans, serving bowls etc., in thelower basket. Glasses, cups, small pla...
Page 50 - Cutlery tray/Cutlery basket; Loading the 3D MultiFlex tray
Loading the dishwasher 50 Cutlery tray/Cutlery basket (depending on model) See “Loading the dishwasher -Loading examples” for examples ofhow to load crockery and cutlery. Load cutlery into the 3D MultiFlex trayor the cutlery basket (depending onmodel). Loading the 3D MultiFlex tray To make unloadi...
Page 51 - Loading the cutlery basket
Loading the dishwasher 51 Loading the cutlery basket The cutlery basket can be placedanywhere on the front rows of spikes inthe left or right corner of the lowerbasket. To avoid the risk of injury, knives andforks should be placed with thehandles upwards in the cutlerybasket. However, cutlery plac...
Page 52 - Loading examples; Dishwashers with cutlery tray
Loading the dishwasher 52 Loading examples Dishwashers with cutlery tray Upper basket Lower basket
Page 53 - Cutlery tray
Loading the dishwasher 53 Cutlery tray Heavily soiled crockery
Page 54 - Dishwashers with cutlery basket
Loading the dishwasher 54 Dishwashers with cutlery basket Upper basket Lower basket
Page 55 - Cutlery basket
Loading the dishwasher 55 Cutlery basket Heavily soiled crockery
Page 56 - Comparison tests; Standard programme
Comparison tests 56 Test standard: AS/NZS 2007.1:2005, AS/NZS 2007.2:2005;AS/NZS 6400:2005 Standard programme (for energy label): ECO Capacity: 14 place settings Detergent amount: 27.5 g Rinse aid dosage: Setting 3 You can find information on adjusting the rinse aid dosage in the "Rinse aid&#...
Page 57 - Capacity
Page 62 - Detergents; Types of detergents
Detergents 62 Types of detergents Damage due to unsuitable detergents.Detergents that are not suitable fordomestic dishwashers can causedamage to the dishwasher or to theload.Only use detergents formulated fordomestic dishwashers. Modern detergents contain variousactive ingredients, the most impor...
Page 63 - Risk of chemical burns from; Detergent dispensing
Detergents 63 Risk of chemical burns from detergent.Dishwasher detergents can causeburning on the skin and in the eyes,nose, mouth, and throat.Avoid contact with detergents. Do not inhale or ingest powderdetergents. Do not swallowdishwasher detergent. Seek medicalattention immediately if detergent...
Page 64 - Automatic dispensing/AutoDos; Activating AutoDos; AutoDos
Detergents 64 Automatic dispensing/AutoDos Before you can use AutoDos, you mustinsert a PowerDisk containing powderdetergent into the PowerDiskcompartment. One PowerDisk contains enoughdetergent for approx. 20 cycles,depending on the selected programme. PowerDisks are available to orderdirectly from...
Page 65 - Inserting a PowerDisk; The message; will
Detergents 65 Inserting a PowerDisk Switch on the dishwasher before youreplace the PowerDisk so that thedishwasher recognises it. Only replace the PowerDisk when themessage PowerDisk empty. Deactivate AutoDos with OK. appears. Slide the yellow catch of the AutoDoslid to and open it. The messag...
Page 67 - Manual detergent dispensing
Detergents 67 Manual detergent dispensing Detergent must be manually dispensedif you have deactivated automaticdispensing using the AutoDos sensor. Detergent dispensing The detergent compartment holds amaximum of 50 ml. There are marks in the detergentcompartment to aid with dispensing:20, 30, ...
Page 69 - Operation; “Programme
Operation 69 Switching on the dishwasher Turn on the tap if it is turned off. Open the door. Make sure the spray arms can rotatefreely. Press the button. When a programme is selected, it willappear briefly in the display and therelevant indicator light will come on. Next, the estimated en...
Page 70 - Display of programme duration
Operation 70 Display of programme duration The estimated duration of the selectedprogramme appears in the displaybefore the programme begins. If thedoor is opened during the programme,the time left until the end of theprogramme is displayed. Each programme stage is indicated bya symbol: Pre-wash/S...
Page 71 - At the end of the programme; If the; programmable; Energy management
Operation 71 At the end of the programme At the end of a programme, the opticalin-operation indicator light will flashslowly with the door shut. The signaltones might also sound. The optical in-operation indicator lightwill go out 10 minutes after the end ofthe programme if the door is closed. The p...
Page 72 - Switching off the dishwasher; Confirm the query; with; Unloading the dishwasher
Operation 72 Switching off the dishwasher Open the door. The dishwasher can be switched offat any time using the button. Confirm the query Switch off with OK . Switching the dishwasher off during aprogramme cancels the programme. You can also do this to stop an ongoingtimer. Risk of damag...
Page 73 - Interrupting a programme; Risk of scalding due to hot
Operation 73 Interrupting a programme A programme will be interrupted assoon as the door is opened. If the door is closed again, theprogramme will continue from the pointit was at before the door was opened. Risk of scalding due to hot water.During operation, water in thedishwasher may be very hot...
Page 74 - Options; until just before
Options 74 Timer You can set the start time of aprogramme. The programme start timecan be delayed for between 30 minutesand 24 hours. With a start time delay between30 minutes and 3 hours, the delay canbe set in 30-minute increments. It is setin hours for periods longer than this. With manual det...
Page 76 - Guide for selecting a programme; Crockery
Guide for selecting a programme 76 Pots, pans, everyday porcelain and cutlery Standard dried-on normal food deposits Stubborn dried-on, burnt-on food deposits containing starch or protein 1 Water and energy saving programme Maximum cleaning performance Crockery Food deposits Programme features Tempe...
Page 78 - Programme chart; Programme
Programme chart 78 Programme Programme sequence Pre-wash Main wash Interim rinse Final rinse Drying °C °C ECO 1 47 34 Auto 45–65 °C Variable programme sequence, sensor-controlled adjustment to load size and level of soiling As required 45–65 As required 55–70 Intensive 75 °C 75 55–70 Q...
Page 80 - Further programmes; PowerWash 60 °C; programme to clean it. The
Programme chart 80 Further programmes PowerWash 60 °C Programme for cleaning a mixed loadwith fresh food deposits which havebegun to dry on. ExtraQuiet 55 °C Very quiet programme with longerduration. This programme is suitable fora mixed load with lightly dried on fooddeposits. Maintenance progra...
Page 81 - Programme options; Selecting programme options
Programme options 81 Selecting programme options You can use programme options toadjust the programmes. To do this, you can select or deselectthe programme options before startingthe programme. Open the door. Switch the dishwasher on with the button. The indicator light next to theprogramme s...
Page 82 - Cleaning and care; Damage caused by unsuitable; Cleaning the wash cabinet; programme to clean the; Intensive 75 °C
Cleaning and care 82 Check the condition of yourdishwasher regularly (approx. every4–6 months). This way, faults andproblems can be avoided. Damage caused by unsuitable cleaning agents.All surfaces of this appliance aresusceptible to scratching. Contactwith unsuitable cleaning agents canalter or d...
Page 83 - Cleaning the control panel; only; Cleaning the appliance front
Cleaning and care 83 Cleaning the door and the doorseal The door seal and the sides of thedishwasher door are not accessed andcleaned by the spray arm jets. As aresult, mould can develop here. Wipe the door seals regularly with adamp cloth to remove food deposits. Wipe off any food or drink resi...
Page 84 - Cleaning the AutoDos
Cleaning and care 84 Cleaning the AutoDos You should check that the detergentfill channel is clean every time youreplace the PowerDisk, and clean it ifnecessary, e.g. powder residues.This should be done at the latestwhen the Clean AutoDos message is displayed. This helps keep theAutoDos working prop...
Page 86 - Cleaning the spray arms; Damage due to soiling entering
Cleaning and care 86 Cleaning the spray arms Particles of food can get stuck in thespray arm jets and bearings. The sprayarms should therefore be inspectedregularly (approx. every 2–4 months). Never run a wash programmewithout using the spray arms. Damage due to soiling entering the circulation sy...
Page 87 - Removing the upper spray arm
Cleaning and care 87 Removing the upper spray arm Push the upper spray arm upwards to engage the inner ratchet. Thenunscrew the spray arm by rotating thescrew thread anti-clockwise (whenviewed from below) . Removing the middle spray arm Rotate the screw thread of the middlespray arm clockwi...
Page 88 - Refitting the spray arms
Cleaning and care 88 Refitting the spray arms Reinstall the upper spray arm andtighten it by hand. Reinstall the middle spray arm. Refit the lower spray arm and ensurethat the filter combination lies flat inthe base of the wash cabinet. Rotate the screw thread of the lowerspray arm clockwise...
Page 89 - Cleaning the filters
Cleaning and care 89 Checking the filters in thewash cabinet The filter combination in the base of thewash cabinet retains coarse soilingfrom the suds solution. This preventssoiling getting into the circulationsystem and re-entering the washcabinet through the spray arms. Damage due to soiling ent...
Page 91 - Cleaning the water inlet filter; Never
Cleaning and care 91 Cleaning the water inlet filter A filter is incorporated in the screwthread to protect the water inlet valve. Ifthe filter is soiled, insufficient waterflows into the wash cabinet. Risk of electric shock. The plastic housing of the waterconnection contains an electricalvalve.T...
Page 92 - Cleaning the drain pump
Cleaning and care 92 Cleaning the drain pump If water remains in the wash cabinetafter the end of a programme, the waterhas not been pumped away. The drainpump may be blocked by foreignobjects. These foreign objects are easyto remove. Disconnect the dishwasher from thepower supply. To do this, swi...
Page 93 - Risk of injury from glass
Cleaning and care 93 The drain pump (see arrow) isunderneath the cover. Risk of injury from glass splinters.It is especially difficult to see glasssplinters in the drain pump.Take care when cleaning the drainpump. Carefully remove all foreign objectsfrom the drain pump. Check the drainpump impel...
Page 94 - Problem solving guide; Technical problems; Problem
Problem solving guide 94 With the help of the following guide, minor faults in the performance of theappliance, some of which may result from incorrect operation, can be remediedwithout contacting Miele. This will save you time and money because you won'tneed a service call. Please note that a call-...
Page 95 - Fault messages
Problem solving guide 95 Fault messages Problem Possible cause and remedy The optical in-operationindicator light isflashing quickly. The alarm tone issounding. One of the followingfaults appears in thedisplay: Before rectifying the problem, you must: Switch the dishwasher off. Fault FXX There...
Page 96 - Door release; Switch the dishwasher back on.
Problem solving guide 96 Door release Problem Possible cause and remedy The optical in-operationindicator light isflashing quickly. The alarm tone issounding. The following fault isindicated in the display: Before rectifying the problem, you must: Switch the dishwasher off. Door fault The door...
Page 97 - Water intake fault
Problem solving guide 97 Water intake fault Problem Possible cause and remedy The optical in-operationindicator light isflashing quickly. The alarm tone issounding. One of the followingmessages appears inthe display: Turn on tap The tap is turned off. Turn on the tap fully. Water intake Be...
Page 98 - Water drainage fault; Switch the dishwasher off.
Problem solving guide 98 Water drainage fault Problem Possible cause and remedy The optical in-operationindicator light isflashing quickly. The alarm tone issounding. The following messageappears in the display: Drain Before rectifying the problem, you must: Switch the dishwasher off. Water dra...
Page 99 - General problems with the dishwasher
Problem solving guide 99 General problems with the dishwasher Problem Possible cause and remedy The indicator lights andthe display are dark. The dishwasher has switched off automatically tosave energy. Switch the dishwasher back on with the button. Detergent residue is leftin the detergentcomp...
Page 100 - Noises
Problem solving guide 100 Noises Problem Possible cause and remedy Knocking noise in thewash cabinet. A spray arm is knocking against a crockery piece. Carefully open the door and rearrange the washitems that are obstructing the spray arm. Rattling noise in thewash cabinet. Items of crockery are n...
Page 101 - Unsatisfactory cleaning result
Problem solving guide 101 Unsatisfactory cleaning result Problem Possible cause and remedy The dishes are notclean. The items were not loaded correctly. See notes under “Loading the dishwasher”. The programme was not thorough enough. Select a more intensive programme (see“Programme chart”). Ac...
Page 105 - Service; Contact in case of fault
Service 105 Contact in case of fault In the event of any faults which youcannot remedy yourself, please contactMiele. You can book a Miele customerservice call-out online atwww.miele.com.au/service orwww.miele.co.nz/service. Contact information for Miele can befound at the end of this booklet. Pleas...
Page 106 - Optional accessories; PowerDisk
Optional accessories 106 Dishwasher detergent, rinse aid, andcleaning and care products areavailable for this dishwasher, as areoptional accessories. All the products have been designed forMiele appliances. These and many other useful productscan be ordered from the Miele onlinestore or a Miele Expe...
Page 107 - Appliance care; IntenseClean; Descaling agent
Optional accessories 107 Appliance care Miele cleaning and care productsprovide optimum care for yourdishwasher. IntenseClean - for use with the Maintenance programme (depending on model)without detergent dispensing - cleans the dishwasher effectively and thoroughly - removes grease, bacteria and as...
Page 108 - The Miele Waterproof system; Danger to health due to rinsing
Installation *INSTALLATION* 108 The Miele Waterproof system Provided that your dishwasher hasbeen installed correctly, the MieleWaterproof system will protect you fromwater damage throughout its lifetime. Water intake Danger to health due to rinsing water.Water in the dishwasher must not beused as...
Page 109 - will appear in
Installation *INSTALLATION* 109 A tap with a ¾" male thread must beprovided on site. If this type of tap isnot available, only a qualified plumbermay connect the dishwasher to thehousehold water supply. The dishwasher must be connected to amains water supply in accordance withcurrent local and n...
Page 110 - Drainage; The drain hose must not be shortened.
Installation *INSTALLATION* 110 Drainage The appliance drainage system is fittedwith a non-return valve, which preventsdirty water from flowing back into thedishwasher via the drain hose. The dishwasher is supplied withapprox. 1.5 m of flexible drain hose withan internal diameter of 22 mm. The hose ...
Page 111 - Venting the water drainage
Installation *INSTALLATION* 111 Venting the water drainage If the on-site drainage connection issituated lower than the guide for therollers of the lower basket in the door,the drainage system must be vented.Otherwise, a siphoning effect during aprogramme can cause the appliance toempty itself of wa...
Page 112 - Electrical connection; Risk of fire from overheating.
Installation *INSTALLATION* 112 Electrical connection The dishwasher is supplied with amains cable with moulded plug readyfor connection to an earthed socket. The socket must be easily accessibleafter the dishwasher has been installed.If the switch is not accessible afterinstallation, an additional ...
Page 113 - Technical data; Dishwasher model
Technical data 113 Technical data Dishwasher model Normal XXL Height 80.5 cm(adjustable by+6.5 cm) 84.5 cm(adjustable by+6.5 cm) Niche height min. 80.5 cm (+6.5 cm) min. 84.5 cm (+6.5 cm) Width 59.8 cm 59.8 cm Niche width 60 cm 60 cm Depth 57 cm 57 cm Weight max. 47 kg max. 54 kg Voltage see data pl...
Page 115 - Miele New Zealand Limited
Miele Head Office Melbourne: Level 4, 141 Camberwell RoadHawthorn East, VIC 3123 Miele Experience Centre South Melbourne: 206-210 Coventry StreetSouth Melbourne, VIC 3205 Miele Experience Centre and Office Sydney: 3 Skyline PlaceFrenchs Forest, NSW 2086 Miele Experience Centre and Office Brisbane: T...


 Miele 11387580
User Manual
Miele 11387580
User Manual
 Miele 11387590
User Manual
Miele 11387590
User Manual
 Miele 11388120
User Manual
Miele 11388120
User Manual
 Miele 11388260
User Manual
Miele 11388260
User Manual
 Miele 11388290
User Manual
Miele 11388290
User Manual
 Miele 11636710
User Manual
Miele 11636710
User Manual
 Miele 11636720
User Manual
Miele 11636720
User Manual
 Miele 11636760
User Manual
Miele 11636760
User Manual