Page 3 - Contents
Contents 3 Guide to the appliance .......................................................................................... 6 Appliance overview ................................................................................................. 6Control panel ...........................................
Page 5 - After sales service
Contents 5 After sales service ............................................................................................... 83 Repairs .................................................................................................................. 83Warranty ......................................
Page 6 - Guide to the appliance; Appliance overview
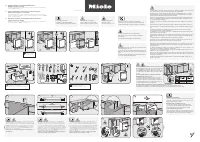
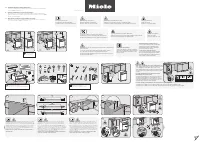
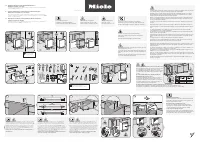
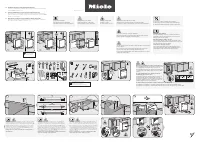
Guide to the appliance 6 Appliance overview a Upper spray arm (not visible) b Cutlery tray (depending on model) c Upper basket d Middle spray arm e Air inlet for drying (depending onmodel) f Lower spray arm g Filter combination h Data plate i Rinse aid reservoir j Dual compartment detergentdispenser...
Page 7 - Control panel; Turbo
Guide to the appliance 7 Control panel a Programme selectionAuto = Sensor wash = Gentle 45°C ECO = ECO 50°C = Light soiling 50°C 75°C = Pots & pans 75°C b Time display c Check/Refill indicators / = Inlet/Drain = Rinse aid = Salt d / button (Start/Stop) with indicator light e De...
Page 8 - Warning and Safety instructions
Warning and Safety instructions 8 This dishwasher complies with current safety requirements.Inappropriate use can, however, lead to personal injury anddamage to property. To avoid the risk of accidents and damage to the dishwasher,please read the installation plan and the operating instructionscaref...
Page 9 - Correct application; This appliance is designed for domestic use and for use in similar
Warning and Safety instructions 9 Correct application This appliance is designed for domestic use and for use in similar environments by guests in hotel or motel rooms, bed & breakfastsand other typical living quarters. This does not include common/shared facilities or commercial facilities wi...
Page 10 - Safety with children
Warning and Safety instructions 10 Safety with children Young children must not be allowed to use this appliance. Older children may only use the appliance when its operation has been clearly explained to them and they are able to use it safely,recognising the dangers of misuse. Cleaning work ...
Page 11 - Technical safety
Warning and Safety instructions 11 Technical safety Repairs and other work by unqualified persons could be dangerous. Installation, maintenance work and repairs to electricalappliances must only be carried out by a Miele approved servicetechnician. Before installation, check the dishwasher for v...
Page 14 - Correct installation
Warning and Safety instructions 14 In areas which may be subject to infestation by cockroaches or other vermin, pay particular attention to keeping the appliance andits surroundings in a clean condition at all times. Any damage whichmay be caused by cockroaches or other vermin will not be coveredb...
Page 15 - Correct use
Warning and Safety instructions 15 Correct use Do not use solvents in the dishwasher. Danger of explosion! Do not inhale or ingest dishwasher detergent. Some dishwasher detergents are strongly alkaline and contain irritants or corrosiveingredients. They can be extremely dangerous if swallowed, a...
Page 16 - In an appliance with a cutlery basket (depending on model) cutlery; Accessories; Use only genuine original Miele spare parts. If spare parts or; Disposal of your old dishwasher; Make the door lock inoperative so that children cannot
Warning and Safety instructions 16 In an appliance with a cutlery basket (depending on model) cutlery is cleaned and dried more efficiently if placed in the basket with thehandles downwards. However, to avoid the risk of injury, placeknives and forks etc. with the handles upwards. Plastic items ...
Page 17 - Caring for the environment; – Corrugated cardboard made from up
Caring for the environment 17 Disposal of the packingmaterial The packaging is designed to protectthe appliance from damage duringtransportation. The packaging materialsused are selected from materials whichare environmentally friendly for disposaland should be recycled. The packaging consists of th...
Page 18 - Energy-saving dishwashing; ECO
Caring for the environment 18 Energy-saving dishwashing This dishwasher is exceptionallyeconomical in its use of water andelectricity.You can make the most of yourappliance by following these tips: – For most economical dishwashing, make full use of the baskets withoutoverloading the dishwasher. – C...
Page 19 - Before using for the first time; Opening the door; Water in the dishwasher may be; Closing the door; Push the baskets right in.; Safety lock
Before using for the first time 19 Opening the door To open the door, reach under thedoor grip and pull. If the door is opened during operation,all functions are automaticallyinterrupted. Water in the dishwasher may be hot. Danger of scalding!Only open the door during operationif absolutely nece...
Page 20 - Water softener; – The water softener requires
Before using for the first time 20 Water softener In order to achieve good cleaningresults, the dishwasher needs tooperate with soft water. Hard waterresults in a build-up of calcium depositson crockery and in the dishwasher. Mains water with a hardness levelhigher than 0.7 mmol/l (4 °d - Germanscal...
Page 21 - whilst
Before using for the first time 21 Displaying and setting the waterhardness level Switch the dishwasher off with the button, if it is switched on. Press the / button in and, whilst holding it in , switch the dishwasher on using the button. Keep the / button pressed in for at least...
Page 23 - – domestic dishwasher detergent,; Dishwasher salt; not
Before using for the first time 23 Before using the appliance forthe first time, you require: – approx. 2 litres of water, – approx. 2 kg dishwasher salt, – domestic dishwasher detergent, – rinse aid formulated for domestic dishwashers. Every dishwasher is tested at thefactory. There will be residua...
Page 24 - Filling the salt reservoir
Before using for the first time 24 Filling the salt reservoir Before filling the salt reservoir withdishwasher salt for the first time, youmust fill it with approx. 2 litres ofwater to enable the salt to dissolve.Once the dishwasher has been used,there is always sufficient water in thereservoir. R...
Page 25 - Add salt reminder
Before using for the first time 25 Add salt reminder Fill the salt reservoir with dishwashersalt when the Salt indicator light comes on (If it comes on during aprogramme, wait until the end of theprogramme). Risk of corrosion! Immediately after filling the saltreservoir, run the Gentle 4...
Page 26 - Rinse aid; Adding rinse aid
Before using for the first time 26 Rinse aid Rinse aid is necessary to ensure waterdoes not cling and leave marks oncrockery during the drying phase andhelps crockery dry faster after it hasbeen washed. Rinse aid is poured into the storagereservoir and the amount set isdispensed automatically. Ina...
Page 27 - Add rinse aid reminder
Before using for the first time 27 Add rinse aid only until it is visible inthe opening. The rinse aid reservoir holds approx.110 ml. Close the flap firmly so that it clicksinto place. Otherwise water can enterthe rinse aid reservoir during aprogramme. Wipe up any spilled rinse aid. Thispreven...
Page 28 - Setting the rinse aid dosage
Before using for the first time 28 Setting the rinse aid dosage You can adjust the rinse aid dosage forbest results. The rinse aid dosage is set in stagesfrom 0 to 6. It is set to 3 at the factory.This is the recommended setting. If the "Adjust Sensor wash" programmefunction (depending on mo...
Page 29 - Loading the dishwasher; Notes
Loading the dishwasher 29 Notes Remove coarse food residues fromcrockery. There is no need to rinse items underrunning water. Do not wash items soiled with ash, sand, wax, lubricating grease orpaint in the dishwasher. Ash doesnot dissolve and is distributed in thewash cabinet. Wax, sand, lubricati...
Page 30 - Items not suitable for dishwashers:
Loading the dishwasher 30 Items not suitable for dishwashers: – Wooden cutlery and crockery or items with wooden parts: these maydiscolour and fade. The glue used inthese items is not dishwasher-proofand wooden handles may comeloose after being washed in adishwasher. – Craft items, antiques, valuabl...
Page 31 - Upper basket; For safety reasons, do not; Cup rack
Loading the dishwasher 31 Upper basket See "Loading the dishwasher /Loading examples" for examples ofhow to load crockery and cutlery. For safety reasons, do not operate the dishwasher without theupper and lower baskets in place(except when running the Tall items programme, if available). ...
Page 32 - Adjusting the upper basket
Loading the dishwasher 32 Adjusting the upper basket In order to gain more space for tallerpieces of crockery in the bottom orupper basket, the upper basket can beadjusted on three levels with 2 cmbetween each level. The upper basket can also be set at anangle with one side high and the otherside lo...
Page 33 - Lower basket; MultiComfort area
Loading the dishwasher 33 Lower basket See "Loading the dishwasher -Loading examples" for examples ofhow to load crockery and cutlery. For larger and heavier items such asplates, serving platters, saucepans,bowls, etc.Glasses, cups and small items suchas saucers can also be placed in thelo...
Page 34 - Cutlery; Cutlery tray
Loading the dishwasher 34 Cutlery Cutlery tray See "Loading the dishwasher -Loading examples" for examples ofhow to load crockery and cutlery. Arrange the cutlery in the tray asshown. To make unloading much easier, cutleryshould be grouped in zones, one forknives, one for forks, one for sp...
Page 35 - Cutlery basket
Loading the dishwasher 35 Cutlery basket (depending on model) The cutlery basket can be placedanywhere on the front rows of spikes inthe lower basket. To avoid the risk of injury, knives andforks should be placed with thehandles upwards in the basket.However, cutlery placed handle downin the baske...
Page 36 - Loading examples; Dishwashers with cutlery tray
Loading the dishwasher 36 Loading examples Dishwashers with cutlery tray Upper basket Lower basket
Page 38 - Dishwashers with cutlery basket
Loading the dishwasher 38 Dishwashers with cutlery basket Upper basket Lower basket
Page 40 - Comparison tests; Standard height with cutlery tray; Standard programme
Comparison tests 40 Standard height with cutlery tray Test standard: AS/NZS 2007.1:2005, AS/NZS 2007.2:2005;AS/NZS 6400:2005 Standard programme for energy label comparisontests: ECO Capacity: 14 place settings Detergent quantity: 32.5 g in Compartment II Rinse aid dispensing: Setting 3 You can fi...
Page 41 - Capacity
Page 43 - XXL height with cutlery tray
Comparison tests 43 XXL height with cutlery tray Test standard: AS/NZS 2007.1:2005, AS/NZS 2007.2:2005;AS/NZS 6400:2005 Standard programme for energy label comparisontests: ECO Capacity: 15 place settings Detergent quantity: 33.7 g in Compartment II Rinse aid dispensing: Setting 3 You can find in...
Page 46 - Standard and XXL height with cutlery basket
Comparison tests 46 Standard and XXL height with cutlery basket Test standard: AS/NZS 2007.1:2005, AS/NZS 2007.2:2005;AS/NZS 6400:2005 Standard programme for energy label comparisontests: ECO Capacity: 14 place settings Detergent quantity: 5.0 g in Compartment I, 27.5 g in Compartment II Rinse aid...
Page 49 - Operation; Detergent; Active ingredients
Operation 49 Detergent Only use detergents formulated for domestic dishwashers. Do notuse washing-up liquid. Active ingredients Modern detergents contain variousactive ingredients, the most importantof which are: – Complexing agents to prevent calcification. – Alkalis to aid the removal of dried o...
Page 50 - Detergent dosage
Operation 50 Detergent dosage Follow the dosage recommended bythe manufacturer on the packaging. Unless directed otherwise, use onedetergent tab or add 20 to 30 mldetergent to compartment II,depending on the level of soiling.With very heavy soiling you can alsoadd a small amount of detergent toc...
Page 51 - Adding detergent
Operation 51 Adding detergent Press the opening catch on thedetergent dispenser. The flap willspring open. The flap is always open at the end of aprogramme. Add the required amount of detergentand close the flap. Make sure that the detergentpackaging is properly closed afteruse to avoid it get...
Page 52 - Switching on the dishwasher; Programme
Operation 52 Switching on the dishwasher Make sure the spray arms are notobstructed. Close the door. Turn on the tap if it is turned off. Switch the dishwasher on with the button. The / indicator light flashes and the indicator light comes on next to theprogramme selected. Selecting a ...
Page 53 - Starting the programme; Press the
Operation 53 Starting the programme Press the / button. The programme will begin. The / indicator light comes on. A programme should only becancelled in the first few minutes, ifat all. Otherwise importantprogramme stages could be omitted. Display The duration of the programme selectedappe...
Page 54 - Energy management; Programme finished; The programme has ended when
Operation 54 Energy management To save energy, the dishwasher willswitch off automatically 10 minutesafter the last time a button has beenpressed or 10 minutes after the end ofthe programme (see "Programmeoptions - Optimise standby"). Press the button to switch the dishwasher back on. Th...
Page 55 - Switching off; At the end of a programme:; Unloading the dishwasher
Operation 55 Switching off At the end of a programme: The dishwasher can be switched offat any time using the button. Switching the dishwasher off during aprogramme stops the programme. Switching the dishwasher off during therun-up to a Delay start time will alsostop the process. If the dishwas...
Page 56 - Interrupting a programme; Changing a programme; Press and hold the
Operation 56 Interrupting a programme A programme is interrupted as soon asthe door is opened. If the door is closed again, theprogramme will continue from the pointit was at before the door was opened. Water in the dishwasher may be hot. Danger of scalding!Only open the door if absolutelynecessar...
Page 57 - Programme options; DetergentAgent
Programme options 57 Turbo The Turbo option reduces the duration of programmes in which this option isavailable. In order to achieve optimum cleaningresults, consumption rates areincreased with this option. Switch the dishwasher on with the button. The / indicator light will flash. Select...
Page 59 - Delay start; immediately
Programme options 59 Delay start You can set the start time for aprogramme, e.g. to take advantage ofnight time electricity tariffs. The starttime can be delayed between 30minutes and 24 hours. The delay period is shown in 30minutes increments for a delay periodbetween 30 minutes and 9 hours 30minut...
Page 61 - Adjust Sensor wash; Sensor wash
Programme options 61 Adjust Sensor wash You can adjust the Sensor wash programme so that it will removestubborn soiling in a lightly soiled load. Switch the dishwasher off with the button, if it is switched on. Press the / button in and, whilst holding it in , switch the dishwasher on usi...
Page 62 - Optimise standby
Programme options 62 Optimise standby "Optimise standby" is activated bydefault. To save energy, the dishwasher willswitch off automatically a few minutesafter the last time a button has beenpressed or after the end of aprogramme. The dishwasher will not switch offwhilst a programme is runni...
Page 63 - Factory default settings
Programme options 63 Factory default settings If you have altered any settings from thefactory default, you can reset themback to the factory default settings asfollows: Switch the dishwasher off with the button, if it is switched on. Press the / button in and, whilst holding it in , swit...
Page 64 - Programme chart
Programme chart 64 Programme Programme sequence Pre-wash Main wash Interim rinse Final rinse Drying °C °C Sensor wash Variable programme sequence, sensor-controlled adjustment according to amount of crockery and soiling If required 47-55 If required 65 X Gentle 45°C X 44 X 65 X ECO 1) X 50 50 X Li...
Page 65 - Consumption
Programme chart 65 Consumption 2) Duration 2) Electricity Water Cold water Hot water Litres Cold water Hot water kWh kWh h:min h:min 0.85 3) -1.35 4) 0.65 3) -0.90 4) 13.5 3) -16.0 4) 1:30-2:50 1:25-2:40 1.05 0.60 19.0 1:48 1:38 0.88 5) / 0.85 0.37 5) / 0.38 14.0 2:22 5) / 2:29 6) 2:11 5) / 2:23 1.4...
Page 66 - Crockery
Programme chart 66 Mixed, everyday crockery Heat-sensitive glasses and plastic Mixed crockery Pots, pans, everyday porcelain and cutlery All fresh to dried-on food deposits Fresh, easily removed food deposits Normal food deposits which have begun to dry on Fresh food deposits which have begun to dry...
Page 67 - Light soiling 50°C; Compartment I
Programme chart 67 - 25 ml or 1 tab Sensor wash +Turbo - 20 ml or 1 tab Gentle 45°C +Turbo - 25 ml or 1 tab ECO - 25 ml or 1 tab Light soiling 50°C +Turbo 10 ml 25 ml or 1 tab Pots & pans 75°C 2) see "Detergent" Detergent Compartment I 2) Compartment II 2) Programme
Page 68 - Cleaning and care; The external surfaces of this; Cleaning the wash cabinet; programme
Cleaning and care 68 Check your dishwasher regularly(approx. every 4-6 months). This wayfaults and problems can be avoided. The external surfaces of this appliance are all susceptible toscratching.Contact with unsuitable cleaningagents can alter or discolour theexternal surfaces. Cleaning the wash...
Page 69 - Cleaning the door front
Cleaning and care 69 Cleaning the door front Soiling that is left too long might become impossible to remove andcould cause external surfaces to alteror discolour.Remove any soiling immediately. Clean the front with a solution ofwarm water and a little washing-upliquid applied with a soft sponge...
Page 70 - This dishwasher must not be; Cleaning the filters; Switch the dishwasher off.
Cleaning and care 70 Checking the filters in thewash cabinet The filter combination in the base of thewash cabinet retains coarse soil fromthe suds solution, preventing itaccessing the circulation system andre-entering the cabinet through thespray arms. This dishwasher must not be used without all...
Page 71 - Press the catches
Cleaning and care 71 To clean the inside of the filter, the flapmust be opened: Press the catches together in the direction of the arrows as shown, andopen the filter . Rinse all the filters under runningwater. Then close the flap so that the catchengages. Replace the filter combination ...
Page 72 - Cleaning the spray arms; top
Cleaning and care 72 Cleaning the spray arms Particles of food can get stuck in thespray arm jets and bearings. The sprayarms should therefore be inspected andcleaned regularly (approx. every 4 - 6months). Switch the dishwasher off. Remove the spray arms as follows: Take out the cutlery tray (if...
Page 73 - Problem solving guide; Technical problems; Problem
Problem solving guide 73 With the help of the following guide, minor faults in the performance of theappliance, some of which may result from incorrect operation, can be put rightwithout contacting Miele. This will save time and money. Please note that a call-out charge will be applied to unnecessar...
Page 74 - There may be a technical fault.
Problem solving guide 74 Problem Possible cause and remedy The / and indicator lights areflashing at the sametime.Fault number is visible in the display. There may be a technical fault. Switch the dishwasher off with the button. Switch the dishwasher back on after a fewseconds. Sel...
Page 75 - Water inlet fault
Problem solving guide 75 Water inlet fault Problem Possible cause and remedy The / indicator light flashes on and off. The tap is turned off. Turn on the tap fully. The dishwasher stopsduring a programme.The / indicator light flashes.Fault code or appears in the display. Before rec...
Page 76 - General problems
Problem solving guide 76 General problems Problem Possible cause and remedy The indicator lights anddisplay are dark. The dishwasher has switched off automatically tosave energy. Switch the dishwasher on again with the button. Detergent residue is leftin the dispenser at theend of a programme. T...
Page 77 - Noises
Problem solving guide 77 Noises Problem Possible cause and remedy Knocking noise in thewash cabinet. A spray arm is knocking against an item in a basket. Interrupt the programme, and rearrange the itemswhich are obstructing the spray arm. Rattling noise in thewash cabinet. Items of crockery are in...
Page 78 - Unsatisfactory washing result
Problem solving guide 78 Unsatisfactory washing result Problem Possible cause and remedy The dishes are notclean. The dishes were not loaded correctly. See notes in "Loading the dishwasher". The programme was not powerful enough. Select a more intensive programme (see"Programme chart...
Page 81 - Maintenance; Cleaning the water inlet filter; The plastic housing of the water
Maintenance 81 Cleaning the water inlet filter A filter is incorporated in the screwconnection of the valve on the waterinlet hose. The filter must be cleanedwhen dirty, otherwise insufficient waterflows into the wash cabinet. The plastic housing of the water connection contains an electricalcompo...
Page 82 - Lift out the non-return valve
Maintenance 82 Cleaning the drain pump andnon-return valve If the water has not been pumped awayat the end of a programme, the drainpump or the non-return valve might beblocked. They are, however, easy toclean. Disconnect the dishwasher from themains supply. Switch off at the mainssocket and withd...
Page 83 - Repairs
After sales service 83 Repairs In the event of any faults which youcannot remedy yourself, please contactMiele. The contact details for Miele aregiven at the back of theseinstructions. When contacting Miele, please quotethe model and serial number of yourdishwasher, both of which are shownon the dat...
Page 84 - Optional accessories; Detergent tabs
Optional accessories 84 Dishwasher detergent and rinse aid, aswell as cleaning and care products, areavailable as optional accessories.All the products are designed for usewith Miele dishwashers. These and many other useful productscan be ordered via the internet atwww.miele-shop.com (depending onco...
Page 85 - Dishwasher care products
Optional accessories 85 Dishwasher care products Miele cleaning and care productsprovide optimum care for yourdishwasher. Dishwasher cleaner – cleans the dishwasher effectively and thoroughly – removes grease, bacteria and unpleasant odours – ensures excellent dishwashing results Dishwasher descaler...
Page 86 - Electrical connection; The electrical socket must be
Electrical connection 86 This dishwasher is supplied with amains cable with moulded plug readyfor connection to an AC single phasesupply, (230 - 240 V 50 Hz for NZ andAustralia) via a suitable switchedsocket. The electrical socket must be easily accessible after thedishwasher has been installed. D...
Page 87 - Water connection; The Miele Waterproof system
Water connection 87 The Miele Waterproof system As long as your dishwasher has beeninstalled correctly, the Miele waterproofanti-leak system will protect you fromwater damage. Connection to the water supply Water in the dishwasher must not be used as drinking water. IMPORTANT Australia and New Z...
Page 88 - Drainage; Venting the drainage system
Water connection 88 Drainage – The appliance drainage system is fitted with a non-return valve whichprevents dirty water from flowingback into the dishwasher via thedrain hose. – The dishwasher is supplied with approx. 1.5 m of flexible drain hosewith an internal diameter of 22 mm. – The drain hose ...
Page 89 - Technical data; Dishwasher model
Technical data 89 Dishwasher model Standard XXL Height freestanding model 84.5 cm (adjustable +3.5 cm) - Height built-in model 80.5 cm (adjustable +6.5 cm) 84.5 cm (adjustable +6.5 cm) Height of building-in recess Min. 80.5 cm (+ 6.5cm) Min. 84.5 cm (+ 6.5cm) Width 59.8 cm 59.8 cm Width of building-...
Page 91 - Miele New Zealand Limited
www.miele.com.au Miele Experience Centre and Head Office Melbourne: 1 Gilbert Park DriveKnoxfield, VIC 3180 Miele Experience Centre South Melbourne: 206-210 Coventry StreetSouth Melbourne, VIC 3205 Miele Experience Centre and Office Sydney: 3 Skyline PlaceFrenchs Forest, NSW 2086 Miele Experience Ce...


 Miele 11387580
User Manual
Miele 11387580
User Manual
 Miele 11387590
User Manual
Miele 11387590
User Manual
 Miele 11388120
User Manual
Miele 11388120
User Manual
 Miele 11388260
User Manual
Miele 11388260
User Manual
 Miele 11388290
User Manual
Miele 11388290
User Manual
 Miele 11636710
User Manual
Miele 11636710
User Manual
 Miele 11636720
User Manual
Miele 11636720
User Manual
 Miele 11636760
User Manual
Miele 11636760
User Manual