Page 2 - Contents
Description of the machine . . . . . . . . . . . . . . . . . . . . . . . . . . . . . . . . . . . . . . . . . . 3 Guide to the machine . . . . . . . . . . . . . . . . . . . . . . . . . . . . . . . . . . . . . . . . . . . . . . . 4 Warning and Safety instructions . . . . . . . . . . . . . . . . . . . ...
Page 3 - Description of the machine
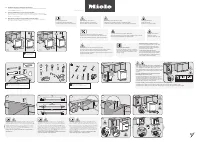
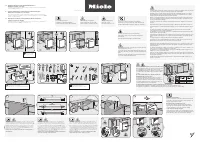
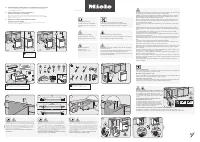
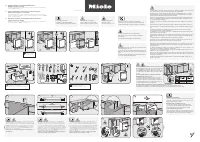
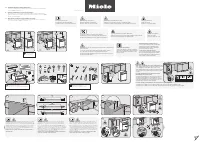
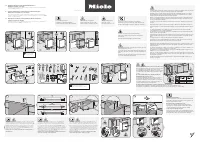
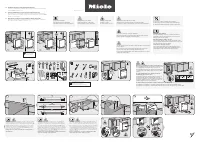
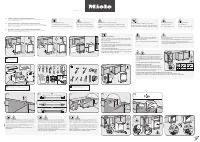
This Miele machine is a front-loadingcommercial dishwasher, with very shortbatch times. It is especially suitable foruse in cafes, fast food outlets,restaurants, guest houses etc.It operates on the freshwater systemand is equipped with a water softeneras standard. Description of the machine 3
Page 4 - Guide to the machine
a On/Off button (I-0) b Door release button c Display d Delay start indicator light (seeProgramming special functions) e Drying indicator light f Programme start indicator light g Start button h Drying button i Button to change between thecurrent temperature and elapsedtime in the display j Optical ...
Page 6 - Correct use; explosion or of freezing conditions.; Warning and Safety instructions
This machine complies with allrelevant local and national safetyrequirements. Incorrect use can leadto personal injury and damage toproperty.Read the operating instructionscarefully before starting to use thismachine. This way you will avoid therisk of accidents and damage to themachine.Keep these i...
Page 10 - Caring for the environment
Disposal of the packingmaterial The transport and protective packinghas been selected from materials whichare environmentally friendly for disposaland can normally be recycled. Ensure that any plastic wrappings,bags etc. are disposed of safely andkept out of the reach of babies andyoung children. Da...
Page 11 - Set the water softener unit; Filling the salt reservoir with; Add rinsing agent; Inadvertently filling the reservoir; Load the machine carefully; Before using for the first time
Before using for the first time pleasepay special attention to the followingpoints. Detailed information on these pointscan be found in the relevant sections ofthese Operating Instructions. Set the water softener unit The water softener unit must be set forthe water hardness level in your area. The ...
Page 12 - Open the door; Do not touch the heating; To close the door; Opening and closing the door
Open the door a ^ Press the door button in as far as itwill go, and at the same time, grip thehandle and open the door. The door should only be opened duringoperation for emergencies, e.g. ifarticles are knocking together or if aprogramme fault is indicated in thedisplay (see "Cancelling aprogra...
Page 13 - Water softener
The water needs to be softened toavoid calcium deposits building up onutensils and in the machine itself. To ensure a steady supply of soft water,the water softener unit must always be: 1. correctly programmed and 2. the salt reservoir must be filled. If the water hardness level is below 4°d - Germa...
Page 14 - Table of settings
Table of settings °d (German scale) mmol/l °f Setting 123456789 101112131415161718 19 2021222324252627282930313233343536373839404142434445 0.20.40.50.70.91.11.31.41.61.82.02.22.32.52.72.93.13.23.43.63.84.04.14.34.54.74.95.05.25.45.65.85.96.16.36.56.76.87.07.27.47.67.77.98.1 24579 1113141618202223252...
Page 15 - Setting the water softener
Setting the water softener ^ Switch the machine off. ^ Turn the programme selector to theSTOP position f . ^ Press 4 and 6 at the same time, hold them in and, whilst doing so,switch the machine on with the I-0 button.The current programme status "P..."will show in the display.The indicator l...
Page 16 - Filling the salt reservoir
Filling the salt reservoir Please only use special coarse grainedreactivation salt with granules ofapprox. 1-4 mm. Do not use other typesof salt, e.g. table salt, agricultural orgritting salt. These could containcomponents which are insoluble in wa-ter which could result in damage to thewater soften...
Page 17 - Salt indicator; When the salt reservoir is empty the
Salt indicator When the salt reservoir is empty the k indicator light b comes on to remind you to fill the reservoir. Reactivation takes place automaticallyduring a programme.The programme sequence indicatorlight k a lights up whilst this is happening. Water softener 17
Page 18 - Preparing the load; Ensure that no acid or solvent; Please note; Loading the machine
Loading the machine Preparing the load ^ Empty all containers before loadinginto the machine. , Ensure that no acid or solvent residues, especially hydrochloricacid or chlorides, get into the washcabinet. Please note ^ Load items so that water will comeinto contact with all surfaces. Thisensures tha...
Page 21 - Adjusting the top basket; Example: Top basket O 881
Adjusting the top basket The top basket can be adjusted aboveand below the middle position by 2.5cm. It is set in the middle position ondelivery. Depending on the position of the topbasket, plates of the following diametercan be accommodated in the baskets: Example: Top basket O 881 Top basketpositi...
Page 22 - Inadvertently filling the rinsing; If the; Adding rinsing agent
Rinsing agent is necessary to ensurewater does not cling and leave markson items during the drying phase andto help items dry faster after they havebeen washed.Rinsing agent is poured into thestorage reservoir and the amount set isdispensed automatically in the finalrinse.The rinsing agent reservoir...
Page 24 - Setting the dosage; rinsing
Setting the dosage The dosage adjuster in the opening hassettings from 1 to 6 (1-6 ml). It is set to3 (3 ml) at the factory as therecommended dosage for rinsing agent . ^ Use a higher setting if there aremarks on the surface of utensils afterdrying. ^ Use a lower setting if the surfacebecomes cloudy...
Page 25 - Adding cleaning agent
, Only use cleaning agents suitable for specialist machines. Donot use detergents formulated fordomestic dishwashers. Powder cleaning agent is dispensedvia the dispenser for powder cleaningagents in the door or liquid cleaningagent via the DOS module (available asan optional extra - see "Note...
Page 26 - Take great care when handling
Note As a chargeable optional extra, thismachine can also be fitted with a DOSModule G 60 dispenser pump for liquidcleaning agent. This is connectedexternally.See Programming special functions forventing the dispensing system andsetting the dosage. The optional DOS Module is suppliedwith its own ins...
Page 27 - Programme Chart; Programme selection
Choose your programme according tothe type of instruments or utensils beingcleaned, and the degree of soiling. The different programmes and theiruses are described overleaf in the Programme Chart . Programme selection 27
Page 28 - Programme chart
Programme When to use Powder cleaning agent (when not using liquid cleaning agent) Follow manufacturer’s instructions D PRE-RINSE To rinse heavily soiled items, (e.g. for removingsoiling or to prevent soiling drying on to disheswhen a complete programme does not yet needto be run). , BEERGLASSES Spe...
Page 29 - Programme sequence
Programme sequence 1. Economy pre-wash 2. Pre-wash 3. Main wash 4. Economy interim rinse 5. Interim rinse I 6. Interim rinse II 2) 7. Final rinse 8. Drying (Additional prog.) X X 50°C/1’ 1) X (X) X —/1’ 3) (X) X 50°C/1’ 1) X (X) X 50°C/1’ 1) (X) X X 55°C/1’ 1) (X) X 60°C/1’ 1) (X) X X 55°C/2’ 1) X (...
Page 30 - Switching on; Starting a programme; Operation
Switching on ^ Close the door. ^ Open the stopcocks (if turned off) . ^ Press the I-0 button. When the programme selector is at theSTOP position f a point lights up in the display. Starting a programme ^ Turn the programme selectorclockwise or anti-clockwise to therequired programme.The temperature ...
Page 31 - Switching off
Changing a programme Provided the START button has not yetbeen pressed, a wrongly selectedprogramme may be changed asdescribed below (if it has beenpressed, see Cancelling a programme): ^ Turn the programme selector to therequired programme. ^ Select additional function DRYING 3 again if required (s...
Page 32 - To cancel a programme; Turn the programme selector to the
To cancel a programme Once a programme is running it shouldonly be cancelled in extreme cases,e.g. when articles in the machine rattleor jostle against each other and have tobe rearranged. ^ Turn the programme selector to the f position (the programme is cancelled after approx. 2 secs.). ^ Open the ...
Page 33 - Selecting a second interim rinse; Programming special functions
For future servicing work, pleasedocument any alterations to the stan-dard factory settings.Enter any alterations in the relevantValue set:_________ box. . 1. Setting the cold water inlet from:Nominal water intake to Nominal wa-ter intake + 1 l. The amount of water taken into themachine at each inta...
Page 35 - Venting the dispensing system:
4. Venting and setting the dosage onDOS modules G 60 and C 60(optional extra) ^ Set the dosage selector on the DOSmodule to position 10 (applies toDOS Module C 60 only). ^ Turn the programme selector to STOP f . ^ Switch the machine off. ^ Press and hold 4 and 6 at the same time, and whilst doing so...
Page 36 - min
5. Altering the temperature and/or thetemperature holding time in the“Main wash” and “Final rinse”programme stages Please make a note of any changesto the temperature and / or thetemperature holding time in theappropriate section of theprogramme chart. The programme chart shows the factorysettings f...
Page 40 - Cleaning the coarse filter; Remove the coarse filter.; Cleaning and care
Cleaning the filters in the washcabinet , The machine must not be used without all the filters in place. The filter combination in the base ofthe wash cabinet should beinspected regularly and cleaned ifnecessary. , Caution: Watch out for glass splinters whichcould cause injury. Cleaning the coarse f...
Page 41 - Cleaning the spray arms; Remove the spray arms as follows:; upper; Remove the; middle
Cleaning the spray arms Waste particles can lodge in the sprayarm jets.The spray arms should be inspectedand cleaned regularly (approx. every6 months). ^ Use a sharp pointed object to pushparticles into the spray arm jets andrinse well under running water. Remove the spray arms as follows: ^ Unscrew...
Page 42 - Release the locking clamp.
Cleaning the drain pump andnon-return valve If water has not been pumped away atthe end of a programme the drainpump or the non-return valve might beblocked. They are however, easy toclean. ^ Take the filter combination out of thewash cabinet. ^ Release the locking clamp. ^ Lift up the non-return va...
Page 43 - The plastic housing of the water; To clean the filters; Cleaning the control panel; Do not use abrasive cleaners,
Cleaning the filters in the waterinlet Filters are incorporated in the screwconnection of the water inlet hose toprotect the water inlet valve. If thesefilters get dirty they need to be cleaned,otherwise insufficient water flows intothe wash cabinet. , The plastic housing of the water connection con...
Page 44 - Faults / possible causes; The machine does not start; Correcting minor faults
With the aid of the following explanatorynotes, minor faults can be correctedwithout contacting the Miele ServiceDept. Any work on the electrical componentsof the machine should only be carriedout by a suitably qualified andcompetent person in accordance withlocal and national safety regulations.Una...
Page 45 - Remove the cause of the fault.; Customer service
Water in the wash cabinet is notheated; the programme sequencelasts too long This machine has a resettable heaterlimiter which will switch off the heaters ifthey over-heat. This could be causedfor example, by large articles coveringthe heating elements or if the filters inthe wash cabinet are blocke...
Page 46 - Furniture and fittings installed; Installation
Please refer to the installationdiagram supplied with the machine. , Furniture and fittings installed near the machine must be of acommercial standard able towithstand the effects of steam andcondensation. The machine must be installed correctlyand levelled.Any unevenness in the floor level canbe co...
Page 48 - Electrical connection
, All electrical work must be carried out by a suitably qualifiedand competent person inaccordance with local and nationalsafety regulations. ^ Connection should be made via asuitable isolator, with an on-off switchwhich should be easily accessible forservicing work. WARNINGTHIS APPLIANCE MUST BEEAR...
Page 49 - Connection to the water inlet; Water in the machine must not; Plumbing
Connection to the water inlet , Water in the machine must not be used as drinking water. ^ The machine must be connected tothe water supply in accordance withlocal and national water authorityregulations. ^ This machine is constructed tocomply with German waterregulations (DVGW), and may beconnected...
Page 50 - Drainage
Drainage ^ The drainage system is fitted with anon-return valve which prevents dirtywater from flowing back into themachine via the drain hose. ^ The machine should preferably beconnected to a separate drainagesystem on-site.If separate drainage is not availablecontact your Miele applicationspeciali...
Page 51 - Technical data
Height: 85 (82) cm Width: 60 cm Depth: 60 cm Voltage: see data plate Rated load: see data plate Fuse rating: see data plate Mains connection cable: approx. 1.8 m Water pressure (flow rate): 0.5 - 10 bar (50 -1000 kPa) Cold or hot water connection: up to max. 70 °C Delivery head: min. 0.3 m, max. 1 m...