Page 2 - Contents; IMPORTANT SAFETY INSTRUCTIONS
Contents 2 IMPORTANT SAFETY INSTRUCTIONS ............................................................ 5 Guide to the appliance ...................................................................................... 16 Appliance overview ...................................................................
Page 6 - Appropriate use
IMPORTANT SAFETY INSTRUCTIONS 6 Appropriate use This dishwasher is intended for use in the home and in similar en- vironments, for example– in shops, offices, and similar work settings– on agricultural estates– by guests in hotels, motels, bed and breakfasts, and other typicalhome settings. This...
Page 7 - Safety with children
IMPORTANT SAFETY INSTRUCTIONS 7 Safety with children Children must be kept away from the dishwasher unless they are constantly supervised. Children must not be allowed to clean or maintain the appliance. Children should be supervised in the vicinity of the dishwasher. Never allow children to p...
Page 8 - Technical safety; Unauthorized installation, maintenance, and repairs can cause
IMPORTANT SAFETY INSTRUCTIONS 8 Technical safety Unauthorized installation, maintenance, and repairs can cause considerable danger for the user. Installation, maintenance, and re-pairs should only be carried out by a Miele authorized technician. Damage to the dishwasher can compromise your safet...
Page 11 - Correct installation
IMPORTANT SAFETY INSTRUCTIONS 11 If the power cord is damaged, it must only be replaced with a spe- cific cord of the same type (available from Miele Customer Service).For safety reasons, this must only be done by Miele Customer Ser-vice or a service technician authorized by Miele. Do not place ...
Page 12 - Correct use
IMPORTANT SAFETY INSTRUCTIONS 12 A sink in the adjacent cabinet of the dishwasher must be carefully sealed. Regularly check for leaks to avoid damage to the dish-washer. The dishwasher must only be built into a tall cabinet if additional safety precautions are taken. In order to safely install t...
Page 14 - Accessories and parts
IMPORTANT SAFETY INSTRUCTIONS 14 Accessories and parts Only use original Miele accessories. If other parts are used, war- ranty, performance, and, if applicable, product liability claims will beinvalidated. Miele will guarantee to supply functional spare parts for a mini- mum of 10 years and up ...
Page 15 - FCC Declaration of Conformity; These devices comply with FCC Rules Part 15. This equipment; FCC Radiation Exposure Statement; This equipment complies with FCC radiation exposure limits set; Industry Canada Statement; This digital apparatus does not exceed the Class B limits for Ra-
IMPORTANT SAFETY INSTRUCTIONS 15 FCC Declaration of Conformity These devices comply with FCC Rules Part 15. This equipment has been tested and found to be in compliance with the limits for aClass B digital device, pursuant to Part 15 of the FCC Rules of Oper-ation and is subject to the following c...
Page 16 - Guide to the appliance; Appliance overview
Guide to the appliance 16 Appliance overview a Door locking pins b Top spray arm c 3D MultiFlex Cutlery Tray (dependingon model) d Upper basket (depending on model) e Middle spray arm f Aeration valve g Bottom spray arm h Filter combination i Salt reservoir j Data plate k Rinse aid reservoir l Deter...
Page 17 - Control field
Guide to the appliance 17 Control field a In-operation indicator lightFor indicating an ongoing wash pro-gram when the door is closed. b DisplayFor further information, see “Displayfunctions” under “Guide to the appli-ance”. c buttons For program selection. For changing the values displayed. For...
Page 18 - Display functions; OK
Guide to the appliance 18 Display functions The display is used to select or set thefollowing: - the program - the Timer - the Settings The display can show the following: - the program stage - The estimated time left for the pro- gram to run - Any relevant fault messages and in- formation To save...
Page 19 - Caring for the environment; Disposal of your old appliance
Caring for the environment 19 Disposal of the packing mate-rial The cardboard box and packing materi-als protect the appliance during ship-ping. They have been designed to bebiodegradable and recyclable. Ensure that any plastic wrappings,bags, etc. are disposed of safely andkept out of the reach of ...
Page 20 - Before using for the first time; Opening the door; Pull the handle to open the door.; Closing the door; Risk of crushing due to the door
Before using for the first time 20 Every dishwasher is tested at the fac-tory. There will be residual water in themachine from this test. It is not an in-dication that the dishwasher has beenused previously. Opening the door In some programs the door automati-cally opens slightly to assist the dryin...
Page 21 - - Call up information on the operating
Before using for the first time 21 Miele@home Your dishwasher is equipped with anintegrated WiFi module. To use this feature, you will need: - A WiFi network - The Miele app - A Miele user account. The user ac- count can be created via the Mieleapp The Miele app will guide you as youconnect your dis...
Page 22 - Basic settings; Turning on the dishwasher
Before using for the first time 22 Basic settings Turning on the dishwasher Open the door. Turn the dishwasher on with the button. The welcome screen will appear whenthe dishwasher is turned on. For further information about the dis-play functionality, see “Display func-tions” under “Guide to...
Page 23 - Setting the water hardness
Before using for the first time 23 Setting the water hardness The display changes to the screen forsetting the water hardness. - The dishwasher must be pro- grammed to the correct water hard-ness for your area. - Your local water authority will be able to advise you of the water hardnesslevel in you...
Page 24 - After confirming these prompts with; and; Select
Before using for the first time 24 Finally, prompts will appear in the dis-play. After confirming these prompts with OK , the messages Refill salt and Refill rinse aid may appear. Add salt and rinse aid if necessary(see “Reactivation salt” and “Rinseaid” under “Before using for the firstti...
Page 25 - Reactivation salt; lower than 5 gpg
Before using for the first time 25 Reactivation salt In order to achieve good cleaning re-sults, the dishwasher needs to operatewith soft water. Hard water results inthe build-up of calcium deposits ondishes and on the inner surfaces of themachine. Domestic water with a hardness levelhigher than 5 g...
Page 26 - Filling the salt reservoir
Before using for the first time 26 Filling the salt reservoir Before filling the salt reservoir for thefirst time, you must fill it with approx.1/2 gallon (2 l) of water to enable thesalt to dissolve. Once the dishwasher has been usedonce, there is always sufficient waterin the salt reservoir. Rem...
Page 27 - Refilling the salt
Before using for the first time 27 Refilling the salt Fill the salt reservoir with reactivationsalt when Refill salt appears in the display. Confirm with OK . The salt refill indicator will go out. Danger of corrosion due to saline solution.Salt solution that runs out can causecorrosion in...
Page 28 - Rinse aid; Liquid dish soap or detergent
Before using for the first time 28 Rinse aid Rinse aid is necessary to ensure thatwater does not cling and leave markson dishes during the drying phase, andhelps dishes dry faster after they havebeen washed. Rinse aid is poured into the containerand the amount set is dispensed auto-matically. Liqu...
Page 29 - Adding rinse aid
Before using for the first time 29 Adding rinse aid Press the yellow button on the lid of the rinse aid reservoir. The lid will spring open. Fill with rinse aid until the filling levelindicator (arrow) changes to a darkcolor while the door is horizontallyopen. The rinse aid reservoir holds ap...
Page 30 - Settings; Opening the settings menu; Changing settings
Settings 30 You can alter the dishwasher’s con-trols to suit changing requirements byadjusting the settings. The settings can be altered at anytime. Opening the settings menu Turn the dishwasher on with the button if it is turned off. Use the Program button to select the More option. The ...
Page 31 - Language; The flag after the word; Water hardness; - Your local water authority will be able
Settings 31 Language The display can be set to appear in oneof several different languages. You can change the language used inthe display and also the country via the Language sub-menu. The flag after the word Language serves as a guide if a language thatyou do not understand has been set.I...
Page 33 - Auto; tion and confirm with; Rinse Aid
Settings 33 AutoDos (AutoDos) AutoDos automatically adjusts theamount of detergent to the selectedprogram. In the Auto program, the quantity is adjusted depending on thedegree of soiling of the dishware. If you want to extend the service life ofthe PowerDisk, you can reduce the dis-pensing quantity....
Page 35 - Connect using WPS
Settings 35 Connect using WPS As an alternative to networking via theMiele app, you can connect your dish-washer to your WiFi network using WPS(Wireless Protected Setup). Your WiFi router must support WPS. Confirm the message Press WPS but- ton with OK . Activate the WPS function on yourrouter w...
Page 36 - Displaying Connection status
Settings 36 Displaying Connection status You can call up the current connectionstatus of your dishwasher. Select the Connection status menu op- tion and confirm with OK . Use the buttons to consecutively call up the WiFi signal strength, thename of your router and the associ-ated IP address....
Page 37 - Remote update; Activating/deactivating
Settings 37 Remote update The RemoteUpdate menu option isonly displayed and can only be se-lected if the requirements for usingMiele@home have been met (see“Miele@home” under “Before using forthe first time”). The RemoteUpdate function is used forupdating the software in your dish-washer. If an upda...
Page 38 - Display brightness
Settings 38 Display brightness You can set the display brightness toone of 7 different levels. Buzzer A sequence of audible signals willsound at the end of the program or ifthere is a fault, provided that the audi-ble signals have been activated. The audible signals at the end of a pro-gram and the ...
Page 39 - AutoOpen; Risk of damage due to steam.; Extra clean; Extended drying; omy
Settings 39 AutoOpen In some programs the door automati-cally opens slightly to assist the dryingprocess. This function can be deactivated if youwish. Risk of damage due to steam. Steam from the dishwasher coulddamage the edges of delicate coun-tertops when you open the door atthe end of the progr...
Page 40 - nd interim rinse; For demonstration purposes only.; Factory default; and confirm with
Settings 40 2nd interim rinse You can choose this function to in-crease the cleaning performance of theprograms with a second interim rinse. When this function is activated, waterconsumption may increase. If this function is switched on, it will beapplied to all programs until it isswitched off agai...
Page 42 - Energy-saving dishwashing; Normal
Caring for the environment 42 Energy-saving dishwashing This dishwasher is exceptionally eco-nomical in its use of water and electric-ity. You can make the most of your ma-chine by following these tips: - Washing in a dishwasher generally uses less water and energy thanwashing by hand. - There is no...
Page 43 - Loading the dishwasher; General information
Loading the dishwasher 43 General information Remove coarse food residues fromdishes. There is no need to pre-rinse items un-der running water. Damage can be caused by ash, sand, wax, lubricating grease, orpaint.These substances will contaminatethe dishwasher and can then nolonger be removed.Do no...
Page 44 - Silver
Loading the dishwasher 44 Wash items not suitable for dish-washers: - Wooden cutlery and dishes or items with wooden parts. These may dis-color and fade. The glue used inthese items is not dishwasher-proofand wooden handles may comeloose after being washed in a dish-washer. - Craft items, antiques, ...
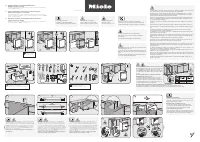
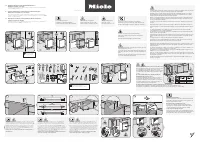
Page 45 - Loading examples; Loading for 10 standard place settings with cutlery tray
Loading the dishwasher 45 Loading examples Loading for 10 standard place settings with cutlery tray Upper basket Lower basket Cutlery tray
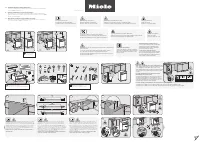
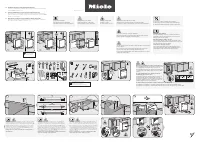
Page 46 - Loading for 16 standard place settings with cutlery tray
Loading the dishwasher 46 Loading for 16 standard place settings with cutlery tray Upper basket Lower basket Cutlery tray
Page 47 - Loading the upper basket; Loading the FlexCare cup rack
Loading the dishwasher 47 Upper basket Loading the upper basket Risk of damage due to water leakage.If you run the dishwasher without theupper basket, water can leak out ofthe dishwasher.Only run the dishwasher with the up-per basket in place (except duringthe Tall items program, if available). ...
Page 48 - Adjusting the FlexCare cup rack
Loading the dishwasher 48 Adjusting the FlexCare cup rack You can set the height and depth of thecup rack at 2 different levels so that itcan accommodate larger cups and sothat taller items can be placed under-neath it. Pull the cup rack upwards and click itinto the desired position (see arrow). L...
Page 49 - Lowering the spikes
Loading the dishwasher 49 Lowering the spikes On both right-hand rows of spikes, youcan lower every other spike to make iteasier to arrange larger dishes, like ce-real bowls. Press the yellow lever downward , and then lower the dark grayspikes . Place the bowls vertically in the rowof spik...
Page 50 - Adjusting the upper basket; Pull out the upper basket.
Loading the dishwasher 50 Adjusting the upper basket In order to gain more space for talleritems in the lower basket or upper bas-ket, the upper basket can be adjustedon 3 levels with 3/4" (2 cm) betweeneach level. The upper basket can also be set at anangle so that water can run off freelyfrom ...
Page 51 - Lower basket; Loading the lower basket
Loading the dishwasher 51 Lower basket Loading the lower basket Place larger and heavier items suchas plates, serving platters,saucepans, bowls, etc., in the lowerbasket. Glasses, cups, and small plates andsaucers can also be placed in thelower basket. Loading the MultiComfort area The rear sectio...
Page 53 - Cutlery tray; Loading the 3D MultiFlex Tray
Loading the dishwasher 53 Cutlery tray See “Loading the dishwasher, Loadingexamples” for examples of how toload dishware and utensils. Load the utensils into the 3D Multi-Flex Tray. Loading the 3D MultiFlex Tray To make unloading easier, utensilsshould be grouped in zones, one forknives, one for f...
Page 54 - Detergents; Active ingredients
Detergents 54 Active ingredients Damage caused by using unsuit- able cleaning agents.Cleaning agents that are not suitablefor domestic dishwashers can causedamage to the dishwasher or to thewash items.Only use cleaning agents formulatedfor domestic dishwashers. Modern cleaning agents contain vario...
Page 55 - Risk of chemical burns from de-; Detergent dispensing
Detergents 55 Risk of chemical burns from de- tergent.Dishwasher detergents can causeburning on the skin and in the eyes,nose, mouth, and throat.Avoid contact with detergents. Do not inhale or ingest powder de-tergents. Do not swallow dishwasherdetergents. Seek medical attentionimmediately if dete...
Page 56 - Automatic dispensing/AutoDos; Risk of chemical burns from; AutoDos; will be
Detergents 56 Automatic dispensing/AutoDos Before you can use AutoDos, you mustinsert a PowerDisk containing powderdetergent into the PowerDisk compart-ment. One PowerDisk contains enough deter-gent for approx. 20 rinse cycles, de-pending on the chosen program. PowerDisks are available to order di-r...
Page 57 - Inserting a PowerDisk; Turn the AutoDos lid to; Remove the empty PowerDisk.
Detergents 57 Inserting a PowerDisk Turn on the dishwasher before you re-place the PowerDisk so that the dish-washer recognizes it. Only replace the PowerDisk when themessage PowerDisk empty Deactivate AutoDos with OK. appears. Turn the AutoDos lid to and open it. The message AutoDos lid open wi...
Page 59 - Manual detergent dispensing
Detergents 59 Manual detergent dispensing Detergent must be manually dispensedif you have deactivated automatic dis-pensing using the AutoDos button. Detergent dispensing The detergent compartment holds amaximum of 3 1/2" tablespoons. There are marks in the detergent com-partment to aid wit...
Page 61 - Operation; view
Operation 61 Turning on the dishwasher Turn on the water supply if it is turnedoff. Open the door. Make sure the spray arms can rotatefreely. Press the button. The program selected will appear in thedisplay briefly and the indicator light forthe program selected will come on. Then the dis...
Page 62 - Display of program duration
Operation 62 Display of program duration The estimated duration of the selectedprogram appears on the display beforethe program begins. If the door isopened during the program, the timeleft until the end of the program is dis-played. Each program phase is indicated by asymbol: Pre-rinse/Soak Mai...
Page 63 - End of program; Energy management
Operation 63 End of program At the end of a program, the in-opera-tion indicator light will be flashing slowlywith the door shut. The audible signalmay also be sounding. The in-operation indicator light will goout 10 minutes after the end of the pro-gram if the door is closed. The program has ended ...
Page 64 - Turning off the dishwasher; Confirm the query; with; Unloading the dishwasher
Operation 64 Turning off the dishwasher Open the door. The dishwasher can be turned off atany time using the button. Confirm the query Turn appliance off with OK . Turning the dishwasher off during a pro-gram stops the program. You can also do this to stop an ongoingtimer. Risk of damage ...
Page 65 - Interrupting a program; Program
Operation 65 Interrupting a program A program will be interrupted as soonas the door is opened.After 4 seconds, the indicator light ofthe selected program and the time dis-play will flash. Press the Program button and close the door within 4 seconds. The program will continue from thepoint at whic...
Page 66 - Options; Timer; Activating the timer
Options 66 Timer You can set the start time of a program.The program start time can be delayedfor between 30 minutes and 24 hours. With start-time delays between 30 min-utes and 3 hours, the delay can be setin 30 minute stages. It is set in hours forperiods longer than this. During manual deterge...
Page 68 - Program overview; Program When to use
Program overview 68 Program When to use Program sequence Pre- wash Main wash Interim rinse Finalrinse Drying °F/°C °F/°C Normal 1 Program for regular use to completelywash a full load of normally soileddishes with the ability to adjust energyand water consumption based on thesoil load of the dishes....
Page 69 - Consumption
Program overview 69 Consumption 2 Duration 2 Energy Water Cold water Hot water Gallons/Liters Cold water Hot water 50°F/10°C 120°F/49°C 50°F/10°C 120°F/49°C kWh kWh h:min h:min 1.06 1.20 3.2/12.1 3:04 2:43 1.40 1.55 3.4/13.0 3:29 3:11 0.90 1.05 3.3/12.5 2:45 2:25 1.10 1.15 2.9/11.0 1:13 0:58 1.45 1....
Page 70 - Program options; Selecting program options
Program options 70 Selecting program options You can use program options to adjustthe programs. To do this, you can select or deselectthe program options before running theprogram. Open the door. Turn the dishwasher on with the button. The indicator light next to the selectedprogram will come...
Page 71 - Cleaning and care; Damage due to unsuitable clean-; Cleaning the wash cabinet
Cleaning and care 71 Check the condition of your dish-washer regularly (approx. every 4–6 months). This helps to avoid faultsand problems. Damage due to unsuitable clean- ing agents.All surfaces are susceptible toscratching. Contact with unsuitablecleaning agents can alter or discolorall surfaces....
Page 72 - Hygiene cycle; Intensive
Cleaning and care 72 Hygiene cycle The frequent use of low-temperaturewash programs increases the risk ofcontamination and odors inside thewash cabinet. If you repeatedly uselow-temperature programs, you shouldregularly run a high-temperature pro-gram. This is to prevent contaminationand odors. You ...
Page 73 - Cleaning the control panel; only; Cleaning the reflector panel
Cleaning and care 73 Cleaning the control panel The control panel should only be wiped with a damp cloth. Cleaning the reflector panel The reflector panel for the in-operationindicator light is situated on the coversheeting underneath the countertop. The reflector panel should only becleaned wit...
Page 76 - Cleaning the spray arms
Cleaning and care 76 Cleaning the spray arms Particles of food can get stuck in thespray arm jets and bearings. The sprayarms should therefore be inspected reg-ularly (approx. every 2–4 months). Never run a wash program withoutusing the spray arms. Damage due to soiling entering the circulation sy...
Page 77 - Removing the upper spray arm
Cleaning and care 77 Removing the upper spray arm Push the upper spray arm upward to engage the inner ratchet. Then un-screw the spray arm by rotating thescrew thread counterclockwise . Removing the middle spray arm Rotate the screw thread of the middlespray arm clockwise and remove the...
Page 78 - Inserting the upper spray arm
Cleaning and care 78 Inserting the upper spray arm Reinstall the upper spray arm andtighten it by hand. Inserting the middle spray arm Replace the middle spray arm andturn the screw thread counterclock-wise until it engages. Make sure thatthe recesses in the lock line up. Inserting the lower spr...
Page 79 - Cleaning the filters
Cleaning and care 79 Checking the filters in thewash cabinet The filter combination in the base of thewash cabinet retains coarse soil fromthe suds solution. This prevents soilinggetting into the circulation system andre-entering the wash cabinet throughthe spray arms. Damage due to soiling enteri...
Page 80 - Damage due to soiling entering
Cleaning and care 80 In order to clean the inside of the fil-ter, pull the microfilter on the plasticring downwards and away from thefilter combination. Rinse all of the filters under runningwater. If necessary, use a soft cleaningbrush to remove soiling. Insert the microfilter back into the f...
Page 81 - Cleaning the drain pump
Cleaning and care 81 Cleaning the drain pump If water remains in the wash cabinet af-ter the end of a program, the water hasnot been pumped away. The drainpump may be blocked by foreign ob-jects. These foreign objects are easy toremove. Disconnect the dishwasher from thepower supply. To do this, t...
Page 82 - Risk of injury from glass splin-
Cleaning and care 82 The drain pump (see arrow) is under-neath the cover. Risk of injury from glass splin- ters.It is especially difficult to see glasssplinters in the drain pump.Take care when cleaning the drainpump. Carefully remove all foreign objectsfrom the drain pump. Check the drainpump i...
Page 83 - Frequently asked questions; Technical faults; Problem
Frequently asked questions 83 Many malfunctions and faults that can occur in daily operation can be easily reme-died. You can save time and money in many cases, as you do not need to contactMiele Customer Service. Information to help you rectify faults yourself can be found at www.miele.com/ser-vice...
Page 84 - Fault messages
Frequently asked questions 84 Fault messages Problem Possible cause and solution The in-operation indica-tor light is flashingquickly. The alarm tone issounding. One of the followingfaults appears in thedisplay: Before remedying the fault: Turn off the dishwasher. Fault FXX There may be a tech...
Page 85 - Door release; Turn the dishwasher back on.
Frequently asked questions 85 Door release Problem Possible cause and solution The in-operation indica-tor light is flashingquickly. The alarm tone issounding. The following fault is in-dicated via the display: Before remedying the fault: Turn off the dishwasher. Door fault The door does not o...
Page 86 - Water intake fault
Frequently asked questions 86 Water intake fault Problem Possible cause and solution The in-operation indica-tor light is flashingquickly. The alarm tone issounding. One of the followingmessages appears inthe display: Open water supply The water supply is turned off. Open the shut-off valve al...
Page 87 - Water drainage fault; Before remedying the fault:
Frequently asked questions 87 Water drainage fault Problem Possible cause and solution The in-operation indica-tor light is flashingquickly. The alarm tone issounding. The following messageappears on the display: Drain Before remedying the fault: Turn off the dishwasher. Water drainage fault.T...
Page 88 - Fault in the AutoDos (automatic dispensing); The message
Frequently asked questions 88 Fault in the AutoDos (automatic dispensing) Problem Possible cause and solution The following messageappears on the display: Insert PowerDisk. or deacti-vate AutoDos with OK. The AutoDos function is active but no PowerDisk has been inserted. Insert a PowerDisk (s...
Page 91 - General dishwasher problems
Frequently asked questions 91 General dishwasher problems Problem Possible cause and solution The in-operation indica-tor light is flashingquickly.The alarm tone issounding.The indicator light ofthe selected programand the time display willflash.The dishwasher doesnot start or the delay-start time s...
Page 93 - Noises
Frequently asked questions 93 Noises Problem Possible cause and solution There is a knockingnoise in the wash cabi-net. A spray arm is knocking against a wash item. Carefully open the door and rearrange the washitems that are obstructing the spray arm. There is a rattling noisein the wash cabinet....
Page 94 - Poor cleaning results
Frequently asked questions 94 Poor cleaning results Problem Possible cause and solution The dishware is notclean. The dishware was not loaded correctly. See notes under “Loading the dishwasher”. The program was not powerful enough. Select a more powerful program (see “Programoverview”). Activa...
Page 98 - Customer Service; Contact in the event of a fault
Customer Service 98 Information to help you rectify faultsyourself and about Miele spare partscan be found at www.miele.com/ser-vice. Contact in the event of a fault In the event of a fault which you cannotremedy yourself, please contact yourMiele dealer or Miele Customer Service. You can book a Mie...
Page 99 - Optional accessories; PowerDisk
Optional accessories 99 Dishwasher detergent, rinse aid, andcleaning and care products are avail-able for this dishwasher, as are optionalaccessories. All the products have been designed forMiele appliances. These and many other useful productscan be ordered directly from Miele’s on-line store, Miel...
Page 100 - Appliance care; Dishwasher cleaner; Descaling agent
Optional accessories 100 Appliance care Miele cleaning and care products pro-vide optimum care for your dishwasher. Dishwasher cleaner - For use with the Clean Machine pro- gram without detergent dispensing - Cleans the dishwasher effectively and thoroughly - Removes grease, bacteria, and asso- ciat...
Page 101 - Installation; Water inlet; Risk to health due to wash water.
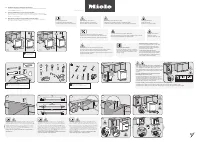
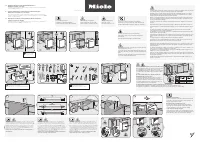
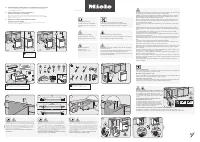
Installation *INSTALLATION* 101 Water inlet Risk to health due to wash water. Water in the dishwasher must not beused as drinking water.Do not drink any water from the dish-washer. Risk to health and risk of dam- age due to contaminated incomingwater.The quality of the incoming watermust corresp...
Page 102 - Risk of damage from leaking wa-
Installation *INSTALLATION* 102 A faucet with a 9/16" male thread mustbe provided on site. If this type offaucet is not available, only a qualifiedinstaller may connect the dishwasher tothe drinking water supply. A backflow preventer is not required.The appliance meets the requirementsof the app...
Page 103 - Water drainage; The drain hose must not be shortened.
Installation *INSTALLATION* 103 Water drainage The appliance drainage system has anon-return valve, which prevents dirtywater from flowing back into the dish-washer via the drain hose. The dishwasher is supplied with approx.5 ft (1.5 m) of flexible drain hose with aninternal diameter of 7/8" (22...
Page 104 - Venting the water drainage
Installation *INSTALLATION* 104 Venting the water drainage If the on-site drainage connection is sit-uated lower than the guide path for thelower basket rollers in the open door,the drainage system must be vented.Otherwise, a siphoning effect during aprogram can cause the appliance toempty itself of...
Page 105 - Electrical connection; Installation, repairs and other
Installation *INSTALLATION* 105 Electrical connection Installation, repairs and other work by unqualified persons couldbe dangerous.Check that the voltage, frequencyand fuse rating shown on the dataplate match the household powersupply.The power outlet must be accessibleafter installation. Do not ...
Page 106 - Hardwired electrical connection
Installation *INSTALLATION* 106 Hardwired electrical connection It is possible to hardwire this applianceto an existing power cable. CAUTION: Before servicing, dis- connect the power supply by eitherremoving the fuse, shutting off thepower main or manually “tripping”the circuit breaker.Installatio...
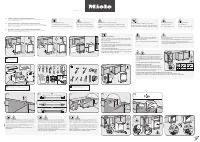
Page 107 - Sound emission testing; Prerequisites for sound emission tests; Load the dishwasher with; Setup for sound emission tests; Install the dishwasher into an analyzing unit.
Sound emission testing 107 Prerequisites for sound emission tests Load the dishwasher with 16 standard place settings and use the Normal pro- gram. Setup for sound emission tests The dishwasher must be set up according to the following specifications. Install the dishwasher into an analyzing unit....
Page 111 - National Headquarters; Canada; Headquarters and Miele Centre; International Headquarters
9 Independence WayPrinceton, NJ 08540www.mieleusa.com U.S.A. Miele, Inc. National Headquarters Please have the model and serial numberof your appliance available whencontacting Customer Service. Canada ImporterMiele Limited Headquarters and Miele Centre Customer Support Phone: 888-99-MIELE (64353)[e...


 Miele 11387580
User Manual
Miele 11387580
User Manual
 Miele 11387590
User Manual
Miele 11387590
User Manual
 Miele 11388120
User Manual
Miele 11388120
User Manual
 Miele 11388260
User Manual
Miele 11388260
User Manual
 Miele 11388290
User Manual
Miele 11388290
User Manual
 Miele 11636710
User Manual
Miele 11636710
User Manual
 Miele 11636720
User Manual
Miele 11636720
User Manual
 Miele 11636760
User Manual
Miele 11636760
User Manual