Page 2 - Contents
Caring for the environment . . . . . . . . . . . . . . . . . . . . . . . . . . . . . . . . . . . . . . . . . . 5 Guide to the machine . . . . . . . . . . . . . . . . . . . . . . . . . . . . . . . . . . . . . . . . . . . . . . 6 Accessories supplied . . . . . . . . . . . . . . . . . . . . . . . . . ....
Page 5 - Disposal of your old machine; Caring for the environment
Disposal of the packingmaterial The transport and protective packinghas been selected from materials whichare environmentally friendly fordisposal, and should be recycled. Ensure that any plastic wrappings,bags, etc. are disposed of safely andkept out of the reach of babies andyoung children. Danger...
Page 6 - Exterior view; Guide to the machine
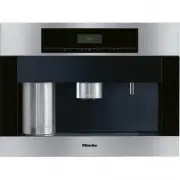
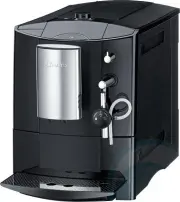
Exterior view a On/Off sensor for switching the coffee machine on and off b Display c Left arrow, for scrolling through the various programme options d OK sensor, for confirming the selection of a programme option and for saving asetting e Right arrow, for scrolling through the various programme opt...
Page 7 - Interior view
Interior view a Master switch b Ground coffee chute cover c Ground coffee chute d Slide control to select fineness of ground coffee e Coffee bean container f Drip tray with grid for easier carrying g Water container h Brew unit i Waste container j Central spout connector (connecting the brew unit an...
Page 8 - Accessories supplied
Stainless steel milk flask For storing and keeping milk cold, with lid (with handle) andadditional cap( not suitable for cleaning in a dishwasher) Containers Large and small containers for cleaning and rinsing the milkpipework Coffee spoon For adding the correct amount of ground coffee Cleaning agen...
Page 9 - Optional accessories
Miele accessories and cleaning and conditioning productsare available for your coffee machine.These can be ordered via the internet atwww.miele-shop.com, from the Miele Spare Parts Departmentor from your Miele Dealer. Stainless steel milk flask with cap For storing and keeping milk cold( not suitabl...
Page 10 - Correct application; his coffee machine is not designed; Warning and Safety instructions
This coffee machine conforms withall relevant legal safetyrequirements. Improper use can,however, lead to personal injury anddamage to property. To avoid the risk of accidents anddamage to the machine, pleaseread these instructions carefullybefore using it for the first time.They contain important i...
Page 13 - Correct use
Correct use , Caution. The spouts present a danger of burning or scalding. Theliquids and steam dispensed arevery hot. Please note: – Keep well away from the area underneath the spouts when hotliquids and steam are beingdispensed. – Do not touch hot components. – The spouts can spray hot liquid or s...
Page 15 - Before using for the first time; Switching on; Míele; Using the coffee machine - first steps
The following notes should help you getto know your coffee machine beforestarting to use it. Controls This machine has sensor controls whichreact to touch. To operate the machine,you only need to touch the relevantsensor. There are five sensors: s On/Off sensor: For switching themachine on or off &l...
Page 17 - Filling the water container; Do not on any; Open the machine door.; Filling the water and coffee bean containers
The coffee machine must becleaned thoroughly (see "Cleaningand care") before you fill it with waterand coffee beans. It is vital that you programme inthe water hardness level of yourwater (see "Settings: Customising your machine - Setting the waterhardness"). Filling the water contai...
Page 19 - Touch the On/Off sensor; Water will run out of the central spout.; Touch the Hot water sensor.; Making drinks
Switching on When you switch the coffee machine onit will start heating up and the pipeworkwill be rinsed through. This cleans andpre-heats the pipework in preparationfor making coffee. ^ Touch the On/Off sensor s . The following message will thenappear: Heating phase If the automatic Rinsing progra...
Page 20 - Place a cup under the central spout.; both; once
Adjusting the height of thecentral spout The height of the central spout can beadjusted to suit the height of the cup sothat the drink will not cool down asquickly as it would if the spout werefurther away from the cup. The cremawill also be a better quality if the coffeedoes not have so far to go! ...
Page 22 - Drinks with milk
If you not added any groundcoffee, you must select "No". Otherwise the machine will assume that there is ground coffee inthe chute, and only water will bedispensed the next time coffee ismade! To make a drink ^ Place a cup under the central spout. ^ Touch the OK sensor. The machine will prep...
Page 23 - Touch the OK sensor again to; stop
To make drinks with milk, ^ place the lid on the stainless steelmilk flask by twisting it anticlockwiseuntil it locks into place. ^ Open the machine door and hang themilk flask in the machine asillustrated, ensuring that the milkpipework is correctly engaged. ^ Close the machine door. Cappuccino, la...
Page 24 - User profile drinks; A large user profile symbol; After use; The milk pipework will now be rinsed.; not; confirm the
User profile drinks The User profile function is used toselect the quantity of water and milk foryour drink, as well as the fineness of theground, temperature and pre-brewingto suit your taste and that of yourguests (see "Setting up user profiles"). If you have set the machine up for aspecif...
Page 25 - and then let the machine grind; To alter the grinder setting; Then try the slide control again.; Setting the coffee grinder
A good espresso or coffee with a thick,even crema depends not only on thequality, pressure and temperature ofthe water and the quality of the coffeebeans, but also on the quantity ofbeans and how finely they are ground. The crema should have an evennut-brown colour with dark stripesrunning through i...
Page 26 - Settings menu; Possible setting options; Settings: Customising your machine
It is easy to customise your machine tosuit your exact requirements. Settings menu To select the various programmeoptions: Settings F q r H I J L n m C ^ Touch the right arrow sensor until"Settings F " appears in the display, and then touch the OK sensor. ^ Touch one of the arrow sensors unt...
Page 27 - Selecting the language
Water hardness: Soft 1, Medium 2, Hard 3, Very hard 4 Display: Contrast, Brightness Volume: Buzzer tones, Keypad tone Plate warmer (CVA 5060 only): Auto- matic, On, Off Showroom prog.: Demo programme, Off Factory default: All settings can be reset to the factory default, and userprofiles deleted. To...
Page 28 - Setting the time of day; There are three options:; Display; : The display will always show; Clock format; The time of day is now saved.
Setting the time of day ^ Select "Settings F " from the Main menu, and then touch the OK sensor. Settings Time of day Timer ^ Touch the right arrow sensor until"Time of day" is highlighted and touchthe OK sensor. There are three options: Display The Time of day display can beswitched...
Page 29 - Setting the timer; activate the Timer
Setting the timer ^ Select "Settings F " from the Main menu, and then touch the OK sensor. Settings Timer Coffee jug ^ Touch the right arrow sensor until"Timer" is highlighted and touch theOK sensor. ^ Select "Set" with the arrow sensorsand touch the OK sensor. There are thre...
Page 30 - If you
^ First set the hour with one of thearrow sensors. Touch the OK sensor. ^ Then use the arrow sensors to set theminutes. Touch the OK sensor. The machine will now switch off afterthe time you have set. If Automatic rinsing is set to "On"and the machine has been used formaking drinks, it will ...
Page 31 - When; Setting the amount of coffee; – If the crema is evenly coloured but
Coffee jug (making severalcups one after the other) This function can be used to make upto 8 cups of coffee automatically oneafter the other (max. 1 l). ^ Select "Settings F " from the Main menu, and then touch the OK sensor. Settings Coffee jug Prog. the amount ^ Touch the right arrow senso...
Page 32 - delivered; with; Setting the temperature
^ Use the arrow sensor to select thedrink that you wish to set the amountof coffee for and then touch the OKsensor. ^ Use the arrow sensor to set theamount to "more" or "less". ^ Touch the OK sensor to save thesetting. Setting Pre-brewing When the Pre-brewing function isswitched on, ...
Page 33 - Setting Automatic rinsing; on; Setting Eco mode
^ Use the arrow sensors to highlightthe temperature option. ^ Touch the OK sensor to save thesetting. Setting Automatic rinsing The pipework is rinsed throughautomatically when the coffee machineis switched off if the automatic rinsingfunction is switched on and the coffeemachine has been used for p...
Page 34 - left
Lighting: Setting thebrightness You can set how bright the lightingshould be on the machine: ^ Select "Settings F " from the Main menu, and then touch the OK sensor. Settings Lighting Info ^ Touch the right arrow sensor until"Lighting" is highlighted, and thentouch the OK sensor. ^ S...
Page 35 - will
Info (showing the number ofdrinks) The "Info" option enables you to checkhow many drinks the machine hasalready dispensed or how many youcan still dispense before it has to bedescaled. ^ Select "Settings F " from the Main menu, and then touch the OK sensor. Settings Info Safety ^ Tou...
Page 36 - Setting the water hardness
To override the System lock ^ Touch the OK sensor for about 3seconds. The machine is now temporarilyunlocked and can be used to makedrinks again. It locks itself as soon as the machine is switched off. Setting the water hardness For trouble-free operation of the coffeemachine, and to ensure that the...
Page 37 - Setting the display
If the water is harder than 40°dH/7.0mmol/l, limescale will build up morerapidy than with soft water.Descaling will need to be carried outmore regularly than stated toprevent limescale damage to themachine. ^ Select "Settings F " from the Main menu, and then touch the OK sensor. Settings Wat...
Page 38 - If you continue; towards the left; until; off; Activating the plate warmer; Automatic
Setting the volume (keypadtone, buzzer) You can choose for a tone to soundeach time a sensor is touched. Thevolume of the tone can also beadjusted: ^ Select "Settings F " from the Main menu, and then touch the OK sensor. Settings Volume Plate warmer ^ Touch the right arrow sensor until"V...
Page 39 - proceed as above again, but select; Showroom programme; all settings; back to the default or; user profiles; Various options will then be available:
On You can switch the plate warmer onand off manually whenever you want,independently of the coffee machine. Off The plate warmer will not switch onbecause the coffee machine is notsupplying it with any electricity. Thecoffee machine is delivered with "Off"as the default setting. To switch t...
Page 40 - Miele
All settings This option sets "All settings" back tothe factory default. ^ Select "Reset" under "All settings",and touch the OK sensor. All settings are then reset to the default. If you select "Reset" bymistake, switch the coffeemachine off: Resetting to the factory ...
Page 41 - With; milky drinks; the proportions of; will not; Programming the amount: setting the portion sizes
The flavour of the coffee produceddepends on the type of coffee, howfinely the beans are ground and thequantity of water used. Not all espressoand coffee cups are the same size. Toensure the machine uses the rightamount of water to suit your taste andyour cups, you can programme theamount to use. Wi...
Page 44 - Select User profile; Selecting a User profile; Setting up User profiles
To cater for different tastes andpreferences, you can enter up to 9individual User profiles. For each Userprofile, you can select the followingindividual settings: – The amount of water for coffee-based drinks and hot water – The amount of milk for drinks with milk – The amount of coffee – The water...
Page 45 - Creating a User profile; up to 9; Changing a User profile
Creating a User profile ^ Use the arrow sensors to highlight"Create", and then touch the OKsensor. You can allocate up to 9 User profiles. If you try to allocate morethan 9 User profiles, " Memory full " will appear in the display and youwill need to delete one name tocreate space. L...
Page 46 - To set the profile to be used:; Manually
Deleting a User profile If you want to delete the User profilecompletely, ^ Select "Delete User profile" using theOK sensor. ^ Use the arrow sensors to select theUser profile you want to delete. ^ Touch the OK sensor. A tick will appear after the user profileand after a short while it will b...
Page 47 - Quick guide; Recommended frequency; Cleaning and care
Quick guide Clean the coffee machine every day to prevent a build-up of bacteria. Recommended frequency What do I have to do? Each time milk is used to make adrink, if more than one hour haspassed since the last drink wasmade Rinse milk pipework Every day(usually at the end of the day,before the mac...
Page 49 - Rinse the system; Milk pipework; Rinse milk pipework; Follow the instructions in the display.
Rinse the system Before switching the machine off forany length of time, the pipework, brewsystem and central spout need to becleaned.If you have switched the automaticrinsing function off, you will need torinse the system through manually.Place the smaller of the two containersunder the central spo...
Page 50 - day using the Miele; Follow the instructions step by step.; lukewarm; appears in the display. You
To rinse the milk pipework: Fill thelarger of the two plastic containersto the "max" mark with cold water. Then fit the lid from the stainlesssteel milk flask making sure itengages properly. Clean milk pipework To prevent milk going off in themachine and the pipework gettingclogged up it sho...
Page 53 - by hand; using hot
Stainless steel milk flask withlid The stainless steel milk flask with lidmust be washed by hand using hot water. It is important to keep the top of theflask and the seals clean (whilst filling itand carrying it). Any soiling can lead toa malfunction of the flask in themachine. ^ Clean the stainless...
Page 54 - Central spout; the spout forwards to remove it (
Central spout ^ Pull the central spout down as far asit will go ( a ), and pull the cover to the spout forwards to remove it ( b ). ^ Turn the cover around, push theinsert up and out and then clean bothparts thoroughly. ^ Slide the insert back into the coveruntil it clicks into place. ^ Pull out the...
Page 55 - every day; make it easier to tip the grounds out.
Water container Empty the water container daily and fillwith fresh, cold tap water just beforeuse. When cleaning, make sure that thereis no soiling in the area around thevalve. Otherwise the container willnot sit correctly and this could resultin water leaking from the machine. ^ The water container...
Page 56 - Drip tray; every; Make sure that the; metal contact; at the top of the drip tray are; Drip tray cover
Drip tray There is a sensor in the drip tray whichcauses a message to appear in thedisplay when the drip tray is full andneeds to be emptied. Remove the trayand empty and clean it when thismessage appears.However, to avoid a build-up of odours,the drip tray should be cleaned every day . After runnin...
Page 57 - Coffee bean container; with hot water and; Central spout connector
Coffee bean container The coffee bean container must becleaned by hand with hot water and a little washing-up liquid. ^ Take the coffee bean container out ofthe machine and then push the lidback to remove it. ^ Clean the coffee bean container andthe lid, and then dry them boththoroughly. ^ Replace t...
Page 58 - Brew unit
Brew unit The brew unit must be cleaned once a week by hand and without usingcleaning agent, because the moving parts are lubricated and therubber seals could become brittle ina dishwasher. ^ Remove the water container, wastecontainer and the coffee chute cover. ^ Press the light coloured button und...
Page 59 - and; Degreasing the brew unit
^ Press the light-coloured button underthe handle of the brew unit a and whilst doing so turn the handle in thedirection of the arrow b . Degreasing the brew unit Depending on the natural oilcontent of the coffee used,the brew unit could become blocked. It should therefore be cleanedafter approx. 20...
Page 60 - When prompted to; Drop a cleaning; Machine front
When prompted to Drop a cleaning tablet in the ground coffee chute , ^ remove the coffee chute cover andopen the lid of the coffee chute. ^ Place a cleaning tablet into the coffeechute. ^ Close the lid, replace the coffeechute cover and close the machinedoor. ^ Follow the instructions in the display...
Page 61 - Descaling the machine
The machine should be descaledregularly to ensure that it functionscorrectly. It will remind you when thisneeds to be carried out. When only 50 portions can be madebefore the next descaling programmehas to be run, the following messagewill appear in the display the first time: No. of portions until ...
Page 63 - Has the lighting been switched off?; switch off time which; Problem solving guide
Repairs to electrical appliancesshould only be carried out by asuitably qualified and competentperson in strict accordance withcurrent local and national safetyregulations. Repairs and other workby unqualified persons could bedangerous. The manufacturercannot be held liable forunauthorised work. Var...
Page 65 - empty
... a message appears in the displayreminding you to fill or replace themilk flask even though it is full andpositioned correctly. ^ Clean the flask thoroughly, payingparticular attention to the area aroundthe lid and the neck (see "Cleaningand care - Stainless steel milk flaskwith lid").Any...
Page 67 - The machine needs descaling.
... water or milk stops flowing whilstprogramming in the amount todispense. The flow stops automatically when themaximum fill quantity is reached. Themaximum quantity is stored in memory. If there was not enough water or milk inthe water container or milk flask, theamount that has been dispensed wil...
Page 71 - Guarantee; After Sales / Guarantee
In the event of a fault which you cannotcorrect yourself, or if the appliance isunder guarantee, please contact: – your Miele Dealer or – Miele (see back cover for contact details). Please note that telephone calls maybe monitored and recorded fortraining purposes (UK only). When contacting your Dea...
Page 72 - Saving energy
AItering the following settings from thefactory default, will increase the energyconsumption of the coffee machine: – Eco mode – Lighting – Time of day display – Timer – Connection of a plate warmer When altering these settings, themessage "This setting increases energyconsumption" appears i...
Page 73 - Do not connect via an extension lead.; Non-rewireable plugs BS 1363
All electrical work should be carried outby a suitably qualified and competentperson only, in strict accordance withcurrent national and local safetyregulations (BS 7671 in the UK). Installation, repairs and other work byunqualified persons could bedangerous. The manufacturer cannotbe held liable fo...
Page 74 - Building-in and combination options; The machine is designed for installation in a tall unit.; Installation
Building-in and combination options The machine is designed for installation in a tall unit. It can also be combined with other Miele built-in appliances. If the coffee machineis to be built in above another appliance, there must be a full-width, closed shelfbetween them (except when it is combined ...
Page 76 - Adjusting the door hinges; To adjust the door in direction
If it is not: ^ realign the machine by adjusting thefour feet. The feet can be unscrewed by up toapprox. 10 mm. ^ Connect the machine to theelectricity supply. ^ Push it all the way into the niche untilyou feel resistance. ^ Open the door of the machine, andpartially tighten the side socketscrews. ^...


 Miele 11106260
User Manual
Miele 11106260
User Manual
 Miele 11648140
User Manual
Miele 11648140
User Manual
 Miele 11648170
User Manual
Miele 11648170
User Manual
 Miele 11648400
User Manual
Miele 11648400
User Manual
 Miele 11733820
User Manual
Miele 11733820
User Manual
 Miele 11733830
User Manual
Miele 11733830
User Manual
 Miele 11733860
User Manual
Miele 11733860
User Manual
 Miele CM5000BL
User Manual
Miele CM5000BL
User Manual