Page 2 - Contents
Packing material / Disposal of old machine . . . . . . . . . . . . . . . . . . . . . . . . . . . . 5 Guide to the machine . . . . . . . . . . . . . . . . . . . . . . . . . . . . . . . . . . . . . . . . . . . . . . 6 Warning and Safety instructions . . . . . . . . . . . . . . . . . . . . . . . . . . ...
Page 4 - Short instructions
Descaling . . . . . . . . . . . . . . . . . . . . . . . . . . . . . . . . . . . . . . . . . . . . . . . . . . . . . . . 55 Selecting the Descale option in the MAINTENANCE menu . . . . . . . . . . . . . . . . . 56 Problem solving guide . . . . . . . . . . . . . . . . . . . . . . . . . . . . . . . . ....
Page 5 - Packing material / Disposal of old machine
Packing material The packing material protects themachine during transit. Please retain the original box andpolystyrene pieces so that you canpack the coffee machine securely,should you wish to transport it in thefuture. The original packaging will also beuseful should you wish to return thecoffee m...
Page 6 - Guide to the machine
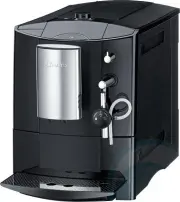
a Cup heating surface b Bean container, ground coffee chute and rotary control for selectingfineness of ground coffee c Display and controls d Steam and hot water spout e Cappuccinatore for frothing milk (see inset diagram above) f Coffee spouts g Drip tray cover h Drip tray with waste container i M...
Page 7 - Display and controls; Control
Display and controls Control How to operate Function a Coffee button / Press For dispensing coffee b Espresso button . Press For dispensing espresso c On/Off button - Press For switching the coffee machine on or off (Standbymode) d Rotary control Turn clockwise oranti-clockwise For displaying option...
Page 8 - Correct application; This appliance is designed for; Warning and Safety instructions
This appliance conforms to currentsafety requirements. Improper useof the appliance can, however,present a risk of both personal injuryand material damage. To avoid the risk of accidents anddamage to the appliance, pleaseread these instructions carefullybefore installation and before usingit for the...
Page 11 - Correct use
Correct use Caution! The coffee spouts and thecappuccinatore present a danger ofburning or scalding. The liquids andsteam dispensed are very hot. ~ Please note: – Keep well away from the area underneath the coffee spouts orcappuccinatore when hot liquids andsteam are being dispensed. – Do not touch ...
Page 13 - – Language; To set the language; The setting is now saved.; Preparing the coffee machine for use
Please read the operatinginstructions and take the time tofamiliarise yourself with the coffeemachine before using it for the firsttime. Before using for the first time ^ Set up the coffee machine andremove any protective film (see"Installation"). ^ Insert the plug of the coffee machineinto ...
Page 14 - TIP; Water hardness
To set the clock display ^ If you want the time to be shown as a12-hour clock, turn the rotary controluntil 12 H appears. or ^ If you want the time to be shown as a24-hour clock, turn the rotary controluntil 24 H appears. ^ Press the OK button. The setting is now saved. To set the time of day You ca...
Page 16 - If the water container is a little high; Filling the water container
The quality of the water plays animportant part in the overall quality ofthe coffee. The water container should therefore beemptied and filled with fresh tap waterevery day. Warning: Bacteria can causeinfection.It is important to empty and fill thecontainer with fresh tap water everyday to avoid the...
Page 17 - Only add enough beans to last for; Filling the coffee bean container
Fill the coffee bean container withroasted espresso or coffee beans if youwant to use freshly ground coffeebeans for each cup of espresso orcoffee. Alternatively, you can make coffee orespresso with ready ground coffee (see"Making espresso and coffee usingready ground coffee"). Important: On...
Page 18 - Switching on; Switching off; Switching on and off
You can use the On/Off button - (standby) to switch the coffee machineon and off, if the master switch at theback of the machine is switched on. Switching on When the On/Off button - is pressed, the coffee machine will heat up and thepipework will be rinsed through. Thiscleans and heats the pipework...
Page 19 - To save energy you could also heat; To switch cup heating on or off; or
Cups should always be pre-heated toallow the flavour of the coffee todevelop and be retained.The smaller the volume ofcoffee/espresso and the thicker thecup, the more important it is to pre-heatthe cup. You can use the cup heating surface onthe top of the coffee machine topre-heat coffee cups and gl...
Page 20 - Making coffee or espresso
Making coffee or espresso When the / or . button is pressed, the coffee machine grinds the beans andthen uses the freshly ground beans tobrew the coffee. ^ Place a cup under the spouts. ^ To make a coffee, press the / button, or ^ To make an espresso, press the . button. The coffee or espresso will ...
Page 21 - Cancelling preparation
To make a double portion of coffee orespresso: ^ Place one cup under each of thecoffee spouts. ^ Press the / button twice, to make a double coffee. or ^ Press the . button twice, to make a double espresso. Two portions of the coffee/espresso willbe dispensed from the two coffeespouts. Cancelling pre...
Page 22 - Only; one; portion can be prepared at a; Adding ready ground coffee; Or to; cancel; preparation with ready; Making coffee or espresso using ready ground coffee
To make espresso or coffee usingready ground coffee, you add a portionof ground coffee to the ground coffeechute. This gives you the option of preparing acup of decaffinated coffee, forexample, even though the coffee beancontainer is filled with roasted coffeebeans. The coffee machine will recognise...
Page 23 - Place a cup under the spouts.; Coffee preparation will be cancelled.
Preparing coffee or espressousing ready ground coffee You can now select whether you wantto dispense a coffee or an espressomade with ground coffee. If no drink is selected within 15seconds, the ground coffee will bedirected into the waste container. The following message will appear inthe display: ...
Page 24 - Turn the cappuccinatore dial to the; For best results, use cold milk; Frothing and heating milk
You can use the coffee machine to heator froth milk. The coffee machine draws the milkthrough a tube from the container, e.g.a milk carton. Steam is then used toheat the milk in the cappuccinatore. Itcan also be frothed if milk froth isrequired. If milk has not been prepared forsome time, rinse the ...
Page 25 - Preparing hot milk; Milk preparation will be cancelled.; After preparing milk
Preparing hot milk ^ Turn the cappuccinatore dial to the J position. ^ Place a cup or suitable containerunder the cappuccinatore. ^ Press the * button. The coffee machine will heat up.HEATING-UP PHASE will appear in thedisplay. After being heated, hot milk willbe dispensed from the cappuccinatoreint...
Page 26 - Hot milk; Turn the dial to the position below for:; Milk froth; Turn the dial to the positions below for:; Coffee specialities; For a; Cappuccino; Half fill a cup with milk froth.
Temperature of the milk andconsistency of the milk froth You can use the cappuccinatore dial toadjust the temperature of the milk andthe consistency of the milk froth. Hot milk Turn the dial to the position below for: a Warm milk b Hot milk Milk froth Turn the dial to the positions below for: c Hot ...
Page 27 - Preparing hot water
The temperature of the hot waterdispensed by the coffee machine isnot suitable for making black tea, butideal for warming up cups and like. If you have previously used thecappuccinatore to prepare hot milk ormilk froth: ^ Rinse the cappuccinatore with water(see "Cleaning and care"). Caution:...
Page 28 - Grinder setting; too coarsely; Coffee the way you like it
You can customise the coffee machineto suit your exact requirements. Youcan – adjust the grinder setting, – change the amount of coffee, – pre-brew the freshly ground coffee, – set the brewing temperature. Grinder setting You can adjust the grinder setting tosuit the type of coffee you are using. Wh...
Page 29 - Amount of coffee; too low
Amount of coffee The coffee machine can grind andbrew 6-14 g of coffee per cup. Thegreater the quantity, the stronger thecoffee or espresso. There are various ways to tell whetherthe amount of coffee is set correctly. The amount of coffee is too low if – espresso or coffee flows into the cup too qui...
Page 30 - Pre-brewing the coffee; Brewing temperature
Pre-brewing the coffee When the pre-brewing function isswitched on, the freshly ground coffeeis first moistened with a little hot water.Then the remaining water is forcedthrough the moistened coffee at highpressure. This helps release the flavourof the coffee. The pre-brewing function can beswitched...
Page 32 - will not; Setting the portion sizes
You can programme the amount ofwater used for each portion ofespresso, coffee or hot water to suityour taste and your cups. With milky drinks you can set theduration of the steam used for heatingor frothing the milk. There is a maximum amount of waterwhich can be programmed for eachtype of drink. Wa...
Page 34 - Options which are currently selected will have a tick; Operation principles; The factory default setting for each option is shown in; bold; in the following chart.; The SETTINGS menu
You can use the SETTINGS menu to customise the coffee machine to suit yourindividual requirements. Options which are currently selected will have a tick B next to them. If none of the buttons has been pressed for a while, the coffee machine will revertto the main menu. Operation principles What do y...
Page 35 - Possible setting options
Possible setting options Option Available settings Language Deutsch, English and other languages Maintenance Rinse the systemDescaleClean the brew unit Time of day(available in Comfort mode) Clock display 12 H / 24 H Set Timer(available in Comfort mode) Set switch on at / switch off after ( 1:00 ) /...
Page 36 - Press the OK button for two seconds.; appears in the; Language
You can select the language you wantthe display to appear in in theSETTINGS menu. ^ Press the OK button for two seconds. SETTINGS r LANGUAGE F s ^ Turn the rotary control untilLANGUAGE F appears in the display.Press the OK button. ^ Turn the rotary control until thelanguage you want appears in thedi...
Page 37 - not; To set the clock display; Time of day and Clock display
If you are operating the coffee machinein Comfort mode, you can set the timeof day and the clock display in theSETTINGS menu. The clock can be displayed as: – a 24-hour clock – a 12-hour clock It is necessary to set the time of day forthe timer function to work. However, thetime of day will not be s...
Page 38 - Comfort mode; The coffee machine; To set the timer; Switch on at; switch on at the required; Timer function
The timer is only available if you areoperating the coffee machine in Comfort mode . You can set the following timerfunctions: The coffee machine – switches on at a particular time, e.g. in the morning for breakfast (SWITCHON AT). – switches off at a particular time (SWITCH OFF AT). – switches off a...
Page 41 - Factory default
You can reset the settings back to theones which were set when the coffeemachine was delivered - the factorysettings. Please refer to the "Possible settingoptions" chart for the factory settingswhich are shown in bold. Please note that the followingsettings will not be reset: - Language - Ti...
Page 42 - To select the operating mode; Operating modes
You can operate the coffee machine in Eco mode or Comfort mode . Eco mode saves energy as the coffee machine will switch to standby if nodrink has been prepared for a while.The coffee machine will heat up againwhen a button is pressed. The "Switchon at" and "Switch off at" timer func...
Page 43 - To lock the coffee machine
You can lock the coffee machine toprevent it being used without yourknowledge, by children, for example. To activate and deactivate thesystem lock When the system lock is activated,the "Switch on at" option for the timerwill not work. The c timer symbol will not appear in the display. ^ Pres...
Page 44 - Displaying information
You can use the INFO option to check – the total number of portions of espresso, coffee, steam and hotwater dispensed (TOTALPORTIONS), – the number of portions of espresso and coffee dispensed (COFFEE), – how many times steam for hot milk and milk froth has been generated(STEAM), – how many times ho...
Page 45 - Quick guide; Clean the coffee machine every day to avoid a build-up of bacteria.; Recommended frequency; Clean by hand only; Cleaning and care
Quick guide Clean the coffee machine every day to avoid a build-up of bacteria. Recommended frequency What do I have to do? Each time milk is used to make adrink, if more than one hour haspassed since the last drink wasmade Rinse the cappuccinatore Every day(usually at the end of the daybefore switc...
Page 46 - Rinsing the system
Danger of burning and scalding onhot components or by hot liquids!Always allow the coffee machine tocool down before cleaning. Caution:The water in the drip tray can be veryhot. Do not use a steam cleaner to cleanthe coffee machine. The steam couldcause a short circuit. Do not use cleaners containin...
Page 47 - Rinsing the system manually; Cappuccinatore; Rinsing the cappuccinatore
^ Turn the rotary control until YESappears in the display, if you want toswitch the automatic rinsing functionon. or ^ Turn the rotary control until NOappears in the display, if you want toswitch the automatic rinsing functionoff. ^ Press the OK button. The setting is now saved. Rinsing the system m...
Page 48 - Cleaning the cappuccinatore
Cleaning the cappuccinatore Danger of burning and scalding.The cappuccinatore is very hot afterit has been used to prepare milk.Allow it to cool down beforecleaning. ^ Remove the cappuccinatore from thesteam and hot water spout by pullingit downwards. Now take the cappuccinatore apart: ^ Remove the ...
Page 49 - Dry the drip tray thoroughly.
Water container Change the water every day to preventa build-up of bacteria. Make sure that the valve, theunderside of the water container andthe surface the water container sitson are clean. Otherwise the watercontainer will not sit correctly. ^ The water container can be cleanedin the dishwasher, ...
Page 50 - Drip tray and waste container
Drip tray and waste container Clean the drip tray and wastecontainer every day to avoid unpleasant smells and mildew. The waste container is located in thedrip tray. The coffee machine will alert you in thedisplay when the drip tray and/or wastecontainer is full and needs to beemptied. Remove the tr...
Page 51 - Waste container; Coffee bean container
Waste container The waste container will usually containsome residual water from the rinsingprocess. ^ Push the coffee spouts as farupwards as they will go. ^ Carefully remove the drip traytogether with the waste container. ^ Empty the waste container and thedrip tray, if necessary. Used coffeegroun...
Page 52 - Brew unit; by hand only
Brew unit Clean the brew unit by hand only using hot water . Do not use washing-up liquid. Please note: – The moving parts of the brew unit are lubricated. Washing-up liquid willdamage the brew unit. – Clean the brew unit once a week. Removing and cleaning the brew unitby hand The brew unit can be r...
Page 53 - turn the handle to the right; Degreasing the brew unit
To replace the brew unit, proceed inthe reverse order: ^ Push the brew unit back into thecoffee machine, making sure it isstraight. ^ Press the button under the handle ofthe brew unit a and, whilst doing so, turn the handle to the right b . ^ Close the door. Turn the flaps 90°anti-clockwise. Lower t...
Page 54 - Housing
Various instructions about degreasingthe brew unit will appear in the display. You must empty the drip tray whenprompted to do so in order to continuethe cleaning programme. TIP Place a suitable container underneath the coffee spouts, so thatyou do not have to empty the drip traytoo frequently. When...
Page 55 - must now be carried out; Place a suitable container under; Descaling solution; Descaling
Limescale builds up in the coffeemachine during use. It will need to bedescaled regularly. How often, willdepend on the hardness of the localwater supply. The coffee machine will remind youwhen the descaling programme needsto be carried out. NO. PORTIONSUNTIL DESCALING: 50 will appear inthe display....
Page 57 - Important! On no account should; Problem solving guide
, Important! On no account should you open the appliance housing!Installation, maintenance andrepairs may only be carried out by asuitably qualified and competentperson in strict accordance withcurrent national and local safetyregulations.Repairs and other work byunqualified persons could bedangerou...
Page 58 - Messages in the display; Message
Messages in the display Message Possible cause and remedy FAULT - 1 FAULT - 2 FAULT - 82 The coffee machine has overheated. ^ Switch the machine off with the On/Off button. Wait forone hour and then switch it back on again. If the fault message appears in the display again, ^ contact Miele. FAULT - ...
Page 60 - The water container is not sitting correctly.
Message Possible cause and remedy FILL WATERCONTAINERAND PLACE INTHE MACHINE appears in thedisplay, althoughthe water containeris full. The water container is not sitting correctly. ^ Remove the water container and replace it. If the fault message appears in the display again, ^ empty the water cont...
Page 61 - Switch the machine off with the On/Off
Message Possible cause and remedy The followingmessage flashes inthe display: SYSTEM FILLINGUP - START The machine needs descaling and/or the filters in the brewunit are blocked. ^ Switch the machine off with the On/Off - button. ^ Press the OK button for two seconds and go toMAINTENANCE - DESCALING...
Page 62 - Unsatisfactory result; Problem
Unsatisfactory result Problem Possible cause and remedy Only water isdispensed from thecoffee spouts whencoffee has beenselected. The ground coffee chute lid has been opened and thenclosed again without any ready ground coffee being addedto the chute. Then the YES option was selected whenGROUND COFF...
Page 64 - Unusual performance of the coffee machine; The filters in the brew unit are blocked.
Unusual performance of the coffee machine Problem Possible cause and remedy Only very littlecoffee or nothing atall is dispensed fromthe coffee spouts,although a drink hasbeen selected. The filters in the brew unit are blocked. ^ Clean the brew unit (see "Brew unit"). ^ Degrease the brew uni...
Page 67 - The coffee machine needs descaling.
Problem Possible cause and remedy The descalingprogramme wasstarted by mistake. The descaling programme cannot be cancelled once youhave pressed the OK button. The programme has to be completed through to the end.This is a safety measure to ensure that the machine is fullydescaled, and is important ...
Page 68 - Warranty; After Sales / Warranty
In the event of a fault which you cannotcorrect yourself, please contact: – your Miele Chartered Agent or – Miele (see back cover for contact details). When contacting your Chartered Agentor Miele, please quote the model andserial number of your appliance, both ofwhich are shown on the data plateloc...
Page 69 - Accessories
The following accessories are suppliedwith the machine: – Measuring spoon for ground coffee – Cleaning tablets for degreasing the brew unit – Descaling tablets for descaling the water pipework – Test strips for determining the water hardnesslevel Miele also offers a range of optionalaccessories, as ...
Page 70 - Saving energy
Eco mode Using the coffee machine in Eco modesaves energy. The coffee machine will switch toenergy saving mode if it has not beenused to prepare a drink for some time.This means that the machine does notremain heated and so saves energy. The coffee machine will heat up againas soon as a drink is sel...
Page 71 - Packing the machine; Transporting the coffee machine
If you are not going to use the coffeemachine for a long period of time and itneeds to be moved, e.g. when movinghouse: – Empty and clean the coffee bean container – Empty and clean the water container – Evaporate the coffee machine – Clean the drip tray and waste container – Pack the machine secure...
Page 72 - Electrical connection
All electrical work should be carried outby a suitably qualified and competentperson only, in strict accordance withcurrent national and local safetyregulations. Installation, repairs and other work byunqualified persons could bedangerous. The manufacturer cannotbe held liable for unauthorised work....
Page 73 - Installation
Please note: Danger of overheating.Ensure that there is sufficientventilation around the coffeemachine.Make sure that the vents on the topof the machine are not coveredcompletely. Danger of overheating. If the coffeemachine is installed behind akitchen furniture door, it may only beused with the fur...
Page 74 - Coffee machine dimensions


 Miele 11106260
User Manual
Miele 11106260
User Manual
 Miele 11648140
User Manual
Miele 11648140
User Manual
 Miele 11648170
User Manual
Miele 11648170
User Manual
 Miele 11648400
User Manual
Miele 11648400
User Manual
 Miele 11733820
User Manual
Miele 11733820
User Manual
 Miele 11733830
User Manual
Miele 11733830
User Manual
 Miele 11733860
User Manual
Miele 11733860
User Manual
 Miele CM5310BLK
User Manual
Miele CM5310BLK
User Manual