Page 3 - CONTENTS
1 Safety Information........................................................................................................................ 2 Identifying Parts of the Dryer........................................................................................................ 4 Simple Installation....
Page 4 - SAFETY INFORMATION; Safety information
Congratulations on your new Midea dryer. This manual contains important information on the installation, use and care of your appliance. Please read this manual carefully before use. Follow instructions and keep the manual for future reference. SAFETY INFORMATION 2 CAUTION: HOT SURFACE! CAUTION: RIS...
Page 5 - Precautions
SAFETY INFORMATION 3 Precautions Ÿ Install or store the dryer where it will not be exposed to temperature below freezing or exposed to water or the weather, which could cause permanent damage and invalidate the warranty. Ÿ Do not spray combustible aerosols near the dryer during use. If accidental sp...
Page 6 - IDENTIFYING PARTS OF THE DRYER
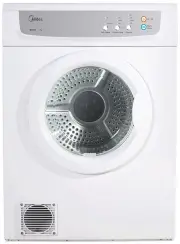
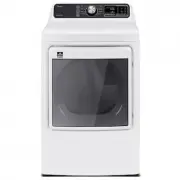
IDENTIFYING PARTS OF THE DRYER 4 top board control panel door drum door switch adjustable foot exhaust vent lint filter air intake grill power cord with plug safety reset button
Page 7 - SIMPLE INSTALLATION; Wall mounting accessories
SIMPLE INSTALLATION 5 Wall mounting accessories No. Name Quantity Illustration 1 Horizontal drilling template 1 2 Vertical drilling template 2 3 Expansion screw bolt 8 4 Hanging hook 2 5 Left support bracket + damper gasket 1+1 6 Right support bracket + damper gasket 1+1 7 Inverted control panel 1 8...
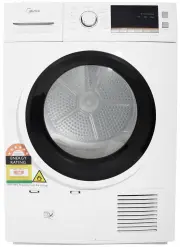
Page 8 - Dryer installation options; There are several different ways you can install your dryer.; Free standing
SIMPLE INSTALLATION 6 Dryer installation options The dryer must be installed in a suitable dry and well ventilated location. Ensure that the full opening of dryer door is not restricted. There are several different ways you can install your dryer. Fig. 1 Free standing Free standing The dryer stands ...
Page 9 - Dryer wall mounting instructions; control panel with the inverted panel sticker.; Note: All tapes must be removed before operating the dryer.
SIMPLE INSTALLATION 7 Dryer wall mounting instructions WARNING: Make sure that the mounting wall is of sufficient strength to support the dryer weight. Use two or more people to move and install the dryer, failure to do so can result in personal injury. Determine the position of the dryer on the wall...
Page 10 - BEFORE YOU DRY; Capacity; Lint givers
BEFORE YOU DRY 8 Capacity The maximum capacity of your dryer (when the load is dry) is 7kg. Note: Overloading the machine will affect the drying performance, and may damage items. Sorting and loading To get the most efficient use of your dryer we recommend you sort your loads. Ÿ Look for a care label...
Page 11 - DRYING GUIDE; Permanent press and synthetics; - take out as soon as the dryer stops to reduce wrinkles.; Woollen articles; - acrylic clothing or sleep wear use only the “Synthetic” setting.; Rubber and plastics; May be tumble dried
DRYING GUIDE 9 Always check your labels for the drying symbols to ensure they are suitable for drying in a tumble dryer. Ÿ Permanent press and synthetics - take out as soon as the dryer stops to reduce wrinkles. Ÿ Woollen articles - not recommended. Pull them to their original shape, then dry them fl...
Page 12 - CONTROL FEATURES AND FUNCTIONS; Start / Pause button; Is used to select the desired program. Programs available are:; Child Lock; Is used to select the desired dryness level. Levels available are:
10 CONTROL FEATURES AND FUNCTIONS 6 5 3 2 1 4 Medium Light 1 On / Off button This button switches the dryer on. At the end of the program, press the button again to switch the dryer off. 2 Start / Pause button This button allows you to start or pause the dryer to check the contents of the load or pe...
Page 13 - Program guide; Program; SAFETY RESET SWITCH
11 CONTROL FEATURES AND FUNCTIONS 6 Anti-Crease The Anti-Crease feature is designed to minimise the creasing that occurs when the clothes are left to sit in the dryer. After the cycle has finished, the drum will intermittently rotate so that the clothes do not settle in one position. Program guide Pr...
Page 14 - OPERATION
12 OPERATION 1. Load your dryer loosely until it is no more than TWO THIRDS FULL. Clothes must tumble freely in the dryer. Do not cram them in as wet clothes fluff up when dry. Overloading will: - Reduce efficiency - Increase drying time - Increase the risk of creasing 2. Press and release the On / Of...
Page 15 - HINTS; The laundry must be thoroughly spun before tumble drying.
13 HINTS Ÿ Never tumble dry the following: delicate items such as net curtains, wool, silk, fabric with metal trim, nylon tights, bulky materials such as anoraks, blankets, sleeping bags, feather quilts and any item containing rubber foam or materials similar to foam rubber. Ÿ Do not place in your d...
Page 16 - CLEANING AND MAINTENANCE; Cleaning the lint filter; You must clean this lint filter after every load.; Cleaning the outer surface and inner tub
14 CLEANING AND MAINTENANCE Cleaning the lint filter Ÿ Lint build-up is a fire hazard. Ÿ A clean lint filter reduces drying time, saves energy and avoids overheating. Ÿ Overheating may also damage your clothes. The lint filter is located at the front of your dryer at the bottom of the door opening. 1. ...
Page 17 - TROUBLESHOOTING GUIDE; Problem
15 TROUBLESHOOTING GUIDE If the clothes dryer does not perform as expected, malfunctions, or an alarm is sounding, please check the following list of possible solutions. If a solution cannot be found or the problem persists, please contact Midea service (refer to page 16). Do not, under any circumst...
Page 18 - If service is required; Complete and retain the following information for your records:; Please retain proof of purchase for warranty claims.; Date of purchase
16 REPAIRS, SERVICE & WARRANTY It is hazardous for anyone installing, removing, repairing servicing or testing this appliance. Only an Authorised Service Person can carry out servicing or repairs to this appliance. If service is required If you have a problem which persists after you have made t...
Page 19 - SPECIFICATIONS
17 SPECIFICATIONS Model MDV07 Rated Power 2000W Rated Volume of Dryer 7.0Kg Voltage 220~240V Frequency 50Hz Dimensions Height 840mm Width 595mm Depth 555mm Net Weight 35Kg IP rating IPX4 NOTE: This product is subject to continuous improvement, specifications are subject to change without prior notice...