Page 3 - CONTENTS; IMPORTANT SAFEGUARDS; OPERATION INSTRUCTION; CLEANING & MAINTENANCE; Specifications
33 6 1 1 1 CONTENTS IMPORTANT SAFEGUARDS PRECAUTIONSIMPORTANT SAFETY INSTRUCTIONSGROUNDING INSTRUCTIONSRADIO INTERFERENCE BEFORE THE FIRST USE UTENSILS INSTALLATION PARTS & FEATURES NAMES OF PARTS & ACCESSORIES CONTROL PANEL OPERATION INSTRUCTION USER OPTION FUNCTION INST CTION CLEANING &...
Page 4 - WARNING; IMPORTANT SAFETY INSTRUCTIONS
WARNING To reduce the risk of burns, electric shock, fire,injury topersons or exposure to excessive microwave oven energy when using your appliance, follow basic safety precautions, including the following: IMPORTANT SAFETY INSTRUCTIONS (a).Do not attempt to operate this oven with the door open since...
Page 6 - GROUNDING INSTRUCTIONS
This appliance must be grounded. In the event ofan electrical short circuit, grounding reduces the riskof electric shock by providing an escape wire for theelectric current. This appliance is equipped with a cord having grounding wire with a grounding plug. The plug must be plugged into an outlet th...
Page 7 - RADIO INTERFERENCE
A short power-supply cord is provided to reduce the risks resulting from becoming entangled in or tripping over a longer cord. Longer cord sets or extension cords are available and may be used if cared is exercised in their use. If a long cord sets or extension cord is used: 1). The marked electrica...
Page 8 - SAFETY
The oven must be on a leveled surface.The turntable and turntable roller rest must be in the oven during cooking. Place the cookware gently on the turntable and handle it carefully to avoid possible breakage.Incorrect use of browning dish may cause the turntable to break.Use only the specified bag si...
Page 9 - Personal Injury Hazard; UTENSILS CAUTION
Personal Injury Hazard Tightly-closed utensilscould explode. Closedcontainers should be openedand plastic pouches should bepierced before cooking. See the instructions on "Materials you can use inmicrowave oven or to be avoided in microwave oven."There may be certain non-metallic utensils th...
Page 12 - Countertop Installation; External Equipotential
1 Remove all packing material and accessories.Examine the oven for any damage such asdents or broken door. Do not install if oven isdamaged. Countertop Installation Cabinet: Remove any protective film foundon the microwave oven cabinet surface. Do not remove the light brown Mica coverthat is attached...
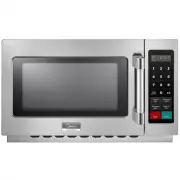
Page 13 - Control Panel and Features; CONTROL PANEL
1 Control Panel and Features (1) Power Buttons (2) Time Entry Button (3) X2 Button (4) Stop/Reset Button (5) Start Button (6) Number Button 2 CONTROL PANEL s (1) (2) (4) (3) (5) (6) (1)
Page 14 - Five power levels are available.; Appendix. A User Options
1 OPERATION INSTRUCTION Five power levels are available. Level PowerDisplay High 100% M. High 70% 70 Med.50%50 Defrost 20% 20 Hold 0% 00 Option Setting Discription 1 EOC Tone 2 Beeper Volume 3 Beeper On/Off 5 On the Fly 6 Door Reset 8 Manual Programming 9 Double Digit O O PP ::11 00 OP:11 OP:12OP:20O...
Page 16 - Power Up
1 Power Up " " displays when the oven is for the first time. If " " button pressed, the oven will change to Idle Mode. Idle Mode1) The oven shall enter Idle Mode after a period of time have expired in Ready Mode or Pause Mode without any operation. The length of time is determined by ...
Page 17 - Pause Mode; End of Cook Cycle Mode
1 Pause Mode 5. 6. OPERATION INSTRUCTION 1) While in cooking state, if the door is opened and then closed, or if the " " pad is pressed, the oven will enter Pause Mode.2) While paused,the screen will display the remaining cooking time.3) In Pause Mode, if the " " button is pressed, t...
Page 19 - Stage Cooking Programming
1 For example: set the program as memory cooking. Power level 70% and cooking time is 1 minute and 25 secondStep1: Open the door, press number button "1" for 5 seconds,"PROGRAW " displays.Step 2: Press number button "3", 2 seconds later, the screen will display the related ti...
Page 20 - Double Quantity cooking
1 a. Open the door,press number button "1" for 5 seconds,"PROGRAW" displays.b. Press number button "3", after two seconds, the screen will display the related time. c. Press "1","2","5" to input the cooking time. "1:25" displays.d. Press " ...
Page 21 - Cleaning Instructions; Always keep the oven clean; .Shorten cooking time
20 1. Cleaning the glass viewing window, the inner door panel and oven front face. For best performance and to maintain the high degree of safety, the inner door panel and oven front face should be free of food or grease build-up. Wipe these parts with a mild detergent, rinse and wipe dry. Never use...