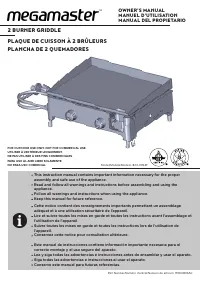
Page 2 - IMPORTANT SAFETY INFORMATION; EN
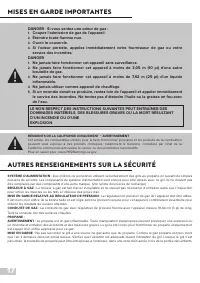
1 DANGER: If you smell gas: 1. Shut off gas to the appliance. 2. Extinguish any open flame. 3. Open lid. 4. If odor continues, keep away from the appliance and immediately call your gas supplier or local fire department. FAILURE TO FOLLOW THESE INSTRUCTIONS COULD RESULT IN FIRE, EXPLOSION OR BURN HA...
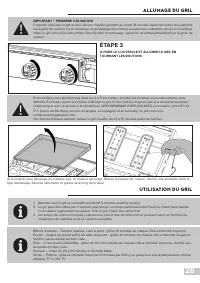
Page 3 - OUTDOOR GRILL SAFETY
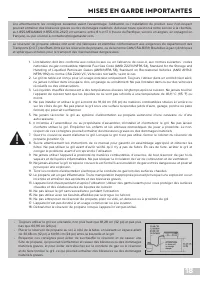
2 IMPORTANT SAFETY INFORMATION 1. The installation must conform with local codes or, in the absence of local codes, with the National Fuel Gas Codes, the National Fuel Gas Code, ANSI Z223.1/NFPA 54, Storage and Handling of Liquefied Petroleum Gases, ANSI/NFPA 58, or the Standard for Recreational Veh...
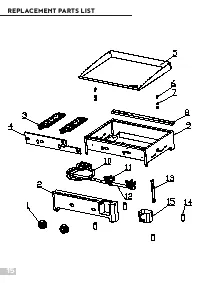
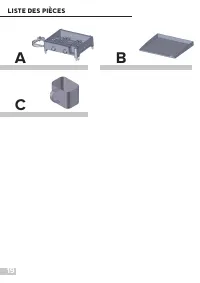
Page 4 - PARTS LIST
Page 5 - ASSEMBLY INSTRUCTIONS; ASSEMBLY STEPS
4 PREPARATION Before beginning assembly, installation or operation of product, make sure all parts are present andundamaged. Compare parts with package contents list and diagram above. If any part is missing or damaged,do not attempt to assemble, install or operate the product. Contact customer serv...
Page 7 - CONNECTION INSTRUCTIONS; LIQUID PROPANE CYLINDER REQUIREMENTS
6 CONNECTION INSTRUCTIONS LIQUID PROPANE CYLINDER REQUIREMENTS GAS HOOK-UP Only the pressure regulator and hose assembly supplied with the grill should be used. Any replacement pressure regulatorand hose assembly must be specified by the grill manufacturer. This grill is configured for liquid propan...
Page 8 - LEAK TEST
7 LEAK TEST WARNING:CHECK ALL GAS SUPPLY FITTINGS FOR LEAKS BEFORE EACH USE. DO NOT USE THE GRILL UNTIL ALL CONNECTIONS HAVE BEEN CHECKED AND DO NOT LEAK. DO NOT SMOKE WHILE LEAK-TESTING. NEVER LEAK-TEST WITH AN OPEN FLAME. GENERAL Although gas connections on the grill are leak-tested prior to shipm...
Page 10 - OPERATING INSTRUCTIONS; PREPARING TO LIGHT YOUR GRILL
9 OPERATING INSTRUCTIONS PREPARING TO LIGHT YOUR GRILL THIS COOKING APPLIANCE IS FOR OUTDOOR USE ONLY AND SHALL NOT BE USED IN A BUILDING,GARAGE OR ANY OTHER ENCLOSED AREA. FIND A LEVEL SURFACE ON WHICH TO PLACE THE GRILL. STEP 1 MOVING INSTRUCTIONS Caution: Never move the grill with burners lit.Mak...
Page 11 - LIGHTING YOUR GRILL; USING YOUR GRILL
10 OPEN THE LID AND TURN KNOB TO IGNITE. If ignition does not occur within 3-5 seconds, turn knob to “OFF” ( ) position. Wait 5 minutes before attempting to re-light the grill. If the grill fails to ignite after the second attempt, call our Customer Service Department at 1-855-MEGAMAS (1-855-634-2...
Page 12 - SPIDER WEB INSPECTION; CARE AND MAINTENANCE
11 TURNING OFF YOUR GRILL STORAGE AND TRANSPORTATION REQUIREMENTS 1. Turn knob to “OFF” ( ) position. 2. Turn the propane cylinder control knob to the CLOSED position. CAUTION: Do not attempt to re-light the grill without following all the lighting instructions.3. Dispose of grease drippings and f...
Page 13 - CLEANING
12 To remove the burners for cleaning:1. Locate the burner screws at the rear of the firebox.2. Remove the screws and lift the burners out of the firebox. BURNERS – Extreme care should be taken when removing and replacing a burner. It must be correctly centred on the orifice before any attempt is ma...
Page 14 - STORAGE
13 FIREBOX Use warm soapy water to clean this area. Do not allow grease to build up. GRIDDLE DRAIN HOLE The drain hole must be kept clear of grease and food particles to allow drippings to drain properly into the grease tray. This mustbe done to maintain proper operation of your grill. This grill, l...
Page 15 - WARRANTY STATEMENT
14 Nexgrill Industries, Inc. warrants to the original consumer-purchaser only that this product (Model #820-0054F) shall be free from defects in workmanship and materials after correct assembly and under normal and reasonable home use for the periods indicated below beginning on the date of purchase...
Page 16 - REPLACEMENT PARTS LIST
Page 17 - TROUBLESHOOTING
16 NO. PART (DESCRIPTION) WARRANTY COVERAGE QTY NO. PART (DESCRIPTION) WARRANTY COVERAGE QTY 1 Control knob 1 year 2 9 Main burner bowl assembly Non-replaceable 1 2 Control panel 1 year 2 10 LP regulator with hose 1 year 1 3 Main burner 1 year 1 11 Main gas valve 1 year 2 4 Front baffle 1 year 4 12 ...
Page 18 - AUTRES RENSEIGNEMENTS SUR LA SÉCURITÉ
17 RÉSIDENTS DE LA CALIFORNIE UNIQUEMENT – AVERTISSEMENT Cet article, les combustibles utilisés pour le faire fonctionner (propane) et les produits de la combustion peuvent vous exposer à des produits chimiques, notamment le benzène, considéré par l’état de la Californie comme pouvant causer le canc...
Page 19 - MISES EN GARDE IMPORTANTES
18 MISES EN GARDE IMPORTANTES Lire attentivement les consignes suivantes avant l’assemblage, l’utilisation ou l’installation du produit. Leur non-respect pourrait entraîner des blessures graves ou des dommages matériels. Adresser toute question à notre service à la clientèle, au 1-855-MEGAMAS (1-855...
Page 20 - LISTE DES PIÈCES
Page 21 - INSTRUCTIONS D'ASSEMBLAGE
20 INSTRUCTIONS D'ASSEMBLAGE DES QUESTIONS? IL MANQUE DES PIÈCES? Avant de retourner chez le détaillant, appeler le service à la clientèle au 1-855-MEGAMAS (1-855-634-2627) en semaine, entre 8 h et 17 h (heure du Pacifique; service en anglais, en espagnol et en français), ou écrire à [email protecte...
Page 23 - RACCORDEMENT DU RÉSERVOIR DE PROPANE; INSTRUCTIONS DE RACCORDEMENT; EXIGENCES RELATIVES AUX RÉSERVOIRS DE PROPANE
22 AVERTISSEMENTNE JAMAIS UTILISER DE MATÉRIEL ENDOMMAGÉ OU OBSTRUÉ. CONSULTER LE FOURNISSEUR DE PROPANE POUR TOUTE RÉPARATION. RACCORDEMENT DU RÉSERVOIR DE PROPANE REMPLACEMENT DE LE RÉSERVOIR DE PROPANE Éteindre les brûleurs (position ) et attendre que le gril refroidisse. Fermer le robinet de l...
Page 24 - ÉTAPE 1
23 AVANT L’ESSAI Vérifier que l’emballage a été entièrement retiré du gril, y compris les sangles des brûleurs. ESSAI D'ÉTANCHÉITÉ AVERTISSEMENTVÉRIFIER TOUS LES RACCORDEMENTS DE LA CONDUITE DE GAZ POUR DÉTECTER LES FUITES AVANT CHAQUE UTILISATION. NE PAS UTILISER LE GRIL SANS AVOIR INSPECTÉ TOUS LE...
Page 25 - ÉTAPE 3
24 AVERTISSEMENTNE PAS ENTREPOSER LE GRIL À L’INTÉRIEUR À MOINS D’AVOIR DÉBRANCHÉ LA BOUTEILLE. NE PAS ENTREPOSER LA BOUTEILLE DANS UN BÂTIMENT, UN GARAGE OU TOUT AUTRE ENDROIT FERMÉ. TOUJOURS TENIR HORS DE LA PORTÉE DES ENFANTS. VÉRIFICATION FINALE APRÈS L’INSTALLATION Tenir le gril à au moins 91,4...
Page 26 - INSTRUCTIONS D'UTILISATION; ÉTAPE 2
25 INSTRUCTIONS D'UTILISATION AVANT L'ALLUMAGE CET APPAREIL DE CUISSON EST CONÇU POUR UN USAGE EXTÉRIEUR UNIQUEMENT ET NE DOIT PAS ÊTRE UTILISÉ DANS UN BÂTIMENT, UN GARAGE OU TOUT AUTRE ENDROIT FERMÉ. TROUVER UNE SURFACE PLANE OÙ PLACER LE GRIL. ÉTAPE 1 CONSIGNES DE DÉPLACEMENT Attention : Ne jamais...
Page 27 - UTILISATION DU GRIL; ALLUMAGE DU GRIL
26 Bifteck d’aloyau – Tranche épaisse, cuite à point : griller 10 minutes de chaque côté à intensité moyenne.Poulet – Quarts de poulet à frire de taille moyenne : griller 30 minutes de chaque côté à intensité moyenne. Vérifier que la viande est bien cuite.Porc – Côtes levées/côtelettes : griller de ...
Page 28 - ÉTEINDRE LE GRIL; RETRAIT DES TOILES D'ARAIGNÉES; ENTRETIEN ET NETTOYAGE
27 LE GRIL NÉCESSITE PEU DE NETTOYAGE ET D’ENTRETIEN. Le gril de table est fait de matériaux qui ont une longue durée de vie dans des conditions d’utilisation normales. Le respect des consignes ci-dessous optimise la durée de vie du gril et la qualité de cuisson. Pour assurer une utilisation sécurit...
Page 29 - NETTOYAGE
28 BRÛLEURS – La fréquence de nettoyage des brûleurs dépend de la fréquence d’utilisation du gril. Il faut faire extrêmement attention lorsque l’on enlève et remet en place les brûleurs. Ils doivent être correctement alignés avec les orifices avant que le gril ne soit rallumé. Autrement, des flammes...
Page 30 - RANGEMENT
29 Comme tout autre appareil, le gril conservera une meilleure apparence et durera plus longtemps s’il est à l’abri des intempéries quand il n’est pas utilisé. Réinstaller les brûleurs :1. Insérer les brûleurs sur la soupape à gaz.2. Vérifier que les extrémités (A) sont à l’intérieur des tubes de ve...
Page 31 - ÉNONCÉ DE GARANTIE
30 Nexgrill Industries, Inc. garantit au premier acheteur seulement que ce produit (modèle 820-0054F) sera exempt de défauts de matériaux et de fabrication, après un assemblage approprié et dans des conditions normale et raisonnable d’utilisation domestique, pour les périodes indiquées ci-dessous, à...
Page 32 - LISTE DES PIÈCES DE RECHANGE
Page 33 - DÉPANNAGE
32 Nº PIÈCE (DESCRIPTION) GARANTIE QTÉ Nº PIÈCE (DESCRIPTION) GARANTIE QTÉ 1 Bouton de commande 1 an 2 9 Boîtier de brûleur principal Non remplaçable 1 2 Panneau de commande 1 an 1 10 Régulateur 1 an 1 3 Brûleur principal 1 an 2 11 Soupape à gaz 1 an 2 4 Chicane avant 1 an 1 12 Admission 1 an 1 5 Pl...
Page 34 - SEGURIDAD PARA LA PARRILLA; INFORMACIÓN DE SEGURIDAD IMPORTANTE
33 RESIDENTES DE CALIFORNIA SOLAMENTE - ADVERTENCIA : Este producto y los combustibles usados para operar este producto (propano líquido), y los productos de la combustión de tales combustibles, pueden exponerle a los productos químicos incluyendo el benceno, que es conocido por el Estado de Califor...
Page 36 - LISTA DE PARTES
Page 37 - INSTRUCCIONES DE MONTAJE; PASOS DE MONTAJE
36 INSTRUCCIONES DE MONTAJE PREGUNTAS, PROBLEMAS, PIEZAS FALTAN? Antes de volver a la tienda , llame al Departamento de Servicio al Cliente al 1-855-MEGAMAS (1-855-634-2627) de 8 a.m.-5 p.m., PST. Lunes a Viernes. Idiomas hablados : Ingles, Español, y Frances. También puede comunicarse con nosotros ...
Page 39 - INSTRUCCIONES DE CONNECIONES; REQUISITOS DEL CILINDRO DE PROPANO LÍQUIDO; CONEXIÓN DEL CILINDRO DE PROPANO LÍQUIDO
38 INSTRUCCIONES DE CONNECIONES REQUISITOS DEL CILINDRO DE PROPANO LÍQUIDO CILINDRO DE 20 LIBRAS. (9KG) INSTALACIÓN DEL GAS Sólo debe utilizar el regulador de presión y el ensamble de la manguera que vienen con la parrilla. Todo reemplazo del regulador de presión y del ensamble de la manguera debe s...
Page 40 - PRUEBA PARA DETECTAR FUGAS
39 PRUEBA PARA DETECTAR FUGAS ADVERTENCIA : ANTES DE UTILIZAR EL ASADOR, REVISE SI HAY FUGAS EN LOS ACCESORIOS DE SUMINISTRO DE GAS. NO UTILICE LA PARRILLA HASTA NO HABER VERIFICADO QUE NINGUNA CONEXIÓN TENGA FUGAS. NO FUME MIENTRAS BUSCA FUGAS DE GAS. NUNCA BUSQUE FUGAS DE GAS CUANDO HAYA UNA LLAMA...
Page 42 - INSTRUCCIONES DE FUNCIONAMIENTO; PREPARANDO PARA ENCENDER SU PARRILLA
41 INSTRUCCIONES DE FUNCIONAMIENTO PREPARANDO PARA ENCENDER SU PARRILLA ESTE APARATO ES PARA USO EXCLUSIVO EN EXTERIORES Y NO DEBE DE USARSE EN EDIFICIOS, COCHERAS O CUALQUIER OTRA ÁREA CERRADA. ENCUENTRE UNA SUPERFICIE PLANA SOBRE LA CUAL COLOCAR LA PARRILLA. PASO 1 INSTRUCCIONES PARA TRASLADAR Pre...
Page 43 - ENCENDIENDO SU PARRILLA; USANDO SU PARRILLA
42 ABRA LA TAPA Y ENCIENDA LA PERILLA. Si no enciende en 3 a 5 segundos, gire la perilla de control a “CERCA”. Espere 5 minutos para volver a tratar de encender la parrilla. Para obtener un reemplazo del producto, por favor llame al Departamento de Servicio al Cliente al 1-855-MEGAMAS (1-855-634-262...
Page 44 - APAGANDO TU PARRILLA; INSPECCIÓN DE TELA DE ARAÑA; CUIDADO Y MANTENIMIENTO
43 APAGANDO TU PARRILLA 1. Gire la perilla a la posición de apagado “OFF” ( ). 2. Gire la perillas de control del cilindro de propano a la posición de APAGADO. PRECAUCIÓN : No trate de volver a encender la parrilla sin seguir todas las instrucciones de encendido.3. Deseche las gotas de grasa y los...
Page 45 - LIMPIEZA
44 Para remover los quemadores para su limpieza :1. Ubique los tornillos de los quemadores en la parte trasera del fogón. 2. Retire los tornillos y levante los quemadores para sacarlo del fogón. 3. Quite los encendedores de los quemadores. QUEMADORES – se debe tener extremo cuidado al extraer y reem...
Page 46 - ALMACENAMIENTO
45 FOGÓN Use agua jabonosa tibia para limpiar esta área. No permita que se acumule la grasa. HOYO DE DRENAJE Debe mantener libre de grasa y partículas de comida al hoyo de drenaje para permitir que el gotee se drene debidamente hacia el depósito de grasa. Debe de hacer esto para mantener el funciona...
Page 47 - DECLARACION DE GARANTIA
46 Nexgrill Industries, Inc. garantiza solamente al consumidor-comprador original de este producto (Modelo N° 820-0054F) que el mismo estará libre de defectos en los materiales y la mano de obra después del ensamblaje correcto y bajo uso normal y razonable en el hogar, durante los períodos indicados...
Page 48 - LISTA DE PIEZAS DE REEMPLAZO
Page 49 - SOLUCION DE PROBLEMAS
48 NO. PIEZA (DESCRIPCIÓN) COBERTURA DE GARANTÍA CANT. NO. PIEZA (DESCRIPCIÓN) COBERTURA DE GARANTÍA CANT. 1 Perilla de control 1 año 2 9 Caja del quemador principal No reemplazable 1 2 Panel de control 1 año 1 10 Regulador LP 1 año 1 3 Quemador principal 1 año 2 11 Válvula principal de gas 1 año 2 ...