Page 2 - CONTENTS AND SAFETY INSTRUCTIONS; State of California Proposition 65 Warning:; State of California Proposition 65 Warning:; Important Safety Instructions; Recognize Safety Symbols,; WARNING
2 CARE AND USE/INSTALLATION NOTE ! CAUTION CONTENTS AND SAFETY INSTRUCTIONS Safety information ...............................................................2 Unpacking your appliance ..................................................3 Warranty registration ............................................
Page 3 - UNPACKING YOUR APPLIANCE; Warranty Registration; EXCESSIVE WEIGHT HAZARD; Important; WARNING - Help Prevent Tragedies
3 CARE AND USE/INSTALLATION NOTE ! CAUTION UNPACKING YOUR APPLIANCE Warranty Registration Remove Interior Packaging XXXXXXXXXXXXXX XXXXXXXXXXXXXX XXXXXXXXXXXX It is important you send in your warranty registration card immediately after taking delivery of your appliance or you can register online at...
Page 4 - CAUTION; Leveling Legs; INSTALLING YOUR APPLIANCE
4 CARE AND USE/INSTALLATION ! CAUTION Leveling Legs Select Location Cabinet Clearance Front Grille The proper location will ensure peak performance of your appliance. We recommend a location where the unit will be out of direct sunlight and away from heat sources. To ensure your product performs to ...
Page 5 - NOTE; Electrical Connection; Electrical Shock Hazard
5 CARE AND USE/INSTALLATION NOTE Figure 6 Electrical Connection Electrical Shock Hazard • Do not use an extension cord with this appliance. They can be hazardous and can degrade product performance. • This appliance should not, under any circumstanc- es, be installed to an un-grounded electrical sup...
Page 6 - INSTALLING THE ANTI TIP DEVICE (FREESTANDING INSTALLATIONS); for locating the position of the bracket:; Floor Mount Installation
6 CARE AND USE/INSTALLATION INSTALLING THE ANTI TIP DEVICE (FREESTANDING INSTALLATIONS) ! CAUTION NOTE Bottom View of Refrigerator Anti-Tip Bracket Leveling Leg Front of cabinet 21 1 ⁄ 2 " (54.6 cm) Figure 7 The anti-tip bracket is to be located on the floor in the left or right rear corner of t...
Page 8 - PRODUCT DIMENSIONS
8 CARE AND USE/INSTALLATION MODEL ROUGH-IN OPENING DIMENSIONS CABINET DIMENSIONS "A" "B" "C" "D" "E" "F" "G" "H" "J" LM15REF 15" (38.1 cm) **34" to 35" (86.4 to 88.9 cm) * 14 7 ⁄ 8 " (37.8 cm) 33 3 ⁄ 4 " to 3...
Page 10 - USING YOUR ELECTRONIC CONTROL; Temperature Sensor Fault:; Starting Your Refrigerator
10 CARE AND USE/INSTALLATION USING YOUR ELECTRONIC CONTROL Set Colder Warmer ON/OFF Press and Hold Press and Hold Alarm F Figure 12 close-up of control • Temperature Sensor Fault: If the control- ler detects that the temperature sensor is not properly functioning, a temperature sensor alarm will sou...
Page 11 - SHELVING CONFIGURATIONS; Alarm Mute
11 CARE AND USE/INSTALLATION Figure 14 Figure17 SHELVING CONFIGURATIONS Refrigerator: Refrigerator: Your appliance is equipped with a cantilever shelf system which provides maximum adjust ability and customizing of the shelving arrangements listed below. 15" (38.1 cm) Wide Models: Wiith a solid ...
Page 12 - To Add or Remove a Shelf
12 CARE AND USE/INSTALLATION Remove stored product from the shelf. Do not try to remove a loaded shelf from the appliance. Grasp the shelf front with both hands, rotate the front upward and lift out. (See Figure 19). To install a shelf insert the shelf in the appliance and insert the top hooks into ...
Page 13 - CARE AND CLEANING; Electrocution Hazard
13 CARE AND USE/INSTALLATION CARE AND CLEANING ! CAUTION • Never attempt to repair or perform maintenance on the appliance until the main electrical power has been disconnected. Turning the appliance control "OFF" does not remove electrical power from the unit's wiring. • Replace all parts a...
Page 14 - Long Term Storage/Winterization
14 CARE AND USE/INSTALLATION CARE AND CLEANING 1. Time to Winterize, when the daily low ambient tempera- ture is at or below 38°F (3.3°C). ! CAUTION Operation of the unit at ambient temperatures below the recommended Winterization temperature will void your war- ranty. 2. Turn unit off, (see page 10...
Page 15 - STAINLESS STEEL MAINTENANCE; Background
15 CARE AND USE/INSTALLATION STAINLESS STEEL MAINTENANCE NOTE Background Care and Cleaning Choosing a Cleaning Product Stainless steel does not stain, corrode, or rust as easily as ordinary steel, but it is not stain or corrosion proof. Stain- less steels can discolor or corrode if not maintained pr...
Page 16 - ENERGY SAVING TIPS AND OBTAINING SERVICE; If Service is Required:; The following suggestions will minimize the cost of; Energy Saving Tips
16 CARE AND USE/INSTALLATION ENERGY SAVING TIPS AND OBTAINING SERVICE If Service is Required: • If the product is within the first year warranty period please contact your dealer or call Lynx Grills Customer Service at 888.289.5969 for directions on how to obtain warranty coverage in your area. • If...
Page 17 - TROUBLESHOOTING
17 CARE AND USE/INSTALLATION • Never attempt to repair or perform maintenance on the appliance until the main electrical power has been disconnected. Turning the appliance control "OFF" does not remove electrical power from the unit's wiring. • Replace all parts and panels before operating. ...
Page 18 - THE LYNX STORY; Lynx Satisfied Customers
18 CARE AND USE/INSTALLATION THE LYNX STORY L ynx began with a vision. A small group of manufacturing engineers with over a cen- tury of collective experience had a dream. They dared to take their extensive commercial manufacturing know-how and create a line of outdoor cooking products that offer co...
Page 20 - The best outdoor kitchen products come from:
All specifications and product designs subject to change without notice. Such revisions do not entitle the buyer to corresponding changes, improvements, additions, replacements or compensation for previously purchased products. 41014708-EN Rev A 1/30/17 The best outdoor kitchen products come from: L...
Page 21 - PROFITEZ AU MAXIMUM DE VOTRE; ENTRETIEN ET UTILISATION / INSTALLATION; RÉFRIGÉRATEURS D'EXTÉRIEUR
PROFITEZ AU MAXIMUM DE VOTRE ENTRETIEN ET UTILISATION / INSTALLATION LM15REF / LM24REF RÉFRIGÉRATEURS D'EXTÉRIEUR
Page 22 - CONTENU; Importantes instructions de sécurité; REMARQUE; Reconnaissance des symboles,; AVERTISSEMENT; AVERTISSEMENT
2 ENTRETIEN ET UTILISATION / INSTALLATION CONTENU Importantes instructions de sécurité Contenu REMARQUE ! ATTENTION Les avertissements et les instructions de sécurité qui ap- paraissent dans ce guide n’ont pas la prétention de couvrir toutes les conditions et situations possibles pouvant arriver. Il...
Page 23 - DÉBALLAGE DE VOTRE APPAREIL; Enregistrement de la garantie; AVERTISSEMENT - Contribuez à éviter des tragédies; Enlèvement de l’emballage intérieur; ATTENTION
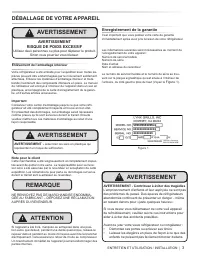
3 ENTRETIEN ET UTILISATION / INSTALLATION DÉBALLAGE DE VOTRE APPAREIL Enregistrement de la garantie XXXXXXXXXXXXXX XXXXXXXXXXXXXX XXXXXXXXXXXX Figure 1 AVERTISSEMENT - Contribuez à éviter des tragédies L’emprisonnement d’enfants et leur asphyxie ne sont pas des problèmes du passé. Des épaves de réfr...
Page 24 - Choix de l’emplacement; INSTALLATION DE VOTRE APPAREIL; Pieds de mise à niveau
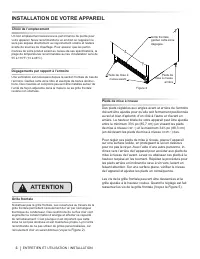
4 ENTRETIEN ET UTILISATION / INSTALLATION Un bon emplacement assurera une performance de pointe pour votre appareil. Nous recommandons un endroit où l’appareil ne sera pas exposé directement au rayonnement solaire et restera écarté de sources de chauffage. Pour assurer que les perfor- mances de votr...
Page 25 - Risque de commotion électrique
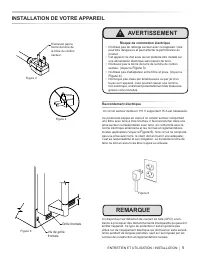
5 ENTRETIEN ET UTILISATION / INSTALLATION Figure 6 Figure 5 INSTALLATION DE VOTRE APPAREIL Figure 3 Figure 4 N’enlevez pas la borne de terre de la fiche du cordon secteur. REMARQUE Un disjoncteur sur détection de courant de fuite (GFCI) a ten- dance à provoquer des déclenchements intempestifs qui pe...
Page 26 - INSTALLATION DU DISPOSITIF ANTI-BASCULEMENT; Dispositif anti-basculement; pour définir la position de la ferrure :
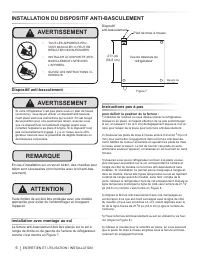
6 ENTRETIEN ET UTILISATION / INSTALLATION INSTALLATION DU DISPOSITIF ANTI-BASCULEMENT Figure 7 Dispositif anti-basculement Installation avec montage au sol Instructions pas à pas • TOUS LES APPAREILS PEU- VENT BASCULER. IL PEUT EN RÉSULTER DES BLESSURES • INSTALLER LE DISPOSITIF ANTI- BASCULEMENT LI...
Page 28 - DIMENSIONS DU PRODUIT
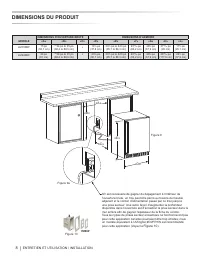
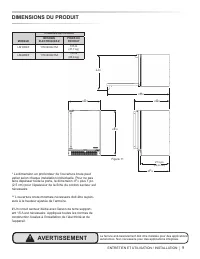
8 ENTRETIEN ET UTILISATION / INSTALLATION «A» «B» «C» «D» «E» DIMENSIONS DU PRODUIT Figure 9 Figure 9a Figure 10 MODÈLE DIMENSIONS D’OUVERTURE BRUTE DIMENSIONS D’ARMOIRE «A» «B» «C» «D» «E» «F» «G» «H» «J» LM15REF 15 po (38,1 cm) **34 po to 35 po (86,4 to 88,9 cm) * 14 7 ⁄ 8 po (37,8 cm) 33 3 ⁄ 4 po...
Page 30 - UTILISATION DE VOTRE COMMANDE ÉLECTRONIQUE; Démarrage de votre réfrigérateur; Mise en marche et à l’arrêt de votre réfrigérateur; Fixation de consigne de température
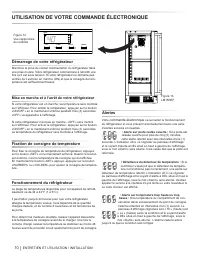
10 ENTRETIEN ET UTILISATION / INSTALLATION UTILISATION DE VOTRE COMMANDE ÉLECTRONIQUE Set Colder Warmer ON/OFF Press and Hold Press and Hold Alarm F Figure 12 Vue rapprochée du contrôle • Défaillance du détecteur de température : Si le contrôleur s’aperçoit que le détecteur de tempéra- ture ne fonct...
Page 31 - Mise en sourdine de l’alarme; CONFIGURATIONS DE ÉTAGÈRES
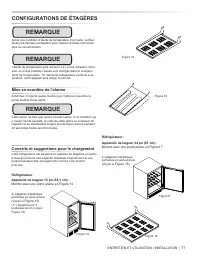
11 ENTRETIEN ET UTILISATION / INSTALLATION Figure 14 Figure17 Réfrigérateur : Réfrigérateur : Votre réfrigérateur est équipé d’un système de étagères en porte- à-faux qui procure une capacité maximale d’ajustement et une personnalisation des arrangements comme c’est montré plus loin. Appareils de la...
Page 32 - Pour ajouter ou enlever une étagère
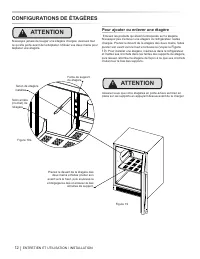
12 ENTRETIEN ET UTILISATION / INSTALLATION CONFIGURATIONS DE ÉTAGÈRES Figure 19a Figure 19 Pour ajouter ou enlever une étagère N’essayez jamais de bouger une étagère chargée, évacuez tout ce qu’elle porte avant de la déplacer. Utilisez vos deux mains pour déplacer une étagère. ! ATTENTION Enlevez le...
Page 33 - Risque d’électrocution; ENTRETIEN ET NETTOYAGE; RISQUE DE COMMOTION ÉLECTRIQUE :
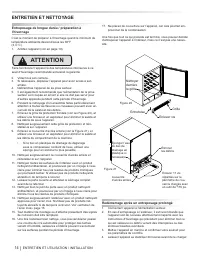
13 ENTRETIEN ET UTILISATION / INSTALLATION Grille frontale Armoire Intérieur Soins pour l’appareil En cas de coupure du secteur Remplacement de l’ensemble d’éclairage • Ne tentez jamais de réparer ou d’exécuter de la mainte- nance sur l’appareil avant que son alimentation électrique n’ait été débran...
Page 35 - ENTRETIEN DE L’ACIER INOX; Contexte; Entretien et nettoyage
15 ENTRETIEN ET UTILISATION / INSTALLATION ENTRETIEN DE L’ACIER INOX Contexte Entretien et nettoyage Choix d’un produit de nettoyage L’acier inox ne se décolore pas, ne se corrode pas et ne rouille pas comme l’acier ordinaire, mais il n’est pas à l’abri des taches ou corrosions. L’acier inox peut se...
Page 36 - CONSEILS POUR L’ÉCONOMIE D’ÉNERGIE, OBTENTION DE SERVICE; Conseils pour l’économie d’énergie
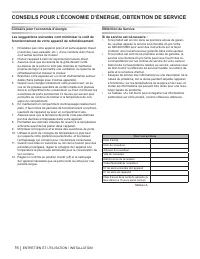
16 ENTRETIEN ET UTILISATION / INSTALLATION CONSEILS POUR L’ÉCONOMIE D’ÉNERGIE, OBTENTION DE SERVICE Conseils pour l’économie d’énergie Obtention de Service Les suggestions suivantes vont minimiser le coût de fonctionnement de votre appareil de refroidissement. 1. N’installez pas votre appareil près ...
Page 37 - DÉPANNAGE; Avant d’appeler pour du service; Problème
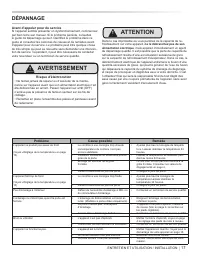
17 ENTRETIEN ET UTILISATION / INSTALLATION DÉPANNAGE Avant d’appeler pour du service Si l’appareil semble présenter un dysfonctionnement, commencez par bien relire son manuel. Si le problème persiste, consultez le guide de dépannage qui suit. Identifiez le problème dans ce guide et consultez les col...
Page 38 - L’HISTOIRE DE LYNX; Clients satisfaits de Lynx
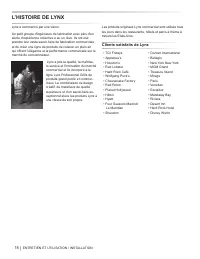
18 ENTRETIEN ET UTILISATION / INSTALLATION L’HISTOIRE DE LYNX Lynx a commencé par une vision. Un petit groupe d'ingénieurs de fabrication avec plus d'un siècle d'expérience collective a eu un rêve. Ils ont osé prendre leur vaste savoir-faire de fabrication commerciale et de créer une ligne de produi...
Page 40 - Les meilleurs produits de cuisine d’extérieure viennent de :
41014708-FR Rev A 1/30/17 Toutes les spécifications et les conceptions des produits sont sujet à des changements sans préa - vis. De telles révisions ne donnent aucun droit pour l’acheteur de produits antérieurs à bénéficier de ces changements, améliorations, ajouts, remplacements, ni de recevoir un...
Page 41 - APROVECHE AL MÁXIMO DE SU; MANTENIMIENTO Y OPERACIÓN / INSTALACIÓN; REFRIGERADORES EXTERIOR
APROVECHE AL MÁXIMO DE SU MANTENIMIENTO Y OPERACIÓN / INSTALACIÓN LM15REF / LM24REF REFRIGERADORES EXTERIOR
Page 42 - ÍNDICE; Instrucciones importantes de seguridad; ADVERTENCIA; Reconozca los símbolos,; ADVERTENCIA
2 MANTENIMIENTO Y OPERACIÓN / INSTALACIÓN ÍNDICE Instrucciones importantes de seguridad Índice Advertencias de la Proposición 65 del estado de California: Este producto contiene una o más sustancias químicas identi- ficadas por el estado de California como causantes de cáncer. ! ADVERTENCIA Adverten...
Page 43 - DESEMBALAJE DE SU ARTEFACTO; NOTA; RIESGO DE PESO EXCESIVO
3 MANTENIMIENTO Y OPERACIÓN / INSTALACIÓN DESEMBALAJE DE SU ARTEFACTO Registro de garantía Retiro del embalaje interior XXXXXXXXXXXXXX XXXXXXXXXXXXXX XXXXXXXXXXXX NOTA ! PRECAUCION ! ADVERTENCIA RIESGO DE PESO EXCESIVO Se necesitan dos o más personas para mover el producto. Si no se procede así, pue...
Page 44 - Patas niveladoras traseras; PRECAUCION; INSTALACIÓN DE SU ARTEFACTO
4 MANTENIMIENTO Y OPERACIÓN / INSTALACIÓN Patas niveladoras traseras Selección de la ubicación Espacios libres alrededor del gabinete Rejilla frontal No obstruya la rejilla frontal. Las aberturas de la rejilla frontal permiten que el aire circule a través del intercambiador de calor del condensador....
Page 45 - Conexión eléctrica; Peligro de choque eléctrico
5 MANTENIMIENTO Y OPERACIÓN / INSTALACIÓN Figura 6 Conexión eléctrica Se necesita un circuito dedicado de 115 volts, 15 amperes. Este producto está equipado de fábrica con un cordón de alimen - tación eléctrica que tiene un enchufe de tres clavijas con puesta a tierra. Debe enchufarse en un tomacorr...
Page 46 - INSTALACIÓN DEL DISPOSITIVO ANTIVUELCO; Dispositivo antivuelco; ubicar la posición del soporte:
6 MANTENIMIENTO Y OPERACIÓN / INSTALACIÓN INSTALACIÓN DEL DISPOSITIVO ANTIVUELCO Figura 7 Dispositivo antivuelco Instalación de montaje en el piso Instrucciones paso a paso para Vista inferior del artefacto Soporte antivuelco Pata niveladora Frente del gabinete 21 1 ⁄ 2 " (54,6 cm) ubicar la pos...
Page 48 - DIMENSIONES DEL PRODUCTO
8 MANTENIMIENTO Y OPERACIÓN / INSTALACIÓN "A" "B" "C" "D" "E" Figura 9 Figura 9a Figura 10 MODELO DIMENSIONES DE LA ABERTURA DE INSTALACIÓN pulgadas (cm) DIMENSIONES DEL GABINETE pulgadas (cm) "A" "B" "C" "D" "E" "F&...
Page 50 - USO DE SU CONTROL ELECTRÓNICO; Puesta en marcha de su refrigerador; Alarma por puerta abierta:
10 MANTENIMIENTO Y OPERACIÓN / INSTALACIÓN USO DE SU CONTROL ELECTRÓNICO Set Colder Warmer ON/OFF Press and Hold Press and Hold Alarm F Figura 12 Primer plano del control Figura 13 LM15REF Puesta en marcha de su refrigerador Encendido y apagado de su refrigerador Ajuste de la temperatura deseada Uti...
Page 51 - Procedimiento para silenciar la alarma; CONFIGURACIONES DE ESTANTES
11 MANTENIMIENTO Y OPERACIÓN / INSTALACIÓN Figura 14 Figura17 Figura 15 Figura 18 Procedimiento para silenciar la alarma Consejos y sugerencias para cargar Figura 16 CONFIGURACIONES DE ESTANTES (2) Estante de chapa metálica perforada (vea la Figura 18). Modelos de 24" (61 cm) de ancho: Con una p...
Page 52 - Para agregar o desmontar un estante
12 MANTENIMIENTO Y OPERACIÓN / INSTALACIÓN CONFIGURACIONES DE ESTANTES Figura 19a Figura 19 Para agregar o desmontar un estante Nunca trate de mover un estante cargado, retire todos los produc - tos del estante antes de moverlo. Use ambas manos para mover el estante. proceda como se indica a continu...
Page 53 - Rejilla frontal; Ante una falla en la alimentación eléctrica; Reemplazo del equipo de iluminación interior; CUIDADOS Y LIMPIEZA; Peligro de electrocución
13 MANTENIMIENTO Y OPERACIÓN / INSTALACIÓN Rejilla frontal Gabinete Interior Cuidado del artefacto Ante una falla en la alimentación eléctrica Reemplazo del equipo de iluminación interior CUIDADOS Y LIMPIEZA Peligro de electrocución • Nunca intente reparar o realizar tareas de mantenimiento en el ar...
Page 54 - Almacenamiento a largo plazo / Acondicionamien-
14 MANTENIMIENTO Y OPERACIÓN / INSTALACIÓN CUIDADOS Y LIMPIEZA Figura 20 Figura 21 Almacenamiento a largo plazo / Acondicionamien- to para el invierno 1. El momento del acondicionamiento para el invierno es cuando la temperatura ambiente mínima diaria es igual o menor de 38 ºF. 2. Apague la unidad (...
Page 55 - MANTENIMIENTO DEL ACERO INOXIDABLE; Cuidado y limpieza; Puesta en marcha después de un almacenamiento
15 MANTENIMIENTO Y OPERACIÓN / INSTALACIÓN MANTENIMIENTO DEL ACERO INOXIDABLE Cuidado y limpieza Elección de un producto de limpieza El acero inoxidable no se mancha, corroe ni oxida tan fácilmente como el acero ordinario, pero no es a prueba de manchas ni de corrosión. Los aceros inoxidables pueden...
Page 56 - CONSEJOS PARA AHORRAR ENERGÍA Y SOLICITUD DE SERVICIO TÉCNICO; Si necesita asistencia técnica tenga en cuenta lo; Consejos Para Ahorrar Energía; Las siguientes sugerencias reducirán al mínimo
16 MANTENIMIENTO Y OPERACIÓN / INSTALACIÓN CONSEJOS PARA AHORRAR ENERGÍA Y SOLICITUD DE SERVICIO TÉCNICO • Si aún no ha finalizado el primer año del período de garantía del producto, comuníquese con su distribuidor o llame al servicio de atención al cliente de Lynx Grills al teléfono 888.289.5969 pa...
Page 57 - LOCALIZACIÓN DE FALLAS; Antes de llamar al servicio técnico siga estos
17 MANTENIMIENTO Y OPERACIÓN / INSTALACIÓN LOCALIZACIÓN DE FALLAS Antes de llamar al servicio técnico siga estos consejos Si el artefacto parece estar funcionando mal, lea primero este manual. Si el problema persiste, vea la guía de localización de fallas incluida a continuación. Antes de llamar al ...
Page 58 - LA HISTORIA DE LYNX; Clientes satisfechos de Lynx
18 MANTENIMIENTO Y OPERACIÓN / INSTALACIÓN LA HISTORIA DE LYNX Lynx comenzó con una visión. Un pequeño grupo de ingenieros de fabricación con más de un siglo de experiencia colectiva tuvo un sueño. Se atrevi - eron a tomar su amplio conocimiento de fabricación com - ercial y crear una línea de produ...
Page 60 - Los mejores productos de cocina exteriores provienen de:
41014708-SP Rev A 1/30/17 Todas las especificaciones y diseños del producto están sujetos a cambios sin aviso previo. Las revisiones del producto no le otorgan al comprador el derecho a cambios, mejoras, accesorios adicionales, reemplazos o compensaciones por los productos previamente comprados. Los...