Page 2 - TABLE OF CONTENTS; Replacing the Ice Maker; Water Valve Instalation
2 TABLE OF CONTENTS WarrantyImportant Safety InstructionsBefore You Begin Replacing the Ice Maker Introduction to the Automatic Ice MakerContents of KitIcemaker Installation Before You BeginTools You Will NeedInstallation Instructions Water Valve Instalation Before You BeginTools You Will NeedInstal...
Page 3 - WARRANTY; LG Icemaker Kit Warranty Period
3 WARRANTY LG ELECTRONICS CANADA, INC. LG REFRIGERATOR LIMITED WARRANTY - Canada ninety (90) days from the date of manufacture of the ice maker). THIS LIMITED WARRANTY DOES NOT COVER: All costs associated with the above excluded circumstances shall be borne by the consumer. For complete warranty det...
Page 4 - • Do n; SAVE THESE INSTRUCTIONS
IMPORTANT SAFETY INSTRUCTIONS This guide contains many important safety messages. Always read and obey. This is the safety alert symbol. It alerts you to safety messages that inform you of hazards that can kill or hurt you or others, or cause damage to the product. All safety messages will be preced...
Page 5 - IMPORTANT; BEFORE YOU BEGIN
Read these instructions completely and carefully. • IMPORTANT : Save these instructions for local servicer’s use. • IMPORTANT: ordinances. Observe all governing codes and • Note to Installer: Be sure to leave these instructions with the consumer. • Note to Consumer: Keep these instructions for futur...
Page 6 - INTRODUCTION TO THE AUTOMATIC ICEMAKER; Personal Injury Hazard; DO NOT; WARNING
INTRODUCTION TO THE AUTOMATIC ICEMAKER Personal Injury Hazard Avoid contact with the moving parts. DO NOT place fingers or hands on the automatic icemaking mechanism while the refrigerator is plugged in. WARNING A newly installed refrigerator may take 12 to 24 hours to begin making ice. The icemaker...
Page 7 - CONTENTS OF KIT
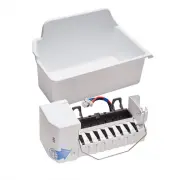
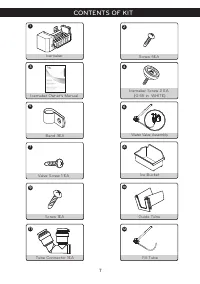
12 CONTENTS OF KIT 1 2 3 4 5 7 8 10 6 Icemaker Owner’s Manual Band 3EA Icemaker Valve Screw 1 EA Ice Bucket Guide Tube Icemaker Screw 2 EA 7 OWNER’S MANUAL ICEMAKER Please read this manual carefully before operating www.lg.com P/NO.MFL63725902 ENGLISH ES PAÑOL FRANÇAIS MANUAL DE USUARIO FÁBRICA DE H...
Page 8 - ICEMAKER INSTALLATION; INSTALLATION INSTRUCTIONS; INSTALL THE ICEMAKER
BEFORE YOU BEGIN Read each step thoroughly before proceeding. TOOLS YOU WILL NEED ICEMAKER INSTALLATION CAUTION: Unplug the refrigerator power cord from the outlet. INSTALLATION INSTRUCTIONS Flat blade and Phillips screwdrivers 8 Turn the icemaker switch to O (off) . Leave the icemaker off until the...
Page 9 - INSTALL THE ICE BUCKET
ICEMAKER INSTALLATION 4. INSTALL THE ICE BUCKET 3 NOTE: Secure the Icemaker to the freezer using 1 screw . . PLUG IN THE ICEMAKER 9 First remove connector cover, press like Figure 1 Figure 2 arrow indicate in order to connect the Icemaker into the freezer. (Figure 1) Plug the Icemaker wire harness i...
Page 10 - WATER VALVE INSTALLATION
10 WATER VALVE INSTALLATION 1. REMOVE THE BACK COVER BEFORE YOU BEGIN Read each step thoroughly before proceeding. TOOLS YOU WILL NEED CAUTION: Unplug the refrigerator power cord from the outlet. INSTALLATION INSTRUCTIONS R (Only for models; LTCS20120*, LTCS20020* and LTCS20040*) emove the back cove...
Page 11 - REMOVE THE ICEMAKER FILL TUBE COVER
11 WATER VALVE INSTALLATION 4. REMOVE THE ICEMAKER FILL TUBE COVER Remove and discard the icemaker fill tube opening cover located on the upper right side of the refrigerator; insert the icemaker fill tube all the way into the opening until it stops. 5. SECURE THE FILL TUBE Locate the marks on the b...
Page 12 - FILL TUBE INSTALLATION; Wrong
12 FILL TUBE INSTALLATION BEFORE YOU BEGIN Read each step thoroughly before proceeding. TOOLS YOU WILL NEED CAUTION: Unplug the refrigerator power cord from the outlet. INSTALLATION INSTRUCTIONS Flat blade and Phillips screwdrivers 1 . REMOVE THE ICEMAKER FILL TUBE COVER R (Apply only for model; LRT...
Page 13 - WHEN SHOULD YOU SET THE ICEMAKER SWITCH TO O (OFF); NORMAL SOUNDS YOU MAY HEAR; CARE
13 WHEN SHOULD YOU SET THE ICEMAKER SWITCH TO O (OFF) NORMAL SOUNDS YOU MAY HEAR WHEN YOU GO ON VACATION •• • • CARE During use, you may hear an occasional "buzzing" noise coming from the back of your refrigerator. This is normal and occurs when the water valve is turned on to allow water to...
Page 14 - TROUBLESHOOTING GUIDE
AUTOMATIC ICEMAKER DOES NOT WORK CUBES PRODUCED BY ICEMAKER ARE TOO SMALL ICE CUBES ARE FREEZING TOO SLOWLY ICE CUBES HAVE A BAD TASTE OR ODOR Icemaker switch in the O (off) position. Water supply turned off or not connected. Freezer compartment too warm. Piled up cubes in the storage bin causes the...
Page 15 - TABLE DES MATIERES
TABLE DES MATIERES Garantie Avant de commencer Remplacement de la machine à glaçons Introduction à la Machine à Glaçons Automatique Contenu de la Trousse Installation de la Machine à Glaçons Avant de commencer Outils nécessaires Installation du robinet d’eau Avant de commencer Outils nécessaires Ent...
Page 16 - GARANTIE; GARANTIE LIMITEE DU REFRIGERATEUR LG – CANADA; LG MACHINE À GLAÇONS PÉRIODE DE GARANTIE
16 GARANTIE LG ELECTRONICS CANADA, INC. GARANTIE LIMITEE DU REFRIGERATEUR LG – CANADA LA PRÉSENTE GARANTIE LIMITÉE NE COUVRE PAS CE QUI SUIT: Tous les coûts associés aux circonstances exclues ci-dessus seront assumés par le consommateur. Composez le 1-888-542-2623 (24 h sur 24, 365 jours par année) ...
Page 17 - Risque de blessures; DANGER; instructions ne sont pas suivies; lire et respecter; GARDEZ CES INSTRUCTIONS; Pour réduire le risque d'incendie, de
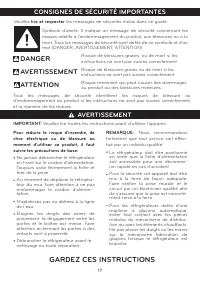
IMPORTANT: Veuillez lire toutes les instructions avant d'utiliser l'appareil. CONSIGNES DE SÉCURITÉ IMPORTANTES AVERTISSEMENT Risque de blessures ou de mort si les graves Risque de blessures graves ou de mort si les Risque imminent qui peut causer des dommages DANGER AVERTISSEMENTATTENTION instructi...
Page 18 - AVANT DE COMMENCER; Niveau de compétence requis:
Lire attentivement la totalité de cette notice avant la première utilisation. AVANT DE COMMENCER • IMPORTANT: Conservez ces instructions pour l'utilisation du réparateur local. • IMPORTANT: Respectez les codes et normes en vigueur. • À l'intention de l'installateur: Assurez vous de donner ces instru...
Page 19 - INTRODUCTION À LA MACHINE À GLAÇONS AUTOMATIQUE; AVERTISSEMENT; Risque de blessure; NE PAS
INTRODUCTION À LA MACHINE À GLAÇONS AUTOMATIQUE AVERTISSEMENT Risque de blessure Un réfrigérateur installé récemment nécessite un délais de 12 à 24 heures avant de faire de la glace. 19 Éviter de toucher les parties mobiles. NE PAS introduire les doigts ou mécanismes de la machine pendant que le réf...
Page 20 - CONTENU DE LA TROUSSE
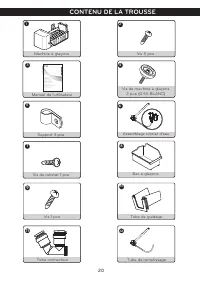
CONTENU DE LA TROUSSE 20 1 2 3 4 5 7 8 Assemblage robinet d’eau 6 Manuel de l’utilisateur Support 3 pce Machine à glaçons Vis du robinet 1 pce Bac à glaçons Vis de machine à glaçons 2 pce (0.55 BLANC) OWNER’S MANUAL ICEMAKER Please read this manual carefully before operating www.lg.com P/NO.MFL63725...
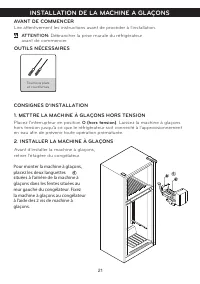
Page 21 - INSTALLATION DE LA MACHINE A GLAÇONS; Débrancher la prise murale du réfrigérateur; avant de commencer.; CONSIGNES D'INSTALLATION; Placez l’interrupteur en position; INSTALLER LA MACHINE À GLAÇONS
Pour monter la machine à glaçons, placez les deux languettes situées à l'arrière de la machine à glaçons dans les fentes situées au mur gauche du congélateur. Fixez la machine à glaçons au congélateur à l'aide des 2 vis de machine à glaçons. AVANT DE COMMENCER Lire attentivement les instructions ava...
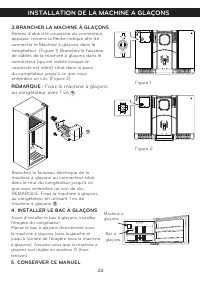
Page 22 - INSTALLER LE BAC À GLAÇONS; Fixez la machine à glaçons; . BRANCHER LA MACHINE À GLAÇONS; CONSERVER CE MANUEL; Avant d’installer le bac à glaçons, installez
INSTALLATION DE LA MACHINE A GLAÇONS 4. INSTALLER LE BAC À GLAÇONS 3 REMARQUE : Fixez la machine à glaçons au congélateur avec 1 vis . . BRANCHER LA MACHINE À GLAÇONS Retirez d'abord le couvercle du connecteur, appuyez comme la flèche indique afin de connecter le Machine à glaçons dans le congélateu...
Page 23 - INSTALLATION DU ROBINET D’EAU
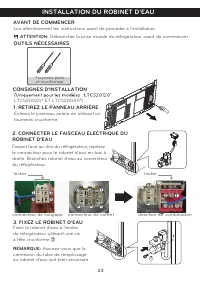
INSTALLATION DU ROBINET D’EAU 23 1. RETIREZ LE PANNEAU ARRIÈRE 2. CONNECTER LE FAISCEAU ÉLECTRIQUE DU ROBINET D’EAU AVANT DE COMMENCER Lire attentivement les instructions avant de procéder à l'installation. OUTILS NÉCESSAIRES ATTENTION: Débrancher la prise murale du réfrigérateur avant de commencer....
Page 24 - avant d'utiliser un lot pour consommation.
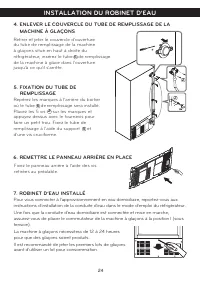
4. ENLEVER LE COUVERCLE DU TUBE DE REMPLISSAGE DE LA MACHINE À GLAÇONS 5. FIXATION DU TUBE DE REMPLISSAGE Fixez le panneau arrière à l’aide des vis retirées au préalable. 7. ROBINET D’EAU INSTALLÉ Pour vous connecter à l'approvisionnement en eau domiciliaire, reportez-vous aux instructions d'install...
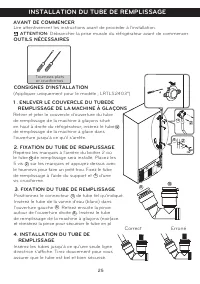
Page 25 - INSTALLATION DU TUBE DE REMPLISSAGE; Erroné
Positionnez le connecteur de tube tel qu’indiqué. Insérez le tube de la vanne d'eau (blanc) dans l'ouverture gauche . Retirez ensuite la pince autour de l'ouverture droite . Insérez le tube de remplissage de la machine à glaçons (noir) et réinsérez la pince pour sécuriser le tube en pl ace. INSTALLA...
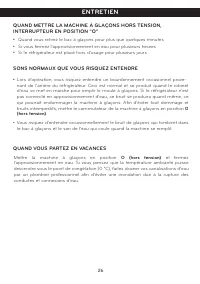
Page 26 - ENTRETIEN; Mettre la machine à glaçons en position
QUAND METTRE LA MACHINE À GLAÇONS HORS TENSION, INTERRUPTEUR EN POSITION "O" SONS NORMAUX QUE VOUS RISQUEZ ENTENDRE QUAND VOUS PARTEZ EN VACANCES •• • • ENTRETIEN • 26 Mettre la machine à glaçons en position O (hors tension) et fermez l’approvisionnement en eau. Si vous pensez que la tempéra...
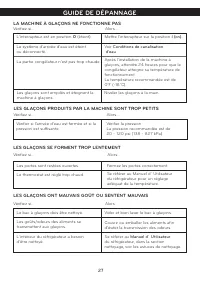
Page 27 - GUIDE DE DÉPANNAGE; LES GLAÇONS SE FORMENT TROP LENTEMENT
LA MACHINE À GLAÇONS NE FONCTIONNE PAS LES GLAÇONS PRODUITS PAR LA MACHINE SONT TROP PETITS LES GLAÇONS ONT MAUVAIS GOÛT OU SENTENT MAUVAIS Le système d'arrivée d'eau est éteint Les portes sont restées ouvertes. Le thermostat est réglé trop chaud. Le bac à glaçons dois être nettoyé. GUIDE DE DÉPANNA...
Page 28 - CANADA; LG Customer Information Center
USA, Consumer User USA, Commercial User CANADA LG Customer Information Center Centre d’appels pour clientèle LG www.lg.com Register your Product Online! Enregistrez votre produit enligne! 1-800-243-0000 1-888-865-3026 1-888-542-2623