Page 3 - Содержание; Введение
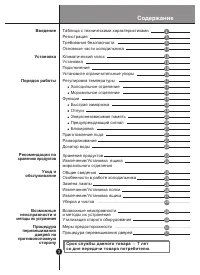
Содержание 3 Холодильное отделениеМорозильное отделение Функции Быстрая заморозка Блокировка Процедура перевешивания дверей на противоположную сторону Процедура перевешивания дверей Отпуск Меры предосторожности 5 5 13 15 15 17 17 18 19 19 19 21 21 21 22 23 25 25 28 29 31 31 Регистрация Требования бе...
Page 4 - ри; Таблица; Спецификация; Модель
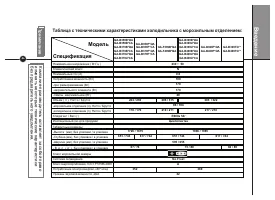
В ве де ни е 4 П ри м еч ани е Ко м па ни я-п ро из во ди те ль о ставл яе т з а со бо й п ра во из м ен ять н ек ото ры е те хн иче ск ие ха ра кте ри ст ик и бе з п ре дв ар ите льн ого ув ед ом ле ни я . Номинальное напряжение ( В ~ Гц ) Климатический классНоминальный ток ( А ) Потребляемая мощно...
Page 5 - Требования безопасности
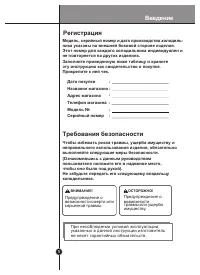
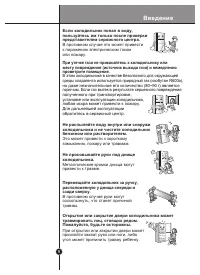
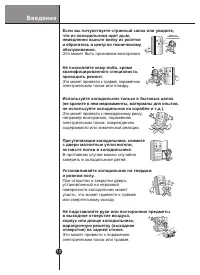
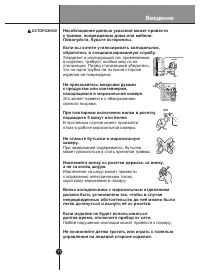
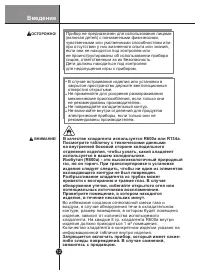
Введение 5 Чтобы избежать риска травмы, ущерба имуществу и неправильного использования изделия, обязательно выполняйте следующие меры безопасноcти. (Ознакомившись с данным руководством пользователя положите его в надежное место, чтобы оно было под рукой). Не забудьте передать его следующему владельц...
Page 7 - При эксплуатации холодильника
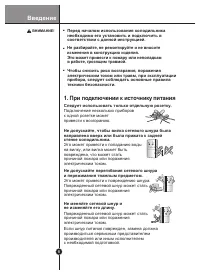
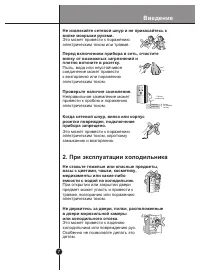
Введение 7 Когда сетевой шнур, вилка или корпус розетки поврежден, подключение прибора запрещено. Перед включением прибора в сеть, очистите вилку от возможных загрязнений и плотно воткните в розетку. нет Не извлекайте сетевой шнур и не прикасайтесь к вилке мокрыми руками. Это может привести к пораже...
Page 13 - с диспенсером; Основные части холодильника; Примечание; Если некоторые названные детали отсутствуют, они,
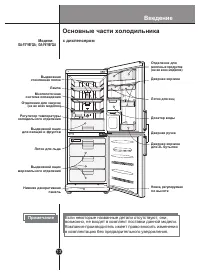
Введение 13 с диспенсером Лоток для яиц Дверная ручка Отделение для молочных продуктов ( не во всех моделях) Дверная корзина для 2 L бутылок Дверная корзина Ножка, регулируемая по высоте Лампа Лоток для льда Нижняя декоративная панель Выдвижная стеклянная полка Многопоточная система охлаждения Регул...
Page 15 - Установка; Климатический; Климатический
Установка 15 1. Выберите подходящее место. Располагайте холодильник там, где им будет удобно пользоваться. 2. Не располагайте холодильник вблизи источников тепла, влаги и в зоне прямого действия солнечных лучей. 4. Над холодильником, а так же с задней и боковых его сторон должно быть свободное прост...
Page 16 - Установите ограничительные
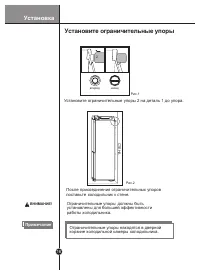
Установите ограничительные упоры 2 на деталь 1 до упора. После присоединения ограничительных упоров поставьте холодильник к стене. должны быть установлены для большей эффективности работы холодильника. вперёд назад Рис.1 С ТЕНА Ограничительные упоры находятся в дверной холодильной камеры холодильник...
Page 17 - ЖК дисплей; Индикаторная панель управления температурой; Холодильное; Регулировка температуры; Порядок работы
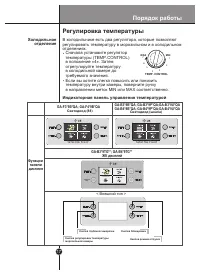
17 Функции панели дисплея Светодиод (88) Светодиод (шкала) Кнопка глубокой заморозки Кнопка блокировки Кнопка режима отпуска Кнопка регулировки температуры морозильной камеры EXPRESS FRZ. 3 SECS EXPRESS FRZ. < Внешний тип > GA-B3*9TG**; GA-B4*9TG** ЖК дисплей GA-B3*9B*QA; GA-B3*9P*QA;GA-B3*9U*...
Page 18 - Морозильное; Модели; Порядок
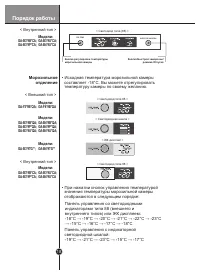
18 • Исходная температура морозильной камеры составляет -18°С. Вы можете отрегулировать температуру камеры по своему желанию. • При нажатии кнопок управления температурой значения температуры морозильной камеры отображаются в следующем порядке: Панель управления с индикаторной светодиодной шкалой: &...
Page 19 - Функции; Быстрая
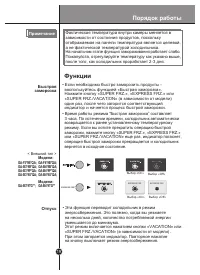
19 • Если необходимо быстро заморозить продукты - воспользуйтесь функцией «Быстрая заморозка». Нажмите кнопку «SUPER FRZ.», «EXPRESS FRZ.» или «SUPER FRZ./VACATION» (в зависимости от модели) один раз, после чего загорится соответствующий индикатор и начнется процесс быстрой заморозки. • Время работы...
Page 21 - Блокировка; Совет; Размораживание
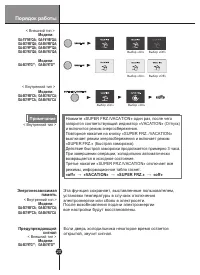
21 Блокировка Если лед нужен срочно,нажмите кнопку «SUPER FRZ.», «EXPRESS FRZ.» или «SUPER FRZ./VACATION» (в зависимости от модели) . «Child Lock On» «Child Lock Off» «Child Lock On» «Child Lock Off» Совет Чтобы кубики легко вынимались, предварительно полейте емкость питьевой водой. Размораживание п...
Page 22 - Дозатор воды
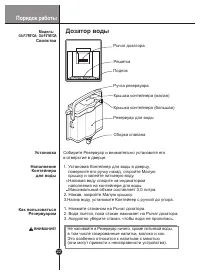
22 Свойства Как пользоваться Резервуаром Наполнение Контейнера для воды Установка Рычаг дозатора Ручка резервуара Установив Контейнер для воды в дверцу, поверните его ручку назад, откройте Малую крышку и залейте питьевую воду . Наливая воду следите за индикатором наполнения на контейнере для воды. М...
Page 23 - Рекомендации по
23 Примечание Если холодильник находится в теплом и сыром месте и его дверь часто открывается, или в нем хранится много овощей, внутри него может образоваться влага, не влияющая на производительность. Удаляйте влагу сухой чистой тканью. Хранение продуктов Не храните при низкой температуре продукты, ...
Page 24 - Установка ящика
Рекомендации по хранению продуктов 24 При эксплуатации ящиков и полок, не применяйте избыточных усилий и грубую силу – это может привести к повреждениям холодильника ! 1 2 4 5 3 Для обеспечения хорошей циркуляции воздуха в устройстве, вставляйте ящики морозильного отделения до упора. При хранении в ...
Page 25 - Общие сведения; Противоконденсатная; трубка; Особенности в работе холодильника; Уход и обслуживание
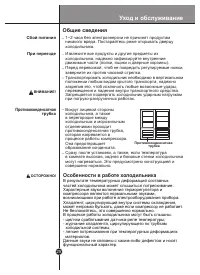
25 Общие сведения 1~2 часа без электроэнергии не причинят продуктам никакого вреда. Постарайтесь реже открывать дверцу холодильника.Извлеките все продукты и другие предметы из холодильника, надежно зафиксируйте внутренние движимые части ( полки, ящики и дверные корзины). Вокруг лицевой стороны холод...
Page 26 - Уход и
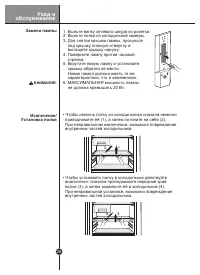
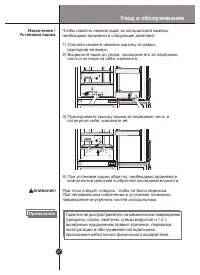
26 1 2 1 3 4 • Чтобы извлечь полку из холодильника сначала немного приподнимите её (1), а затем потяните на себя (2). При неправильном извлечении, возможно повреждение внутренних частей холодильника. • Чтобы установить полку в холодильник действуйте аналогично: сначала приподнимите передний край пол...
Page 28 - Уборка и чистка
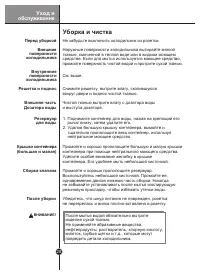
28 Убедитесь, что шнур питания не поврежден, розетка не перегрелась и вилка плотно вставлена в розетку. Уборка и чистка Перед уборкой После уборки Не забудьте выключить холодильник из розетки. См . выше . Наружные поверхности холодильника вытирайте мягкой тканью, смоченной в теплой воде или в жидком...
Page 29 - Возможные
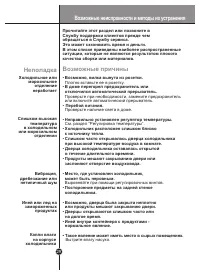
29 Возможные причины • Возможно, вилка вынута из розетки. Плотно вставьте ее в розетку. • В доме перегорел предохранитель или отключился автоматический прерыватель. Проверьте при необходимости, замените предохранитель или включите автоматический прерыватель. • Перебой питания. Проверьте наличие свет...
Page 30 - Утилизация
30 Возможные причины • Дверцы открываются слишком часто или на долгое время. • Во влажную погоду с воздухом в холодильник через открытые дверцы попадает и влага. • Продукты, имеющие сильный запах, следует положить в плотно закрытую тару или хорошо завернуть. • Проверьте, нет ли испортившихся продукт...
Page 31 - Меры предосторожности
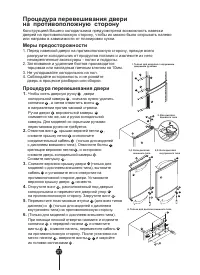
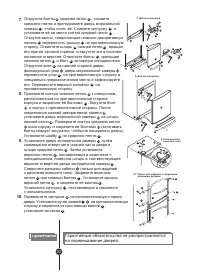
31 1 4 3 2 3 2 16 15 17 19 14 18 10 12 13 31 32 5 6 7 9 8 10 19 10 31 32 11 35 3,4. Если дисплей внешнего типа 2. Для дисплея внешнего типа 4,5. Если дисплей внутреннего типа 6. Только для дисплея внешнего типа 11 1. Только для моделей с наружными дверными ручками Чтобы снять дверную ручку двери хол...
Page 32 - Гарантийные обязательства не распространяются
32 38 38 3 2 3 2 24 20 21 22 11 23 21 28 27 20 25 30 33 26 25 30 27 28 29 9 31 32 36 7 6 37 9 10 34 9. Если дисплей внешнего типа 7. Для всех моделей 8. Для всех моделей 1 4 10. Только для моделей с наружными дверными ручками 39 Открутите болты средней петли , снимите среднюю петлю и приподнимите дв...
Page 33 - Contents; Introduction
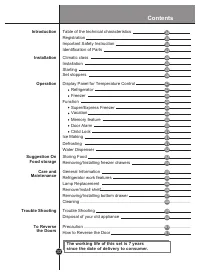
Contents 33 RefrigeratorFreezer Function Super/Express Freezer Child Lock To Reverse the Doors How to Reverse the Door Vacation Precaution 35 35 43 45 45 47 47 48 49 49 49 51 51 51 52 53 55 55 58 59 61 61 RegistrationImportant Safety Instruction Identification of Parts Installation Starting Display ...
Page 34 - Specification; Model
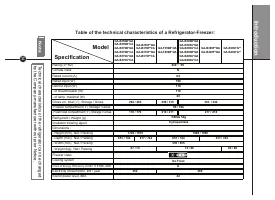
In tr o d u c tio n 3 4 No t e T e chn ical cha ra ct e ri st ics o f t h e re fri g e ra to r can b e cha n g e d by th e С ompan y-man ufa ct ure r w ith ou t p rio r N otice . Rating (V~HZ) Cli m ate с lass Rated сu rrent (A) Rated in pu t (W ) Defrost in pu t (W ) - of sheath heater (W ) - of la...
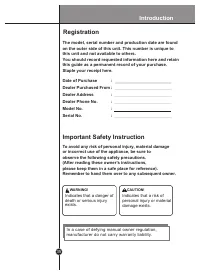
Page 35 - Indicates that a danger of; Date of Purchase; Important Safety Instruction
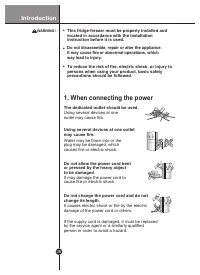
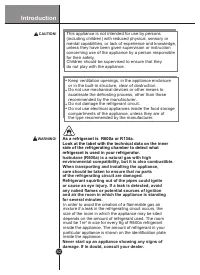
Introduction 35 To avoid any risk of personal injury, material damageor incorrect use of the appliance, be sure toobserve the following safety precautions.(After reading these owner’s instructions,please keep them in a safe place for reference).Remember to hand them over to any subsequent owner. Ind...
Page 36 - When connecting the power; The dedicated outlet should be used.; It causes electric shock or fire by the electric
36 Introduction Do not change the power cord and do not change its length. This fridge-freezer must be properly installed andlocated in accordance with the InstallationInstruction before it is used. Do not disassemble, repair or alter the appliance.It may cause fire or abnormal operations, whichway ...
Page 37 - It may cause electric shock; Make sure of grounding.; The incorrect grounding may cause
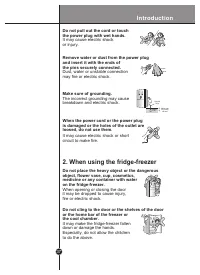
Introduction 37 When the power cord or the power plugis damaged or the holes of the outlet areloosed, do not use them. Remove water or dust from the power plugand insert it with the ends ofthe pins securely connected. NO Do not pull out the cord or touchthe power plug with wet hands. It may cause el...
Page 38 - Deterioration of insulation of electric; Avoid the heating devices.
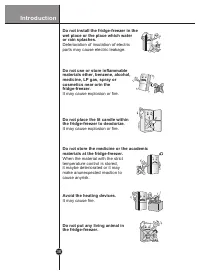
38 Introduction Do not install the fridge-freezer in the wet place or the place which water or rain splashes. Deterioration of insulation of electric parts may cause electric leakage. Do not use or store inflammablematerials ether, benzene, alcohol,medicine, LP gas, spray orcosmetics near orin thefr...
Page 39 - It may cause electric shock or fire.
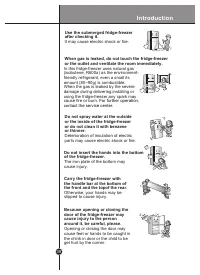
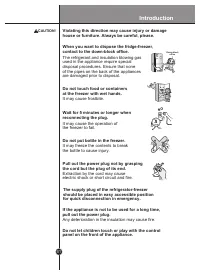
Introduction 39 Thinner Use the submerged fridge-freezer after checking it. It may cause electric shock or fire. When gas is leaked, do not touch the fridge-freezeror the outlet and ventilate the room immediately. In this fridge-freezer uses natural gas (isobutene, R600a) as the environment- friendl...
Page 40 - It may cause injury, electric shock
40 Introduction When any strange smell or smoke is detected from the fridge-freezer, disconnect the power plug immediately and contact to the service center. It may cause fire. Service center Do not allow any person except the qualified engineer to disassemble, repairor alter the fridge-freezer. It ...
Page 41 - It may cause the operation of; Do not put bottle in the freezer.; It may freeze the contents to break
Introduction 41 After 5 minutes When you want to dispose the fridge-freezer,contact to the down-block office. Down-block office Do not touch food or containersat the freezer with wet hands. It may cause frostbite. Wait for 5 minutes or longer when reconnecting the plug. It may cause the operation of...
Page 42 - in structure, clear of obstruction
Introduction 42 .. . . Keep ventilation openings, in the appliance enclosure or in the built - in structure, clear of obstruction . Do not use mechanical devices or other means toaccelerate the defrosting process, other than thoserecommended by the manufacturer . Do not damage the refrigerant circui...
Page 43 - with dispenser; Identification of Parts; N o t e; If you find some parts missing from your unit,; Handle
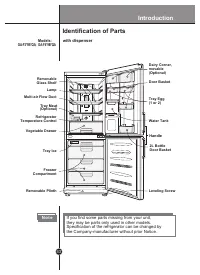
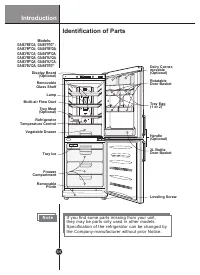
Introduction 43 Tray Meat (Optional) with dispenser Identification of Parts N o t e If you find some parts missing from your unit, they may be parts only used in other models. Specification of the refrigerator can be changed by the Сompany-manufacturer without prior Notice. Dairy Corner,movable (Opt...
Page 44 - facturer without prior
Introduction 44 Removable Glass Shelf Lamp Multi-air Flow Duct Refrigerator Temperature Control Vegetable Drawer Tray Ice Freezer Compartment Removable Plinth Rotatable Door Basket Dairy Corner, movable (Optional) Leveling Screw Tray Egg (1 or 2) Handle (Optional) 2L Bottle Door Basket Display Board...
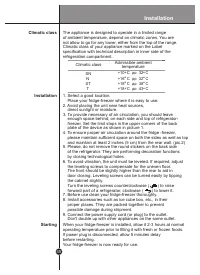
Page 45 - Installation; Climatic class
Installation 45 1. Select a good location. Place your fridge-freezer where it is easy to use.2. Avoid placing the unit near heat sources, direct sunlight or moisture. 4. To ensure proper air circulation around the fridge -freezer, please maintain sufficient space on both the sides as well as top and...
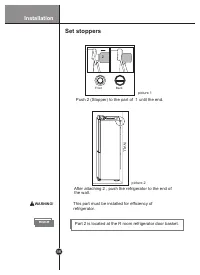
Page 46 - Set stoppers; Part 2 is located at the R room refrigerator door basket.
46 Installation 2 Front Back Push 2 (Stopper) to the part of 1 until the end. After attaching 2 , push the refrigerator to the end of the wall. This part must be installed for efficiency of refrigerator. picture 1 L L A W picture 2 1 Set stoppers WARNING! N o t e Part 2 is located at the R room refr...
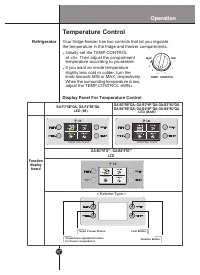
Page 47 - Operation; Function; LCD; Display Panel For Temperature Control; Refrigerator; Temperature Control; Your fridge-freezer has two controls that let you regulate
Operation 47 Function display board LED (88) LED (BAR) Super Freezer Button Lock Button Vacation Button Temperature adjustment buttonfor freezer compartment EXPRESS FRZ. 3 SECS EXPRESS FRZ. < Exterior Type > GA-B3*9TG**; GA-B4*9TG** LCD GA-B3*9B*QA; GA-B3*9P*QA;GA-B3*9U*QAGA-B4*9B*QA; GA-B4*9P...
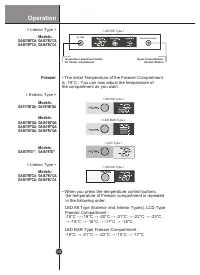
Page 48 - • The initial Temperature of the Freezer Compartment; Freezer
Operation 48 • The initial Temperature of the Freezer Compartment is -18°C . You can now adjust the temperature of the compartment as you want. • When you press the temperature control buttons, the temperature of Freezer compartment is repeated in the following order. LED BAR Type Freezer Compartmen...
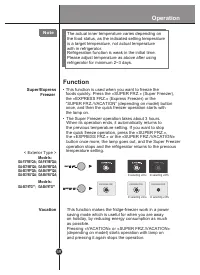
Page 49 - Please adjust temperature as above after using; Vacation; This function is used when you want to freeze the
Operation 49 N o t e The actual inner temperature varies depending on the food status, as the indicated setting temperature is a target temperature, not actual temperature with in refrigerator. Refrigeration function is weak in the initial time. Please adjust temperature as above after using refrige...
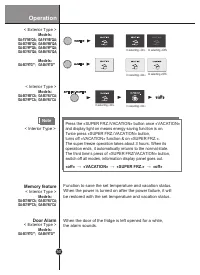
Page 50 - «of; «off»; Memory feature; Note; When the door of the fridge is left opened for a while,; Door Alarm
Operation 50 < Exterior Type > / Press the «SUPER FRZ./VACATION» button once «VACATION» and display light on means energy saving function is on. Twice press «SUPER FRZ./VACATION» button, turns off «VACATION» function & on «SUPER FRZ.». The super freeze operation takes about 3 hours. When i...
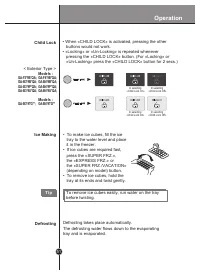
Page 51 - Child Lock; tray to the water level and place; T i p; To remove ice cubes easily, run water on the tray; Defrosting; The defrosting water flows down to the evaporating
Operation 51 Child Lock • When «CHILD LOCK» is activated, pressing the other buttons would not work. • «Locking» or «Un-Locking» is repeated whenever pressing the «CHILD LOCK» button. (For «Locking» or «Un-Locking» press the «CHILD LOCK» button for 2 secs.) Ice Making • To make ice cubes, fill the i...
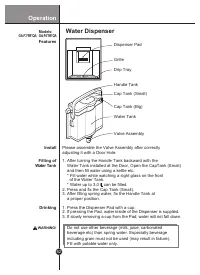
Page 52 - Features; Water Dispenser; Filling of
Operation 52 Features Install Water Dispenser Please assemble the Valve Assembly after correctly adjusting it with a Door Hole. Filling of Water Tank Drinking 1. After turning the Handle Tank backward with the Water Tank installed at the Door, Open the CapTank (Small) and then fill water using a ket...
Page 53 - Suggestions on food storage; Storing Food; Thisprevents moisture from evaporating, and helps food
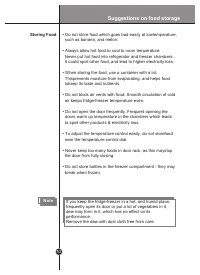
Suggestions on food storage 53 Storing Food • Do not store food which goes bad easily at lowtemperature, such as banana, and melon. • Always allow hot food to cool to room temperature. Never put hot food into refrigerator and freezer chambers. It could spoil other food, and lead to higher electricit...
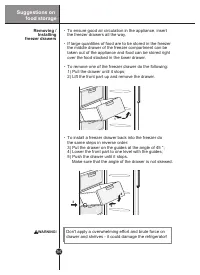
Page 54 - over the food stacked in the lower drawer.; Installing; ) Put the drawer on the guides at the angle of 45 °
Suggestions on food storage 54 To ensure good air circulation in the appliance, insertthe freezer drawers all the way. If large quantities of food are to be stored in the freezer the middle drawer of the freezer compartment can be taken out of the appliance and food can be stored right over the food...
Page 55 - Power Failure; General Information; If You Move; inner movable parts (shelves, drawers and door basket) securely; Anti-Condensation Pipe; Refrigerator work features; ficiency of the appliance.; Care and Maintenance
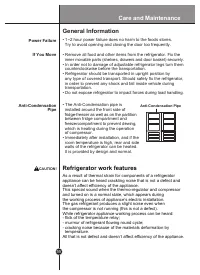
55 Power Failure General Information • 1~2 hour power failure does no harm to the foods stores. Try to avoid opening and closing the door too frequently. If You Move Anti-Condensation Pipe • Remove all food and other items from the refrigerator. Fix the inner movable parts (shelves, drawers and door...
Page 56 - shelf; driver in the underside of the lamp; Care and
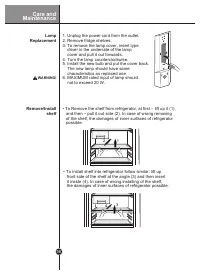
56 1 2 1 3 4 • To Remove the shelf from refrigerator, at first – lift up it (1), and then – pull it out side (2). In case of wrong removing of the shelf, the damages of inner surfaces of refrigerator possible. • To install shelf into refrigerator follow similar: lift up front side of the shelf at th...
Page 57 - Warranty does not cover mechanical damage (cracks,
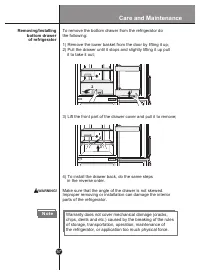
57 Removing/Installing bottom drawer of refrigerator N o t e Warranty does not cover mechanical damage (cracks, chips, dents and etc.) caused by the breaking of the rules of storage, transportation, operation, maintenance of the refrigerator, or application too much physical force. 4) To install the...
Page 58 - Cleaning
58 Check that the power cord is not damaged, power plughas not overheated, and that the power plug is tightly inserted into the outlet. Cleaning Before Cleaning After Cleaning Be sure to unplug the power. As above . Clean the outside of the fridge-freezer with a soft cloth soaked with hot water or l...
Page 59 - Trouble Shooting; Problem; Check and/or replace fuse and reset circuit breaker.
Trouble Shooting 59 Problem Fridge-Freezer does not operate Before calling for service, check this list or call in Support service of clients. It may save your time and expense.This list includes common occurrences that are not the result of defective workmanship or materials in this appliance. Poss...
Page 60 - product it means the product is covered by the Europe an; Disposal of your old appliance
60 Trouble Shooting Problem Possible Causes Moisture collects inside • Too frequent or too long door openings. • In humid weathe r, air carries moisture into fridge when doors are opened. Fridge has odor • Foods with strong odors should be tightly covered or wrapped. • Check for spoiled food. • Inte...
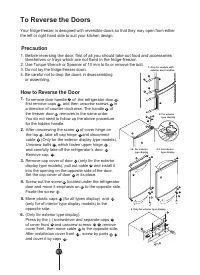
Page 61 - To Reverse the Doors; Precaution; likeshelves or trays which are not fixed; How to Reverse the Door; the left or right hand side to suit your kitchen design.
61 1 4 3 2 3 2 16 15 17 19 14 18 10 12 13 31 32 5 6 7 9 8 10 19 10 31 32 11 35 11 2 1 3 4 2. 5 5 6 8 7 10 9 3. 13 12 11 12 32 31 6. 15 14 18 14 15 17 16 17 16 35 3,4. For exterior type display 2. For exterior type display 4,5. For interior type display 6. Only for exterior type display 32 4. 5. 19 1...
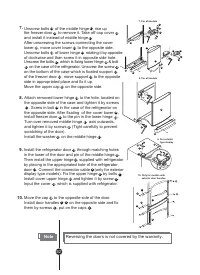
Page 62 - Reversing the doors is not covered by the warranty.
62 38 38 3 2 3 2 24 20 21 22 11 23 21 28 27 20 25 30 33 26 25 30 27 28 29 9 31 32 36 7 6 37 9 10 34 1 4 39 10. 1 3 4 38 2 9. For exterior type display 7. 21 26 20 27 32 31 30 28 8. 29 21 25 9. 34 36 10 7 30 21 25 29 31 33 24 27 23 28 21 20 30 21 9 6 37 37 7. For all models 8. For all models 39 10 10...


 LG DoorCooling+ GC-B247SEDC
User Manual
LG DoorCooling+ GC-B247SEDC
User Manual
 LG DoorCooling+ GC-B247SMDC
User Manual
LG DoorCooling+ GC-B247SMDC
User Manual
 LG GA-B379PLQA
User Manual
LG GA-B379PLQA
User Manual
 LG GA-B409UCA
User Manual
LG GA-B409UCA
User Manual
 LG GA-B419SEUL
Manual
LG GA-B419SEUL
Manual
 LG GA-B419SLUL
Manual
LG GA-B419SLUL
Manual
 LG GA-B419SMHL
Manual
LG GA-B419SMHL
Manual
 LG GA-B419SQGL
Manual
LG GA-B419SQGL
Manual
 LG GA-B419SQUL
Manual
LG GA-B419SQUL
Manual
 LG GA-B419SWJL
Manual
LG GA-B419SWJL
Manual
 LG GA-B459CESL
User Manual
LG GA-B459CESL
User Manual
 LG GA-B459CLSL
User Manual
LG GA-B459CLSL
User Manual
 LG GA-B459CLWL
User Manual
LG GA-B459CLWL
User Manual
 LG GA-B459CQSL
User Manual
LG GA-B459CQSL
User Manual
 LG GA-B509
User Manual
LG GA-B509
User Manual
 LG GA-B509CESL
User Manual
LG GA-B509CESL
User Manual