Page 2 - Read this first
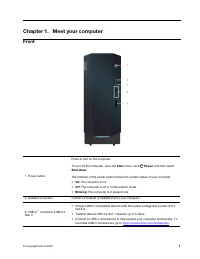
Read this first Before using this documentation and the product it supports, ensure that you read and understand the following: • Appendix A “Important safety information” on page 61 • Safety and Warranty Guide • Setup Guide First Edition (August 2020) © Copyright Lenovo 2020. LIMITED AND RESTRICTED...
Page 3 - Contents
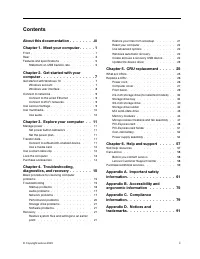
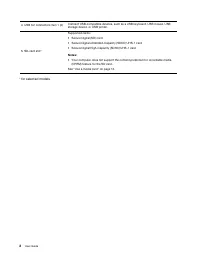
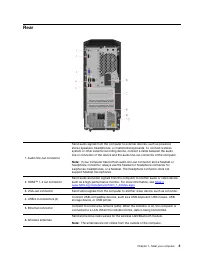
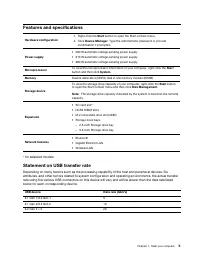
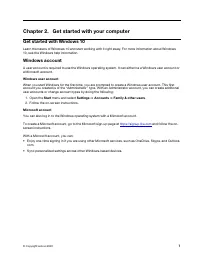
Contents About this documentation . . . . . . . . iii Chapter 1. Meet your computer . . . . . 1 Front . . . . . . . . . . . . . . . . . . . . 1Rear . . . . . . . . . . . . . . . . . . . . 3Features and specifications . . . . . . . . . . . 5 Statement on USB transfer rate . . . . . . . . 5 Chapter 2....
Page 4 - ii
Page 5 - About this documentation; iii
About this documentation • Depending on the model, some optional accessories, features, and software programs might not be available on your computer. • Depending on the version of the operating systems and programs, some user interface instructions might not be applicable to your computer. • Docume...
Page 6 - iv
Page 7 - Chapter 1. Meet your computer; Front
Chapter 1. Meet your computer Front 1. Power button Press to turn on the computer. To turn off the computer, open the Start menu, click Power , and then select Shut down . The indicator in the power button shows the system status of your computer. • On: The computer is on. • Off: The computer is off...
Page 9 - Rear
Rear 1. Audio line-out connector Send audio signals from the computer to external devices, such as powered stereo speakers, headphones, or multimedia keyboards. To connect a stereo system or other external recording device, connect a cable between the audio line-in connector of the device and the au...
Page 11 - Features and specifications; Statement on USB transfer rate
Features and specifications Hardware configuration 1. Right-click the Start button to open the Start context menu. 2. Click Device Manager . Type the administrator password or provide confirmation if prompted. Power supply • 260 W automatic voltage-sensing power supply • 310 W automatic voltage-sens...
Page 13 - Chapter 2. Get started with your computer; Windows user account; Settings
Chapter 2. Get started with your computer Get started with Windows 10 Learn the basics of Windows 10 and start working with it right away. For more information about Windows 10, see the Windows help information. Windows account A user account is required to use the Windows operating system. It can e...
Page 14 - Windows user interface; Open the Start menu; Open the Start context menu
Windows user interface 1. Account Change account settings, lock the computer, or sign out from the current account. 2. Documents Open the Documents folder, a default folder to save your received files. 3. Pictures Open the Pictures folder, a default folder to save your received pictures. 4. Settings...
Page 16 - Adjust the volume; Hardware and Sound
Use multimedia Use your computer for business or entertainment with connected devices (such as a camera, a monitor, or speakers). Use audio To enhance the audio experience, connect speakers, headphones, or a headset to the audio connector. Adjust the volume 1. Click the volume icon in the Windows no...
Page 17 - Chapter 3. Explore your computer; Manage power; Transfer data
Chapter 3. Explore your computer Manage power Use the information in this section to achieve the best balance between performance and power efficiency. Set power button behaviors You can define what the power button does according to your preference. For example, by pressing the power button, you ca...
Page 18 - Use a media card; Install a media card; Use a smart cable clip
Your Bluetooth device and computer will automatically connect the next time if the two devices are in range of each other with Bluetooth turned on. You can use Bluetooth for data transfer or remote control and communication. Use a media card If your computer has a SD-card slot, read the following in...
Page 19 - Lock the computer; Padlock
Lock the computer Note: You are responsible for evaluating, selecting, and implementing the locking device and security feature. Lenovo makes no comments, judgments, or warranties about the function, quality, or performance of the locking device and security feature. You can purchase computer locks ...
Page 20 - Kensington-style cable lock; Purchase accessories
Kensington-style cable lock Lock your computer to a desk, table, or other fixtures through a Kensington-style cable lock. Purchase accessories Lenovo has a number of hardware accessories and upgrades to help expand the capabilities of your computer. Options include memory modules, storage devices, n...
Page 21 - Basic procedure for resolving computer problems; Prerequisite; Troubleshooting
Chapter 4. Troubleshooting, diagnostics, and recovery This chapter provides solutions to resolve computer problems. Use the basic procedure as a starting point for resolving computer problems. Basic procedure for resolving computer problems Prerequisite Before you start, read Appendix A “Important s...
Page 22 - Startup problems
Startup problems Problem Solution The computer does not start up when you press the power button. • Ensure that the power cord is correctly connected to the rear of the computer and to a working electrical outlet. • If the computer has a secondary power switch on the rear of the computer, ensure tha...
Page 23 - Audio problems; Network problems
Audio problems Problem Solution The audio cannot be heard on the Windows operating system. • If you are using powered external speakers that have an On/Off control, ensure that: – The On/Off control is set to the On position. – The speaker power cable is connected to a properly grounded, functional ...
Page 26 - Performance problems
Performance problems Problem Solution Excessive fragmented files exist on the storage drives. Note: Depending on the volume of the storage drives and amount of data stored on the storage drives, the disk-defragmentation process might take up to several hours. 1. Close any open programs and windows. ...
Page 27 - Storage drive problems; Software problems; Recovery; Restore your files from a backup
Storage drive problems Problem Solution Some or all storage drives are missing from the BIOS menu. • Ensure that the signal cables and power cables for all the storage drives are connected correctly. • Ensure that the computer is configured correctly to support the storage drives. – If the computer ...
Page 29 - Troubleshoot; Update the device driver
3. Turn on or restart the computer. When the logo screen is displayed, press F12. The Boot Menu window opens. 4. Select the recovery USB drive as the boot device. 5. Click Troubleshoot to display optional recovery solutions. 6. Select a recovery solution as desired. Then, follow the on-screen instru...
Page 31 - Chapter 5. CRU replacement; What are CRUs; Optional-service CRUs
Chapter 5. CRU replacement What are CRUs Customer Replaceable Units (CRUs) are parts that can be upgraded or replaced by the customer. Lenovo computers contain the following types of CRUs: • Self-service CRUs: Refer to parts that can be installed or replaced easily by customer themselves or by train...
Page 32 - Replace a CRU; Power cord
Replace a CRU Follow the replacement procedure to replace a CRU. Power cord Prerequisite Before you start, read Appendix A “Important safety information” on page 61 and print the following instructions. Before you remove the power cord, turn off the computer and wait several minutes until the comput...
Page 33 - Computer cover
4. Connect the new power cord to the computer. 5. Reconnect all disconnected devices. Computer cover Prerequisite Before you start, read Appendix A “Important safety information” on page 61 and print the following instructions. Before you open the computer cover, turn off the computer and wait sever...
Page 35 - Front bezel; Prerequisites
4. Install the computer cover and secure the cover with the screws. 5. Reconnect the power cord and all other disconnected cables to the computer. Note: If a locking device is available, use it to lock the computer cover. Front bezel Prerequisites Before you start, read Appendix A “Important safety ...
Page 36 - Replacement procedure
Replacement procedure 1. Remove the power cord. See “Power cord” on page 26 2. Remove the computer cover. See “Computer cover” on page 27 3. Remove the front bezel by releasing the three plastic tabs as shown. 30 User Guide
Page 40 - Storage drive bay
8. Connect the signal cable and the power cable to the storage drive. 9. Reinstall all removed parts. Then, reconnect the power cord and all disconnected cables to the computer. Storage drive bay Prerequisite Before you start, read Appendix A “Important safety information” on page 61 and print the f...
Page 48 - Storage drive rubber
Storage drive rubber Prerequisite Before you start, read Appendix A “Important safety information” on page 61 and print the following instructions. Replacement procedure 1. Remove the power cord. See “Power cord” on page 26. 2. Remove the computer cover. See “Computer cover” on page 27. 3. Remove th...
Page 50 - Memory modules
9. Screw in the M.2 mounting screw. 10. Reinstall all removed parts. Then, reconnect the power cord and all disconnected cables to the computer. Memory modules Prerequisite Before you start, read Appendix A “Important safety information” on page 61 and print the following instructions. Replacement p...
Page 53 - Microprocessor heatsink and fan assembly
Microprocessor heatsink and fan assembly Prerequisite Before you start, read Appendix A “Important safety information” on page 61 and print the following instructions. The heatsink might be very hot. Before you open the computer cover, turn off the computer and wait several minutes until the compute...
Page 57 - PCI-Express card holder
PCI-Express card holder Prerequisite Before you start, read Appendix A “Important safety information” on page 61 and print the following instructions. Replacement procedure 1. Remove the power cord. See “Power cord” on page 26. 2. Remove the computer cover. See “Computer cover” on page 27. 3. Remove...
Page 60 - Power supply assembly
Power supply assembly Prerequisite Before you start, read Appendix A “Important safety information” on page 61 and print the following instructions. The power supply might be very hot. Before you open the computer cover, turn off the computer and wait several minutes until the computer is cool. Repl...
Page 63 - Chapter 6. Help and support
Chapter 6. Help and support Self-help resources Use the following self-help resources to learn more about the computer and troubleshoot problems. Resources How to access? Use Lenovo Vantage to: • Configure device settings. • Download and install UEFI BIOS, drivers and firmware updates. • Secure you ...
Page 64 - Telephone numbers
Call Lenovo If you have tried to correct the problem yourself and still need help, you can call Lenovo Customer Support Center. Before you contact Lenovo Prepare the following before you contact Lenovo: 1. Record the problem symptoms and details: • What is the problem? Is it continuous or intermitte...
Page 65 - Purchase additional services
Note: Phone numbers are subject to change without notice. If the number for your country or region is not provided, contact your Lenovo reseller or Lenovo marketing representative. Services available during the warranty period • Problem determination - Trained personnel are available to assist you w...
Page 67 - Appendix A. Important safety information; Safety notices; Conditions that require immediate action
Appendix A. Important safety information Safety notices This information can help you safely use your computer. Follow and retain all information included with your computer. The information in this document does not alter the terms of your purchase agreement or the Limited Warranty. For more inform...
Page 68 - Service and upgrades
• Signs of overheating, smoke, sparks, or fire. • Damage to a battery (such as cracks, dents, or creases), discharge from a battery, or a buildup of foreign substances on the battery. • A cracking, hissing, or popping sound, or strong odor that comes from the product. • Signs that liquid has been sp...
Page 69 - Power cords and power adapters; DANGER; Power cord notice
Sharp Edges: When replacing CRUs, be cautious of sharp edges or corners that might cause injury. If you suffer an injury, seek medical care immediately. Power cords and power adapters DANGER Use only the power cords and power adapters supplied by the product manufacturer. The power cords shall be sa...
Page 70 - Extension cords and related devices
For units intended to be operated at 115 volts: Use a UL-listed and CSA-certified cord set consisting of a minimum 18 AWG, Type SVT or SJT, three-conductor cord, a maximum of 15 feet in length and a parallel blade, grounding-type attachment plug rated 10 amperes, 125 volts. For units intended to be ...
Page 71 - Plugs and outlets; Power supply statement
Plugs and outlets DANGER If a receptacle (power outlet) that you intend to use with your computer equipment appears to be damaged or corroded, do not use the outlet until it is replaced by a qualified electrician. Do not bend or modify the plug. If the plug is damaged, contact the manufacturer to ob...
Page 72 - Lithium coin-cell battery notice; Heat and product ventilation
Lithium coin-cell battery notice DANGER Danger of explosion if battery is incorrectly replaced. If the coin-cell battery is not a CRU, do not attempt to replace the coin-cell battery. Replacement of the battery must be done by a Lenovo-authorized repair facility or technician. The Lenovo-authorized ...
Page 73 - Electrical current safety information
computer, power adapter, and many accessories produce some heat during normal operation. Extended contact with the body could cause discomfort or, potentially, a skin burn. • Do not charge the battery or operate your computer, power adapter, or accessories near flammable materials or in explosive en...
Page 75 - Choking hazard notice; Plastic bag notice
Battery warnings: • Risk of explosion if battery is replaced by an incorrect type. • Dispose of used batteries according to the instructions. Use earphones, headphones, or a headset • If your computer has both a headphone connector and an audio line-out connector, always use the headphone connector ...
Page 76 - Hazardous energy statement; Eye comfort
Glass parts notice CAUTION: Some parts of your product may be made of glass. This glass could break if the product is dropped on a hard surface or receives a substantial impact. If glass breaks, do not touch or attempt to remove it. Stop using your product until the glass is replaced by trained serv...
Page 77 - Temperature
For tips on how to minimize visual fatigue, please go to https://www.lenovo.com/us/en/safecomp/ to visit “Minimizing Visual Fatigue”. Tip-over hazard prevention notice The computer may cause harm to children if it is not located in an appropriate place. Follow the tips below to protect children from...
Page 78 - Cleaning and maintenance; Basic maintenance tips; Maintenance tips about moving the computer
Note: If your computer is stored or transported in temperatures less than 10°C (50°F), allow the computer to rise slowly to an optimal operating temperature before use. This process might take up to two hours. Using the computer in a lower operating temperature might result in irreparable damage to ...
Page 79 - Clean your computer; Clean the keyboard
2. Remove any media from the drives and turn off all connected devices and the computer. Then, disconnect all power cords from electrical outlets and disconnect all cables that are connected to the computer. 3. If you saved the original shipping cartons and packing materials, use them to pack the un...
Page 81 - Appendix B. Accessibility and ergonomic information; Accessibility information
Appendix B. Accessibility and ergonomic information This chapter provides information about accessibility and ergonomics. Accessibility information Lenovo is committed to providing users who have hearing, vision, and mobility limitations with greater access to information and technology. This sectio...
Page 83 - Display settings; Industry-standard connectors; Ergonomic information; General posture
– Change the size of all the items on your screen. 1. Right-click an empty area of the desktop and then click Display settings ➙ Display . 2. Change the item size by following the on-screen instructions. For some applications, your configuration might not take effect until you sign out and then sign...
Page 84 - Arm and hand position
Display : Position the display to maintain a comfortable viewing distance of 510 mm to 760 mm (20 inches to 30 inches). Avoid glare or reflections on the display from overhead lighting or outside sources of light. Keep the display screen clean and set the brightness to levels that enable you to see ...
Page 85 - Appendix C. Compliance information; Radio frequency compliance statements; Locate wireless regulatory notices; European Union-compliance with the Radio Equipment Directive; For computer models with wireless radio devices:; Brazil
Appendix C. Compliance information This chapter provides regulatory, environmental, RoHS, and ENERGY STAR information about Lenovo products. Radio frequency compliance statements Computer models equipped with wireless communications comply with the radio frequency and safety standards of any country...
Page 87 - WEEE information for Hungary; Japan recycling statements; Collect and recycle a disused Lenovo computer or monitor
each geography. This label is applied to various products to indicate that the product is not to be thrown away, but rather put in the established collection systems for reclaiming these end of life products. Users of electrical and electronic equipment (EEE) with the WEEE marking must not dispose o...
Page 88 - Brazil recycling information; Battery recycling information for the European Union
Brazil recycling information Declarações de Reciclagem no Brasil Descarte de um Produto Lenovo Fora de Uso Equipamentos elétricos e eletrônicos não devem ser descartados em lixo comum, mas enviados à pontos de coleta, autorizados pelo fabricante do produto para que sejam encaminhados e processados p...
Page 89 - Disposing of battery packs from Lenovo products; Recycling information for mainland China; European Union RoHS
Disposing of battery packs from Lenovo products Your Lenovo device might contain a lithium-ion battery pack or a nickel metal hydride battery pack. You can find details on the battery pack in the product documentation. If you need to dispose of a battery pack, insulate it with vinyl tape, contact Le...
Page 91 - Taiwan RoHS; Electromagnetic emission notices
Taiwan RoHS Electromagnetic emission notices Federal Communications Commission (FCC) Supplier’s Declaration of Conformity The following information refers to Lenovo product model(s) listed below. Appendix C. Compliance information 85
Page 92 - Industry Canada compliance statement; Compliance with the EMC Directive
Model name Machine types (MT) IdeaCentre G5 14IMB05 90NR, 90N9 IdeaCentre G5 14AMR05 90Q0, 90Q1 IdeaCentre C5 14IMB05 90R7, 90R8 This equipment has been tested and found to comply with the limits for a Class B digital device, pursuant to Part 15 of the FCC Rules. These limits are designed to provide...
Page 95 - ENERGY STAR model information
To enable or disable the ErP LPS compliance mode: 1. Restart the computer. When the logo screen is displayed, press F1 or Fn+F1. 2. Select Power ➙ Enhanced Power Saving Mode and press Enter. 3. Depending on whether you select Enabled or Disabled , do one of the following: • If you select Enabled , p...
Page 97 - Appendix D. Notices and trademarks; Notices
Appendix D. Notices and trademarks Notices Lenovo may not offer the products, services, or features discussed in this document in all countries. Consult your local Lenovo representative for information on the products and services currently available in your area. Any reference to a Lenovo product, ...
Page 98 - Trademarks
Any performance data contained herein was determined in a controlled environment. Therefore, the result obtained in other operating environments may vary significantly. Some measurements may have been made on development-level systems and there is no guarantee that these measurements will be the sam...