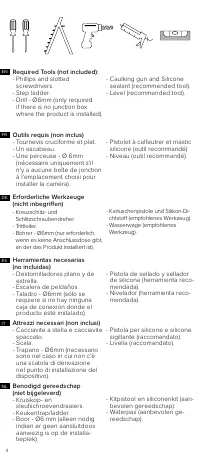
Page 3 - 內含:; 内含:; заземления зеленого цвета.
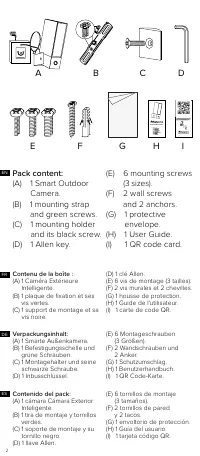
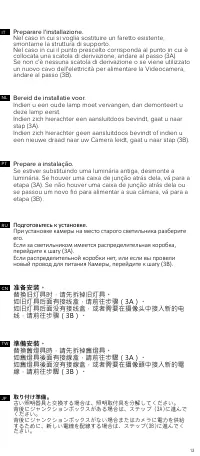
3 NL TW PT RU JP IT CN パッケージ内容: (A) Smart Outdoor Camera カメラ× 1 (B) 取り付けストラップ× 1 、ネ ジ(緑) (C) 取り付けホルダー× 1 、ネ ジ(黒) (D) 六角棒スパナ × 1 (E) 取り付けネジ × 6 ( 3 サイズ) (F) 壁用ネジ × 2 、アンカ ー × 2 (G) 保護カバー × 1 (H) ユーザーガイド ×1 (I) QRコードカード ×1 內含: (A) 1 個 Smart Outdoor Camera 攝像頭。 (B) 1 條安裝帶和若干綠色螺釘。 (C) 1 個安裝支架及其黑色螺釘。 (D)...
Page 4 - Schlitzschraubendreher.; Benodigd gereedschap
4 NL IT ES DE FR EN Required Tools (not included): - Phillips and slotted screwdrivers. - Step ladder. - Drill - Ø6mm (only required if there is no junction box where the product is installed). - Caulking gun and Silicone sealant (recommended tool). - Level (recommended tool). Herramientas necesaria...
Page 5 - 所需工具(未含):; Необходимые инструменты
5 Ferramentas necessárias (não incluídas) - Phillips e chaves de fenda. - Escada. - Broca - Ø6mm (necessária apenas se não houver caixa de junção onde o produto está instalado). - Pistola de calafetagem e selante de silicone (ferramenta recomendada). - Nível (ferramenta recomen- dada). ). 所需工具(未含): ...
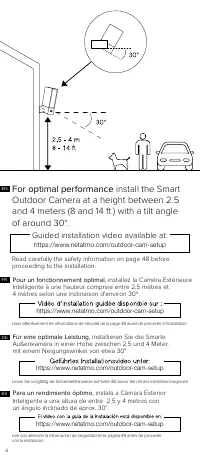
Page 6 - Guided installation video available at:; Pour un fonctionnement optimal,
6 For optimal performance install the Smart Outdoor Camera at a height between 2.5 and 4 meters (8 and 14 ft.) with a tilt angle of around 30°. Guided installation video available at: https://www.netatmo.com/outdoor-cam-setup Read carefully the safety information on page 48 before proceeding to the ...
Page 7 - Voor optimale prestaties; 为优化性能,; 為優化性能; 最適なパフォーマンスのため、; Для оптимальной производительности; Per una prestazione ottimale,; Vídeo do tutorial de instalação disponível em:
7 https://www.netatmo.com/outdoor-cam-setup Voor optimale prestaties installeert u Slimme Buitencamera op een hoogte van 2,5 tot 4 meter met een kantelhoek van ongeveer 30°. NL Lees zorgvuldig de veiligheidsinformatie op pagina 49 voordat u de installatie uitvoert. https://www.netatmo.com/outdoor-ca...
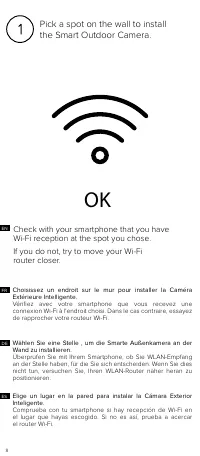
Page 8 - OK; Pick a spot on the wall to install; Check with your smartphone that you have; Wählen Sie eine Stelle , um die Smarte Außenkamera an der
8 OK Pick a spot on the wall to install the Smart Outdoor Camera. Check with your smartphone that you have Wi-Fi reception at the spot you chose.If you do not, try to move your Wi-Fi router closer. Wählen Sie eine Stelle , um die Smarte Außenkamera an der Wand zu installieren. Überprüfen Sie mit Ihr...
Page 9 - Выберите на стене место для установки Smart Outdoor Camera.
9 RU IT TW PT Scegliere il punto di installazione della Videocamera Esterna Intelligente sulla parete esterna della casa. Controllare con lo smartphone che in questo punto sia raggiunto dal segnale WiFi. In caso negativo, avvicinare il router WiFi. Выберите на стене место для установки Smart Outdoor...
Page 10 - Schalten Sie den Strom der Sicherung oder Schutzschalter ab,
10 Caution: electrical danger. Disconnect power at fuse or circuit breaker before proceeding to the installation. ES DE Vorsicht: elektrische Gefahr. Schalten Sie den Strom der Sicherung oder Schutzschalter ab, bevor Sie mit der Installation beginnen. Avertissement : danger électrique. Coupez le cou...
Page 11 - Внимание: опасность поражения электрическим током.; 注意:觸電危險!; 安裝前,請斷開電源保險絲或斷路器。; 注意:触电危险!; 安装前,请断开电源保险丝或断路器。
11 RU IT JP TW PT Attenzione: rischio elettrico. Staccare i fusibili o il contatore della corrente, prima di effettuare l'installazione. Внимание: опасность поражения электрическим током. Перед началом установки отключите электропитание, вынув плавкий предохранитель или выключив автоматический выклю...
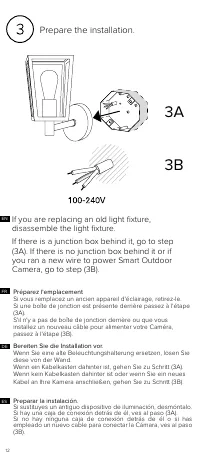
Page 12 - Prepare the installation.; Bereiten Sie die Installation vor.
12 If you are replacing an old light fixture, disassemble the light fixture. If there is a junction box behind it, go to step (3A). If there is no junction box behind it or if you ran a new wire to power Smart Outdoor Camera, go to step (3B). FR DE ES Prepare the installation. Bereiten Sie die Insta...
Page 13 - Prepare a instalação.; 準備安裝。; Bereid de installatie voor.; 准备安装。
13 RU IT CN Preparare l'installazione. Nel caso in cui si voglia sostituire un faretto esistente, smontarne la struttura di supporto. Nel caso in cui il punto prescelto corrisponda al punto in cui è collocata una scatola di derivazione, andare al passo (3A). Se non c'è nessuna scatola di derivazione...
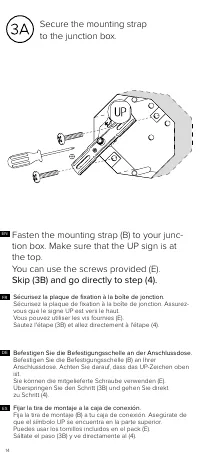
Page 14 - tion box. Make sure that the UP sign is at; Sécurisez la plaque de fixation à la boîte de jonction.; Secure the mounting strap
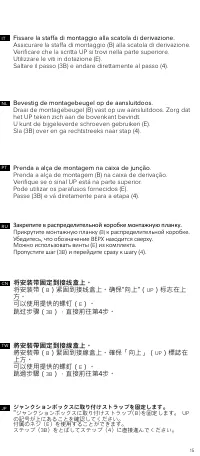
14 Fasten the mounting strap (B) to your junc- tion box. Make sure that the UP sign is at the top. You can use the screws provided (E). Skip (3B) and go directly to step (4). DE Sécurisez la plaque de fixation à la boîte de jonction. Sécurisez la plaque de fixation à la boîte de jonction. Assurez- v...
Page 15 - 将安装带固定到接线盒上。; Prenda a alça de montagem na caixa de junção.; 將安裝帶固定到接線盒上。; Bevestig de montagebeugel op de aansluitdoos.; Закрепите в распределительной коробке монтажную планку.
15 将安装带固定到接线盒上。 将安装带( B )紧固到接线盒上。确保“向上”( UP )标志在上 方。 可以使用提供的螺钉( E )。 跳过步骤( 3B ),直接前往第4步。 Prenda a alça de montagem na caixa de junção. Prenda a alça de montagem (B) na caixa de derivação. Verifique se o sinal UP está na parte superior. Pode utilizar os parafusos fornecidos (E). Passe (3B) e vá diret...
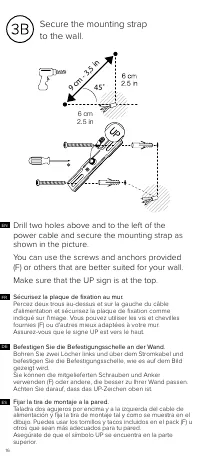
Page 16 - Drill two holes above and to the left of the; Fijar la tira de montaje a la pared.
16 Secure the mounting strap to the wall. ES DE FR Drill two holes above and to the left of the power cable and secure the mounting strap as shown in the picture.You can use the screws and anchors provided (F) or others that are better suited for your wall.Make sure that the UP sign is at the top. F...
Page 17 - 將安裝帶固定到牆上。; Prenda a alça de montagem na parede.; 将安装带固定到墙上。; Bevestig de montagebeugel aan de muur.
17 IT RU NL PT CN TW JP 壁に取り付けストラップを固定します。 電源ケーブルの上部および左側に穴を2つ開けて、図の様に取り付けストラップを固定します。 付属のネジとアンカー(F)を使用するか、壁に適した他のネジを使用してください。 UPの記号が上にあることを確認してください。 將安裝帶固定到牆上。 從上方鑽兩個孔並通到電源線左側,然後固定安裝帶,如圖 所示。 可以使用提供的螺釘和錨栓(F)或更適合牆體的其它螺釘。 確保「向上」(UP)標誌在上方。 Prenda a alça de montagem na parede. Faça dois furos acima e à ...
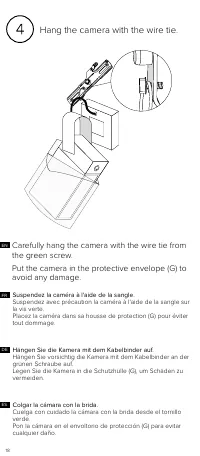
Page 18 - Hang the camera with the wire tie.; Carefully hang the camera with the wire tie from; Suspendez la caméra à l'aide de la sangle.
18 Hang the camera with the wire tie. Carefully hang the camera with the wire tie from the green screw.Put the camera in the protective envelope (G) to avoid any damage. Suspendez la caméra à l'aide de la sangle. Suspendez avec précaution la caméra à l'aide de la sangle sur la vis verte. Placez la c...
Page 19 - 用导线匝带悬挂摄像头。; Pendure a câmara com a abraçadeira.; 用導線匝帶懸掛攝像頭。; Hang de camera op met behulp van de kabelbinder.; Подвесьте камеру при помощи стяжки.
19 RU IT 用导线匝带悬挂摄像头。 小心地用导线匝带通过绿色螺钉悬挂摄像头。将摄像头放入防 护外壳( G )中,避免损坏。 Pendure a câmara com a abraçadeira. Pendure cuidadosamente a câmara com a abraçadeira no parafuso verde. Coloque a câmara no envelope de proteção (G) para evitar danos. Appendere la telecamera con il cavo d'aggancio. Appendere accurata...
Page 20 - Conectar los cables.
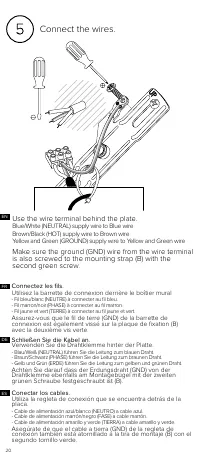
20 Connect the wires. Use the wire terminal behind the plate. Blue/White (NEUTRAL) supply wire to Blue wire Brown/Black (HOT) supply wire to Brown wire Yellow and Green (GROUND) supply wire to Yellow and Green wire Make sure the ground (GND) wire from the wire terminal is also screwed to the mountin...
Page 21 - 連接導線。; Подсоедините провода.; Используйте провод с клеммами, находящийся за панелью.
21 PT CN TW IT RU JP NL プレートの背後にワイヤー端子を使用してください。 - 青/白(ニュートラル)の供給線は青線へ。 - 茶/黒(ホット)の供給線は茶色線へ。 - 黄/緑(グラウンド)の供給線は黄/緑線へ 。 ワイヤー端子のアース線( GND )も、取り付けストラップ( B )に第2の 緑色のネジでネジ止めされていることを確認してください。 連接導線。 使用壁板後的導線接頭。 - 藍色或白色(不帶電)饋電線與藍色導線相連接。 - 棕色或黑色(帶電)饋電線與棕色導線相連接。 - 黃色和綠色(接地)饋電線與黃色和綠色導線相連接。 確保用第二個綠色螺釘將導線接頭中的地線( ...
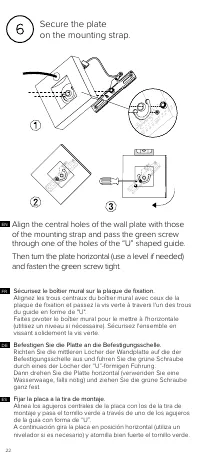
Page 22 - Align the central holes of the wall plate with those; Sécurisez le boîtier mural sur la plaque de fixation.
22 Secure the plate on the mounting strap. ES DE FR Align the central holes of the wall plate with those of the mounting strap and pass the green screw through one of the holes of the “U” shaped guide. Then turn the plate horizontal (use a level if needed) and fasten the green screw tight. Sécurisez...
Page 23 - Bevestig de plaat op de montagebeugel.; 将壁板固定到安装带上。; Assicurare la placca sulla staffa di montaggio.; 將壁板固定到安裝帶上。
23 CN CN JP RU PT NL Bevestig de plaat op de montagebeugel. Zorg dat de middelste gaten van de muurplaat gelijk liggen met de gaten van de montagebeugel, en leid de groene schroef door één van de gaten van de U-vormige geleider. Draai de plaat vervolgens horizontaal (gebruik een waterpas indien nodi...
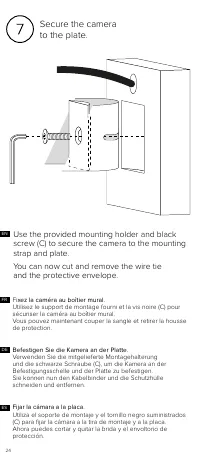
Page 24 - Secure the camera; Use the provided mounting holder and black; Fijar la cámara a la placa.
24 Secure the camera to the plate. ES DE Use the provided mounting holder and black screw (C) to secure the camera to the mounting strap and plate.You can now cut and remove the wire tie and the protective envelope. Fijar la cámara a la placa. Utiliza el soporte de montaje y el tornillo negro sumini...
Page 25 - 將攝像頭固定到壁板上。; 将摄像头固定到壁板上。; Установите камеру на панель.
25 JP プレートにカメラを固定します。 付属の取り付けホルダーとブラックのネジ(C)を使用してカメラを取り付けストラップとプレートに固定します。 そして結束ワイヤーと保護カバーをカットして外してください。 TW 將攝像頭固定到壁板上。 使用提供的安裝支架和黑色螺釘(C)將攝像頭固定到安裝帶 和壁板上。 現在可以剪斷導線匝帶並移除保護外殼。 CN 将摄像头固定到壁板上。 使用提供的安装支架和黑色螺钉(C)将摄像头固定到安装带 和壁板上。 现在可以剪断导线匝带并移除保护外壳。 RU Установите камеру на панель. Закрепите камеру на монтажн...
Page 26 - Neigen Sie die Kamera, um das Video aus dem richtigen; Inclina la cámara para grabar vídeos desde el ángulo correcto.; Inclinez correctement la caméra pour filmer la zone à; Use the Allen key (D) to untighten the screws
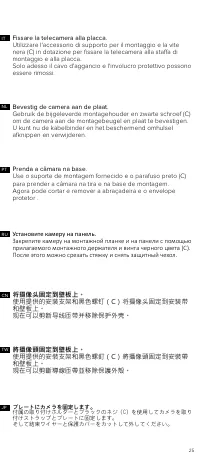
26 Tilt the camera to record video from the correct angle. DE Neigen Sie die Kamera, um das Video aus dem richtigen Winkel aufzunehmen. Verwenden Sie den Inbusschlüssel (D), um die Schrauben an der Seite oder Rückseite zu lösen, um die Kamera zu kippen. Stellen Sie sicher, dass Sie sie danach richti...
Page 27 - 傾斜攝像頭,從正確的角度錄製視頻。; 倾斜摄像头,从正确的角度录制视频。; Наклоните камеру для записи видео под правильным углом.
27 正しい角度からビデオ記録を行うためにカメラを傾けてください。 六角棒スパナ(D)を使用し、カメラを傾けるため横または背後のネジを緩めます。 後で、正しく固定されていることを確認してください。両側のネジを締め、カメラを安全に設置してください。 JP 傾斜攝像頭,從正確的角度錄製視頻。 使用艾倫內六角扳手(D)鬆開側面或後面的螺釘,傾斜攝像 頭。事後確保螺釘和攝像頭安全固定。 兩側的螺絲必須拴緊,以防止攝影機意外鬆脫。 TW 倾斜摄像头,从正确的角度录制视频。 使用艾伦内六角扳手(D)松开侧面或后面的螺钉,倾斜摄像 头。事后确保螺钉和摄像头安全固定。 两侧螺钉必须拧紧,以防止摄像头意外松脱。...
Page 28 - The Smart Outdoor Camera will start for the first
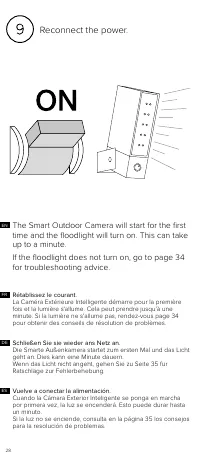
28 Reconnect the power. ES DE Schließen Sie sie wieder ans Netz an. Die Smarte Außenkamera startet zum ersten Mal und das Licht geht an. Dies kann eine Minute dauern. Wenn das Licht nicht angeht, gehen Sie zu Seite 35 für Ratschläge zur Fehlerbehebung. Rétablissez le courant. La Caméra Extérieure In...
Page 29 - Ricollegare la corrente.; 重新接通電源。; Schakel de stroom opnieuw in.; 重新接通电源。
29 JP TW CN Ricollegare la corrente. La Videocamera Esterna Intelligente si attiverà per la prima volta e si accenderà la luce. Questo processo può durare fino ad un minuto. Se la luce non si accende, andare alla pagina di risoluzione di problemi (pag.36). Volte a ligar a energia. A Câmara Exterior ...
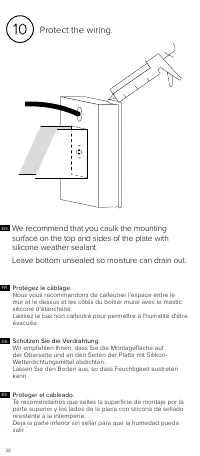
Page 30 - Schützen Sie die Verdrahtung.
30 Protect the wiring. ES DE FR We recommend that you caulk the mounting surface on the top and sides of the plate with silicone weather sealant.Leave bottom unsealed so moisture can drain out. Schützen Sie die Verdrahtung. Wir empfehlen Ihnen, dass Sie die Montagefläche auf der Oberseite und an den...
Page 31 - 保護供電線路。; 建議您使用矽酮耐候密封膠對壁板上方和側面的安裝面填縫。; 保护供电线路。; 建议您使用硅酮耐候密封胶对壁板上方和侧面的安装面填缝。
31 IT Protezione dei fili. Raccomandiamo di sigillare bene la superficie di montaggio sulla parte superiore e ai lati della placca con silicone sigillante. Non sigillare il lato inferiore, per permettere la fuoriuscita dell'umidità. NL Bescherm de bedrading. We raden u aan het montageoppervlak aan d...
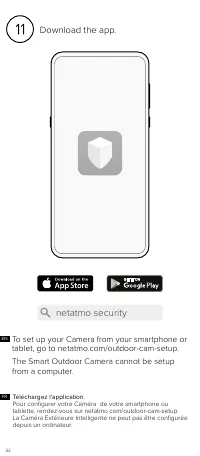
Page 32 - To set up your Camera from your smartphone or; netatmo security
32 Téléchargez l'application. Pour configurer votre Caméra de votre smartphone ou tablette, rendez-vous sur netatmo.com/outdoor-cam-setup. La Caméra Extérieure Intelligente ne peut pas être configurée depuis un ordinateur. FR To set up your Camera from your smartphone or tablet, go to netatmo.com/ou...
Page 33 - 下載應用。; 下载应用。
33 DE Laden Sie die App herunter. Um Ihre Kamera vom Smartphone oder Tablet aus einzurichten, gehen Sie zu netatmo.com/outdoor-cam-setup. Die Smarte Außenkamera kann nicht über einen Computer eingerichtet werden. ES Descargar la aplicación. Para configurar tu Cámara desde tu smartphone o tableta, vi...
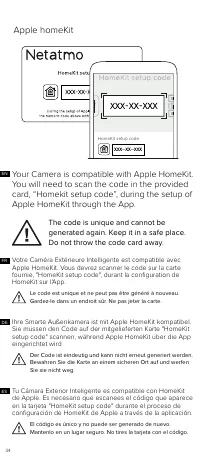
Page 34 - Apple homeKit; Your Camera is compatible with Apple HomeKit.
34 Apple homeKit EN Your Camera is compatible with Apple HomeKit. You will need to scan the code in the provided card, “Homekit setup code”, during the setup of Apple HomeKit through the App. The code is unique and cannot be generated again. Keep it in a safe place. Do not throw the code card away. ...
Page 35 - Ваша камера Smart Outdoor Camera совместима с Apple; Этот код уникальный и не может быть сгенерирован повторно.; 該安裝代碼獨一無二而且無法再次生成。因此,請妥善保存,; 该安装代码独一无二而且无法再次生成。因此,请妥善保存,
35 Smart Outdoor Camera は Apple HomeKit に対応してい ます。アプリから Apple HomeKit をセットアップする際 には、所定のカードに記載されたコード (HomeKit setup code)をスキャ ンすることになります。 コードはひとつしかなく、再発行できません。コードを確実に保管し、コードが記載されたカードを捨てないでください。 JP Ваша камера Smart Outdoor Camera совместима с Apple HomeKit. Во время установки Apple HomeKit через прил...
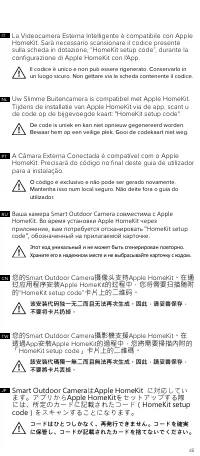
Page 36 - Setup card; This card contains unique configuration codes.
36 Setup card 30cm 1 ft. EN This card contains unique configuration codes. You will need them to reconfigure your Camera. Keep the card in a safe place. Do not throw it away. A. SETUP QR code (black): During the product setup or Wi-Fi configuration, show the black QR code to the camera only when req...
Page 38 - Scheda di configurazione
38 QR-card-V5 Security code for product setup. Keep card in a safe place. Do not throw away. To perform a factory reset, show this red QR code to the camera.The floodlight will make five fast blinks twice to confirm the operation.All the data and configuration will be lost. During the product setup,...
Page 40 - Карта установки
40 RU Карта установки Данная карта содержит уникальные конфигурационные коды. Они потребуются вам для изменения конфигурации вашей камеры. Храните карту в надежном месте и не выбрасывайте ее. A. QR-код УСТАНОВКИ (черный): Во время установки устройства или конфигурации соединения Wi-Fi, отсканируйте ...
Page 41 - 安装代码卡; Smart; 安裝代碼卡; セットアップ・カード
41 CN 安装代码卡 这张卡片上有独一无二的安装代码。若想重新设置 Smart Outdoor Camera 摄像头,您将会需要这些代码。因此,请妥 善保存,不要将卡片扔掉。A . 安装二维码(黑色):在安装产品或设置 Wi-Fi 网络的过程 中,应用程序会要求您手持卡片让摄像头扫描黑色二维 码,一直到泛光灯开始闪动。 B . 重置二维码(红色):若想恢复出厂设置,必须手持卡 片让摄像头扫描红色二维码。泛光灯将快闪五次,再度 快闪五次后,即完成操作。此举将永久删除所有的数据 和设置。 让 Smart Outdoor Camera 扫描二维码时,卡片与摄像头的距 离应为 30 厘米。必须有足够...
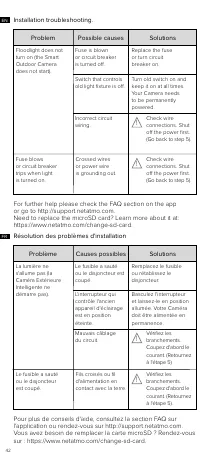
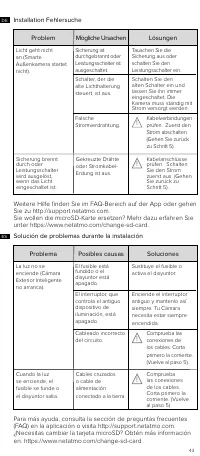
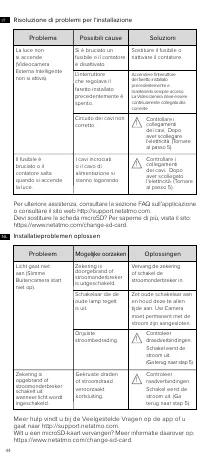
Page 46 - Устранение неполадок при установке; 可能原因
46 Устранение неполадок при установке Для получения дополнительной помощи обратитесь к разделу FAQ в приложении или перейдите по адресу http://support.netatmo.com . Вам требуется заменить карту памяти microSD? Информацию о том, как это сделать, вы найдете по ссылке: https://www.netatmo.com/change-sd...
Page 52 - Legal notice
52 FCC Statement This equipment has been tested and found to comply with the limits for a Class B digital device, pursuant to part 15 of the FCC rules. These limits are designed to provide reasonable protection against harmful interference in a residential installation. This equipment generates, use...
Page 53 - Внимание; 安全警告
53 Sicherheitshinweise Dieses Gerät darf nicht von Personen (einschließlich Kindern) verwendet werden, deren körperliche, sensorische oder geistige Fähigkeiten beeinträchtigt sind oder die keine Erfahrung und kein Wissen haben, es sei denn, sie werden beaufsichtigt oder von einer für ihre Sicherheit...
Page 54 - 无线连接; ワイヤレス接続
54 Canadian Compliance Statement This device complies with Industry Canada license-exempt RSS standard(s). Operation is subject to the following two conditions: (1) this device may not cause interference, and (2) this device must accept any interference, including interference that may cause undesir...
Page 56 - С настоящото Netatmo декларира, че това NOC01; CEO
56 Magyar [Hungarian] - Alulírott, Netatmo nyilatkozom, hogy a NOC01 megfelel a vonatkozó alapvetõ követelményeknek és az 2014/53/EU i ROHS 2011/65/EC irányelv egyéb elõírásainak. Az eredeti EU megfelelőségi nyilatkozat megtalálható a http://www. netatmo.com/declaration/noc oldalon. Norsk [Norwegian...