Page 2 - EN; Contents
2 EN Contents Safety Information .............................................................................................................................. 3 The advantages of microwaves ......................................................................................................... 8 D...
Page 3 - Safety Information
3 EN Safety Information Before the installation and use of the appliance, carefully read the supplied instructions. The manufacturer is not responsible if an incorrect installation and use causes injuries and damages. Always keep the instructions with the appliance for future reference. CHILDREN AND...
Page 8 - The advantages of microwaves; How a microwave oven works
8 EN The advantages of microwaves In conventional ovens, heat radiated by electrical elements or gas burners slowly penetrates the food from outside to inside. On account of this major amount of energy is wasted heating the air, the oven components and the food containers. In a microwave oven, heat ...
Page 9 - Description of your oven
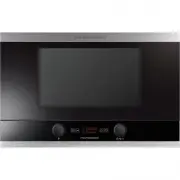
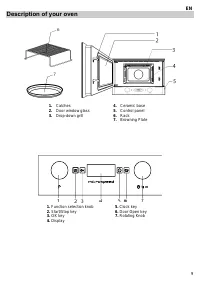
9 EN Description of your oven 1. Catches 4. Ceramic base 2. Door window glass 5. Control panel 3. Drop-down grill 6. Rack 7. Browning Plate 1. Function selection knob 5. Clock key 2. Start/Stop key 6. Door Open key 3. OK key 7. Rotating Knob 4. Display
Page 10 - Description of Functions
10 EN Description of your oven A. Grill Function Indicator F. Weight Indicator B. Microwave Function Indicator G. Power Indicator A+B. Grill + Microwave Function Indicator H. Duration Indicator C. Defrost by Time Indicator I. Clock Indicator D. Defrost by Weight Indicator J. Special Function Indicat...
Page 11 - Basic settings; Setting the clock
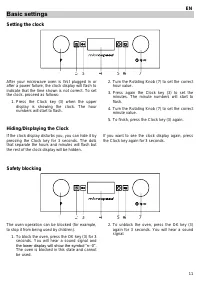
11 EN Basic settings Setting the clock After your microwave oven is first plugged in or after a power failure, the clock display will flash to indicate that the time shown is not correct. To set the clock, proceed as follows: 1. Press the Clock key (3) when the upper display is showing the clock. Th...
Page 12 - Basic Functions; Microwaves; Grill
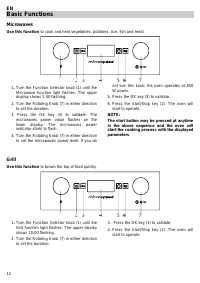
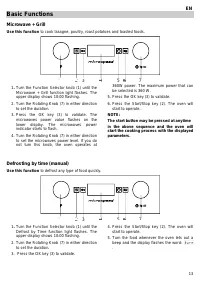
12 EN Basic Functions Microwaves Use this function to cook and heat vegetables, potatoes, rice, fish and meat. 1 . Turn the Function Selector knob (1) until the Microwave function light flashes. The upper display shows 1:00 flashing. 2. Turn the Rotating Knob (7) in either direction to set the durat...
Page 15 - Special functions; Auto cooking function -
15 EN Special functions Auto cooking function - “AUTO” Use this function to cook various types of food. 1 . Turn the Function Selector knob (1) until the Special Function indicator “ Auto ” flashes. The display shows the program “ P1 ” flashing. 2. Turn the Rotating Knob (7) in either direction to s...
Page 17 - Using the Browning Plate; How to clean the browning plate
17 EN Using the Browning Plate Normally when cooking food, such as pizzas or pies, on a grill or in a microwave oven, the dough or pastry becomes soggy. This can be avoided by using a browning plate. As a high temperature is reached quickly on the bottom of the browning plate, the crust turns crisp ...
Page 18 - Altering parameters; Cancelling a cooking cycle; End of a cooking cycle
18 EN When the oven is working... Interrupting a cooking cycle You can stop the cooking process at any time by pressing the Start/Stop key once or by opening the oven door. In both cases: Microwave emission is stopped immediately. The grill is de-activated but is still very hot. Danger of burnin...
Page 19 - Defrosting
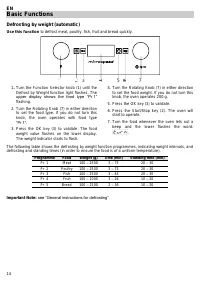
19 EN Defrosting The table below shows different defrosting and standing times (in order to ensure the food temperature is evenly distributed) for different types and weights of food, plus recommendations. Food Weight Defrosting Time Resting time Comment Pieces of meat, veal, beef, pork 100 g 3-4 mi...
Page 20 - General instructions for defrosting
20 EN Defrosting General instructions for defrosting 1. When defrosting, use only dishes that are appropriate for microwaves (china, glass, suitable plastic). 2. The defrost function by weight and the tables refer to the defrosting of raw food. 3. The defrosting time depends on the quantity and thic...
Page 21 - Cooking with a microwave oven
21 EN Cooking with a microwave oven Warning! Read the section “Microwave Safety” before cooking with your microwave. Follow these recommendations when cooking with your microwave: Before heating or cooking foods with peel or skin (e.g. apples, tomatoes, potatoes, sausages) prick them so that they ...
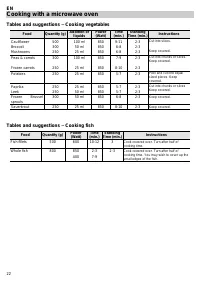
Page 22 - Tables and suggestions
22 EN Cooking with a microwave oven Tables and suggestions – Cooking vegetables Food Quantity (g) Addition of liquids Power (Watt) Time (min.) Standing Time (min.) Instructions Cauliflower Broccoli Mushrooms 500 300 250 100 ml 50 ml 25 ml 850 850 850 9-11 6-8 6-8 2-3 2-3 2-3 Cut into slices. Keep co...
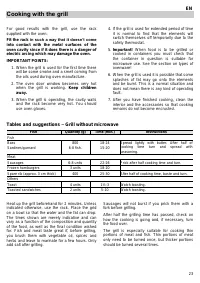
Page 23 - Cooking with the grill
23 EN Cooking with the grill For good results with the grill, use the rack supplied with the oven. Fit the rack in such a way that it doesn’t come into contact with the metal surfaces of the oven cavity since if it does there is a danger of electric arcing which may damage the oven. IMPORTANT POINTS...
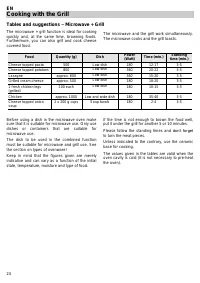
Page 24 - Cooking with the Grill
24 EN Cooking with the Grill Tables and suggestions – Microwave + Grill The microwave + grill function is ideal for cooking quickly and, at the same time, browning foods. Furthermore, you can also grill and cook cheese covered food. The microwave and the grill work simultaneously. The microwave cook...
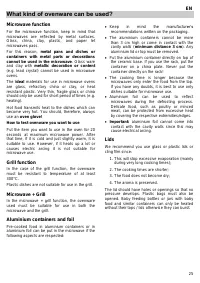
Page 25 - What kind of ovenware can be used?; Microwave function; Grill function; Lids
25 EN What kind of ovenware can be used? Microwave function For the microwave function, keep in mind that microwaves are reflected by metal surfaces. Glass, china, clay, plastic, and paper let microwaves pass. For this reason, metal pans and dishes or containers with metal parts or decorations canno...
Page 26 - Table of Ovenware
26 EN What kind of ovenware can be used? Table of Ovenware The table below gives you a general idea of what type of ovenware is suitable for each situation. Operating mode Type of ovenware Microwave Grill Microwave + Grill Defrosting / heating Cooking Glass and china 1) Home use, not flame resistant...
Page 27 - Oven Cleaning and Maintenance; Front surface; Oven interior
27 EN Oven Cleaning and Maintenance Cleaning is the only maintenance normally required. Warning! Your microwave oven should be cleaned regularly, with all food remains being removed. If the microwave is not kept clean its surfaces may deteriorate, reducing the oven’s working life and possibly result...
Page 28 - Oven ceiling; Accessories
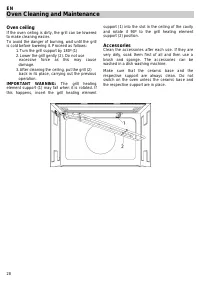
28 EN Oven Cleaning and Maintenance Oven ceiling If the oven ceiling is dirty, the grill can be lowered to make cleaning easier. To avoid the danger of burning, wait until the grill is cold before lowering it. Proceed as follows: 1. Turn the grill support by 180º (1) 2. Lower the grill gently (2). D...
Page 29 - What should I do if the oven doesn’t work?; Substitution of light bulb
29 EN What should I do if the oven doesn’t work? WARNING! Any type of repair must only be done by a specialised technician. Any repair done by a person not authorised by the manufacturer is dangerous. You do not need to contact Technical Assistance to resolve the following questions: The display i...
Page 30 - Technical characteristics; Specifications; Environmental protection
30 EN Technical characteristics Specifications AC Voltage ....................................................................................................... (see rating plate) Power required ................................................................................................. 27...
Page 31 - Installation instructions; Before installation; follow the instructions supplied separately.
31 EN Installation instructions Before installation Check that the input voltage indicated on the characteristics plate is the same as the voltage of the power outlet you are going to use. The rating plate is located on the front part of the cavity and it is only visible after opening the door. Open...
Page 32 - DE; Inhaltsverzeichnis
32 DE Inhaltsverzeichnis Sicherheitsinformationen ................................................................................................................. 33 Die Vorteile der Mikrowelle ............................................................................................................
Page 33 - Sicherheitsinformationen
33 DE Sicherheitsinformationen Lesen Sie vor der Montage und Verwendung des Geräts sorgfältig die mitgelieferte Anleitung. Der Hersteller haftet nicht für Verletzungen oder Schäden, die durch eine fehlerhafte Montage entstehen. Bewahren Sie die Anleitung zum Nachschlagen auf. SICHERHEIT VON KINDERN ...
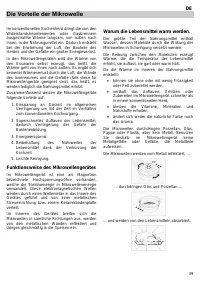
Page 39 - Die Vorteile der Mikrowelle; Funktionsweise des Mikrowellengerätes
39 DE Die Vorteile der Mikrowelle Im konventionellen Küchenherd dringt die von den Widerstandsheizelementen oder Gasbrennern ausgestrahlte Wärme langsam, von außen nach innen, in die Nahrungsmittel ein. Dadurch entsteht bei der Erwärmung der Luft, der Bauteile des Herdes und der Gefäße ein großer En...
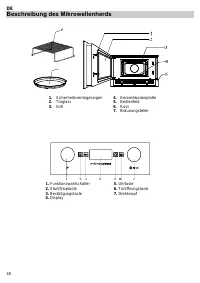
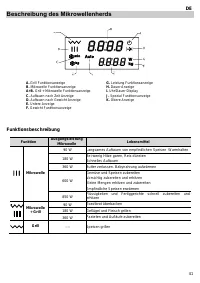
Page 40 - Beschreibung des Mikrowellenherds
40 DE Beschreibung des Mikrowellenherds 1. Sicherheitsverriegelungen 4. Keramikbodenplatte 2. Türglass 5. Bedienfeld 3. Grill 6. Rost 7. Bräunungsteller 1. Funktionswahlschalter 5. Uhrtaste 2. Start/Stoptaste 6. Türöffnungstaste 3. Bestätigungstaste 7. Drehknopf 4. Display
Page 41 - Funktionsbeschreibung
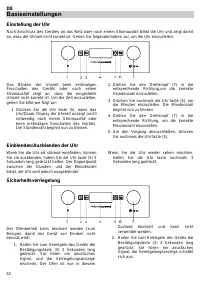
41 DE Beschreibung des Mikrowellenherds A. Grill Funktionsanzeige B. Mikrowelle Funktionsanzeige G. Leistung Funktionsanzeige H. Dauer Anzeige A+B. Grill + Mikrowelle Funktionsanzeige I. Uhr/Dauer Display C. Auftauen nach Zeit Anzeige J. Spezial Funktionsanzeige D. Auftauen nach Gewicht Anzeige E. U...
Page 42 - Basiseinstellungen; Einstellung der Uhr
42 DE Basiseinstellungen Einstellung der Uhr Nach Anschluss des Gerätes an das Netz oder nach einem Stromausfall blinkt die Uhr und zeigt damit an, dass die Uhrzeit nicht korrekt ist. Gehen Sie folgendermaßen vor, um die Uhr einzustellen: Das Blinken der Uhrzeit beim erstmaligen Einschalten des Gerä...
Page 43 - Grundfunktionen; Mikrowelle
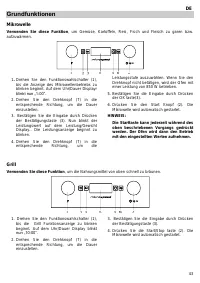
43 DE Grundfunktionen Mikrowelle Verwenden Sie diese Funktion , um Gemüse, Kartoffeln, Reis, Fisch und Fleisch zu garen bzw. aufzuwärmen. 1 . Drehen Sie den Funktionswahlschalter (1), bis die Anzeige des Mikrowellenbetriebs zu blinken beginnt. Auf dem Uhr/Dauer Displayr bli nkt nun „1:00“. 2. Drehen...
Page 46 - Sonderfunktionen; Automatische Garprogramme -
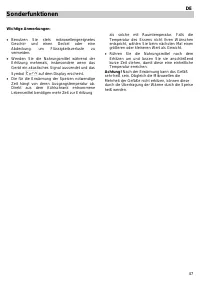
46 DE Sonderfunktionen Automatische Garprogramme - „AUTO“ Verwenden Sie diese Funktion , um verschiedene Lebensmittel zu garen. 1 . Drehen Sie den Funktionswahlschalter (1), bis die Anzeige der Funktion „Auto“ zu blinken beginnt. Auf der Anzeige blinkt nun das Symbol für das Programm „ P1 “. 2. Dreh...
Page 48 - Benutzung des Bräunungstellers; Wichtige Hinweise; Reinigung des Backtellers
48 DE Benutzung des Bräunungstellers Bei dem Garen von Pizza und Kartoffelerzeugnissen mit dem Grill oder in Kombination mit Grill und Mikrowelle bleibt die Unterseite des Lebensmittels meist feucht. Das lässt sich mit dem Bräunungsteller vermeiden. Er erreicht eine hohe Temperatur und somit wird ei...
Page 50 - Auftauen
50 DE Auftauen Zum Auftauen wird empfohlen, die Funktion Mikrowelle gemeinsam mit einer der folgenden Leistungsstufen zu wählen: Die folgende Tabelle zeigt zusammenfassend die verschiedenen Auftau- und Ruhezeiten (um zu gewährleisten, dass die Speisen eine gleichmäßige Temperatur erlangen), in Abhän...
Page 52 - Kochen mit der Mikrowelle
52 DE Kochen mit der Mikrowelle Achtung! Lesen Sie den Abschnitt “Sicherheitshinweise” aufmerksam durch, bevor Sie mit der Mikrowelle garen. Befolgen Sie nachstehende Hinweise beim garen mit der Mikrowelle: Bevor Sie Esswaren mit einer Schale oder einer Haut (z. B. Äpfel, Tomaten, Kartoffeln, Würs...
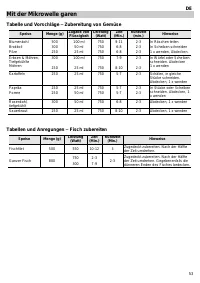
Page 53 - Mit der Mikrowelle garen; Tabelle und Vorschläge
53 DE Mit der Mikrowelle garen Tabelle und Vorschläge – Zubereitung von Gemüse Speise Menge (g) Zugabe von Flüssigkeit Leistung (Watt) Zeit (Min.) Ruhezeit (min.) Hinweise Blumenkohl Brokkoli Pilze 500 300 250 100 ml 50 ml 25 ml 750 750 750 9-11 6-8 6-8 2-3 2-3 2-3 In Röschen teilen In Scheiben schn...
Page 54 - Zubereitung mit dem Grill
54 DE Zubereitung mit dem Grill Benutzen Sie den mit dem Gerät mitgelieferten Rost, um gute Ergebnisse mit dem Grill zu erreichen. Setzen Sie den Grillrost so ein, dass er die Metalloberflächen des Nutzraumes nicht berührt, da die Gefahr der Entstehung eines Lichtbogens gegeben ist, der das Gerät be...
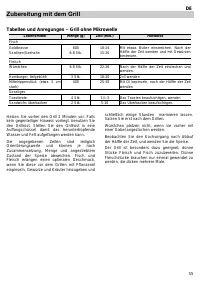
Page 55 - Tabellen und Anregungen
55 DE Zubereitung mit dem Grill Tabellen und Anregungen – Grill ohne Mikrowelle Lebensmittel Menge (g) Zeit (min.) Hinweise Fisch Goldbrasse Sardinen/Seehahn 800 6-8 Stk. 18-24 15-20 Mit etwas Butter einstreichen. Nach der Hälfte der Zeit wenden und mit Gewürzen bestreuen. Fleisch Würstchen 6-8 Stk....
Page 56 - Tabelle und Anregungen
56 DE Zubereitung mit dem Grill Tabelle und Anregungen – Mikrowelle + Grill Die Funktion Mikrowelle mit Grill ist ideal, um Speisen schnell zuzubereiten und gleichzeitig zu bräunen. Außerdem können Nahrungsmittel überbacken werden. Mikrowelle und Grill arbeiten gleichzeitig. Die Mikrowelle gart und ...
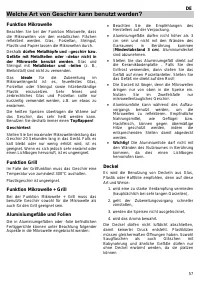
Page 57 - Welche Art von Geschirr kann benutzt werden?
57 DE Welche Art von Geschirr kann benutzt werden? Funktion Mikrowelle Beachten Sie bei der Funktion Mikrowelle, dass die Mikrowellen von den metallischen Flächen reflektiert werden. Glas, Porzellan, Steingut, Plastik und Papier lassen die Mikrowellen durch. Deshalb dürfen Metalltöpfe und –geschirr ...
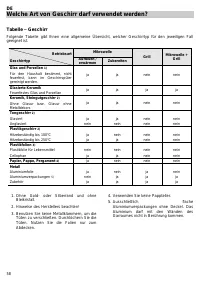
Page 58 - Welche Art von Geschirr darf verwendet werden?; Tabelle
58 DE Welche Art von Geschirr darf verwendet werden? Tabelle – Geschirr Folgende Tabelle gibt Ihnen eine allgemeine Übersicht, welcher Geschirrtyp für den jeweiligen Fall geeignet ist. Betriebsart Geschirrtyp Mikrowelle Grill Mikrowelle + Grill Auftauen / erwärmen Zubereiten Glas und Porzellan 1) Fü...
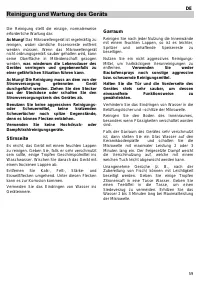
Page 59 - Reinigung und Wartung des Geräts; Stirnseite
59 DE Reinigung und Wartung des Geräts Die Reinigung stellt die einzige, normalerweise erforderliche Wartung dar. Achtung! Das Mikrowellengerät ist regelmäßig zu reinigen, wobei sämtliche Essensreste entfernt werden müssen. Wenn das Mikrowellengerät nicht ordnungsgemäß sauber gehalten wird, kann sei...
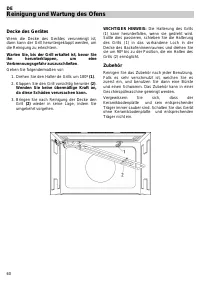
Page 60 - Reinigung und Wartung des Ofens; Decke des Gerätes; Zubehör
60 DE Reinigung und Wartung des Ofens Decke des Gerätes Wenn die Decke des Gerätes verunreinigt ist, dann kann der Grill heruntergeklappt werden, um die Reinigung zu erleichtern. Warten Sie, bis der Grill erkaltet ist, bevor Sie ihn herunterklappen, um eine Verbrennungsgefahr auszuschließen . Gehen ...
Page 61 - Was ist im Falle einer Funktionsstörung zu tun?; Lampenwechsel
61 DE Was ist im Falle einer Funktionsstörung zu tun? ACHTUNG! Jegliche Art von Reparatur darf nur von spezialisierten Fachleuten ausgeführt werden. Jeder Eingriff, der durch nicht vom Hersteller autorisierte Personen vorgenommen wird, ist gefährlich. Folgende Probleme können behoben werden, ohne de...
Page 62 - Technische Eigenschaften; Spezifikation; Hinweise zum Umweltschutz
62 DE Technische Eigenschaften Spezifikation Wechselspannung ........................................................................... (Siehe Typenschild) Geforderte Leistung ........................................................................ 2700 W Grill Leistung .........................
Page 63 - Installationsanleitung; Vor der Installation; Während der Installation; sind die getrennt mitgelieferten Anleitungen zu
63 DE Installationsanleitung Vor der Installation Überprüfen Sie, dass die Versorgungsspannung , die auf dem Typenschild angegeben ist, mit Ihrer Netzspannung übereinstimmt. Das Typenschild befindet sich auf dem vorderen Teil des Hohlraums und ist nur sichtbar nach dem Öffnen der Tür. Öffnen Sie die...
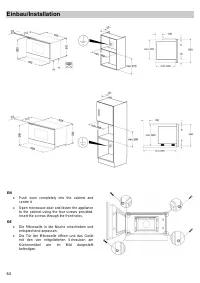
Page 64 - Einbau/Installation
64 Einbau/Installation EN Push oven completely into the cabinet and centre it. Open microwave door and fasten the appliance to the cabinet using the four screws provided. Insert the screws through the front holes. DE Die Mikrowelle in die Nische einschieben und entsprechend anpassen. Die Tür...