Page 2 - I. SAFETY AND WARNING INFORMATION
Please read this Installation and User Care Guide thoroughly before using your built-in grill. Proper understanding and application of these instructions will reduce the risk of fire, burn hazards, and other potential injuries.OUTDOOR GRILL SAFETY Your safety and the safety of others is crucial. We ...
Page 3 - IMPORTANT SAFETY INSTRUCTIONS
2 I. SAFETY AND WARNING INFORMATION IMPORTANT SAFETY INSTRUCTIONS WARNING: To reduce the risk of fire, electric shock, injury to persons, or damage when using the outdoor cooking gas appliance, adhere to basic precautions, including the following: • Do not install built-in outdoor cooking gas applia...
Page 4 - II. INSTALLATION REQUIREMENTS; TOOLS AND MATERIALS; WANRNING
3 II. INSTALLATION REQUIREMENTS TOOLS AND MATERIALS Before you start the installation process, make sure to gather all necessary tools and materials. Please adhere to the instructions that come with any tools listed here. TOOLS REQUIRED • Tape measure• Pipe wrench• Small, flat-blade screwdriver• Sci...
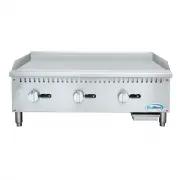
Page 5 - III. SPECIFICATIONS; other combustible materials for the built-in enclosure.; PRODUCT DIMENSIONS
III. SPECIFICATIONS This built-in outdoor grill is designed for installation only within a built-in enclosure made entirely of non-com- bustible materials. Suitable non-combustible materials include brick, firewall, or steel. Do not use wood or other combustible materials for the built-in enclosure....
Page 6 - INTERNAL DIMENSIONS
5 III. SPECIFICATIONS INTERNAL DIMENSIONS Prior to placing the propane tank into the tank tray, secure the tray with four locking screws (size 5/32*8). Please note, this appliance is designed exclusively for installation within a built-in enclosure made entirely of non-combustible materials.
Page 7 - which might lead to a gas leak or even a fire hazard.
6 IV. GAS CONNECTION GAS PRESSURE REGULATOR The gas pressure regulator that comes with this grill is essential for its proper operation and must be used. The input pressure to the regulator should be in accordance with the specifications provided for optimal functionality. CONNECTING THE REGULATOR A...
Page 8 - CONNECTING THE REGULATOR AND HOSE TO YOUR LP GAS TANK; Tank Installation Layout.
7 IV. GAS CONNECTION (LP Tank Installation Layout) CONNECTING THE REGULATOR AND HOSE TO YOUR LP GAS TANK 1. Please note that while this grill is designed to work with a propane tank, the tank itself is not included. The grill, however, comes with a gas pressure regulator and hose assembly. 2. The gr...
Page 9 - V. ELECTRICAL SAFETY; Wait for it to cool down before attaching or detaching parts.
8 V. ELECTRICAL SAFETY Take note of the following safety guidelines when dealing with the electrical components of your outdoor gas appliance:A. To prevent electric shock, never submerge the cord or plugs in water or any other liquid.B. Always unplug the appliance when it's not in use or before clea...
Page 10 - VI. GRILL INSTRUCTIONS; HOW TO USE YOUR OUTDOOR GRILL; has been cut, it must be replaced before you use the outdoor cooking; WARNING
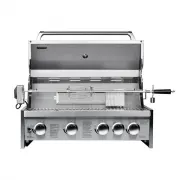
9 VI. GRILL INSTRUCTIONS Your newly purchased grill may contain some or all of the following features. Note that the locations and appear- ances of the features listed may not exactly match your specific model. A. Electric Ignition Control KnobB. Left Grill Burner Control KnobC. Left Center Grill Bu...
Page 11 - PREPARING THE GAS SUPPLY; the grill burner control knob to IGNITE/HI. Hold it in this position.; MANUALLY LIGHTING THE GRILL; and attach a match to the split ring.
10 VI. GRILL INSTRUCTIONS PREPARING THE GAS SUPPLY Ensure that all control knobs are turned to OFF and the drip tray is properly placed and pushed all the way to the back. TURNING ON THE GAS SUPPLY For outdoor grills using a propane tank, open the tank valve slowly.NOTE: If the flow limiting device ...
Page 12 - USING THE ROTISSERIE BURNER
11 VI. GRILL INSTRUCTIONS USING THE ROTISSERIE BURNER To avoid damaging the warming rack, remove it from the grill when using the rotisserie burner. Do not use the main burners while the rotisserie burner is in operation. LIGHTING THE ROTISSERIE BURNER 1. Do not lean over the grill.2. Press the puls...
Page 13 - break and cause further blockage.
12 VII. CARE & MAINTENANCE REPLACEMENT OF IGNITER BATTERY In instances where the igniters cease to spark, a battery replacement may be necessary.1. Remove the igniter button cap by rotating it counterclockwise. A. The Igniter buttonB. "AA" size battery 2. Extract the battery from its com...
Page 14 - necessary to prevent grease buildup.; CLEANING KNOBS AND FLANGE AREA; the flange area surrounding them. Never immerse the knobs in water.; CARE FOR CONTROL PANEL GRAPHICS
13 VII. CARE & MAINTENANCE ROTISSERIE BURNER MAINTENANCE Cleaning Method: 1. Ignite the rotisserie burner (refer to the "Using Your Rotisserie Burner" section).2. Close the grill hood.3. Allow the burner to run on high for about 30 minutes.4. Turn the knob to OFF and let the grill cool c...
Page 15 - VIII. TROUBLESHOOTING GUIDE; - Grill is not properly connected to the gas supply.
14 VIII. TROUBLESHOOTING GUIDE Problem: Grill will not lightPossible causes and solutions:- Propane tank valve is turned off. Please turn it on. - Grill is not properly connected to the gas supply. Review the installation instructions and ensure proper setup. - The propane tank is empty. Verify the ...
Page 16 - WARRANTY
15 LIMITED WARRANTY Koolmore Supply, Inc. extends a limited warranty to the original purchaser, guaranteeing that this Koolmore product is free from manufacturing defects in material or workmanship for one year from the date of purchase.Should you discover any such defect within the warranty period,...