Page 2 - Thoroughly inspect the unit for any shipping damages, cosmetic; IF THERE IS ANY PROBLEM:; Contact your merchant for product replacement due to shipping; PRODUCT HAS BEEN INSTALLED
IMPORTANT READ THIS FIRST READ BEFORE INSTALLATION 1. Carefully check all contents of package(s). 2. Thoroughly inspect the unit for any shipping damages, cosmetic damages or defects. 3. Have a certified contractor/electrician test the unit before installation. IF THERE IS ANY PROBLEM: 1. DO NOT INS...
Page 3 - - READ ALL INSTRUCTIONS CAREFULLY BEFORE STARTING -; A L L W I R I N G M U S T B E D O N E B Y A P R O F E S S I O N A L A N D I N
[ENGLISH] - READ AND SAVE THESE INSTRUCTIONS - CONTENTS IMPORTANT SAFETY INSTRUCTIONS .................................................................................... 1 COMPONENTS OF PACKAGE.................................................................................................. 3 INSTA...
Page 4 - IMPORTANT SAFETY INSTRUCTIONS; - PLEASE READ THIS SECTION CAREFULLY BEFORE INSTALLATION -; ) Ducted fans must be vented to the outside.; WARNING; : TO REDUCE THE RISK OF PERSONAL INJURY IN THE EVENT OF A RANGE; power from switching on accidentally.
1 IMPORTANT SAFETY INSTRUCTIONS - PLEASE READ THIS SECTION CAREFULLY BEFORE INSTALLATION - WARNING : TO REDUCE THE RISK OF FIRE, ELECTRIC SHOCK OR PERSONAL INJURY, OBSERVE THE FOLLOWING: 1) Installation and electrical wiring must be done by qualified professionals and in accordance with all applicab...
Page 5 - What to Do In The Event Of a Range Top Grease Fire; NEVER PICK UP A BURNING PAN – You May Get Burned.; What to Do If You Smell Gas; Extinguish any open flame.; CAUTION
2 What to Do In The Event Of a Range Top Grease Fire • SMOTHER FLAMES with a tight fitting lid, cookie sheet, or metal tray, and then turn off the burner. KEEP FLAMMABLE OR COMBUSTIBLE MATERIAL AWAY FROM FLAMES. If the flames do not go out immediately, EVACUATE THE AREA AND CALL THE FIRE DEPARTMENT ...
Page 6 - CONTENTS OF PACKAGE; I S X 2 1 S Q B- 2 S e r i e s R a n g e H o o d B o x
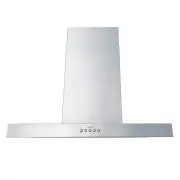
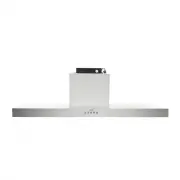
3 CONTENTS OF PACKAGE (Must keep all material for returns or refunds) I S X 2 1 S Q B- 2 S e r i e s R a n g e H o o d B o x {A} Range Hood Body (w/ motor) – 1 {B} 2-pc Duct Cover – 1 {C} Telescopic Stack – 1 {D} Warranty Registration Card – 1 {E} Quick Reference Guide – 1 {F} Baffle Filters x 2 (30...
Page 7 - INSTALLATION; PLEASE READ ENTIRE INSTRUCTIONS BEFORE PROCEEDING; TABLE 1; SAFETY WARNING; OCCUR. USING HAND TOOLS IS RECOMMENDED. DO NOT OVER TIGHTEN SCREWS.; ISLAND INSTALLATION; Before Installation
4 INSTALLATION PLEASE READ ENTIRE INSTRUCTIONS BEFORE PROCEEDING Calculation before Installation To calculate installation, please refer to TABLE 1 (all calculations are in inches.) - FOR ISLAND - TABLE 1 A = Height of Floor to Ceiling B = Height of Floor to Counter Top (Standard: 36”) C = Preferred...
Page 9 - THIS RANGE HOOD MUST BE PROPERLY GROUNDED. MAKE SURE THIS IS DONE BY
6 22. Connect the range hood to an outlet. 23. If hardwired is desired, cut off the plug and connect three wires (black, white, green) to the outlet wires and cap with wire connectors. Connect the wires according to color (ex: black to black). 24. Remove any protective film off the hood, if any. 25....
Page 10 - OPERATING INSTRUCTIONS; Speed Control
7 OPERATING INSTRUCTIONS 3-Speed Mechanual Control Note: For best results, turn fan on prior to any preparation or cooking and keep fans running while cooking. Adjust speed as necessary. Button Control OFF = Turns the range hood OFF. Q = Lowest fan speed (QuietMode). L = Middle fan speed (Low). H = ...
Page 11 - MAINTENANCE
8 MAINTENANCE For optimal performance, clean the range hood surface and baffles regularly. To Clean Hood Surface CAUTION: NEVER USE ABRASIVE CLEANERS, PADS, OR CLOTHS. *** Regular care will help preserve its fine appearance. 1. Use only mild soap or detergent solutions. Dry surfaces using soft cloth...
Page 12 - SPECIFICATIONS; Net
9 SPECIFICATIONS MODEL / SIZE ISX2130SQB-2 / ISX2130SQB-DC37-2 (30”) ISX2136SQB-2 / ISX2136SQB-DC37-2 (36”) ISX2142SQB-2 / ISX2142SQB-DC37-2 (42”) MATERIAL 18-Gauge Commercial Grade Stainless Steel CONSUMPTION / AMPERE 120W / 2.5A NUMBER OF BLOWER 1 DESIGN Seamless / Satin Finish BLOWER TYPE Single ...
Page 13 - MEASUREMENTS & DIAGRAMS
10 MEASUREMENTS & DIAGRAMS ***All inch measurements are converted from millimeters. Inch measurements are estimated. ***All measurements in ( ) are millimeters. MODEL NO.: ISX2130SQB-2 (30”) ISX2136SQB-2 (36”) ISX2142SQB-2 (42”) 30” (Includes 2 baffle filters) 36” (Includes 3 baffle filters) 42”...
Page 15 - PARTS LIST
12 PARTS LIST MODEL NO.: ISX2130SQB-2 / ISX2130SQB-DC37-2 (30”) ISX2136SQB-2 / ISX2136SQB-DC37-2 (36”) ISX2142SQB-2 / ISX2142SQB-DC37-2 (42”) NO. DESCRIPTION MODEL / SIZE PART NO. 1 LED Driver x 2 02-001 2 Duct Cover ISX21DC-2 ISX21-02-002 3 6” Exhaust Vent 02-003 4 Capacitor (12uF, 250 VAC) 02-004 ...
Page 17 - CIRCUIT DIAGRAM
14 CIRCUIT DIAGRAM MODEL NO.: ISX2130SQB-2 / ISX2130SQB-DC37-2 (30”) ISX2136SQB-2 / ISX2136SQB-DC37-2 (36”) ISX2142SQB-2 / ISX2142SQB-DC37-2 (42”)
Page 18 - TROUBLE SHOOTING; Issue
15 TROUBLE SHOOTING Issue Possible Cause Solution After Installation, both motors and lights are not working. The power is not on. Make sure the circuit breaker and the unit’s power is ON. Use a voltage meter to check the power supply. The wire connection is not secure. Check and tighten wire connec...
Page 19 - WARRANTY; WARRANTY CERTIFICATE; WHAT IS NOT COVERED:; abrasive cleaning products.
16 WARRANTY WARRANTY CERTIFICATE In order to obtain warranty service, you must provide proof of original purchase from a KOBE authorized Dealer. Please keep a copy of your original invoice as proof of purchase. ONE-YEAR LIMITED LABOR WARRANTY ON KOBE BRILLIA SERIES: For one year from the date of you...
Page 20 - THIS WARRANTY WILL BE VOIDED WHEN:; its intended purpose which is residential indoor usage only.
17 THIS WARRANTY WILL BE VOIDED WHEN: 1. Improper installation and failure to follow installation instructions. 2. Any repair, alteration, modification not authorized by KOBE. 3. Duct alteration, modification and connection. 4. Incorrect electric current, voltage or wiring. 5. Improper usage of the ...
Page 21 - WARRANTY INFORMATION FORM
18 WARRANTY INFORMATION FORM Fill in the blanks and keep this paper with the original invoice in a safe place for future service purpose. 1. Date of purchase : 2. Model No. : 3. Serial No. : For warranty service or spare parts purchase in US, contact: KOBE Service Center Email (best): [email protect...
Page 22 - KOBE Range Hoods
KOBE Range Hoods 11775 Clark Street Arcadia, CA 91006 USA www.koberangehoods.com This KOBE hood is made for use in the USA and CANADA only. We do not recommend using this hood overseas as the power supply may not be compatible and may violate the electrical code of that country. Using a KOBE hood ov...