KitchenAid 5KHM926ACU - Manuals
User Manual KitchenAid 5KHM926ACU


Summary
2 HAND MIXER INSTRUCTIONS HAND MIXER SAFETY ................................................................................................. 2 Important Safeguards................................................................................................. 3 Electrical Requirements ...............
3 English HAND MIXER SAFETY IMPORTANT SAFEGUARDS SAVE THESE INSTRUCTIONS Electrical requirements Volts: 220-240 Volts Frequency: 50/60 Hz Wattage: 85 W When using electrical appliances, basic safety precautions should always be followed, including the following: 1. Read all instructions. 2. To prote...
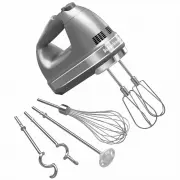
4 PARTS AND FEATURES Hand Mixer parts and accessories Liquid blender rod accessory Turbo Beater II accessory Dough hooks accessory Swivel lock power cord Soft grip handle Oversized beater ejector button Digital speed control Air vents 16-Tine pro whisk accessory Non-tip heel rest Cord strap Storage ...
KitchenAid Mixers Manuals
-
 KitchenAid 91000
User Manual
KitchenAid 91000
User Manual
-
 KitchenAid 91005
User Manual
KitchenAid 91005
User Manual
-
 KitchenAid 91010
User Manual
KitchenAid 91010
User Manual
-
 KitchenAid 91020
User Manual
KitchenAid 91020
User Manual
-
 KitchenAid 91030
User Manual
KitchenAid 91030
User Manual
-
 KitchenAid 91045
User Manual
KitchenAid 91045
User Manual
-
 KitchenAid 91072
User Manual
KitchenAid 91072
User Manual
-
 KitchenAid 91099
User Manual
KitchenAid 91099
User Manual
-
 KitchenAid 91101
User Manual
KitchenAid 91101
User Manual
-
 KitchenAid 91115
User Manual
KitchenAid 91115
User Manual
-
 KitchenAid 91123
User Manual
KitchenAid 91123
User Manual
-
 KitchenAid 91131
User Manual
KitchenAid 91131
User Manual
-
 KitchenAid 91135
User Manual
KitchenAid 91135
User Manual
-
 KitchenAid 93000
User Manual
KitchenAid 93000
User Manual
-
 KitchenAid 93015
User Manual
KitchenAid 93015
User Manual
-
 KitchenAid 93035
User Manual
KitchenAid 93035
User Manual
-
 KitchenAid 93400
User Manual
KitchenAid 93400
User Manual
-
 KitchenAid 93405
User Manual
KitchenAid 93405
User Manual
-
 KitchenAid 93410
User Manual
KitchenAid 93410
User Manual
-
 KitchenAid 93411
User Manual
KitchenAid 93411
User Manual