Page 2 - SAFETY INSTRUCTIONS; Electrical Safety; This appliance is equipped with a 3-prong; Child Safety; Keep fingers out of dispense point area.; DANGER; Unplug the appliance or disconnect power before performing any
2 2 i n f o @ k b g o o d i c e . c o m SAFETY INSTRUCTIONS Electrical Safety DANGER Improper use of the power cord plug can result in the risk of electrical shock, property damage and personal injury or death. Unplug the unit or disconnect power before performing any maintenance. Upon receipt and i...
Page 3 - Do not operate the appliance with wet hands, while standing on a wet; Disposing Safety; When disposing of refrigeration appliances, special handling is
3 2 4 4 1 2 M a i n S t . S u i t e 1 0 5 , C a r s o n , C A 9 0 7 4 5 maintenance. x Do not clean appliance with flammable fluids. Do not store or use gasoline or other flammable vapors or liquids in the vicinity of this or any other unit. The fumes can create a fire hazard or explosion. x Do not ...
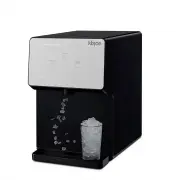
Page 4 - FEATURES & SPECIFICATIONS; Overview; sanitary and operational condition all the time.
4 4 i n f o @ k b g o o d i c e . c o m FEATURES & SPECIFICATIONS Overview This self-dispensing portable ice dispenser allows you to enjoy chewable ice with the touch of a button. Adding water through push-to-open port or removable door makes it portable and easy to use. It is perfect for the nu...
Page 6 - DISPENSER USE; NOTE; If; Add Water; and; Power; LEDs illuminate; Dispense; utton; Combination; Buttons
6 6 i n f o @ k b g o o d i c e . c o m DISPENSER USE NOTE Flush the unit with clean potable water once a week to prevent high water TDS and hardness. Descale the unit with citric acid once a month to prevent sediment buildup. Sanitize the unit with chlorine bleach twice a month to prevent bacteria ...
Page 7 - Clean; LED; The unit does not dispense ice while the Cleaning LED illuminates.; First time use
7 2 4 4 1 2 M a i n S t . S u i t e 1 0 5 , C a r s o n , C A 9 0 7 4 5 Make Ice Button Making Ice LED It will be disabled when the unit is in the cleaning mode. The LED illuminates while the unit is currently in the making ice mode . x Press the button once to start making ice, the Making Ice LED i...
Page 9 - Add clean potable water using the funnel until the Add Water LED; If the Cleaning LED flashes quickly and the unit stops making ice
9 2 4 4 1 2 M a i n S t . S u i t e 1 0 5 , C a r s o n , C A 9 0 7 4 5 x Add clean potable water to MAX WATER FILL following instructions above. x Plug the unit into power. Add Water LED will flash quickly with 5 beeps if the water reservoir is full. x Press the Make Ice button once to start making...
Page 10 - DISPENSER CARE; CAUTION; Unhook the plug/holder with drain tubes out of the unit back and l; -How to empty the ice bin and water reservoir; Dispense ice until no more ice comes out of the ice dispense point.; -If the Add Water LED illuminates and the unit stops making ice; Fill the water reservoir with clean potable water.; Wa e LED d e n; Fill the water reservoir with 12 teaspoons of food grade
1 0 10 i n f o @ k b g o o d i c e . c o m DISPENSER CARE CAUTION Use food grade citric acid powder and chlorine bleach only. Follow the product instructions carefully for First Aid. Keep the unit out of reach of children. Unplug the unit before you drain water. 1-How to drain water x Unplug the uni...
Page 12 - sediment buildup; 1-How to sanitize the unit with chlorine bleach once a month to
1 2 12 i n f o @ k b g o o d i c e . c o m 9-How to flush the unit with clean potable water once a week to prevent high water TDS and hardness x Empty the ice bin and water reservoir following instructions in Section 2. x Fill the water reservoir with clean potable water to MAX WATER FILL. x Plug th...
Page 13 - 3-Cleaning the pump protector when it is dirty
13 2 4 4 1 2 M a i n S t . S u i t e 1 0 5 , C a r s o n , C A 9 0 7 4 5 x Drain water following instructions in Section 1. x Fill the water reservoir with clean potable water to MAX WATER FILL. x Plug the unit into power. Add Water LED will flash quickly with 5 beeps if the water reservoir is full....
Page 14 - INSTALLATIONS; Location Requirements; This unit is designed for indoor use only.; This unit is designed for countertop installation only.; Electrical Requirements
1 4 14 i n f o @ k b g o o d i c e . c o m INSTALLATIONS Location Requirements CAUTION This unit is designed for indoor use only. x Place the unit away from direct sunlight and heat sources. x Do not install the unit in moist areas. x Do not install the unit in garage. x Do not install the unit wher...
Page 15 - TROUBLESHOOTINGS; You may hear the following normal operating sounds; You may hear air being forced through the condenser by the fan.
15 2 4 4 1 2 M a i n S t . S u i t e 1 0 5 , C a r s o n , C A 9 0 7 4 5 TROUBLESHOOTINGS Complaint Possible Causes Response Power LED is not lit a. There is no power at outlet. b. Power cord is unplugged. c. Power cord is broken. d. Control PCB is defective or with wiring problems. e. Display PCB i...
Page 16 - Contact us with any questions at
1 6 16 i n f o @ k b g o o d i c e . c o m SERVICE & WARRANTY The manufacturer has a policy of continuous improvement on its products and reserves the right to change materials and specifications without notice. Contact us with any questions at 800-433-9938 [email protected] 24412 Main St. Suite...