Page 3 - Kambrook Recommends Safety First; IMPORTANT: Please retain your; consumer product, so that you, our valued customer can confidently; Important Safeguards For Kambrook Smarter
5 4 Kambrook Recommends Safety First IMPORTANT: Please retain your instruction book for future use. At Kambrook, we believe that safe performance is the first priority in any consumer product, so that you, our valued customer can confidently use and trust our products. We ask that any electrical app...
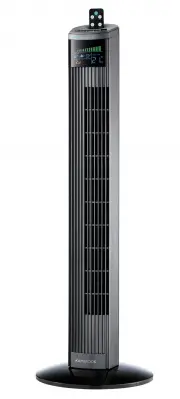
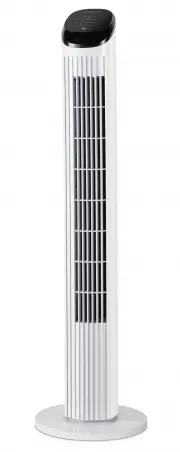
Page 4 - Main Image
7 6 Your Kambrook Smarter Cooling DC Motor Pedestal Fan Main Image 1. 2. 3. 4a. 4b. 5. 6. 20. 21. 22. Main Image Control Panel and LED Display LED displayControl Panel featuring: a) POWER On/Off button b) Drive plate to adjust speed and timer (Includes 26 speed settings) c) MODE & TIMER button I...
Page 5 - Before First Use; Assembling Your Kambrook; Base and Pedestal Stand; Using Your Kambrook Pedestal Fan
9 8 Before First Use Remove any promotional material from fan. NOTE: Assembly of the fan requires a Phillips head screwdriver (not supplied). WARNING: When unpacking the fan, check to see you have received all parts before discarding the packaging. Assembling Your Kambrook Pedestal Fan Base and Pede...
Page 6 - Fan Head assembly
11 10 Fan Head assembly 1. Remove the blade cap from the motor shaft by turning it clockwise and then remove the rear grille locking nut by turning it counter-clockwise. NOTE: You may have to hold the shaft in place with one hand to unscrew the blade cap with the other hand (See Fig 6). Fig. 6 2. Pl...
Page 7 - Adjustments; Tilting Head Adjustment; Control Panel; Normal Mode; To Operate the Kambrook
13 12 8. Align and press together the front and rear grille, ensuring that the clear plastic clasp is in line with the LED screen. Securely snap shut the front and rear grilles by pressing together at 6 points around the edges of the grilles (See Fig 13a and b). Fig. 13a Fig. 13b NOTE: Once the fron...
Page 8 - Sleep Mode; c) Speed control in normal mode; Setting the timer; Pre-set the timer to turn the fan on via
15 14 Sleep Mode The fan speed self regulates within the low wind speed range in accordance to how it’s been programmed, dropping various wind speed levels every half an hour until the fan reaches the lowest wind speed range. The fan will then continue to run constantly at this lower wind speed unti...
Page 9 - Care, Cleaning and Storage; Using the Remote Control; Troubleshooting
17 16 Care, Cleaning and Storage Using the Remote Control Before using the remote control, install the 1 x CR2032 3V Lithium battery that is provided with the remote.To do this, open up the battery compartment at the back of the remote by forming a good grip of the remote, pushing the small arched g...