Page 2 - Content
2 Content Warning .................................................................................................................................. 3About Your Kamado ................................................................................................................ 4Assembly ............
Page 3 - Warning; FIRE HAZARD: May emit hot embers while in use.
3 Warning This product is intended for outdoor use only. Do not use indoors. Never leave a burning fire unattended. Always keep children and pets at a safe distance from theoven when in use. FIRE HAZARD: May emit hot embers while in use. DANGER OF CARBON MONOXIDE POISONING: never light this pr...
Page 4 - About Your Kamado; FIRST USE - CURING THE UNIT; closed. See Cooking Temperature Guide for Smoking (83; You can now use your ceramic charcoal barbecue as normal.
4 About Your Kamado Dating back 4000 years ago archaeologists have discovered large clay vessels thought to be early incarnations of the Kamado ceramic cooker. Since then it has evolved in many ways; removable lid, added draft door for better heat control and the switch from wood to charcoal as the ...
Page 5 - Assembly; Parts List; bolts or components of the ceramic charcoal barbecue.
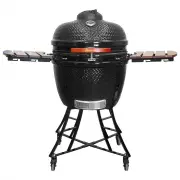
5 Assembly Parts List Prior to assembly, check all parts against the parts list. Carry out assembly on a soft surface to avoid scratching the paint. For ease of assembly, only loosely tighten bolts and then tighten fully when assembly is complete. WARNING: Do not over-tighten bolts. Only tighten all...
Page 7 - Use a minimum of two people when lifting the
7 3.Completing the Cart Continue to attach the crosspieces (4) into the other three support brackets (1). The cart is now complete. 4.Lifting the Ceramic Body onto the Cart Make sure the cart is secure, and all of the bolts are tightbefore placing the ceramic body (8) into it. Press down onthe caste...
Page 9 - Positioning the Grids; reference the diagram below.; .Attaching the Lid Handle; thoroughly prior to use.
9 8.Positioning the Grids Add the firebox (7), charcoal plate (6), and the main cooking grid (5) inside of the ceramic body ((8) Please reference the diagram below. 9 .Attaching the Lid Handle Attach the lid handle (10) to the ceramic body (8), use the 2x pre- attached bolts with their corresponding...
Page 10 - Operation and Use; Lighting; moving around during use.; Refueling
10 Operation and Use Lighting When using the ceramic charcoal barbecue, push down on both of the locking wheels to stop the unit from moving around during use. Ensure the ceramic barbecue is positioned on a permanent, flat, level, heat-resistant non-flammable surface, away from flammable items. Posi...
Page 11 - Cleaning and Maintenance; Cleaning; Tighten the bands and oil the hinge 2 times a year or more if needed.; Ceramic Cooking Guide; Cooking Temperature Guide; The Kamado is self cleaning. Heat it up to 260
11 Cleaning and Maintenance Cleaning • DO NOT use water or any other types of cleaning product to clean the inside of your Kamado. The walls are porous and will absorb any fluids used, this could cause the Kamado to crack. If the soot becomes excessive then use a wire brush or the ash tool (not supp...
Page 12 - General Food Safety; Do not cook until the fuel has a coating of ash.
12 GRILL / ROAST / BAKE (163ºC - 191ºC / 325ºF - 375ºF) Seafood (crab, lobster, shrimp) ................................................................................................................. Until opaque & firm Seafood (clams, oysters) ....................................................
Page 13 - Smoking; You are now ready to use the ceramic charcoal barbecue to smoke on.; Low Temperatures; vent to maintain the temperature.; High Temperatures; the top and bottom vents.
13 Smoking Always follow the Cooking Temperature Guide stated in this instruction manual. Always use heat-resistant gloves when handling hot ceramics or cooking surfaces. See Cooking Temperature Guide. Light the lump charcoal according to the lighting instructions in this manual. Do not move or stok...
Page 14 - Kalamera Limited Warranty
14 Kalamera Limited Warranty Full One Year Warranty Terms: The manufacture warrants to the original purchaser of this product that the product will be free from manufacturingdefects in workmanship and material for a period of 1 year from the date of original purchase when this major appliance isoper...