Page 2 - EN
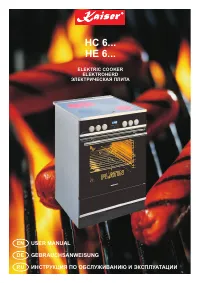
2 EN DEAR CUSTOMER, thank you for purchasing this Kaiser product. We are convinced that you have made the right choice. The appliance satisfies the high quality demands and corresponds to comprehensive international standards. Having been designed by the best European designers, the modern appearanc...
Page 3 - DE RU; ɍȼȺɀȺȿɆɕɃ
3 DE RU LIEBE KUNDIN, LIEBER KUNDE, wir danken Ihnen für den Erwerb unserer Technik. Wir sind überzeugt, dass Sie eine richtige Wahl getroffen haben. Dieses Produkt entspricht den hohen Forderungen zur Qualität und den modernsten internationalen Standards. Das Gerät wird Ihnen Ihre Kochprojekte ermö...
Page 4 - INSTALLATION INSTRUCTIONS; Electrical connection; BRIEF DESCRIPTION; Location drawing; PRACTICAL ADVICE
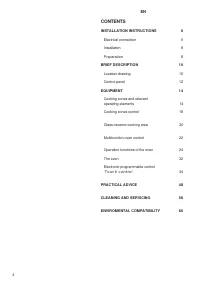
4 EN CONTENTS INSTALLATION INSTRUCTIONS 6 Electrical connection 6 Installation 8 Preparation 8 BRIEF DESCRIPTION 10 Location drawing 10 Control panel 12 EQUIPMENT 14 Cooking zones and relevant operating elements 14 Cooking zones control 18 Glass-ceramic cooking area 20 Multifunction oven control 22 ...
Page 5 - MONTAGEANWEISUNG 7; Gebrauch vom Backofen; PRAKTISCHE EMPFEHLUNGEN; ɈȽɅȺȼɅȿɇɂȿ; Touch control
5 DE RU INHALTSVERZEICHNIS MONTAGEANWEISUNG 7 Stromanschluss 7 Einbau des Herdes 9 Vorbereitung 9 KURZBESCHREIBUNG 11 Gesamtansicht 11 Bedienblende 13 AUSSTATUNG 15 Kochfeld mit entsprechenden Bedienelementen 15 Kochfeldersteuerung 19 Gebrauch vom Glaskeramikkochfeld 21 Steuerung von Multifunktionsb...
Page 6 - ELECTRICAL CONNECTION; The supply voltage corresponds to the
6 EN INSTALLATION INSTRUCTIONS ELECTRICAL CONNECTION Before connecting the stove to the mains power supply, make sure that: x The supply voltage corresponds to the specifications on the data plate on the front of the stove. x The mains supply has an efficient grounding in compliance with all applica...
Page 7 - MONTAGEANWEISUNG; STROMANSCHLUSS; die Eigenschaften des Stromnetzes mit den; ɂɇɋɌɊɍɄɐɂə; ɉɈȾɄɅɘɑȿɇɂȿ; ȼɧɢɦɚɧɢɟ; Der Hersteller ist nicht haftbar,
7 DE RU MONTAGEANWEISUNG STROMANSCHLUSS Vor der Durchführung des Stromanschlusses muss sichergestellt werden, dass: x die Eigenschaften des Stromnetzes mit den Werten auf dem angebrachten Typenschild auf der hinteren Wand des Herdes übereinstimmen, x das Stromnetz gemäß den geltenden Bestimmungen un...
Page 8 - Set the time on the clock before; „Electronic programmable
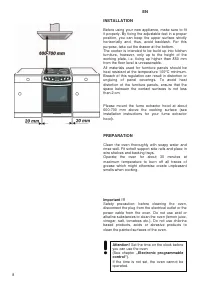
8 EN I NSTALLATION Before using your new appliance, make sure to fit it properly. By fixing the adjustable feet in a proper position, you can keep the upper surface strictly horizontally and, thus, avoid backlash. For this purpose, take out the drawer at the bottom. The cooker is intended to be buil...
Page 9 - DE; RU; Vor dem ersten Gebrauch des; „Elektronische Programmierung.“
9 DE RU EINBAU DES HERDES Vor Gebrauch stellen Sie den Herd richtig auf, durch Drehen von Stützfüßen erreichen Sie die horizontale Lage der Oberfläche des Herdes. Dafür nehmen Sie den unteren Kasten heraus. Der Herd darf in die Reihe von Möbeln nur bis zu der Höhe der Arbeitsoberfläche der Möbel, d....
Page 11 - KURZBESCHREIBUNG; Kochfeld mit Kochzonen; ɄɊȺɌɄɈȿ; ȼɇȿɒɇɂɃ; ɉɪɢɦɟɪɧɨɟ
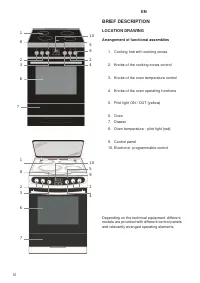
11 DE RU KURZBESCHREIBUNG GESAMTANSICHT Anordnung von Funktionsbaugruppen 1. Kochfeld mit Kochzonen 2. Drehregler der Kochzonen 3. Drehregler des Backofentemperaturreglers 4. Drehregler der Backofenbetriebsfunktionen 5. Betrieb - Kontrollleuchte ON/OFF (gelb) 6. Backofen 7. Schublade 8. Backofentemp...
Page 12 - Knobs of cooking zones; Knobs of the oven temperature control; Push“; Knobs of the oven operating functions; Push“
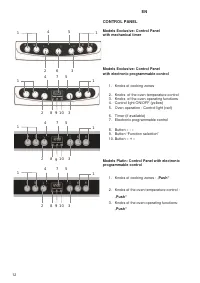
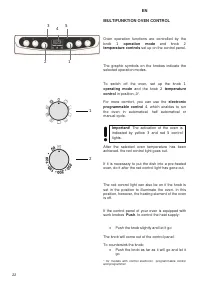
12 EN CONTROL PANEL Models Exclusive: Control Panel with mechanical timer Models Exclusive: Control Panel with electronic programmable control 1. Knobs of cooking zones 2. Knobs of the oven temperature control 3. Knobs of the oven operating functions 4. Control light ON/OFF (yellow) 5. Oven operatio...
Page 13 - Drehregler; ɉȺɇȿɅɖ
13 DE RU BEDIENBLENDE Bedienblende von Modellen Exclusive mit Kurzzeitwecker Bedienblende von Modellen Exclusive mit elektronischer Programmierung 1. Drehregler für Kochzonen 2. Drehregler “Backofentemperatur” 3. Drehregler “Backofenbetriebsfunktionen” 4. Kontrollleuchte ON/OFF (gelb) 5. Backofenbet...
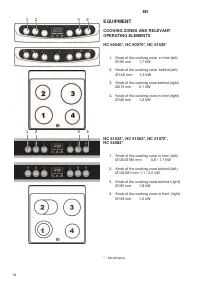
Page 14 - EQUIPMENT; Knob of the cooking zone
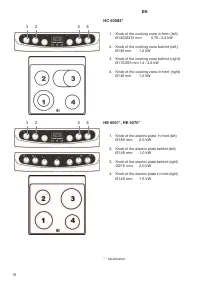
14 EN EQUIPMENT COOKING ZONES AND RELEVANT OPERATING ELEMENTS HC 60040*, HC 60070*, HC 61030* 1. Knob of the cooking zone in front (left) Ø180 mm 1,7 kW 2. Knob of the cooking zone behind (left) Ø145 mm 1,2 kW 3. Knob of the cooking zone behind (right) Ø210 mm 2,1 kW 4. Knob of the cooking zone in f...
Page 15 - AUSSTATUNG; ɈȻɈɊɍȾɈȼȺɇɂȿ; ɇȺȽɊȿȼȺɌȿɅɖɇȺə
15 DE RU AUSSTATUNG KOCHFELD MIT ENTSPRECHENDEN BEDIENELEMENTEN HC 60040*, HC 60070*, HC 61030 NK 1. Drehregler für Kochzone vorne links Ø180 mm 1,7 kW 2. Drehregler für Kochzone hinten links Ø145 mm 1,2 kW 3. Drehregler für Kochzone hinten rechts Ø210 mm 2,1 kW 4. Drehregler für Kochzone vorne rech...
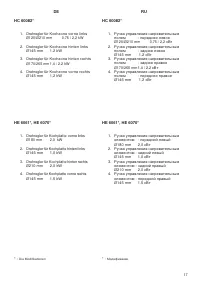
Page 16 - Knob of the electric plate
16 EN HC 60082* 1. Knob of the cooking zone in front (left) Ø120/Ø210 mm 0,75 / 2,2 kW 2. Knob of the cooking zone behind (left) Ø145 mm 1,2 kW 3. Knob of the cooking zone behind (right) Ø170/265 mm 1,4 / 2,2 kW 4. Knob of the cooking zone in front (right) Ø145 mm 1,2 kW HE 6061*, HE 6070* 1. Knob o...
Page 17 - ɤȼɬ
17 DE RU HC 60082* 1. Drehregler für Kochzone vorne links Ø120/Ø210 mm 0,75 / 2,2 kW 2. Drehregler für Kochzone hinten links Ø145 mm 1,2 kW 3. Drehregler für Kochzone hinten rechts Ø170/265 mm 1,4 / 2,2 kW 4. Drehregler für Kochzone vorne rechts Ø145 mm 1,2 kW HE 6061*, HE 6070* 1. Drehregler für Ko...
Page 18 - Push
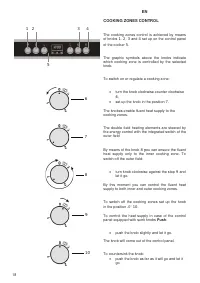
18 EN COOKING ZONES CONTROL The cooking zones control is achieved by means of knobs 1 , 2 , 3 and 4 set up on the control panel of the cooker 5 . The graphic symbols above the knobs indicate which cooking zone is controlled by the selected knob. To switch on or regulate a cooking zone: x turn the kn...
Page 19 - ɍɉɊȺȼɅȿɇɂȿ
19 DE RU KOCHFELDERSTEUERUNG Die Kochzonensteuerung erfolgt mit Hilfe von Drehregler 1 , 2 , 3 und 4 , die auf der Bedienblende des Herdes eingerichtet sind 5 . Die graphischen Symbole, die sich neben den Drehreglern der Kochzonen befinden, zeigen, welche Kochzone von dem gewählten Drehregler verwal...
Page 20 - „Cera Clen“, „Eilfix“; Residual heat indicator; indicates the rest warmth and, thus, warns
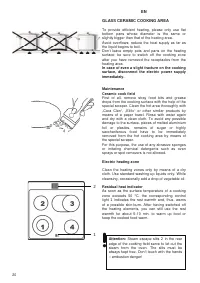
20 EN GLASS CERAMIC COOKING AREA To provide efficient heating, please only use flat bottom pans whose diameter is the same or slightly bigger than that of the heating area. Avoid overflows; reduce the heat supply as far as the liquid begins to boil. Don’t leave empty pots and pans on the heating sur...
Page 21 - Für den Gebrauch; Instandhaltung; ɉɈɅɖɁɈȼȺɇɂȿ; „Cera Clen“; Achtung; an der Hinterkante des Kochfeldes
21 DE RU GEBRAUCH VOM GLASKERAMIKKOCHFELD Für den Gebrauch der Kochzonen empfehlen sich Töpfe mit geradem Boden und gleichem oder nur wenig größerem Durchmesser. Vermeiden Sie das Überlaufen von Flüssigkeiten, indem Sie nach Erreichen des Siedepunktes oder Erhitzen der Flüssigkeit die Wärmezufuhr zu...
Page 24 - at a temperature between
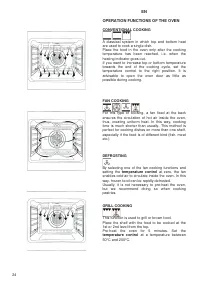
24 EN OPERATION FUNCTIONS OF THE OVEN CONVENTIONAL COOKING A classical system in which top and bottom heat are used to cook a single dish. Place the food in the oven only after the cooking temperature has been reached, i.e. when the heating indicator goes out. If you want to increase top or bottom t...
Page 25 - Falls eine der Umluftfunktionen ausgewählt und der; ɊȺȻɈɑɂȿ
25 DE RU BETRIEBSFUNKTIONEN DES BACKOFENS KONVENTIONELLES BACKEN Ein klassisches System, bei dem Unter- oder Oberhitze verwendet wird, welches für die Zubereitung nur eines Gerichts geeignet ist. Die Speisen sollten möglichst erst dann eingeschoben werden, wenn der Backofen bereits die vorgegebene T...
Page 26 - the Grill functions
26 EN SPIT * Some ovens are completely equipped with stick engine and rotary spit for spit roast. The spit* allows to roast food in the oven rotary. It serves primarily for roasting barbeque, fowl, sausages and similar dishes. Switching the spit on and off occurs simultaneously with switching on and...
Page 27 - Ausschaltung von Grillfunktionen; MECHANISCHER KURZZEITWECKER; das Symbol
27 DE RU DREHSPIESS * Einige Backöfen sind komplett mit Stabmotor und Drehspieß für Spießbraten ausgestattet. Der Spieß* erlaubt es, Speisen im Backofen rotierend zu rösten. Er dient hauptsächlich zum Rösten von Schaschliks, Geflügel, Würstchen u.ä. Speisen. Die Ein- und Ausschaltung vom Spießantrie...
Page 28 - turn the timer into a position; OVEN LIGHT; in the
28 EN In order to have the oven functioning without any using of an automatic switch off-timer one has to turn the timer into a position . In that position the function of an automatic switch-off of an oven will be not activated . OVEN LIGHT The oven is equipped with oven light. The oven light is on...
Page 29 - Position; Backofenbetriebsart 2; in die Position; Wenn der Kurzzeitwecker, der
29 DE RU Für den Backofenbetrieb ohne Anwendung vom Kurzzeitwecker muss der Kurzzeitwecker in die Position gebracht werden. In dieser Position ist die Funktion der automatischen Abschaltung des Backofens nicht aktiviert. INNENBELEUCHTUNG Der Backofen ist mit Innenbeleuchtung ausgestattet. Die Innenb...
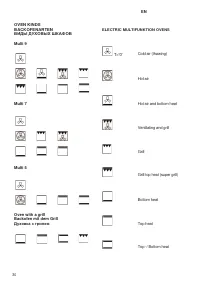
Page 30 - ELECTRIC MULTIFUNKTION OVENS
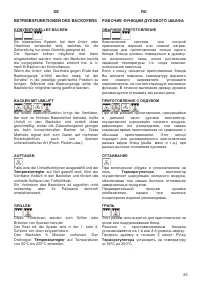
30 EN OVEN KINDS BACKOFENARTEN ȼɂȾɕ ȾɍɏɈȼɕɏ ɒɄȺɎɈȼ Multi 9 Multi 7 Multi 5 Oven with a grill Backofen mit dem Grill Ⱦɭɯɨɜɤɚ ɫ ɝɪɢɥɟɦ ELECTRIC MULTIFUNKTION OVENS T=”0” Cold air (thawing) Hot air Hot air and bottom heat Ventilating and grill Grill Grill top heat (super grill) Bottom heat Top heat Top...
Page 31 - ELEKTRISCHE MULTIFUNKTIONS-
31 DE RU ELEKTRISCHE MULTIFUNKTIONS- BACKÖFEN T=”0” Kaltluft (Auftauen) Heißluft Heißluft und Unterhitze Ventilator und Grill Grill Grill + Oberhitze (Supergrill) Unterhitze Oberhitze Ober-/ Unterhitze ɗɅȿɄɌɊɂɑȿɋɄɂȿ ɆɇɈȽɈɎɍɇɄɐɂɈɇȺɅɖɇɕȿ ȾɍɏɈȼɕȿ ɒɄȺɎɕ T=”0” ɏɨɥɨɞɧɵɣ ɨɛɞɭɜ ( ɪɚɡɦɨɪɚɠɢɜɚɧɢɟ ) Ƚɨɪɹɱɢɣ ɨɛ...
Page 32 - oven operating; IV; To take food out of the oven, use the handle
32 EN V IV III II I THE OVEN To switch on the oven you only need to: x Select the required function with the knob 2 oven operating mode . x Set the required temperature with knob 1 temperature regulator . The activation of the oven is signalled by yellow and red control lights. If the red control li...
Page 33 - Backofenbetriebsart; Verbrennung zu vermeiden.; III
33 DE RU GEBRAUCH VOM BACKOFEN Zum Backen genügen wenige einfache Handgriffe. x Gewünschte Backfunktion mit dem Drehregler 2 Backofenbetriebsart wählen. x Gewünschte Temperatur mit dem Drehregler 1 Temperaturregler wählen. Die Einschaltung vom Backofen wird durch Aufleuchten von gelben und roten Kon...
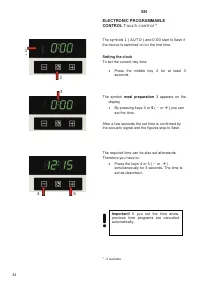
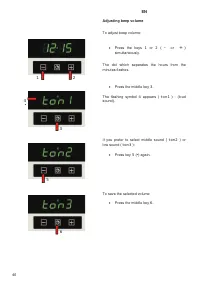
Page 34 - AUTO; meal preparation
34 EN ELECTRONIC PROGRAMMABLE CONTROL Touch control * The symbols 1 ( AUTO ) and 0.00 start to flash if the device is switched on for the first time. Setting the clock To set the current day time: x Press the middle key 2 for at least 3 seconds. The symbol meal preparation 3 appears on the display x...
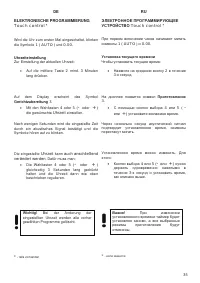
Page 35 - Uhrzeiteinstellung; Uhrzeit; ɗɅȿɄɌɊɈɇɇɈȿ; ɍɫɬɚɧɨɜɤɚ; ȼɚɠɧɨ
35 DE RU ELEKTRONISCHE PROGRAMMIERUNG Touch control * Wird die Uhr zum ersten Mal eingeschaltet, blinken die Symbole 1 ( AUTO ) und 0.00 . Uhrzeiteinstellung Zur Einstellung der aktuellen Uhrzeit: x Auf die mittlere Taste 2 mind. 3 Minuten lang drücken. Auf dem Display erscheint das Symbol Gerichtzu...
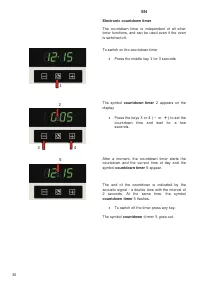
Page 36 - Electronic countdown timer; timer
36 EN Electronic countdown timer The countdown timer is independent of all other timer functions, and can be used even if the oven is switched off. To switch on the countdown timer x Press the middle key 1 for 3 seconds. The symbol countdown timer 2 appears on the display x Press the keys 3 or 4 ( -...
Page 37 - Elektronischer Kurzzeitwecker
37 DE RU Elektronischer Kurzzeitwecker Der Gebrauch des elektronischen Kurzzeitweckers ist von anderen Funktionen unabhängig und kann auch bei ausgeschaltetem Backofen verwendet werden. Zum Einschalten des Kurzzeitweckers: x Die mittlere Taste 1 3 Sekunden lang gedrückt halten. Auf dem Display ersch...
Page 38 - oven operating function
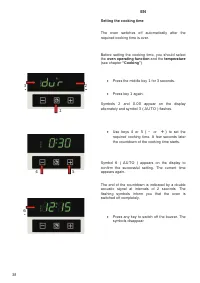
38 EN Setting the cooking time The oven switches off automatically after the required cooking time is over. Before setting the cooking time, you should select the oven operating function and the temperature (see chapter “Cooking” ) x Press the middle key 1 for 3 seconds. x Press key 1 again. Symbols...
Page 39 - Einstellen der Betriebsdauer; die
39 DE RU Einstellen der Betriebsdauer Der Vorgang im Backofen soll nach einer gewünschten Dauer automatisch abgeschaltet werden. Bevor die Dauer der Gerichtszubereitung eingegeben wird, müssen Sie die Backofenfunktion und die Temperatur der Zubereitung einstellen (siehe Kapitel „Gebrauch vom Backofe...
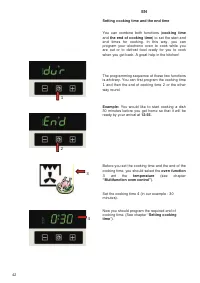
Page 40 - Setting the end of cooking time; sho
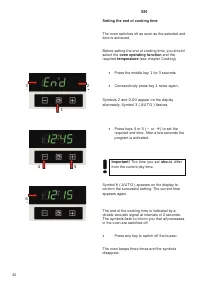
40 EN Setting the end of cooking time The oven switches off as soon as the selected end time is achieved. Before setting the end of cooking time, you should select the oven operating function and the required temperature (see chapter Cooking) x Press the middle key 1 for 3 seconds x Consecutively pr...
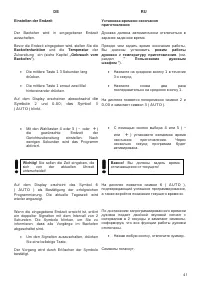
Page 41 - Backofenfunktion
41 DE RU Einstellen der Endzeit Der Backofen wird in eingegebener Endzeit ausschalten. Bevor die Endzeit eingegeben wird, stellen Sie die Backofenfunktion und die Temperatur der Zubereitung ein (siehe Kapitel „Gebrauch vom Backofen“ ). x Die mittlere Taste 1 3 Sekunden lang drücken. x Die mittlere T...
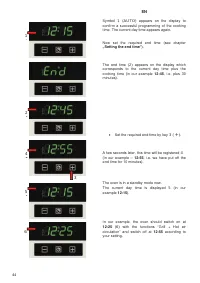
Page 44 - „Setting the end time“
44 EN Symbol 1 ( AUTO ) appears on the display to confirm a successful programming of the cooking time. The current day time appears again. Now set the required end time (see chapter „Setting the end time“ ). The end time ( 2 ) appears on the display which corresponds to the current day time plus th...
Page 45 - Auf dem Display erscheint das Symbol; „Einstellen der Endzeit“; Mit der Wahltaste
45 DE RU Auf dem Display erscheint das Symbol 1 ( AUTO ), das eine erfolgreiche Programmierung der Betriebsdauer bestätigt. Auf dem Display wird wieder die aktuelle Tageszeit angezeigt. Programmieren Sie jetzt die gewünschte Endzeit (siehe Kapitel „Einstellen der Endzeit“ ). Auf dem Display erschein...
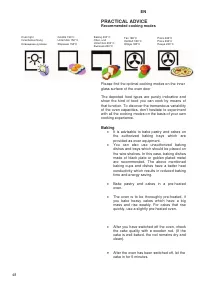
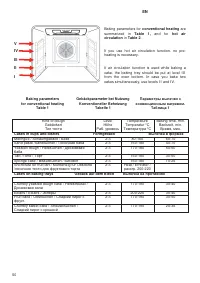
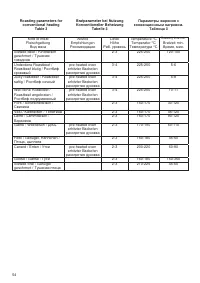
Page 48 - Recommended cooking modes; Baking; It is advisable to bake pastry and cakes on
48 EN PRACTICAL ADVICE Recommended cooking modes Please find the optimal cooking modes on the inner glass surface of the oven door The depicted food types are purely indicative and show the kind of food you can cook by means of that function. To discover the tremendous variability of the oven capaci...
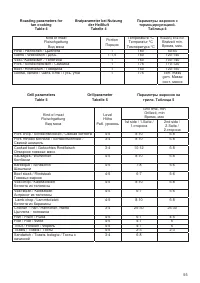
Page 49 - PRAKTISCHE EMPFEHLUNGEN; Empfohlene Zubereitungsbetriebsarten; Backen; ɉɊȺɄɌɂɑȿɋɄɂȿ; Ɋɟɤɨɦɟɧɞɭɟɦɵɟ; ȼɵɩɟɱɤɚ
49 DE RU PRAKTISCHE EMPFEHLUNGEN Empfohlene Zubereitungsbetriebsarten Die empfohlenen Zubereitungsbetriebsarten finden Sie auf der Innentür des Backofens. Diese Symbole stellen nur eine Orientierungshilfe dar, welche Typen von Produkten bei jenem oder anderem Programm zubereitet werden können. Um di...
Page 51 - Crumbly sweet cake
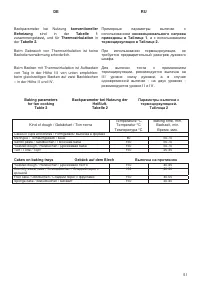
51 DE RU Backparameter bei Nutzung konventioneller Beheizung sind in der Tabelle 1 zusammengefasst , und für Thermozirkulation in der Tabelle 2. Beim Gebrauch von Thermozirkulation ist keine Backofenvorwärmung erforderlich. Beim Backen mit Thermozirkulation ist Aufbacken von Teig in der Höhe III von...
Page 52 - Roast or stew meat joints bigger than 1 kg; conventional; are shown in; hot air; The given parameters refer to roasting on
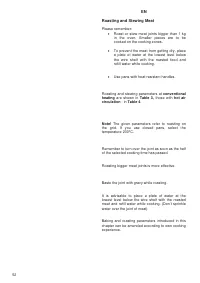
52 EN Roasting and Stewing Meat Please remember: x Roast or stew meat joints bigger than 1 kg in the oven. Smaller pieces are to be cooked on the cooking zones. x To prevent the meat from getting dry, place a plate of water at the lowest level below the wire shelf with the roasted food and refill wa...
Page 53 - konventioneller Beheizung; ɀɚɪɟɧɢɟ
53 DE RU Braten und Schmoren von Fleisch Es wird folgendes empfohlen: x Braten bzw. Schmoren von über 1 kg Fleischstücken im Backofen. Kleinere Fleischstücke sind auf Kochzonen vorzubereiten, x beim Braten von Fleisch auf dem Rost wird empfohlen, auf der niedrigsten Ebene (unter dem Rost mit Gericht...
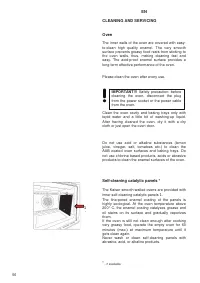
Page 56 - Safety precaution: before
56 EN CLEANING AND SERVICING Oven The inner walls of the oven are covered with easy- to-clean high quality enamel. The very smooth surface prevents greasy food rests from sticking to the oven walls, thus, making cleaning fast and easy. The acid-proof enamel surface provides a long-term effective per...
Page 57 - Backöfen mit glatten Wänden bieten die; Als Sicherheitsvorkehrung
57 DE RU PFLEGE UND WARTUNG Backofen Die inneren Wände des Backofens sind mit hochwertiger pflegeleichter Emaille bedeckt. Die sehr glatte Oberfläche wirkt dem Erscheinen der restlichen Verschmutzungen auf den Wänden des Backofens sehr schnell entgegen und lässt sich einfach reinigen. Die antisäureh...
Page 58 - ȺȺȼ
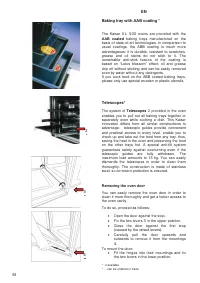
58 EN Baking tray with ȺȺȼ coating * The Kaiser XL 500 ovens are provided with the ȺȺȼ coated baking trays manufactured on the basis of state-of-art technologies. In comparison to usual coatings, the ABB coating is much more advantageous: it is durable, resistant to scratches, grease and oil stains ...
Page 59 - Antianbrennbeschichtung; ɉɪɨɬɢɜɟɧɶ
59 DE RU Das Backblech mit der Antianbrennbeschichtung AAB * Die neusten Backbleche des Herdes XL 500 mit der Antianbrennbeschichtung AAB entsprechen den modernsten Technologien. Der neue Antihaftbelag ist viel vorteilhafter als übliche Beschichtungen. Das neue Backblech ist strapazierfähig, kratzfe...
Page 60 - Removing inner glass; Replacing the oven light; Fan filter
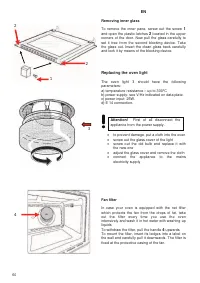
60 EN 2 2 1 4 Removing inner glass To remove the inner pane, screw out the screw 1 and open the plastic latches 2 located in the upper corners of the door. Now pull the glass carefully to set it free from the second blocking device. Take the glass out. Insert the clean glass back carefully and lock ...
Page 61 - Herausziehen der inneren Scheibe; der Backofentür befinden.; Auswechslung der Ofenbeleuchtung
61 DE RU Herausziehen der inneren Scheibe Drehen Sie dazu die Schrauben 1 heraus und entfernen Sie die Kunststoffverschlüsse 2 , die sich in den oberen Ecken der Backofentür befinden. Danach schieben Sie die Scheibe aus dem zweiten Verriegelungselement heraus und ziehen Sie sie heraus. Nach dem Rein...
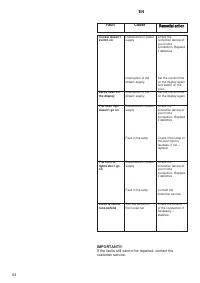
Page 64 - Fault; Remedial action
64 EN Fault Cause Remedial action IMPORTANT!!! If the faults still cannot be repaired, contact the customer service. Cooker doesn’t switch on Disturbance in power supply Interruption of the stream supply Check the protection device of your home conduction. Replace if defective. Set the current time ...
Page 65 - Störung Mögliche
65 DE RU Störung Mögliche Ursache Hinweise WICHTIG !!! Wenn trotz der Empfehlungen die Probleme nicht beseitigt werden konnten – wenden Sie sich an den Kundendienst. Der Herd funktioniert nicht Sörung der Elektroversorgung Unterbrechung der Stromzufuhr Prüfen der Schutzvorrichtung der häuslichen Lei...
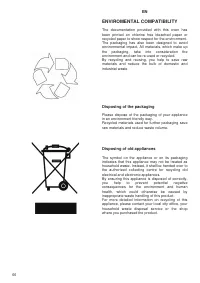
Page 66 - ENVIROMENTAL COMPATIBILITY; Disposing of the packaging
66 EN ENVIROMENTAL COMPATIBILITY The documentation provided with this oven has been printed on chlorine free bleached paper or recycled paper to show respect for the environment. The packaging has also been designed to avoid environmental impact. All materials, which make up the packaging, take into...
Page 67 - UMWELTVERTRÄGLICHKEIT; Verpackungs-Entsorgung; ɈɏɊȺɇȺ; ɍɬɢɥɢɡɚɰɢɹ
67 DE RU UMWELTVERTRÄGLICHKEIT Als Beitrag zum Umweltschutz wurde die Dokumentation dieses Geräts auf chlorfrei gebleichtes oder Recycling-Papier gedruckt. Bei der Verpackung wurde auf deren Umweltverträglichkeit Wert gelegt; sie kann gesammelt oder recycelt werden, da es sich um umweltschonendes Ma...
Page 69 - ɈɌɆȿɌɄȺ
69 ȽȺɊȺɇɌɂɃɇɕɃ ɌȺɅɈɇ (Nr. ɫɨɨɬɜɟɬɫɬɜɭɟɬ ɧɨɦɟɪɭ ɚɩɩɚɪɚɬɚ , ɫɦɨɬɪɢ ɧɚ ɡɚɞɧɟɣ ɨɛɥɨɠɤɟ ɧɚɫɬɨɹɳɟɣ ɢɧɫɬɪɭɤɰɢɢ ) Ⱦɚɧɧɵɟ ɝɚɪɚɧɬɢɣɧɵɟ ɨɛɹɡɚɬɟɥɶɫɬɜɚ ɧɟ ɨɝɪɚɧɢɱɢɜɚɸɬ ɨɩɪɟɞɟɥɟɧɧɵɟ ɡɚɤɨɧɨɦ ɩɪɚɜɚ ɩɨɬɪɟɛɢɬɟɥɟɣ ɉɨɡɞɪɚɜɥɹɟɦ ȼɚɫ ɫ ɩɪɢɨɛɪɟɬɟɧɢɟɦ ɛɵɬɨɜɨɣ ɬɟɯɧɢɤɢ ɨɬɥɢɱɧɨɝɨ ɤɚɱɟɫɬɜɚ ! ɉɨɠɚɥɭɣɫɬɚ ɨɡɧɚɤɨɦɶɬɟɫɶ ɫ ɧɚɫɬɨɹɳɢɦ ...


 Kaiser HC 50010 B
User Manual
Kaiser HC 50010 B
User Manual