Page 2 - WARNING – To reduce risk of injury:
1.0 IMPORTANT SAFETY INSTRUCTIONS Read and understand the entire instruction manual before operating machine. This band saw is designed and intended for use by properly trained and experienced personnel only. If you are not familiar with the proper and safe operation of a band saw, do not use until ...
Page 3 - SAVE THESE INSTRUCTIONS; On-off switch padlock
3 23. Maintain tools with care. Keep saw blades sharp and clean for the best and safest performance. Follow instructions for lubricating and changing accessories. 24. Turn off the machine before cleaning. Use a brush to remove chips or debris — do not use your hands. 25. Do not stand on the machine....
Page 4 - Table of contents; Section
4 3.0 Table of contents Section Page 1.0 IMPORTANT SAFETY INSTRUCTIONS ....................................................................................................... 2 2.0 On-off switch padlock ..................................................................................................
Page 5 - About this manual
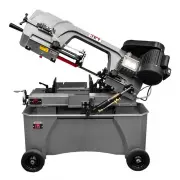
5 4.0 About this manual This manual is provided by JET, covering the safe operation and maintenance procedures for a JET Model HVBS-712 and HVBS-712D Band Saw. This manual contains instructions on installation, safety precautions, general operating procedures, maintenance instructions and parts brea...
Page 6 - Specifications
6 5.0 Specifications Model number ................................................................HVBS-712D .................................................... HVBS-712 Stock number ........................................................................ 414560 ........................................
Page 8 - Setup and assembly; Shipping contents
8 6.0 Setup and assembly Read and understand all instructions before attempting assembly. Band Saw must be disconnected from power during all assembly procedures. Failure to comply may cause serious injury. 6.1 Shipping contents See Figures 6-1, 6-2. 1 Band saw (not shown) 1 Pulley cover – A 1 Table...
Page 10 - Coolant tank preparation; Electrical connections; GROUNDING INSTRUCTIONS
10 Figure 6-10: coolant tank 6.5 Coolant tank preparation Use of a water-soluble coolant will increase cutting efficiency and prolong blade life. Do not use black cutting oil as a substitute. Change cutting oil often and follow manufacturer’s instructions as to its uses and precautions. 1. Disconnec...
Page 11 - Adjustments; Tools required for adjustments
11 reconnection, the tool should comply with all local codes and ordinances. 7.2 Voltage conversion Conversion from 115V to 230V must be done by a qualified electrician. The Band Saw is prewired for 115 volt. To change incoming leads for 230 volt operation: 1. Open main motor junction box cover, and...
Page 13 - Blade replacement; Blade guide bearings
13 Figure 8-7: blade guide adjustment 8.5 Blade replacement A general-use variable-tooth blade is provided with this band saw. Choice of blade pitch is governed by thickness of workpiece: the thinner the workpiece, the more teeth advised. A minimum of 3 teeth should engage workpiece at all times. If...
Page 14 - Test cut to verify adjustment
14 8.7 Chip brush The wire chip brush must be properly adjusted and maintained in working condition; otherwise damage to blade can occur. Adjust brush so that its bristles overlap blade. Replace brush if it becomes worn or damaged. 8.8 Blade tension 1. Disconnect machine from power source. 2. Open r...
Page 15 - Setting feed rate; Counterbalance spring
15 6. Use a micrometer to measure the thickness variation of the disk you have cut from the bar stock. Measure at top and bottom of disk. Figure 8-11 The saw blade can be considered correctly adjusted when the variation measure is no more than 0.012 inch across the face of the disk. If you do not ha...
Page 16 - Auto shut-off adjustment
16 8.13 Blade-to-table squareness The blade must be perpendicular to table to ensure a straight cut. This setting should be confirmed by the user. Special blade setting gauges can be purchased for this type of inspection; however, it can also be done using more common shop items, as follows. 1. “Ext...
Page 17 - Operation; General operating procedure
17 8.16 Vise positioning (712 only) To set vise for 90 to 45 degree cutting: 1. Remove bolt and nut assemblies (F, Figure 8- 17). 2. Position vise and reinstall as shown in Figure 8- 17. Pay particular attention to bolt hole location. 3. Set vise to desired angle, reinstall nuts and bolts, and tight...
Page 18 - Evaluating cutting efficiency; Lubrication
18 Figure 9-1: clamping positions 4. Adjust left blade guide to minimize exposed blade area. 5. Set suitable feed rate on cylinder dial. 6. Open coolant valve, and open valve on hydraulic cylinder to allow bow to descend in gradual and controlled manner. 7. Switch trip tab must turn off saw at compl...
Page 19 - Troubleshooting HVBS-712/712D Band Saw; Mechanical and electrical problems
19 10.2 Coolant level Maintain coolant level. Low coolant level can cause foaming and high blade temperatures. Replace dirty coolant; dirty or weak coolant can clog the pump, cause crooked cuts, a low cutting rate and/or permanent blade damage. To fill tank, pour coolant into hole through strainer c...
Page 20 - Operational problems
20 11.2 Operational problems Symptom Possible Cause Correction Cuts not square. Blade not square to vise/material. Adjust vise square to blade. Blade surface not perpendicular to table. Adjust blade guides until perpendicular. Workpiece shifting in vise. Properly secure workpiece by tightening vise ...
Page 21 - Replacement Parts
21 12.0 Replacement Parts Replacement parts are listed on the following pages. To order parts or reach our service department, call 1-800-274-6848 Monday through Friday, 8:00 a.m. to 5:00 p.m. CST. Having the Model Number and Serial Number of your machine available when you call will allow us to ser...
Page 22 - HVBS-712/712D Bed and Stand Assembly – Exploded View
22 12.1.1 HVBS-712/712D Bed and Stand Assembly – Exploded View
Page 23 - HVBS-712/712D Bow Assembly – Exploded View
23 12.1.2 HVBS-712/712D Bow Assembly – Exploded View
Page 29 - Electrical Connections – HVBS-712/712D Band Saw
29 13.0 Electrical Connections – HVBS-712/712D Band Saw
Page 30 - Warranty and service
30 14.0 Warranty and service JET warrants every product it sells against manufacturers’ defects. If one of our tools needs service or repair, please contact Technical Service by calling 1-800-274-6846, 8AM to 5PM CST, Monday through Friday. Warranty Period The general warranty lasts for the time per...