Page 2 - CONTENTS
1 CONTENTS IMPORTANT SAFETY-------------------------------------------------------------------------------------2SPECIFICATION--------------------------------------------------------------------------------------------4 DIMENSION/CONNECTION------------------------------------------------------------...
Page 3 - IMPORTANT SAFETY; instructions before using any appliance.; that a certified technician perform the service.
2 IMPORTANT SAFETY When using electrical appliances, basic safety precautions should be followed to reduce the risk of fire, electric shock, and injury to persons or property. Read all instructions before using any appliance. Use this appliance only for its intended purpose as described in this owne...
Page 5 - SPECIFICATIONS
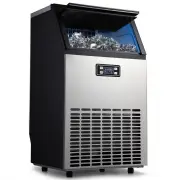
4 SPECIFICATIONS 1) DIMENSIONS/CONNECTIONS 2) Rating MODEL HZB-45 HZB-65 POWER SUPPLY VOLTAGE 1Phase, 110-120/60Hz 1Phase, 110-120/60Hz CLAIMATE CLASS 10-40 ℃ 10-40 ℃ ELECTRICAL PROTECTION CLASS I I ICE MAKING RATING (Amps) 2.2Amp 2.7Amp ICE HARVEST RATING (Amps) 2.5Amp 3.0Amp ICE MAKING CAPACITY (K...
Page 8 - ) EXPLOSIVE DRAWINGS
7 4) EXPLOSIVE DRAWINGS No. Parts Name Material Qty. 1 Front panel Stainless steel 1 2 Bottom plate Zinc-plated steel board 1 3 Condenser Copper tube and aluminum fin 1 4 Operation panel paper PET 1 5 Operation panel PCB box ABS 1 6 Operation panel PCB Electrical and Electronic parts 1 7 Compressor ...
Page 10 - OPERATING PROCEDURES & MAINTENANCE; UNPACKING YOUR ICE MAKER; INSTALLATION LOCATION REQUIREMENT
9 OPERATING PROCEDURES & MAINTENANCE UNPACKING YOUR ICE MAKER 1. Remove the exterior and interior packaging. Check if all the accessories, including instruction manual, ice scoop, white water inlet pipe, 4 ways to 2 ways water quick connector and the waterdraining pipe, etc., are inside or not. ...
Page 11 - ELECTRICAL REQUIREMENT & CONNECTIONS
10 Electrical Shock Hazard Plug into a grounding wall outlet.Never remove the ground prong.Use separate power supply or receptacle.Never use an adapter.Never use an extension cord.Failure to follow these instructions can result in death, fire, orelectrical shock. Choose a well-ventilated area with t...
Page 12 - WATER CONNECTION FOR YOUR ICE MAKER; connect to water mains and that old hose-sets should not be reused.; water hose; Unit Back View
11 ice-cube made by the first ice making cycle after cleaning. 4. The outside of the ice maker should be cleaned regularly with a mild detergent solution and warm water. 5. Dry the interior and exterior with a clean soft cloth. WATER CONNECTION FOR YOUR ICE MAKER Important: Be sure to use the new ho...
Page 13 - OPERATION YOUR UNIT; Operation the ice-making process; TIMER
12 OPERATION YOUR UNIT Operation button and display area diagram Operation the ice-making process 1. Starting up : Plug in the power plug,the symbol will flash in the display window,press the ON/OFF button on the control panel,the machine will start to make ice when the external pipe addwater to rea...
Page 14 - How to switch Fahrenheit(
13 4. When the symbol lights up , the machine stop working,it will work again after you take out the ice. 5. Shut down the unit : During the unit making ice , press the “ ON/OFF ” button on the control panel , the unit shut down and into standby mode.If you press "ON/OFF" longer than 5S duri...
Page 15 - Normal Sounds; WIRING DIAGRAM; MCU; Relay; Power; Main Control PCB; ELECTRICAL DIAGRAM; LCD
14 Normal Sounds Your new ice maker may make sounds that are not familiar to you. Most of the new sounds are normal.Hard surfaces like the floor, walls and cabinets can make the sounds seem louder than they actuallyare. The following describes the kinds of sounds that might be new to you and what ma...
Page 16 - Preparing the Ice Maker for Long Storage; CLEANING & MAINTENANCE; If the ice maker has been left unused for a long time, before the
15 Preparing the Ice Maker for Long Storage If the ice maker will not be used for a long time, or is to be moved to another place, it will be necessaryto drain out all of the water in the system.1. Allow all of the ice cubes have been ejected from the evaporator of ice maker.2. Turn off the unit, an...
Page 17 - What shouldn't be done; Exterior Cleaning; Discoloration from chlorine gas is normal.; Interior Cleaning; For Ice Storage Bin; Ice Making Parts Cleaning; or discolor the interior.
16 What shouldn't be done Never keep anything in the ice storage bin that is not ice: objects like wine and beer bottles are not onlyunsanitary, but also it’s labels may slip off and obstruct the drain pipe. Exterior Cleaning The door and cabinet may be cleaned with a mild detergent and warm water s...
Page 18 - position, and return machine to work, discard first batch of ice.
17 3 、 When there are ice cubes on the surface of the evaporator, but can’t fall down easily, do not use themechanical substance to remove it by force; Only press the “ON/OFF” button for more than 5seconds, the unit will enter the ice melting process, after some while, the big ice-cubes will falldow...
Page 19 - WARNING
18 Ice Making Assembly System Cleaning by Using Nu-Calgon Nickle Safe Ice-machine Cleaner Minerals that are removed from water during the freezing cycle will eventually form a hard scaly deposit in the water system. Cleaning the system regularly helps remove the mineral scale buildup. How often you ...
Page 21 - NORMAL TROUBLE SHOOTING
20 Problem Possible Cause Solution “ ” indicator is on. No water supply Check the main water supply pressure orcheck the water supply hose is blocked ornot, adding the water pressure or cleaningthe hose necessary. Floating ball of the water leveldetecting switch is blocked,can’t be raised up Clean t...