Page 3 - INTRODUCTION; SAFETY; Your safety and the safety of others are very important.; DANGER
3 INTRODUCTION SAFETY IMPORTANT SAFETY INSTRUCTIONS WARNING: To reduce the risk of fire, electric shock, or injury when using your wine celler, follow these basic precautions: SAVE THESE INSTRUCTIONS ■ Plug into a grounded 3 prong outlet. ■ Do not remove ground prong. ■ Do not use an adapter. ■ Do n...
Page 4 - WARNING
4 PROPER DISPOSAL OF YOUR OLD WINE CELLAR IMPORTANT: Child entrapment and suffocation are not problems of the past. Junked or abandoned wine cellars are still dangerous – even if they will sit for “just a few days.” If you are getting rid of your old wine cellar, please follow these instructions to ...
Page 5 - INSTALLATION REQUIREMENTS; TOOLS AND PARTS; LOCATION REQUIREMENTS
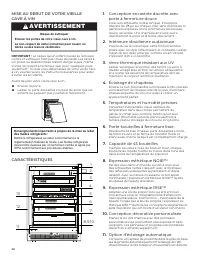
5 12. Hushed Acoustics Our internal compressor keeps your beverages impeccably chilled, while running unobtrusively in the background. Brilliance doesn’t have to announce itself; it just is. 13. Emotive Controls Hold sway over every zone. Let your light-guided touch coax out the distinct flavors and...
Page 6 - PRODUCT DIMENSIONS; CUSTOM OVERLAY PANEL
6 PRODUCT DIMENSIONS OVERALL PRODUCT Width (up to hinge cover) 237/8" (60.72 cm) Height (up to hinge cover) 343/8" (87.32 cm) Glass door model (NOIR™) depth (no handle) 233/4" (60.36 cm) Glass door model (RISE™) depth (no handle) 235/8" (60 cm) Solid door models (NOIR™/ RISE™) 235/8&...
Page 8 - ELECTRICAL REQUIREMENTS; INSTALLATION INSTRUCTIONS; UNPACK THE WINE CELLAR
8 ELECTRICAL REQUIREMENTS Before you move your wine cellar into its final location, it is important to make sure you have the proper electrical connection. RECOMMENDED GROUNDING METHOD A 115 V, 60 Hz, AC only, 15 or 20 A fused, grounded electrical supply is required. It is recommended that a separat...
Page 9 - CUSTOM OVERLAY PANEL INSTALLATION
9 CUSTOM OVERLAY PANEL INSTALLATION IMPORTANT: Create custom overlay panel according to the specifications in the “Custom Overlay Panel” section. JennAir is not responsible for the removal or addition of molding or decorative panels that would not allow access to the wine cellar for service. 1. Open...
Page 10 - INSTALLATION AND DOOR CLOSING
10 INSTALLATION AND DOOR CLOSING Your wine cellar has four leveling legs. If your wine cellar seems unsteady or you want the door to close more easily, adjust the wine cellar’s tilt using the instructions below. 1. Plug into a grounded 3 prong outlet. 2. Move the wine cellar into its final location....
Page 11 - USING WINE CELLAR; CONTROLS
11 USING WINE CELLAR CONTROLS NOTE: When the wine cellar is turned On for the first time, the temperature defaults to the recommended setting. There are two adjustable temperature controls, one for each compartment. The left temperature and preset touch pads control the temperature of the upper comp...
Page 12 - NORMAL SOUNDS
12 8. Over Temp Alarm Helps avoid wine f rom spoiling by giving an audible and visual alert if the temperature in either zone rises above the preset range for 10 minutes.The audio alarm will shut off automatically when the temperature returns to normal. To let you know an Over Temperature condition ...
Page 13 - STOCKING THE WINE CELLAR; WINE RACKS
13 STOCKING THE WINE CELLAR NOTE: For optimum wine storage, place white wines at the top of the wine cellar, light red wines in the center and champagne/larger diameter wine bottles at the bottom. TO STOCK THE WINE CELLAR - RACKS 1 TO 5NOTE: The wine rack can be stocked with the bottles facing eithe...
Page 14 - CARE AND CLEANING; CLEANING; REMOVING BASE GRILLE; VACATION CARE
14 CARE AND CLEANING CLEANING Clean the wine cellar once a month to avoid buildup of odors. Wipe up spills immediately. TO CLEAN YOUR WINE CELLAR: 1. Unplug wine cellar or disconnect power. 2. Remove all racks f rom inside the wine cellar. 3. Hand wash, rinse, and dry removable parts and interior su...
Page 15 - TROUBLESHOOTING; OPERATION
15 TROUBLESHOOTING Try the solutions suggested here first in order to avoid the cost of an unnecessary service call. OPERATION Power supply cord unplugged? Plug into a grounded 3 prong outlet. Is outlet working? Plug in a lamp to see if the outlet is working. Household fuse blown, or a circuit break...
Page 16 - ASSISTANCE; IN CANADA
16 ASSISTANCE IF YOU NEED SERVICE Before calling for assistance or service, please check “Troubleshooting.” It may save you the cost of a service call. If you still need help, follow the instructions below.When calling, please know the purchase date and the complete model and serial number of your a...
Page 17 - TEN YEAR LIMITED WARRANTY
17 JENNAIR ® REFRIGERATION LIMITED WARRANTY ATTACH YOUR RECEIPT HERE. PROOF OF PURCHASE IS REQUIRED TO OBTAIN WARRANTY SERVICE. Please have the following information available when you call the Customer eXperience Center: ❑ Name, address, and telephone number ❑ Model number and serial number ❑ A cle...
Page 19 - SÉCURITÉ; CONSERVER CES INSTRUCTIONS; Votre sécurité et celle des autres est très importante.; AVERTISSEMENT
19 INTRODUCTION SÉCURITÉ IMPORTANTES INSTRUCTIONS DE SÉCURITÉ ■ Brancher sur une prise de courant à 3 alvéoles, reliée à la terre. ■ Ne pas enlever la prise de liaison à la terre. ■ Ne pas utiliser d’adaptateur. ■ Ne pas utiliser de rallonge. ■ Déconnecter la source de courant électrique avant l’ent...
Page 21 - EXIGENCES D’INSTALLATION; OUTILS ET PIÈCES; EXIGENCES D’EMPLACEMENT
21 12. Acoustique silencieuse Notre compresseur interne garde vos boissons impeccablement f raîches tout en fonctionnant discrètement à l’arrière-plan. Le génie n’a pas à s’annoncer. C’est comme ça. C’est tout. 13. Contrôles émotifs Laissez votre regard vaciller sur chaque zone. Laissez votre touche...
Page 22 - DIMENSIONS DU PRODUIT; PANNEAU DÉCORATIF PERSONNALISÉ
22 DIMENSIONS DU PRODUIT PRODUIT ENTIER Largeur ( jusqu’au cache-charnière) 23 7/8 po (60,72 cm) Hauteur ( jusqu’au cache-charnière) 34 3/8 po (87,32 cm) Modèles avec porte en verre (NOIR™) profondeur (sans poignée) 23 3/4 po (60,36 cm) Modèles avec porte en verre (RISE™) profondeur (sans poignée) 2...
Page 23 - SPÉCIFICATIONS ÉLECTRIQUES
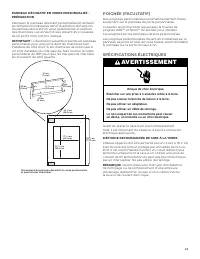
23 PANNEAU DÉCORATIF EN VERRE PERSONNALISÉ – PRÉPARATION Fabriquer le panneau décoratif personnalisé en utilisant les dimensions indiquées dans l’illustration dimensions du panneau décoratif en verre personnalisé et position des charnières. Les zones foncées doivent être creusées de 1/2 po (12 mm) c...
Page 24 - INSTRUCTIONS D’INSTALLATION; DÉBALLAGE DE LA CAVE À VIN
24 INSTRUCTIONS D’INSTALLATION DÉBALLAGE DE LA CAVE À VIN Avant d’utiliser la cave à vin, tous les matériaux d’emballage doivent être enlevés et l’intérieur doit être nettoyé. Enlever tout résidu de ruban adhésif et de colle des surfaces avant de mettre en marche la cave à vin. Frotter une petite qu...
Page 26 - UTILISATION DE LA CAVE À VIN; COMMANDES
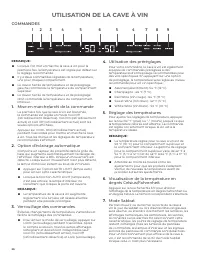
26 UTILISATION DE LA CAVE À VIN COMMANDES REMARQUE : Lorsque l’on met en marche la cave à vin pour la première fois, la température est réglée par défaut sur le réglage recommandé. Il y a deux commandes réglables de la température, une pour chaque compartiment. Le clavier tactile de température et d...
Page 27 - SONS NORMAUX
27 Appuyer sur SABBATH (Sabbat) pendant 3 secondes pour activer la caractéristique. Après le compte à rebours de 3 secondes, la caractéristique s’active et tous les autres affichages s’éteignent. Appuyer sur SABBATH (Sabbat) pendant 3 secondes pour désactiver la caractéristique et activer l’affichag...
Page 28 - STOCKAGE DANS LA CAVE À VIN
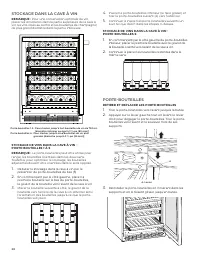
28 STOCKAGE DANS LA CAVE À VIN REMARQUE : Pour une conservation optimale du vin, placer les vins blancs dans la partie supérieure de la cave à vin, les vins rosés au centre et les bouteilles de champagne/ de plus grand diamètre dans la partie inférieure. STOCKAGE DE VINS DANS LA CAVE À VIN – PORTE-B...
Page 29 - ENTRETIEN ET NETTOYAGE; NETTOYAGE; ENLEVER LA GRILLE DE LA BASE
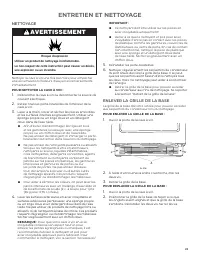
29 ENTRETIEN ET NETTOYAGE NETTOYAGE Nettoyer la cave à vin une fois par mois pour empêcher une accumulation d’odeurs. Essuyer les renversements immédiatement. POUR NETTOYER LA CAVE À VIN : 1. Débrancher la cave à vin ou déconnecter la source de courant électrique. 2. Retirer tous les porte-bouteille...
Page 30 - DÉPANNAGE; UTILISATION
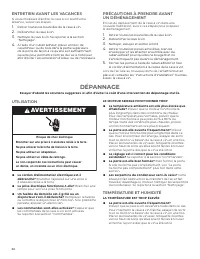
30 ENTRETIEN AVANT LES VACANCES Si vous choisissez d’arrêter la cave à vin avant votre absence, suivez ces étapes. 1. Retirer toutes les bouteilles de la cave à vin. 2. Débrancher la cave à vin. 3. Nettoyer la cave à vin. Se reporter à la section “Nettoyage”. 4. À l’aide d’un ruban adhésif, placer u...
Page 31 - PORTE
31 Le réglage est-il correct pour les conditions existantes? Se reporter à la section “Commandes”. La grille de la base est-elle obstruée? Pour le meilleur rendement, ne pas installer la cave à vin derrière une porte d’armoire ni obstruer la grille de la base. IL Y A ACCUMULATION D’HUMIDITÉ À L’INTÉ...
Page 32 - AU CANADA
32 ASSISTANCE SI VOUS AVEZ BESOIN DE SERVICE Avant de faire un appel pour assistance ou dépannage, vérifiez la section “Dépannage”. Cette vérification peut vous faire économiser le coût d’une intervention de dépannage. Pour de l’aide supplémentaire, suivez les instructions ci-dessous.Avant d’appeler...
Page 33 - GARANTIE LIMITÉE DE DIX ANS
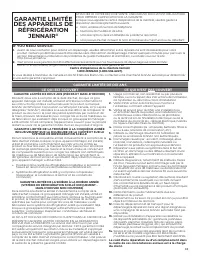
33 GARANTIE LIMITÉE DES APPAREILS DE RÉFRIGÉRATION JENNAIR ® ATTACHEZ ICI VOTRE REÇU DE VENTE. UNE PREUVE D’ACHAT EST OBLIGATOIRE POUR OBTENIR L'APPLICATION DE LA GARANTIE. Lorsque vous appelez le centre d'eXpérience de la clientèle, veuillez garder à disposition les renseignements suivants : ❑ Nom,...


 JennAir JUBFL242HL
User Manual
JennAir JUBFL242HL
User Manual