Page 2 - Welcome
1 to your new Instant ™ Vortex ™ Plus! This Instant Vortex Plus ClearCook Air Fryer can help you cook delicious meals with less oil and less hassle. We hope you fall in love with Instant air frying and enjoy it in your kitchen for years to come! Welcome Before using your new Vortex Plus, read all in...
Page 3 - CONTENTS
1 Important Safeguards 2 What’s in the box 8 Using your Vortex Plus 9 Initial set up 12 Cooking 14 Smart Programmes 16 Cleaning 19 Troubleshooting 21 Error Codes 22 Learn more 23 Warranty 24 CONTENTS
Page 4 - INSTANTTM VORTEXTM PLUS CLEARCOOK; Safety Instructions
2 Safety Warnings 3 Safety Warnings INSTANT™ VORTEX™ PLUS CLEARCOOK AIR FRYER 5.7L Safety Instructions At Instant, we want you to feel comfortable using our products. This Instant ™ Vortex ™ Plus was designed with your safety in mind. When using electrical appliances, basic safety precautions should...
Page 5 - IMPORTANT; READ ALL INSTRUCTIONS; Placement
2 Safety Warnings 3 Safety Warnings IMPORTANT SAFEGUARDS READ ALL INSTRUCTIONS Placement DO place the appliance on a countertop only. Always operate the appliance on a stable, non-combustible, level surface. DO NOT place the appliance on or close to a hot gas or electric burner, or a heated oven. DO...
Page 6 - Air Frying Cautions
4 Safety Warnings 5 Safety Warnings DO NOT allow children or persons with reduced physical, sensory or mental capabilities to operate this appliance. Close supervision is necessary when any appliance is used near children and individuals with reduced capabilities. Children should not play with this ...
Page 7 - Accessories
4 Safety Warnings 5 Safety Warnings DO NOT overfill the air fryer. Overfilling may cause food to contact the heating element, which may result in fire, property damage, and/or personal injury. DO NOT pour oil into the cooking container. If needed, spray food lightly with non-stick cooking spray. Usi...
Page 8 - Care and Storage
6 Safety Warnings 7 Safety Warnings Care and Storage DO let the appliance cool to room temperature before cleaning or storage. DO NOT store any materials in the appliance when not in use. DO NOT place any combustible materials in the appliance, such as paper, cardboard, plastic, Styrofoam or wood. D...
Page 9 - SAVE THESE; CAUTION
6 Safety Warnings 7 Safety Warnings DO allow unit to cool before adding or removing parts or accessories. DO regularly inspect the appliance and power cord. DO NOT operate the appliance if the power cord or plug is damaged, or after the appliance malfunctions or is dropped or damaged in any manner. ...
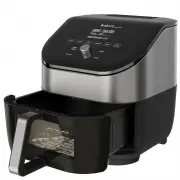
Page 10 - WHAT’S IN THE BOX; Air Fryer
8 Get Started 9 Get Started WHAT’S IN THE BOX Air Fryer Remember to recycle! We designed this packaging with sustainability in mind. Please recycle everything that can be recycled where you live. Be sure to keep this User Manual for reference. Illustrations are for reference only and may differ from...
Page 11 - USING YOUR VORTEX PLUS; Control panel
8 Get Started 9 Get Started USING YOUR VORTEX PLUS Control panel We’ve designed the control panel to be simple to use and easy to read. 1. Display • Cooking time• Cooking temperature• Messages 2. Smart Programmes • Air Fry• Roast• Bake• Reheat• Grill• Dehydrate 3. Temperature/Time Control • Select t...
Page 12 - Turning cooking light On/Off
10 Get Started 11 Get Started Turning cooking light On/Off • To turn the light on, press Light . • To turn the light off, press Light again. The cooking light cannot be turned off in the last 60 seconds of a cooking programme. Replace filter indicator • When it’s time to replace the Trap & Extra...
Page 13 - Reset Smart Programmes to original settings; Cancel active cooking programme
10 Get Started 11 Get Started Reset Smart Programmes to original settings Reset individual Smart Programmes 4. With the cooker in Standby mode, press and hold one of the Smart Programme buttons until the cooker returns to Standby. Reset all Smart Programmes 5. With the cooker in Standby mode, press ...
Page 14 - INITIAL SET UP; Unpack; Clean before use
12 Get Started 13 Get Started INITIAL SET UP Unpack 1. Remove your new Vortex Plus from the box. 2. Remove all the packaging material from in and around the air fryer. 3. Make sure to remove all the accessories from inside the cooking chamber. 4. Don’t remove the safety warning stickers or the ratin...
Page 15 - Test run
12 Get Started 13 Get Started Test run Before using your new Vortex Plus for the first time, you must perform a test run to ensure everything is working correctly. To perform a test run: 1. Follow the instructions for cooking on page 14. 2. Insert the cooking basket, but do not add food. 3. Select t...
Page 16 - COOKING; What to cook in
14 Get Started 15 Get Started COOKING The Vortex Plus uses rapid air circulation to crisp or cook food, giving your meals all the rich, crispy flavour of deep frying, with little to no oil. What to cook in The cooking basket with cooking tray is perforated to allow air to flow under and around your ...
Page 17 - Turn; Finish
14 Get Started 15 Get Started 2. If you want to select a smart programme other than Air Fry, press the button for the programme you want to use. The default time and temperature are displayed for that smart programme.. 3. Press Temp/Time and use the Control Dial to adjust the temperature and cooking...
Page 18 - SMART PROGRAMMES; Air Fry; To air fry; Roast; To roast
16 Get Started 17 Get Started SMART PROGRAMMES Air Fry You can air fry foods like fries, cauliflower bites, wings, nuggets and more. Setting Default Minimum Maximum Temperature 196 ° C / 385 ° F 82 ° C / 180 ° F 205 ° C / 400 ° F Cooking Time 15 minutes (00:15) 1 minute(00:01) 1 hour (01:00) To air ...
Page 19 - Bake; To bake; Grill; To grill
16 Get Started 17 Get Started Bake You can bake foods like breads, cakes, pastries and buns, with the Vortex Plus as your own “mini oven”. Setting Default Minimum Maximum Temperature 185 ° C / 365 ° F 82 ° C / 180 ° F 205 ° C / 400 ° F Cooking Time 30 minutes (00:30) 1 minute(00:01) 1 hour (01:00) T...
Page 20 - Dehydrate; To dehydrate; Reheat; To reheat
18 Get Started 19 Get Started Dehydrate Dehydrating uses low heat over a long period of time to safely dry out food items, like dried fruit, jerky and dried veggies. Setting Default Minimum Maximum Temperature 54 ° C / 130 ° F 35 ° C / 95 ° F 79 ° C / 175 ° F Cooking Time 8 hours (08:00) 1 hour (01:...
Page 21 - CLEANING
18 Get Started 19 Get Started CLEANING Clean your Instant Vortex Plus after each use. Always unplug the unit and let all parts cool to room temperature before cleaning. Before use or storing, make sure all surfaces are dry. Part Cleaning instructions Cooking tray • Dishwasher safe. *• The cooking tr...
Page 22 - Replacing Trap & Extract filter
20 Get Started 21 Get Started Replacing Trap & Extract filter Visit instantpot.com.au to purchase compatible filters, designed to work with your unit. 1. Unplug the Instant Vortex Plus from the electrical outlet. 2. Lift the filter housing up, from the top of the unit. 3. Remove the old filters ...
Page 23 - TROUBLESHOOTING
20 Get Started 21 Get Started TROUBLESHOOTING Problem Cause Solution Air fryer will not turn on The appliance is not properly plugged in. • Make sure the power cord is plugged into the outlet firmly. Outlet is not powered. • Plug another appliance into the same outlet to test the circuit. The oven d...
Page 24 - ERROR CODES
22 Get Started 23 Get Started ERROR CODES If the control panel displays an error code from this list, there is an issue with the Vortex ™ Plus. Here are the actions you should take to fix the problem. Problem Cause Solution E1 Open circuit. • Contact Consumer Care. E2 Temperature sensor short circui...
Page 25 - LEARN MORE
22 Get Started 23 Get Started LEARN MORE There’s a whole world of Instant ™ Vortex ™ Plus information and help just waiting for you. Here are some of the most helpful resources. Download this manual online instantpot.com.au Register your product instantpot.com.au/support/register Contact Consumer Ca...
Page 26 - WARRANTY
24 Warranty 25 Warranty WARRANTY Limited Warranty This Limited Warranty is issued by Instant Brands (Australia) Pty Ltd (Instant Brands Australia) and is effective for one year from the date of original consumer purchase. Proof of original purchase date and return of your appliance is required to ob...