Page 2 - English; Français
2 • WARNING: The appliance and its accessible parts become hot during use. • Care should be taken to avoid touching heating elements. • Children less than 8 years of age shall be kept away unless continuously supervised. • This appliance can be used by children aged from 8 years and above and person...
Page 6 - RS; Русский; ВНИМАНИЕ
6 RS Русский ВНИМАНИЕ ! • ВНИМАНИЕ : Данное изделие и его доступные комплектующие сильно нагреваются в процессе эксплуатации . • Будьте осторожны и не касайтесь нагревательных элементов . • Не разрешайте детям младше 8 лет приближаться к изделию без контроля . • Данное изделие может быть использован...
Page 9 - Questo prodotto soddisfa i requisiti imposti dalla nuova; Descrizione dell’apparecchio; Opis urz; Panel sterowania; łą
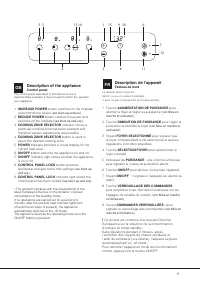
GB 9 IT Il pannello di controllo che qui viene descritto è rappresentato a fini esemplificativi: può non essere una esatta riproduzione del modello acquistato. 1 Tasto AUMENTO POTENZA per accendere la piastra e regolare la potenza ( vedi Avvio e utilizzo ). 2 Tasto DIMINUZIONE POTENZA per regolare l...
Page 11 - Installation; Positioning; see Precautions and tips; Ventilation; COMPARTMENT
11 GB Installation ! Before operating your new appliance please read this instruction booklet carefully. It contains important information concerning the safe operation, installation and maintenance of the appliance. ! Please keep these operating instructions for future reference. Pass them on to an...
Page 12 - Fixing; Electrical connection; Terminal board; Other types of connection; see Terminal
12 GB Fixing The appliance must be installed on a perfectly level supporting surface. Any deformities caused by improper fixing could affect the features and operation of the hob.The thickness of the supporting surface should be taken into account when choosing the length of the screws for the fixin...
Page 13 - Extendable cooking zones
13 GB 5. Secure the power supply cable by fastening the cable clamp screw, then put the cover back on. Three-phase 400 U-bolt connection support Neutral Earth Phase Phase Phase 1 2 3 5 4 Connecting the electricity supply cable to the mains If the appliance is being connected directly to the electric...
Page 15 - Pan sensor; Buzzer
15 GB Practical advice on using the appliance To obtain the best results from your hob:• Use pans with a thick, flat base in order to fully utilise the cooking zone. • Always use pans with a diameter which is large enough to cover the hotplate fully, in order to use all the available heat. • Make su...
Page 16 - Practical cooking advice; cooking
16 GB Practical cooking advice ª Pressure cookingPressure cooker Frying Grilling Boiling Very high-flame cooking High-flame cooking Medium-flame cooking Low-flame cooking Very low-flame cooking •• ¶ Crêpes Cooking on a high flame and browning(roasts, steaks, escalopes, fish fillets, fried eggs) ¶ § ...
Page 17 - Precautions and tips; General safety; The appliance must be used by adults only for; Disposal
17 GB Precautions and tips ! This appliance has been designed and manufactured in compliance with international safety standards. The following warnings are provided for safety reasons and must be read carefully. This appliance conforms to the following European Economic Community directives: - 2006...
Page 18 - Care and maintenance; Switching the appliance off; Stainless steel frame; Disassembling the hob; Do not attempt to repair the appliance yourself. If the; Technical description of the models
18 GB Care and maintenance Switching the appliance off Disconnect your appliance from the electricity supply before carrying out any work on it. Cleaning the appliance ! Do not use abrasive or corrosive detergents (for example, products in spray cans for cleaning barbecues and ovens), stain removers...
Page 19 - FR; Positionnement; voir; Encastrement; voir fi gures; Aération; TIROIR
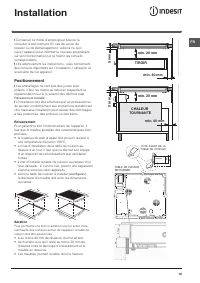
19 FR Installation ! Conserver ce mode d’emploi pour pouvoir le consulter à tout moment. En cas de vente, de cession ou de déménagement, veiller à ce qu’il suive l’appareil pour informer le nouveau propriétaire sur son fonctionnement et lui fournir les conseils correspondants. ! Lire attentivement l...
Page 20 - Fixation; Raccordement électrique; Bornier; voir fi gure
20 FR dépasse celle du plan de cuisson, doivent être placés à au moins 600 mm du bord du plan. Fixation Il est impératif d’assurer l’encastrement de l’appareil sur un plan d’appui parfaitement plat. Les déformations provoquées par une mauvaise fixation risquent d’altérer les caractéristiques de la t...
Page 21 - Foyers extensibles; voir Mise en marche et Utilisation
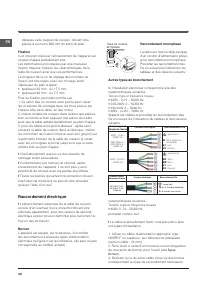
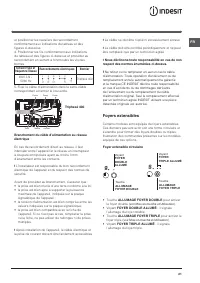
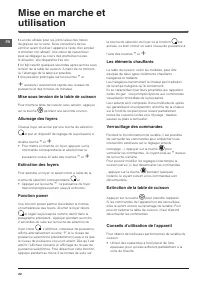
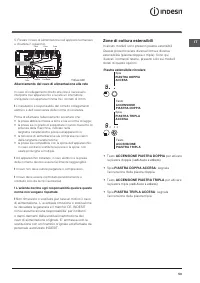
21 FR et positionner les cavaliers de raccordement conformément aux indications du tableau et des figures ci-dessous.4. Positionner les fils conformément aux indications du tableau et des figures ci-dessous et procéder au raccordement en serrant à fond toutes les vis des bornes. Tension type et fréq...
Page 23 - Les sécurités; Détection de récipient; Signal sonore
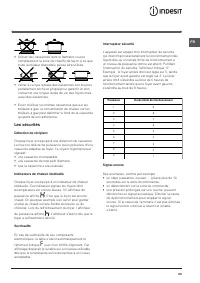
23 FR • Utiliser des casseroles dont le diamètre couvre complètement la zone de chauffe de façon à ce que toute la chaleur disponible puisse être utilisée. • Veiller à ce que la base des casseroles soit toujours parfaitement sèche et propre pour garantir un bon contact et une longue durée de vie des...
Page 24 - Conseils utiles pour la cuisson
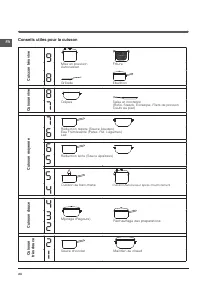
24 FR Conseils utiles pour la cuisson ª Mise en pressionAutocuisser Friture Grillade Ebullition Cuiccon très vive Cuisson vive Cuisson moyenne Cuisson douce Cuisson très douce •• ¶ Crêpes Saise et coloration(Rotis, Steack, Escalope, Filets de poisson,Oeufs au plat) ¶ § Réduction rapide (Sauce liquid...
Page 25 - Précautions et conseils; Sécurité générale; Cet appareil qui sert à cuire des aliments ne doit; voir Mise en marche et; Le dispositif n’est pas destiné à être mis en; Mise au rebut
25 FR Précautions et conseils ! Cet appareil a été conçu et fabriqué conformément aux normes internationales de sécurité. Ces consignes de sécurité sont très importantes et doivent être lues attentivement. Cet appareil est conforme aux Directives Communautaires suivantes : - 2006/95/CEE du 12.12.06 ...
Page 26 - Nettoyage et entretien; Mise hors tension; Cadre en acier inox; Démontage de la table
26 FR Nettoyage et entretien Mise hors tension Avant toute opération de nettoyage ou d’entretien couper l’alimentation électrique de l’appareil. Nettoyage de l’appareil ! Ne jamais utiliser de détergents abrasifs ou corrosifs, tels que des bombes aérosols pour grilloirs et fours, des détacheurs et d...
Page 27 - Instalación; Colocación; ver Precauciones y consejos; Empotramiento; ver; Aireación; CAJÓN
27 ES Instalación ! Es importante conservar este manual para poder consultarlo en todo momento. En el caso de venta, de cesión o de mudanza, verifique que permanezca junto al aparato para informar al nuevo propietario sobre su funcionamiento y sobre las advertencias correspondientes. ! Lea atentamen...
Page 28 - Fijación; Conexión eléctrica; Tablero de bornes; Otros tipos de conexión; ver la imagen Tablero de bornes
28 ES supere la de la superficie de trabajo, deben estar situados a 600 mm., como mínimo, del borde de la misma. Fijación La instalación del aparato se debe realizar sobre una superficie de apoyo perfectamente plana. Las deformaciones que se podrían provocar por una mala fijación, pueden alterar las...
Page 29 - No quitar ni sustituir por ninguna razón el cable; Zonas de cocción extensibles; ver Puesta en funcionamiento
29 ES al tipo de conexión necesaria y coloque los puentes de conexión de acuerdo con la tabla y los dibujos que se muestran a continuación.4. Coloque los cables de acuerdo con la tabla y los dibujos que se muestran a continuación y realice la conexión apretando a fondo todos los tornillos de los bor...
Page 31 - Detección de los recipientes; Señal sonora
31 ES Consejos prácticos para el uso del aparato Para obtener las mejores prestaciones de la encimera:• Utilice ollas con fondo plano y de gran espesor para asegurarse que se adhieran perfectamente a la zona calentadora • Utilice ollas de un diámetro suficiente para cubrir completamente la zona de c...
Page 32 - Consejos prácticos para la cocción
32 ES Consejos prácticos para la cocción ª Cocción a presiónOlla a presión Freído Asado Ebullición Cocción a fuego muy fuerte Cocción a fuego fuerte Cocción a fuego medio Cocción a fuego bajo Cocción a fuego muy bajo •• ¶ Crêpe Cocción a fuego fuerte y dorado(Asados, Bistec, Escalopes, Filetes de pe...
Page 33 - Precauciones y consejos; Seguridad general; El aparato debe ser utilizado para cocinar; ver Puesta en funcionamiento y uso; El aparato no se debe poner en funcionamiento; Eliminación
33 ES Precauciones y consejos ! El aparato ha sido proyectado y fabricado en conformidad con las normas internacionales sobre seguridad. Estas advertencias se suministran por razones de seguridad y deben ser leídas atentamente. Este aparato es conforme con las siguientes Normas Comunitarias: -2006/9...
Page 34 - Mantenimiento y cuidados; Interrumpir el suministro de corriente; Estructura de acero inoxidable; Desmontar la encimera
34 ES Mantenimiento y cuidados Interrumpir el suministro de corriente eléctrica Antes de realizar cualquier operación, desconecte el aparato de la red de alimentación eléctrica. Limpiar el aparato ! Evite el uso de detergentes abrasivos o corrosivos, como aerosoles para barbacoas y hornos, quitamanc...
Page 35 - Instalação; Posicionamento; veja em Precauções e; Encaixe; veja fi guras; Ventilação; GAVETA
35 PT Instalação ! É importante guardar este folheto para poder consultá-lo a qualquer momento. No caso de venda, cessão ou mudança, assegure-se que o mesmo permanece com o aparelho para informar o novo proprietário sobre o funcionamento e sobre as respectivas advertências. ! Leia com atenção as ins...
Page 36 - Fixação; Ligação eléctrica; Caixa de bornes; veja imagem Caixa de bornes
36 PT aquela do plano de trabalho, devem ser situados ao menos 600 mm do bordo do mesmo plano. Fixação A instalação do aparelho deve ser realizada sobre uma superfície de apoio perfeitamente plana. As deformações eventualmente provocadas por uma fixação errada poderão alterar as características e as...
Page 37 - Zonas de cozedura extensíveis; veja Início e utilização
37 PT necessária e posicione os grampos de ligação conforme a tabela e os desenhos a seguir.4. Posicione os fios de acordo com a tabela e os desenhos abaixo e efectue a ligação apertando todos os parafusos dos bornes. Tensão tipo e frequência rede Ligações eléctricas Caixa de bornes 400V 3-N ~ 50/60...
Page 38 - Início e utilização
38 PT Início e utilização ! A cola aplicada nas guarnições deixa alguns traços de graxa no vidro. Antes de utilizar o aparelho, é recomendável eliminá-la com um produto não abrasivo específico para a manutenção. Durante as primeiras horas de funcionamento, pode ser que note odor de borracha, que em ...
Page 39 - Detecção de recipientes; Sinal acústico
39 PT Conselhos práticos para utilizar esta aparelhagem Para obter as melhores performances do plano de cozedura:• Empregue panelas com fundo chato e elevada espessura, para ter a certeza que haverá uma perfeita aderência à zona de aquecimento. • Empregue panelas com diâmetro suficiente para cobrir ...
Page 40 - Conselhos práticos para a cozedura
40 PT Conselhos práticos para a cozedura ª Cozedura à pressãoPanela de pressão Frituras Assado Ebulição Cozedura em fogo altíssimo Cozedura em fogo alto Cozedura em fogo médio Cozedura em fogo brando Cozedura em fogo muito brando •• ¶ Crêpe Cozedura em fogo alto e doiramento (Assados, Bifes, Escalop...
Page 41 - Precauções e conselhos; Segurança geral; O aparelho deve ser utilizado para cozinhar; O aparelho não é destinado a ser colocado em; Eliminação
41 PT Precauções e conselhos ! Este aparelho foi projectado e fabricado em conformidade com as normas internacionais de segurança. Estas advertências são fornecidas por razões de segurança e devem ser lidas com atenção. Este aparelho é em conformidade com as seguintes Directivas da Comunidade Europe...
Page 42 - Manutenção e cuidados; Desligar a corrente eléctrica; Quadro em aço inoxidável; Desmontar o plano
42 PT Manutenção e cuidados Desligar a corrente eléctrica Antes de realizar qualquer operação, desligue o aparelho da alimentação eléctrica. Limpeza do aparelho ! Evite o emprego de detergentes abrasivos ou corrosivos, tais como sprays para churrasqueiras e fornos, tira-manchas e produtos contra fer...
Page 43 - Aufstellung; siehe Vorsichtsmaßregeln; Einbau; siehe; Belüftung; WÄRMEFACH
43 DE Installation ! Bewahren Sie diese Bedienungsanleitung bitte sorgfältig auf, damit Sie sie jederzeit zu Rate ziehen können. Sorgen Sie dafür, dass sie im Falle eines Verkaufs, eines Umzugs oder einer Übergabe an einen anderen Benutzer das Gerät stets begleitet, damit auch der Nachbesitzer die M...
Page 44 - Befestigung; Elektroanschluss; Klemmengehäuse; Andere Anschlussarten; siehe Abbildung
44 DE Arbeitsplatte überschreiten, müssen einen Abstand vom Rand der Kochmulde von mindestens 600 mm aufweisen. Befestigung Das Kochfeld muss auf einer perfekt ebenen Stütz- bzw. Auflagefläche installiert werden. Durch unsachgemäße Befestigung hervorgerufene Verformungen könnten die Eigenschaften un...
Page 45 - Erweiterbare Kochzonen; siehe Inbetriebsetzung und Gebrauch
45 DE 3. Schrauben Sie die Schraube der Kabelklemme sowie die Schrauben der Klemmen, die der erforderlichen Anschlussart entsprechen, aus und positionieren Sie die Brücken in Anlehnung an nachfolgende Tabelle und Zeichnungen: 4. Verlegen Sie die Drähte gemäß nachstehenden Zeichnungen und Tabelle und...
Page 47 - Topferkennung; Tonsignal
47 DE Praktische Ratschläge zum Einsatz des Gerätes So gibt Ihnen Ihr Kochfeld sein Bestes:• Verwenden Sie Kochgeschirr mit dickem und ebenem Boden, um sicher zu sein, dass dieser perfekt auf der Kochzone aufliegt. • Benutzen Sie stets nur Kochgeschirr, dessen Durchmesser mit dem der Kochzone überei...
Page 49 - Allgemeine Sicherheit; Das Gerät darf nur von Erwachsenen und; Dieses Gerät kann nicht mit einem; Entsorgung
49 DE Vorsichtsmaßregeln und Hinweise ! Das Gerät wurde entsprechend den strengsten internationalen Sicherheitsvorschriften entworfen und gebaut. Nachstehende Hinweise werden aus Sicherheitsgründen geliefert und sollten aufmerksam gelesen werden. Dieses Gerät entspricht den folgenden EG-Richtlinien:...
Page 50 - Reinigung und Pflege; Abschalten Ihres Gerätes vom Stromnetz; Edelstahlrahmen; Demontage des Kochfeldes
50 DE Reinigung und Pflege Abschalten Ihres Gerätes vom Stromnetz Vor jeder Reinigung und Pflege ist das Gerät vom Stromnetz zu trennen. Reinigung des Gerätes ! Der Einsatz von Scheuermitteln oder scharfen oder chemischen Reinigungsmitteln wie Backofensprays, Fleckenentferner, Rostentfernungsmittel,...
Page 51 - Installazione; Posizionamento; Incasso; vedi fi gure; Aerazione; CASSETTO
IT 51 Installazione ! È importante conservare questo libretto per poterlo consultare in ogni momento. In caso di vendita, di cessione o di trasloco, assicurarsi che resti insieme all’apparecchio per informare il nuovo proprietario sul funzionamento e sui relativi avvertimenti. ! Leggere attentamente...
Page 52 - Fissaggio; Collegamento elettrico; Morsettiera
52 IT Fissaggio L’installazione dell’apparecchio deve essere effettuata su un piano d’appoggio perfettamente piano. Le eventuali deformazioni provocate da un errato fissaggio potrebbero alterare le caratteristiche e le prestazioni del piano cottura. La lunghezza della vite di regolazione dei ganci d...
Page 53 - L’azienda declina ogni responsabilità qualora queste; Zone di cottura estensibili; vedi Avvio e utilizzo
IT 53 5. Fissare il cavo di alimentazione nell’apposito fermacavo e chiudere il coperchio. Fase Fase Fase Cavallotto Neutro Terra 1 2 3 5 4 Trifase 400 Allacciamento del cavo di alimentazione alla rete In caso di collegamento diretto alla rete è necessario interporre tra l’apparecchio e la rete un i...
Page 54 - Avvio e utilizzo
54 IT Avvio e utilizzo ! La colla applicata sulle guarnizioni lascia alcune tracce di grasso sul vetro. Prima di utilizzare l’apparecchio, si raccomanda di eliminarle con un prodotto specifico per la manutenzione non abrasivo. Durante le prime ore di funzionamento è possibile avvertire un odore di g...
Page 55 - Dispositivi di sicurezza; Rilevamento dei recipienti; Segnale acustico
IT 55 garantire lo sfruttamento di tutto il calore disponibile. • Accertarsi che il fondo delle pentole sia sempre perfettamente asciutto e pulito, per garantire la corretta aderenza e una lunga durata, sia alle zone di cottura che alle pentole stesse. • Evitare di utilizzare le stesse pentole utili...
Page 56 - Consigli pratici per la cottura
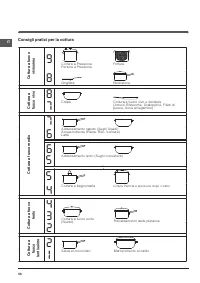
56 IT Consigli pratici per la cottura ª Cottura a PressionePentola a Pressione Frittura Grigliata Ebollizione Cottura a fuoco vivissimo Cottura a fuoco vivo Cottura a fuoco medio Cottura a fuoco lento Cottura a fuoco lentissimo •• ¶ Crêpe Cottura a fuoco vivo e doratura(Arrosti, Bistecche, Scaloppin...
Page 57 - Precauzioni e consigli; Sicurezza generale; L’apparecchio deve essere usato per cuocere; vedi Avvio e; L’apparecchio non è destinato a essere messo in; Smaltimento
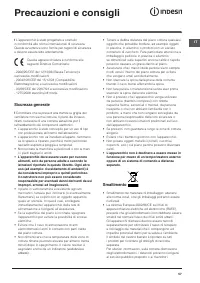
IT 57 Precauzioni e consigli ! L’apparecchio è stato progettato e costruito in conformità alle norme internazionali di sicurezza. Queste avvertenze sono fornite per ragioni di sicurezza e devono essere lette attentamente. Questa apparecchiatura è conforme alle seguenti Direttive Comunitarie: - 2006/...
Page 58 - Manutenzione e cura; Escludere la corrente elettrica; Telaio in acciaio inox; Smontare il piano
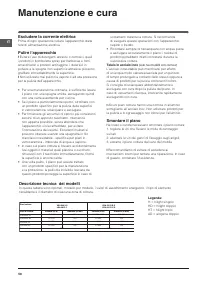
58 IT Manutenzione e cura Escludere la corrente elettrica Prima di ogni operazione isolare l’apparecchio dalla rete di alimentazione elettrica. Pulire l’apparecchio ! Evitare l’uso di detergenti abrasivi o corrosivi, quali i prodotti in bombolette spray per barbecue e forni, smacchiatori e prodotti ...
Page 59 - Installatie; Plaatsing; zie Voorzorgsmaatregelen en advies; Inbouw; zie afbeeldingen; Ventilatie; LADE
59 NL Installatie ! Bewaar dit instructieboekje zorgvuldig voor eventuele raadpleging in de toekomst. Wanneer u het product weggeeft, verkoopt, of wanneer u verhuist, dient u dit boekje bij het apparaat te bewaren zodat waarschuwingen en informatie betreffende werking voorhanden blijven. ! Lees de i...
Page 60 - Bevestigen; Elektrische aansluiting; Klemmenstrook; Andere soorten aansluitingen; zie afbeelding Klemmenstrook
60 NL hierboven uitsteken, moeten op minstens 600 mm van de rand van de plaat staan. Bevestigen Het apparaat moet op een absoluut horizontaal oppervlak worden geïnstalleerd. Eventuele door onjuiste installatie veroorzaakte vervormingen kunnen de eigenschappen en de prestaties van de kookplaat aantas...
Page 61 - Verwijder of vervang de voedingskabel voor; Verlengbare kookgedeeltes; zie Starten en
61 NL 4. Plaats de draden zoals aangegeven in de volgende afbeeldingen en tabel en stel een verbinding tot stand door alle schroeven van de klemmetjes goed vast te draaien. Spanningstype en netfrequentie Elektrische aansluitingen Klemmenbord 400V 3-N ~ 50/60 Hz Driefasen 400 5. Bevestig de voedingsk...
Page 62 - Starten en gebruik
62 NL Starten en gebruik ! De lijm die gebruikt is voor de afdichtingen laat wat vetvlekjes achter op het glas. Voordat u het apparaat gebruikt raden wij u aan de vlekken te verwijderen met een speciaal niet-schurend schoonmaakmiddel. Gedurende de eerste paar uur dat u het apparaat gebruikt kan het ...
Page 63 - Veiligheidssystemen; Pannensensor; Geluidssignaal
63 NL • Gebruik pannen die groot genoeg zijn om de kookplaat geheel te bedekken zodat alle beschikbare hitte wordt benut. • Houd de bodem van de pannen altijd goed schoon en droog zodat ze goed aansluiten op het kookvlak. Dit verlengt de levensduur van zowel de pannen als het kookvlak zelf. • Vermij...
Page 64 - Praktische kooktips
64 NL Praktische kooktips ª Koken met een snelkookpanSnelkookpan Frituren Grillen Koken VKoken op zeer hoog vuur Koken op hoog vuur Koken op middelmatig vuur Koken op laag vuur Koken op zeer laag vuur •• ¶ Crêpes Koken op hoog vuur en bruin bakken(Braadstukken, biefstukken, kalfslappen, visfilets, g...
Page 65 - Algemene veiligheidsmaatregelen; Het apparaat dient gebruikt te worden om; Het apparaat is niet geschikt om te worden; Afvalverwijdering
65 NL Voorzorgsmaatregelen en advies ! Dit apparaat is ontwikkeld en gefabriceerd volgens de geldende internationale veiligheidsvoorschriften. Deze aanwijzingen zijn geschreven voor uw veiligheid en u dient ze derhalve goed door te nemen. Dit apparaat voldoet aan de volgende EU Richtlijnen: - 2006/9...
Page 66 - Onderhoud en verzorging; De elektrische stroom afsluiten; Raamwerk van roestvrij staal; De kookplaat verwijderen
66 NL Onderhoud en verzorging De elektrische stroom afsluiten Sluit altijd eerst de stroom af voordat u tot enige handeling overgaat. Reinigen van het apparaat ! Vermijd het gebruik van schuurmiddelen of bijtende middelen, zoals sprays voor barbecues en ovens, vlekkenmiddelen, roestverwijderende pro...
Page 67 - Instalacja; Ustawienie; patrz Zalecenia i; Zabudowa; patrz rysunki; Obieg powietrza; SZUFLADY
67 PL Instalacja ! Nale ż y zachowa ć niniejsz ą instrukcj ę , aby móc z niej skorzysta ć w ka ż dej chwili. W razie sprzeda ż y, odst ą pienia lub przeniesienia urz ą dzenia, nale ż y si ę upewni ć , czy instrukcja zosta ł a przekazana wraz z nim, aby nowy w ł a ś ciciel p ł yty grzejnej móg ł si ę...
Page 68 - patrz rysunek
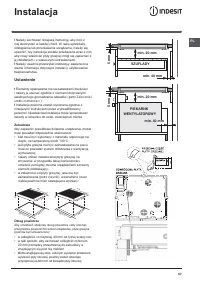
68 PL Mocowanie Urz ą dzenie powinno by ć zainstalowane na idealnie p ł askim blacie. Ewentualne odkszta ł cenia, spowodowane nieprawid ł owym zamocowaniem, mog ą by ć przyczyn ą zmiany w ł a ś ciwo ś ci urz ą dzenia i, w konsekwencji, wp ł ywaj ą c niekorzystnie na jego prac ę . D ł ugo ść ś ruby r...
Page 69 - Rozszerzalne pola grzejne; WLACZENIA PODWÓJNEJ PLYTY; W£¥CZENIA PODWÓJNEJ P£YTY; patrz Uruchomienie i; W£¥CZENIA POTRÓJNEJ P£YTY
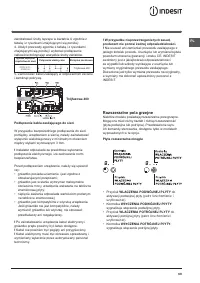
69 PL zainstalowa ć ś ruby łą cz ą ce w kszta ł cie U zgodnie z tabel ą i z rysunkami znajduj ą cymi si ę poni ż ej: 4. U ł o ż y ć przewody zgodnie z tabel ą i z rysunkami znajduj ą cymi si ę poni ż ej i wykona ć pod łą czenie ca ł kowicie dokr ę caj ą c wszystkie ś ruby zacisków. Typowe napięcie i...
Page 73 - Ogólne zasady bezpiecze; patrz; Utylizacja
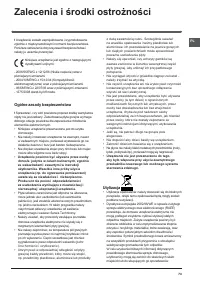
73 PL Zalecenia i ś rodki ostro ż no ś ci ! Urz ą dzenie zosta ł o zaprojektowane i wyprodukowane zgodnie z mi ę dzynarodowymi normami bezpiecze ń stwa. Poni ż sze ostrze ż enia dotycz ą zasad bezpiecze ń stwa i nale ż y je uwa ż nie przeczyta ć . Niniejsze urz ą dzenie jest zgodne z nast ę puj ą cy...
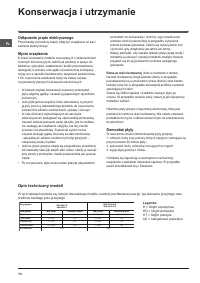
Page 74 - Konserwacja i utrzymanie; Rama ze stali nierdzewnej; ęż
74 PL Konserwacja i utrzymanie Od łą czenie pr ą du elektrycznego Przed ka ż d ą czynno ś ci ą nale ż y od łą czy ć urz ą dzenie od sieci zasilania elektrycznego. Mycie urz ą dzenia ! Unika ć stosowania ś rodków czyszcz ą cych o w ł a ś ciwo ś ciach ś ciernych lub korozyjnych, takich jak produkty w ...
Page 75 - Монтаж; Расположение; Встроенный; см; Вентиляция; Ящик
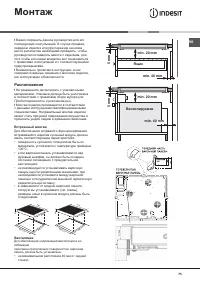
75 RS Монтаж ! Важно сохранить данное руководство для его последующих консультации . В случае продажи , передачи изделия или при переезде на новое место жительства необходимо проверить , чтобы руководство оставалось вместе с изделием , для того чтобы его новыи владелец мог ознакомиться с правилами э...
Page 76 - Электрическое
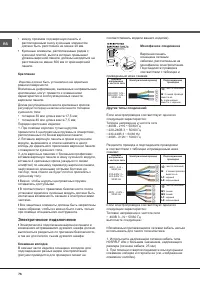
76 RS • между проемом под варочную панель и расположенным снизу кухонным элементом должно быть расстояние не менее 20 мм . • Кухонные элементы , расположенные рядом с кухонной плитой , высота которых превышает уровень варочной панели , должны находиться на расстояние не менее 600 мм от края варочной...
Page 77 - INDESIT; Расширяющиеся
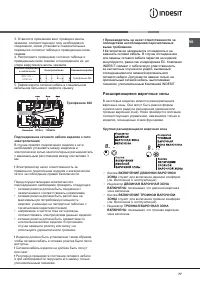
77 RS 3. Отвинтите прижимнои винт провода и винты зажимов , соответствующих типу необходимого соединения , затем установите соединительные перемычки согласно таблице и приведенным ниже схемам . 4. Расположите проводники согласно таблице и приведенным ниже схемам и подсоедините их , до упора закрутив...
Page 78 - Включение; power
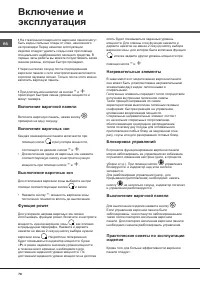
78 RS Включение и эксплуатация ! На стекляннои поверхности варочнои панели могут быть видны сальные следы от клея , нанесенного на прокладки Перед началом эксплуатации изделия следует удалить следы клея при помощи специального неабразивного моющего средства . В первые часы работы вы можете почувство...
Page 79 - Защитные
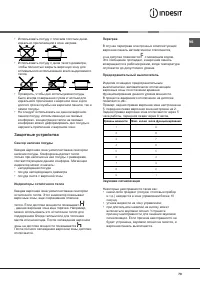
79 RS • Использовать посуду с плоским толстым дном , идеально прилегающим к зоне нагрева ; • Использовать посуду с дном такого диаметра , чтобы полностью закрыть варочную зону для оптимального использования всего выделяемого тепла . • Проверить , чтобы дно используемои посуды было всегда совершенно ...
Page 80 - Практические
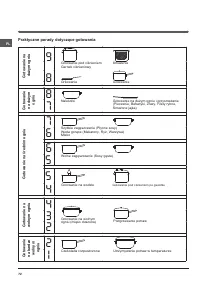
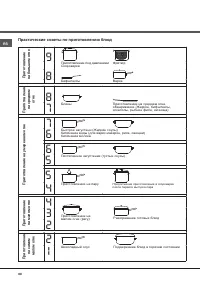
80 RS Практические советы по приготовлению блюд ª Приготовление под давлением Скороварка Фритюр Бифштексы Варка Приготовление на большом огне Приготовление на среднем огне Приготовление на умеренном огне Приготовление на малом огне Приготовление на самом малом огне •• ¶ Блины Приготовление на средне...
Page 81 - Предосторожности; Общие; Утилизация
81 RS Предосторожности и рекомендации ! Изделие спроектировано и изготовлено в соответствии с международными нормативами по безопасности . Необходимо внимательно прочитать настоящие предупреждения , составленные в целях вашеи безопасности . Данное оборудование отвечает требованиям нижеуказанных Дире...
Page 82 - Техническое; “hilight”
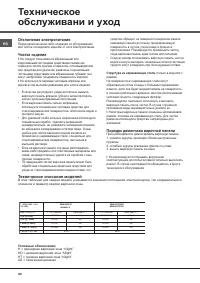
82 RS Техническое обслуживани и уход Отключение электропитания Перед началом какои - либо операции по обслуживанию или чистке отсоедините изделие от сети электропитания . Чистка изделия ! Не следует пользоваться абразивными или коррозивными чистящими средствами такими как спраи для чистки духовок и ...
Page 83 - ПАСПОРТНАЯ; Company
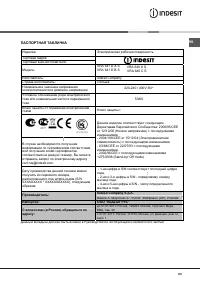
83 RS ПАСПОРТНАЯ ТАБЛИЧКА Изделие : Электрическая рабочая поверхность Торговая марка : Торговый знак изготовителя : Модель : VRA 641 D X S VRA 641 D B S VRA 640 X S Изготовитель : Indesit Company Страна - изготовитель : Польша Номинальное значение напряжения электропитания или диапазон напряжения 22...
Page 84 - XEROX FABRIANO