Page 3 - S E C T I O N; PA G E
S E C T I O N Safety Instructions Your RangehoodOperating Your RangehoodInstallation InstructionsCleaning & Maintenance Troubleshooting & Technical DataNotesWarranty InformationPurchase Details PA G E 4567 1 1 1 2 1 3 1 4 1 6 C O N T E N T S
Page 4 - S A F E T Y I N S T R U C T I O N S
4 This rangehood must only be installed in accordance with the instructions provided. Incorrect installation may cause harm to persons, damage property and void the product’s warranty. Important Please ensure that you read the entire instructions before beginning the installation of your rangehood. ...
Page 5 - Y O U R R A N G E H O O D
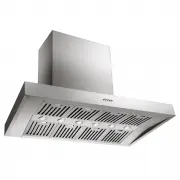
5 Specifications Model Product dimensions (W,D,H mm) ARCBBQ 1200mm × 700mm × 689-1279mm Model Extraction Other features: ARCBBQ 2 × 1000m3/hr extraction – 3 speed push button control – 6 × 1W LED lamp – 8 × Baffle filter Y O U R R A N G E H O O D Rangehood components Your Airvolution Canopy Rangehoo...
Page 6 - O P E R AT I N G Y O U R R A N G E H O O D
6 Controls O P E R AT I N G Y O U R R A N G E H O O D Y our Airvolution Canopy Rangehood features push button controls. Of f button It’s used for turning off the fan. Lo w Speed button It’s used for Ventilation on the kitchen. It is suitable for simmering and cooking which do not make much steam. Me...
Page 7 - I N S TA L L AT I O N I N S T R U C T I O N S
7 It’s important to carefully read the following installation instructions before beginning the installation of your oven. Important installation safety – Always switch the power off prior to beginning the installation. – Stainless steel is very easily damaged during installation. Wherever possible,...
Page 8 - Through your wall; Cooker hood
8 I N S TA L L AT I O N I N S T R U C T I O N S C O N T I N U E D Through your wall Further to your various ducting options, below are some tips on how to correctly duct your rangehood: – Always use correctly sized ducting – DO NOT reduce the size of the ducting – Always use solid ducting – Always u...
Page 9 - Chimney installation
9 I N S TA L L AT I O N I N S T R U C T I O N S C O N T I N U E D Chimney installation – We need the secure screws to make sure the hood is stable on the wall. After hanging the cooker hood on the bracket ,remove the filters , mark and drill 2 holes and fasten the hood on the wall with 2 wall plugs ...
Page 10 - Upper chimney
10 I N S TA L L AT I O N I N S T R U C T I O N S C O N T I N U E D Chimney installation Upper chimney Lower chimney – Slide the upper chimney to adjust the chimney height. When the height required is reached, drill 4 × 8mm holes to accommodate the plate II. Screw and tighten the plate II onto the wa...
Page 11 - C L E A N I N G & M A I N T E N A N C E
1 1 By ensuring proper cleaning and maintenance of your Airvolution rangehood, you can ensure that it will have a long and fault free operation. Cleaning the baffle filters Keeping this filter clean will eep the rangehood extraction performance at an optimum. Please strictly follow the guidelines be...
Page 12 - T R O U B L E S H O O T I N G
1 2 Operation in case of emergency I n the event of an emergency you should: – Switch off all rangehood controls. – Switch the rangehood off at the power outlet and immediately unplug. – Call the Residentia Support Team on 1300 11 HELP (4357). Some minor faults can be fi ed by referring to the instr...
Page 13 - N O T E S
Page 14 - Warranty terms and conditions; WA R R A N T Y
1 4 Warranty terms and conditions Cooking appliances (rangehoods) This document sets out the terms and conditions of the product warranties for Residentia Group Appliances. It is an important document. Please keep it with your proof of purchase documents in a safe place for future reference should y...
Page 15 - IMPORTANT; WA R R A N T Y C O N T I N U E D
1 5 5. You will bear the cost of transportation, travel and delivery of the Appliance to and from Residentia Group or its ASR. If you reside outside of the service area, you will bear the cost of: (a) travel of an authorised representative; (b) transportation and delivery of the Appliance to and fro...
Page 16 - Store details; Product details; P U R C H A S E D E TA I L S
1 6 For your records, please record details of your purchase below and staple your receipt on the opposite page. Store details Store name | Address | Telephone | Purchase date | Product details Model no. | Serial no.* | * Note. Your serial number can be found on the inside of the rangehood, undernea...
Page 17 - R E C E I P T