Page 2 - Table of Contents
ENGLISH Table of Contents General Information Important Tip/Image Sticking Precaution ...............................1 Safety Precaution .................................................................2 Contents of the Package .......................................................6 Products Sold S...
Page 3 - image for a long time.; Box still image; Important Tip
1 General Information ENGLISH Image Retention Effect (Image Sticking) 1. Cause : - Image Retention Effect may come from displaying a still picture in a certain period of time with at a certain area continuously, as feature of Panel. This is caused due to brightness degradation. Many Panelmanufacture...
Page 4 - Safety Precaution
2 General Information ENGLISH Safety Precaution The contents of this section are provided for the safety of users and their property.Please read the instructions carefully before using. Do not connect multiple electricalappliances to a single outlet. - It may cause a fire due to overheating from the...
Page 8 - Contents of the Package
6 General Information ENGLISH Contents of the Package When opening the package, please ensure to check the following accessories. Products Sold Separately If you want to purchase the following accessories, consult a service center, electronics shops, or parts seller. Antenna Cable(coaxial cable) Pow...
Page 9 - How to Mount and Detach The Speakers; How to mount the speakers onto the base of the unit; WARNING; 2” - Press the tension hook and remove; When detaching the speakers; 6” - Remove the speakers in reverse order.
7 General Information ENGLISH How to Mount and Detach The Speakers - 26”/32” LCD TV You can attach the speakers to the base of the unit or use them separately. How to mount the speakers onto the base of the unit 1. Tilt the unit backward until its base faces yourself (See next page “How to Adjust th...
Page 10 - Kensington Lock Anti-theft Device; * Kensington Technology Group; How to adjust the view angle; You can adjust the panel downward or upward at a 0~15 degree angle.
Kensington Lock Anti-theft Device - 26”/32”/40” LCD TV - This display unit supports Kensington standard security lock to prevent theft. - You should purchase the Kensington lock device personally, if you need. The security lock is available at an electronics shop. - For more information, please refe...
Page 11 - How To Install Desktop Stand
9 General Information ENGLISH How To Install Desktop Stand - 42”/50” PDP TV 1. Place the TV body on a flat desk or a shelf. Clean the surface of the desk or the shelf in order to prevent scratch on the product. 2. Align the stand with TV body below and fasten the stand bars using 4 fixing screws.3. ...
Page 12 - Parts configuration chart
10 General Information ENGLISH How To Use Speakers (Standing Type) - 42”/50” PDP TV Parts configuration chart Assembly and Connection Method Insert brackets into the grooves onthe rear of speakers and fasten themwith fixing screws. (Left and right side each) Fasten with TV body using fixing screws. ...
Page 14 - Parts Names and Functions; Front View
12 General Information ENGLISH - Power Indicator Status - Parts Names and Functions - 26”/32” LCD TV Front View Volume buttons Use these buttons to adjust sound levels.These buttons also serve as the cursors ofSelect/Adjust in Menu mode. Channel buttons Use these buttons to change channels. Thesebut...
Page 15 - Rear View
13 General Information ENGLISH Rear View Power switch Power (AC) input terminal DVI Video / HDMI input terminal D-SUB input terminal DVI/D-SUB Audio input terminal Component 2 Audio input terminal Component 2 Video input terminal Component 1 Audio input terminal Component 1 Video input terminal CVBS...
Page 20 - external; Remote Control
18 General Information ENGLISH 1. POWER/STANDBY 2. MUTE This button is also used when setting up to use other external devices . 3. PIP FUNCTIONS - PIP : Use this button for PIP On/Off. - SOURCE : Use this button to select the input source of sub-picture. - SIZE : Use this button to select the size ...
Page 21 - Other buttons available in Memory Mode; How to Insert Batteries in the Remote Controller; The following buttons are used differently in each menu.; Teletext & Fastext Function
19 General Information ENGLISH Power Saving Function when listening to musicMusic Playback Setting (Repeat 1, Repeat All, Sequence)Select, Start, Pause/PlaybackMove between file listings, Previous Track/Next Track, Reverse/Fast Forward, Photo Rotation Exit, CancelEject CardSlide ShowZoom InCheck Ver...
Page 22 - Connecting Antenna Input Connection to External Equipments
20 Connections ENGLISH ✓ When inserting a 75 ohm coaxial cable into the input connection, ensure the wire tip not to bend. ✓ If you experience poor signal reception, we recommend you purchase a signal amplifier for better picture quality. VHF Antenna UHF Antenna Antenna cable Connecting Indoor/Outdo...
Page 23 - The superior picture quality starts from the far left side.; How to Connect a DTV Receiver or DVD Player
21 Connections ENGLISH Before Connecting the Video/Audio Connections to External Devices... Please make sure to read the following instruction to enjoy the best picture quality.Best picture quality is displayed in the following order. The superior picture quality starts from the far left side. ✓ Out...
Page 24 - How to Connect to a PC
How to Connect to a PC 1. Connect the PC signal cable (15-pin D-sub) between the output terminal of PC and the D-sub input terminal of TV.2. Connect the Audio cable between Audio output terminal of PC and Audio input terminal for PC on the rear of TV. (Connect the jacks to terminals in the same colo...
Page 25 - Resolutions Supported in PC; Scart Connection to the External Input/Output
23 Connections ENGLISH Resolutions Supported in PC Vertical frequency 70.00 - 72.8075.00 -- 70.0860.3275.0072.19 74.5560.0070.0775.0360.0274.99 Horizontal frequency 31.47 - 37.8631.50 -- 31.4737.8846.8848.08 49.7348.3656.4860.0263.9861.27 Vertical frequency 70.0985.0859.9472.8075.0085.0170.0860.3272...
Page 26 - HDMI Connection; compliant consumer electronic device, such; Compatible VIDEO Signal; - This input terminal is not intended for use with computers.
*1. HDMI, the HDMI logo and High-Definition Multimedia Interface are trademarks or registered trademarks of HDMI Licensing LLC. *2. EIA/CEA-861/861B profiles compliance covers profiles for transmission of uncompressed digital video including high bandwidth digital content protection. HDMI Connection...
Page 27 - Different OSD Menu; You can confirm OSD menu of three different type.; How to Set the OSD Screen; PC; ANALOG TV
25 Connections ENGLISH Different OSD Menu You can confirm OSD menu of three different type. How to Set the OSD Screen PC : For supporting Personal Computer connection. DVI* : Digital Visual Interface for using TMDS transmission reduces the loss of signal. ➥ *Notes : “DVI” is changed to “HDMI” in HDM...
Page 28 - How to Select the Picture Mode
ENGLISH 26 Picture Setup Press MENU button. Menu items appear on the screen. Press button to select “Picture” Icon. “PICTURE MODE” is highlighted. Press / buttons, then the menu changes in the following order. ➛ STANDARD ➛ DYNAMIC ➛ MOVIE ➛ MILD ➛ USER ➛ Press EXIT button to TV viewing or press MENU...
Page 29 - How to Set the Desired Picture in PC, DVI/HDMI Input Modes; How to Select a Color Temperature
ENGLISH Press MENU button.Menu items appear on the screen. Press button to select “Picture” Icon. “CONTRAST” is highlighted. Select required option by pressing the / buttons, then Press / buttons to adjust. After selecting COLOR TEMP, then the menu changes in the following order. ➛ NORMAL ➛ WARM ➛ C...
Page 30 - How to Set the Display Scale; Press; How to Set Noise Reduction
ENGLISH 28 Picture Setup How to Set the Display Scale Users can adjust the display scale as they want Press MENU button.Menu items appear on the screen. Press button to select “Picture” Icon. “PICTURE MODE” is highlighted. Press / buttons to move to “SCALE”. Press / buttons, then the mode change in ...
Page 31 - How to Set Image Adjust in PC Mode
ENGLISH 29 Picture Setup How to Set Image Adjust in PC Mode Press MENU button. Menu items appear on the screen. Press button to select “PC” Icon. “H-POSITION” is highlighted. Select required option by pressing the / button, then Press / button to adjust. Press EXIT button to TV viewing or press MENU...
Page 32 - How to Adjust the Desired Audio Mode; How To Directly Select Picture Mode : Press SOUND button.; How to Select the Audio Mode
ENGLISH 30 Sound Setup How to Adjust the Desired Audio Mode Users can adjust sound mode automatically as they want. Press MENU button.Menu items appear on the screen. Press / buttons to move to “SOUND” icon. Press button to select “SOUND” icon. “SOUND MODE” is highlighted. Press / buttons to select ...
Page 33 - How to Select S. Mode
ENGLISH Press MENU button.Menu items appear on the screen. Press button to select “SOUND” Icon. “SOUND MODE” is highlighted. Press / buttons to move to “S.MODE”. Press / buttons to set to MONO/STEREO . Press EXIT button to TV viewing or press MENU button to return to the previousmenu. ➥ How To Direc...
Page 34 - How to Set the Output of Subwoofer; How to Select TruSurround XT
ENGLISH 32 Sound Setup How to Set the Output of Subwoofer You can set this function when you wish to install your subwoofer speaker system. Press MENU button.Menu items appear on the screen. Press / buttons to move to “SOUND” icon. Press button to select “SOUND” icon. “SOUND MODE” is highlighted. Pr...
Page 35 - How to Select Earphone
ENGLISH 33 Sound Setup How to Select Earphone User can adjust earphone volume. Press MENU button.Menu items appear on the screen. Press / buttons to move to “SOUND” icon. Press button to select “SOUND” icon. “SOUND MODE” is highlighted. Press / buttons to move to “EARPHONE”. Press / buttons to adjus...
Page 36 - Automatic Program Searching
ENGLISH 34 Channel Setup Press MENU button.Menu items appear on the screen. Press / Buttons to move to “CHANNEL” icon. Press button to select “CHANNEL” Icon. “AUTO PROGRAM” is highlighted. Press / Buttons to move to “MANUAL PROGRAM”. Press button to select “MANUAL PROGRAM”. Manual program menu appea...
Page 37 - How to Set the Program Edit
ENGLISH Press MENU button.Menu items appear on the screen. Press / Buttons to move to “CHANNEL” icon. Press button to select “CHANNEL” Icon. “AUTO PROGRAM” is highlighted. Press / Buttons to move to PROGRAM EDIT”. Press button to select “PROGRAM EDIT”. The program table appears on the screen. One pr...
Page 39 - Supported PIP Table
ENGLISH 37 Function Setup Press / buttons to move to “SOURCE”. Press / button, then source changes. ➟ see the refer supported PIP table. ➥ How To Directly Change Sub Source : Press SOURCE button. In case of PIP mode, go to step 8 if you need to set the “SWAP” of Main and sub pictures. Press / button...
Page 40 - Using the Pixel Shift / Full White
ENGLISH 38 Function Setup Press MENU button.Menu items appear on the screen. Press button to select “Function” Icon. “PIP/TWIN” is highlighted. Press / buttons to move to “KEY LOCK”. Press / buttons to set to ON/OFF . Press EXIT button to TV viewing or press MENU button to return to the previousmenu...
Page 41 - Choosing the Your Languages; How to Set Teletext in ATV
ENGLISH Choosing the Your Languages Using the TV for the first time, users must select thier prefered language preference in order todisplay main menus and sub menus, etc. Press MENU button. Menu items appear on the screen. Press button to select “OSD” Icon. “LANGUAGE” is highlighted. Press / button...
Page 42 - Selecting Teletext Display Options in ATV Mode; BUTTON
ENGLISH 40 Function Setup • FLOF INDEX (Full Level One Facilities) • TOP INFO. (Table of Page) • To Store Page • Return to List or FLOF mode Selecting Teletext Display Options in ATV Mode When users have displayed a teletext page, they can have various options to suit their requirements. DISPLAY(ACT...
Page 44 - How to Search Automatically
ENGLISH 42 DTV Channel Setup Press MENU button.Menu items appear on the screen. Press / Buttons to move to “DTV CHANNEL” icon. Press button to select “DTV CHANNEL” Icon. “AUTO SCAN” is highlighted. Press / Buttons to move to “MANUAL SCAN”. Press buttons to select MANUAL SCAN” MANUAL Scan menu appear...
Page 45 - How to Check Tuner State
ENGLISH 43 DTV Channel Setup Press / buttons to select “Bandwidth”, and set the proper value for the selected Channel. Press Up and Down buttons to move to “Scan”. Press buttons to store all the entered channel data. Then you can get the following menu showing the scanning process.After scanning pro...
Page 47 - How to Select Channel List
ENGLISH 45 DTV Channel Setup How to Select Channel List Users can change the current channel to any other channel they want. Press MENU button.Menu items appear on the screen. Press / buttons to move to “DTV CHANNEL” icon. Press button to select “DTV CHANNEL” Icon. “AUTO SCAN” is highlighted. Press ...
Page 48 - How to Use Channel List Mode
ENGLISH 46 DTV Channel Setup Press CH. LIST button.Channel list appears on the screen. Press “ORANGE” button, then you can see “Channel List Mode” window. Select required option by pressing the / buttons, then Press / buttons to select you want. Press buttons. You will see the following mode. ♦ Favo...
Page 49 - How to Set the Channel Order; How to Delete Channel; Users can delete channels from the channel list.
ENGLISH 47 DTV Channel Setup How to Set the Channel Order Users can organize the number or sequence of the channels. Press CH. LIST button.Channel list menu appears on the screen. Press / or / buttons to select the channel you want to move. Press “YELLOW” buttons. Press / or / buttons to move to the...
Page 50 - How to Add Channel; How to Factory Set
ENGLISH 48 DTV Channel Setup How to Add Channel Users add channels they want. Press CH. LIST button.Channel list menu appears on the screen. Press WHITE buttons. The Add Digital Channel window will appear. Select the channels with / buttons or numeric keys. Select required option by pressing the / b...
Page 51 - How to TV/RADIO switching
ENGLISH 49 DTV Channel Setup How to TV/RADIO switching Users can use this menu when they want to change a TV channel to a Radio channel or vice versa. ➥ Press “TV/RADIO” button. Avoid listening to the radio for a long time, without changing the screenimage. It can cause “Image Sticking”. Check “Imag...
Page 52 - How to Select Channel / Information; How to Set Teletext in DTV
ENGLISH 50 DTV Channel Setup How to Select Channel / Information Brief information is displayed, such as current channel type, name, local start/end time, guide information, current time,fav/normal mode, Audio mode and Audio ID. ➥ Press “INFO” button.The information bar will pop-up. ✓ If you have no...
Page 53 - How to Use Memory Mode; Precautions when using a Memory Card; Commercially available memory cards (Sold separately)
51 Memory Setup ENGLISH Memory Card Slot 1 (MT) Memory Card Slot 2 (CF) How to Use Memory Mode -* For Q320, Q400 Model only Please read the following instructions carefully before using it. Remaining for a long time in Memory mode (Still Image) can cause “Image Sticking”. Precautions when using a Me...
Page 55 - Using a Memory Card; CAUTION; Shifting into Memory Mode
53 Memory Setup ENGLISH Using a Memory Card 1. Insert a memory card or USB memory into Slot 1/2 or USB port. 2. Press to power on. 3. Press to select Memory Mode. 4. Refer to icons listed below menu screen to manipulate. CAUTION ! When you are going to remove the memory card, press the button on the...
Page 57 - Viewing full-size photos
55 Memory Setup ENGLISH Viewing full-size photos Whenever you press from the current screen, magnifying powers are shifted in sequence 1.5X 2X 2.5X 1X(original size). After zooming in a photo, press to move. Rotating a photo To rotate the photo by 90 degrees clockwise, press button. To rotate the ph...
Page 59 - Checking the stored movie files
57 Memory Setup ENGLISH Checking the stored movie files You can set to play back all files (Play Sequence) or selected file (Play One) in sequence by pressing . Playing back movie files 1. Press to move to movie file you want. 2. Press to select a movie file to play back. To hide the icon menus on t...
Page 61 - How to Use an External Device Using the Remote Control; VCR Setting Number Table
59 Appendix ENGLISH How to Use an External Device Using the Remote Control When setting other manufacturer s product using the remote control, some of the buttons on the remote control maynot operate or different functions may be activated, or some of other manufacturer s products may not work. Some...
Page 63 - Troubleshooting; Installation Problems
61 Appendix ENGLISH Troubleshooting Installation Problems Picture Problems Symptom How can I install an antenna? TV screen is not clear after installing an indoors antenna. How can I view cable broadcasting? Symptom Neither picture nor sound comes up. Picture turns on slowly after power is on. Pictu...
Page 64 - Possible solution
Sound Problems General After setting the time, I turned TV off and turn it on. The programmed information has been erased. Symptom Too much noise occurs. No sound while viewing a cable channel Picture is OK but sound does not come out. One of the speakers does not produce sound. Symptom Remote contr...
Page 65 - Product Specifications
63 Appendix ENGLISH Product Specifications - The above specifications may be subject to change without prior notice. Q321 / Q320 1 (A/V) 1 (A/V) 1 (A/V audio common) 1 (Audio included) 2 (Audio included) 1 D-SUB 1366 X 768 @ 75 Hz L/R 1 Slot 1, Slot 2, USB (For Q320 model only) 1 (Audio included) 1 ...
Page 68 - Inhaltsverzeichnis
DEUTSCH Inhaltsverzeichnis Allgemeine Informationen Wichtiger Hinweis .................................................................1 Sicherheitsmaßnahmen ........................................................2 Inhalt der Verpackung ...........................................................3 G...
Page 69 - Bildkonservierungseffekt (Image Sticking); Kleines Standbild; Wichtiger Hinweis
1 Allgemeine Informationen DEUTSCH Bildkonservierungseffekt (Image Sticking) 1. Ursache: - Der Bildkonservierungseffekt (oder auch Einfrieren des Bildes) kann durch die längerfristige Anzeige eines Standbildes entstehen und ist ein Merkmal von Fernsehern. Dies entsteht durch eine Verschlechterung de...
Page 70 - Sicherheitsmaßnahmen
2 Allgemeine Informationen DEUTSCH Erdung der Außenantenne Bei Anschluss einer Außenantenne oder eines Kabelsystems an das Gerät, muss dieAntenne oder das Kabelsystem so geerdet werden, dass es gegen Spannungsspitzenund statische Aufladungen schützt. Abschnitt 810 des National Electrical Code(Nation...
Page 71 - Sicherheitsvorkehrungen.
3 Allgemeine Informationen DEUTSCH Bei einer deutlichen Ansammlungvon Staub oder Wasser auf demStecker muss dieser mit einemtrockenen Tuch abgewischt werden. - Es besteht Feuer- oder Stromschlaggefahr. Stecker fest in die Steckdoseeinstecken, damit dieser sich nichtselbständig löst. - Lockere Verbin...
Page 74 - Inhalt der Verpackung; Beim Auspacken sollten Sie folgende Zubehörteile vorfinden.; Getrennt erhältliche Zubehörartikel
6 Allgemeine Informationen DEUTSCH Inhalt der Verpackung Beim Auspacken sollten Sie folgende Zubehörteile vorfinden. Getrennt erhältliche Zubehörartikel Setzen Sie sich mit einem Kundendienstcenter, Elektronikgeschäft oder Händler in Verbindung, falls Siegetrennt erhältliche Zubehörartikel erwerben ...
Page 75 - ACHTUNG; Montage und Demontage der Lautsprecher; Montage der Lautsprecher auf dem Sockel des Gerätes.; 2” - Spannhaken drücken, Lautsprecher in; Abmontieren der Lautsprecher
7 Allgemeine Informationen DEUTSCH Die mitgelieferten Lautsprecher sind nur für dieses Gerät geeignet. Sie sollten nicht an andereGeräte angeschlossen werden. Wenn Sie einen anderen Verstärker anschließen, dann solltedie Leistung des Verstärkerausgangs 10 W nicht überschreiten. Eine höhere Leistung ...
Page 76 - Einstellen des Betrachtungswinkels
8 Allgemeine Informationen DEUTSCH Einstellen des Betrachtungswinkels - 26”/32” LCD TV Sie können den Bildschirm in einem Winkel zwischen 0 und 15 Grad nach vorne oder hinten verstellen. Kensington-Diebstahlsicherung - 26”/32”/40” LCD TV - Dieses Displaygerät unterstützt die Kensington-Standarddiebs...
Page 77 - Anbringen des Standfusses
9 Allgemeine Informationen DEUTSCH Anbringen des Standfusses - 42”/50” PDP TV 1. Legen Sie den PDP auf einen flachen Tisch. Reinigen Sie die Schreibtischfläche vorher, um ein Verkratzen des Produkts zu verhindern. 2. Richten Sie die Unterkante des PDP-Gehäuses mit dem Halter aus, und befestigen Sie ...
Page 78 - Verwenden der Lautsprecher; Lautsprecherzubehör; WARNUNG
10 Allgemeine Informationen DEUTSCH Verwenden der Lautsprecher - 42”/50” PDP TV Lautsprecherzubehör Anschluss- und Verbindungsmethode Setzen Sie die Halter in die Nutenauf der Rückseite der Lautsprecherein, und befestigen Sie sie mit denBefestigungsschrauben(linke und rechte Seite). Befestigen Sie d...
Page 79 - Verwenden der Lautsprecher als Standlautsprecher
11 Allgemeine Informationen DEUTSCH Verwenden der Lautsprecher als Standlautsprecher - 42”/50” PDP TV Lautsprecherzubehör Anschluss- und Verbindungsmethode 2 Lautsprecher (links und rechts) 2 Lautsprecherständer (links und rechts) 8 Befestigungsschrauben 2 Sätze Lautsprecherkabel (links und rechts) ...
Page 80 - Teilebezeichnungen und Funktionen; Frontansicht; Auswahltaste
12 Allgemeine Informationen DEUTSCH Teilebezeichnungen und Funktionen - 26”/32” LCD TV Frontansicht Lautstärke-Tasten Mit diesen Tasten können Sie die Lautstärkeeinstellen. Diese Tasten dienen im Menü Modusauch als Cursor für Auswählen / Einstellen. Sender-Tasten Verwenden Sie diese Tasten um den Se...
Page 81 - Rückansicht
13 Allgemeine Informationen DEUTSCH Rückansicht Ein-/Ausschalter Netzkabeleingangsbuchse DVI-Video Eingangsbuchse D-Sub Eingangsbuchse DVI/D-SUB Audio-Eingangsbuchse Component 2 Audio-Eingangsbuchse Component 2 Video-Eingangsbuchse Component 1 Audio-Eingangsbuchse Component 1 Video-Eingangsbuchse CV...
Page 82 - Lautsprecher
14 Allgemeine Informationen DEUTSCH Teilebezeichnungen und Funktionen - 40” LCD TV Frontansicht Lautsprecher Ein-/Ausschalter Fernbedienungssensor und Betriebs-LED. - Die Fernbedienung auf die LED richten.- Zeigt den Standby- oder Betriebsstatus an. Ein-/Ausschalttaste Verwenden Sie diese Taste um d...
Page 86 - Fernbedienung; DVDs oder VCRs anderer Hersteller.
18 Allgemeine Informationen DEUTSCH Fernbedienung 1. POWER/STANDBY2. STUMMSCHALTUNG Diese Taste wird auch zum Einstellen anderer externerGeräte benutzt. 3. Bild-in-Bild-FUNKTIONEN -PIP : Verwenden Sie diese Taste um PIP ein- und auszuschalten.-QUELLE : Verwenden Sie diese Taste, um die Eingangsquell...
Page 87 - Andere im Speichermodus mögliche Tasten; Einsetzen der Batterien in die Fernbedienung; Folgende Tasten werden in jedem Menü anders verwendet.; Bedienen der Tasten im Speichermodus
Energiesparfunktion beim Hören von Musik.Einstellung der Musikwiedergabe (Repeat 1, Repeat All, Sequence)Auswählen, Start, Pause/WiedergabeUmschalten zwischen Dateilisten, Vorheriger/Nächster Track,Zurück-/Vorspulen, FotodrehungVerlassen, AufhebenKarte auswerfenDiaschauVergrößernVersionsinfo (erster...
Page 88 - Verbinden des Antenneneingangs mit externen Geräten.; Antenneneingang Ihres LCD-Fernsehers zu verbinden; Videorekorder/Kabelreceiver
20 Anschlüsse DEUTSCH ✓ Achten Sie beim Anschließen eines 75-Ohm Koax-Kabels darauf, dass die Kabelspitze nicht verbogen ist. ✓ Bei schlechter Empfangsqualität empfehlen wir, einen Antennenverstärker zur Verbesserung der Bildqualität zu kaufen. Anschluss der Innen- / Außenantenne (UHF/VHF) - Antenne...
Page 89 - Vor dem Anschluss der Video-/Audioverbindungen an externe Geräte; Die bessere Bildqualität beginnt ganz weit links.; Anschluss eines DTV-Receivers oder DVD-Spielers
21 Anschlüsse DEUTSCH Vor dem Anschluss der Video-/Audioverbindungen an externe Geräte Beachten Sie folgende Hinweise hinsichtlich des Anschlusses, um beste Bildqualität zu erfahren. Die besteBildqualität wird in der folgenden Reihenfolge angezeigt. Die bessere Bildqualität beginnt ganz weit links. ...
Page 90 - Anschließen an einen PC
Anschließen an einen PC 1. Schließen Sie die PC-Signalkabel (15-Pin D-Sub) zwischen den Ausgangsbuchsen des PC und der D-Sub Eingangsbuchse des LCD-Fernsehers an.2. Schließen Sie das Audiokabel zwischen den Audioausgangsbuchsen des PC und den Audioeingangsbuchsen für PC des LCD-Fernsehers an. (Verbi...
Page 91 - Bei PC unterstützte Auflösungen; Fernsehprogramm aufzunehmen.
23 Anschlüsse DEUTSCH Bei PC unterstützte Auflösungen Scart-Anschluss an externen Ein-/Ausgang Wenn Sie einen zweiten Videorekorder haben und Kassetten kopieren möchten, verbinden Sie denAusgangsvideorekorder an die Buchse “F Scart” und den Zielvideorekorder an die Buchse “H Scart”, damit Sie dasSig...
Page 92 - HDMI Anschluss; Unterstützte Videosignale; - Der HDMI Anschluss ist nicht für den Anschluss von PC ́s geeignet
24 Anschlüsse DEUTSCH *1. HDMI, das HDMI Logo und High Definition Multimedia Interface sind Warenzeichen bzw. eingetragene Warenzeichen der HDMI Licensing LLC. *2. EIA/CEA-861/861B definiert das Profil zur Übertragung von unkompremierten digitalen videosignalen incl. HDCP Codierung (High Bandwidth D...
Page 93 - Verschiedene OSD-Menüs; Sie können das OSD-Menü in drei verschiedenen Arten anzeigen.; Einstellen des OSD-Bildschirms; VIDEO; Bei einer Quelle in iDTV
25 Anschlüsse DEUTSCH Verschiedene OSD-Menüs Sie können das OSD-Menü in drei verschiedenen Arten anzeigen. Einstellen des OSD-Bildschirms PC : Zur Unsterstützung eines PC-Anschlusses. DVI* : Digitaes visuelles Interface zur Benutzung von TMDS-Übertragungen reduziert Signalverlust. ➥ *Anmerkungen : I...
Page 94 - Wie der Bildmodus gewählt wird
DEUTSCH 26 Bildeinrichtung Taste MENU drücken.Auf dem Bildschirm werden die Menüpunkte angezeigt. Taste drücken, um das Symbol “BILD” zu wählen. Der Menüpunkt “BILD MODUS” ist markiert. Mit den Tasten / kann man die Menüpunkte in folgender Reihenfolge ändern. ➛ STANDARD ➛ DYNAMIS. ➛ FILM ➛ MILD ➛ BE...
Page 95 - Einstellen einer Farbtemperatur
DEUTSCH 27 Bildeinrichtung Taste MENU drücken.Auf dem Bildschirm werden die Menüpunkte angezeigt. Taste drücken, um das Symbol “BILD” zu wählen. “KONTRAST” ist markiert. Mithilfe der Pfeiltasten / , die Option wählen und mit / einstellen. Nach Auswahl des Menüpunkts COLOR TMP, wechselt das Menü in f...
Page 96 - Einstellen des Bildschirmformats; Drücken Sie auf; Einstellen der Rauschunterdrückung
DEUTSCH 28 Bildeinrichtung Einstellen des Bildschirmformats Der Anwender kann das Bildschirmformat selbst einstellen. Die MENU-Taste drückenAuf dem Bildschirm werden die Menüpunkte angezeigt. Taste drücken, um das Symbol “BILD” zu wählen. Der Menüpunkt “BILD MODUS” ist markiert. Drücken Sie au / um ...
Page 97 - Einstellen des Bildes im PC-Modus
DEUTSCH 29 Bildeinrichtung Einstellen des Bildes im PC-Modus Taste MENU drücken.Auf dem Bildschirm werden die Menüpunkte angezeigt. Taste drücken, um das Symbol “BILD” zu wählen. “H. LAGE”wird markiert. Mithilfe der Pfeiltasten / , die Option wählen und mit / einstellen. EXIT drücken, um das Menü zu...
Page 98 - Einstellen des Audiomodus; Wie der Bildmodus direkt ausgewählt wird: Taste SOUND drücken.; Wie der Audiomodus eingestellt wird
DEUTSCH 30 Klangeinstellung Einstellen des Audiomodus Anwender können den Klangmodus automatisch nach Belieben einstellen. Taste MENU drücken.Auf dem Bildschirm werden die Menüpunkte angezeigt. Drücken Sie auf / um den Menüpunkt "TON" zu wählen. Taste drücken, um das Symbol “TON” zu wählen. ...
Page 99 - Einstellen des S-MODUS
DEUTSCH Taste MENU drücken.Auf dem Bildschirm werden die Menüpunkte angezeigt. Taste drücken, um das Symbol “TON” zu wählen. Der Menüpunkt “SOUNDMODUS” ist markiert. Drücken Sie auf / um den Menüpunkt “S.MODUS” zu wählen. Drücken Sie auf / um MONO/STEREO einzustellen. EXIT drücken, um das Menü zu ve...
Page 100 - Einstellen der Subwoofer-Ausgangs; Einstellen von TRUSURROUND XT
DEUTSCH 32 Klangeinstellung Einstellen der Subwoofer-Ausgangs Sie können diese Funktion einstellen, wenn Sie Ihren Subwoofer installieren wollen. Die MENU-Taste drückenAuf dem Bildschirm werden die Menüpunkte angezeigt. Drücken Sie auf / um den Menüpunkt “TON” zu wählen. Taste drücken, um das Symbol...
Page 101 - Einstellen des KOPFHÖRERS
DEUTSCH 33 Klangeinstellung Einstellen des KOPFHÖRERS Die Anwender können hier die Lautstärke des Kopfhörers einstellen. Die MENU-Taste drückenAuf dem Bildschirm werden die Menüpunkte angezeigt. Drücken Sie auf / um den Menüpunkt “TON” zu wählen. Press um den Menüpunkt “TON” zu wählen. Der Menüpunkt...
Page 102 - Automatischer Sendersuche
DEUTSCH 34 Sendereinstellung 1 Taste MENU drücken.Auf dem Bildschirm werden die Menüpunkte angezeigt. Drücken Sie auf / um den Menüpunkt “KANAL” zu wählen. Taste drücken, um das Symbol “KANAL” zu wählen. “AUTO PR” ist markiert. Drücken Sie auf / um zum Menüpunkt “MANUELL PR.” zu gehen. Taste drücken...
Page 103 - Aufrufen der Programmbearbeitung.
DEUTSCH Die MENU-Taste drückenAuf dem Bildschirm werden die Menüpunkte angezeigt. Drücken Sie auf / um den Menüpunkt “KANAL” zu wählen. Drücken Sie auf um den Menüpunkt “KANAL” zu wählen. “AUTO PR” ist markiert. Drücken Sie auf / um zum Menüpunkt “PR ÄNDERN” zu gehen. Zur Auswahl des Menüpunkts “PR ...
Page 105 - Direktes Umschalten auf die Unterquelle: Taste SOURCE drücken.; Tabelle mit unterstützten
37 Funktionseinstellung DEUTSCH Drücken Sie auf / um den Menüpunkt “QUELLE“ zu wählen. Die Tasten / drücken, dann ändert sich die Quelle. ➟ siehe PIP-Tabelle. ➥ Direktes Umschalten auf die Unterquelle: Taste SOURCE drücken. Im PIP-Modus zu Schritt 8 übergehen, wenn Sie die Funktion “SWAP” des Haupt-...
Page 106 - Einstellen der Tastenverriegelung
DEUTSCH 38 Funktionseinstellung Die MENU-Taste drückenAuf dem Bildschirm werden die Menüpunkte angezeigt. Press um den Menüpunkt “FUNKTION” zu wählen. “PIP/TWIN” ist markiert. Drücken Sie auf / um zum Menüpunkt “TASTENSPERRE” überzugehen. Press / um den Modus Ein-/Auszuschalten EXIT drücken, um das ...
Page 107 - Sprachauswahl; Videotext im ATV einstellen.
DEUTSCH Sprachauswahl Wenn Sie Ihren Fernseher erstmals verwenden, müssen Sie die gewünschte Sprache auswählen, damit die Haupt- undUntermenüs, usw. korrekt angezeigt werden. Drücken Sie die Menu Taste.Auf dem Bildschirm werden die Menüpunkte angezeigt. Drücken Sie die Taste drücken, um das Symbol “...
Page 108 - Auswahl der Videotextanzeigeoptionen im ATV-Modus; Taste
DEUTSCH 40 Funktionseinstellung Auswahl der Videotextanzeigeoptionen im ATV-Modus Nach dem Anzeigen einer Videotextseite haben Sie verschiedene Optionen zur Auswahl. ANZEIGE (AKTION) • Hidden Text (verborgener Text) (z.B.Antworten auf Quizfragen) • Normaler Bildschirm • Eine zweite Seite • Normaler ...
Page 110 - Automatische Suche
DEUTSCH Taste MENU drücken.Auf dem Bildschirm werden die Menüpunkte angezeigt. Drücken Sie auf / um den Menüpunkt “DTV KANAL” zu wählen. Taste drücken, um das Symbol DTV KANALL zu wählen. “AUTO SUCHE” ist markiert. Drücken Sie auf / um zum Menüpunkt “MANUELL SCAN” zu gehen. Taste drücken, um das Sym...
Page 111 - Prüfen des Senderstatus
DEUTSCH 43 DTV -Sendereinstellung Drücken Sie die Tasten / um “Bandbreite” zu wählen und stellen Sie den richtigen Wert für den gewählten Sender ein. Drücken Sie die Auf und Ab Tasten um zu “Suchen” zu wechseln. Zum Speichern sämtlicher eingegebenen Senderdaten die Taste drücken. Dann erhalten Sie f...
Page 113 - Auswahl der Senderliste; Einstellen der bevorzugten Sender
DEUTSCH 45 DTV -Sendereinstellung Auswahl der Senderliste Der Benutzer kann den aktuellen Sender auf einen beliebigen Sender umschalten. Die MENU-Taste drückenauf dem Bildschirm werden die Menüpunkte angezeigt. Drücken Sie auf / um den Menüpunkt “DTV KANAL” zu wählen. Taste drücken, um das Symbol “D...
Page 114 - Senderlistenmodus benutzen
DEUTSCH 46 DTV -Sendereinstellung Taste CH. LIST drücken.Die Kanalliste erscheint auf dem Bildschirm. Die “ORANGE”-farbene Taste drücken und das Fenster “Senderlisten-Modus” erscheint. Mithilfe der Pfeiltasten / , die Option wählen und mit / einstellen. Taste drücken. Sie sehen nun folgende Modi. ♦ ...
Page 115 - Sortieren der Sender; Sender löschen
DEUTSCH 47 DTV -Sendereinstellung Sortieren der Sender Hier können die Benutzer die Nummer oder Senderfolge einstellen. Taste CH. LIST drücken.Die Kanalliste erscheint auf dem Bildschirm. Drücken Sie auf / oder / um den zu bewegenden Sender zu wählen. Drücken Sie die “GELBE” Taste. Drücken Sie auf /...
Page 116 - Sender hinzufügen; Werkseinstellungen zurückstellen
DEUTSCH 48 DTV -Sendereinstellung Sender hinzufügen Die Benutzer können beliebig Kanäle hinzufügen. Taste CH. LIST drücken.Die Kanalliste erscheint auf dem Bildschirm. Drücken Sie die WEISSE Taste.Das Fenster Add Digital Channel erscheint. Den Sender mit den Tasten / oder mit den Zahlentasten wählen...
Page 117 - Umschalten von TV/RADIO
DEUTSCH 49 DTV -Sendereinstellung Umschalten von TV/RADIO Die Benutzer können dieses Menü verwenden, wenn Sie von einem TV-Sender auf Radio oder umgekehrt umschalten wollen. ➥ Die Taste TV/RADIO drücken. Vermeiden Sie einen zu langen Betrieb der Radiofunktion bei gleichemBildinhalt. Dies könnte zu B...
Page 118 - Auswahl der Senderinformationen
DEUTSCH 50 DTV -Sendereinstellung Auswahl der Senderinformationen Hier wird eine kurze Information angezeigt, wie zB.. der aktuelle Sendertyp, Name, lokale Start/Endzeit,Programminformation, aktuelle Uhrzeit, Fav/Normaler Modus, Audiomodus und Audio ID. ➥ Drücken Sie die “INFO” Taste.Die Information...
Page 119 - Benutzen des Speichermodus; Bitte lesen Sie vor Benutzung die Anleitung sorgfältig durch.; Vorkehrungen beim Benutzen einer Speicherkarte; Im Handel erhältliche Speicherkarten (Separat erhältlich)
51 Speichereinstellungen DEUTSCH Speicherkarte Steckplatz 1 (MT) Speicherkarte Steckplatz 2 (CF) Benutzen des Speichermodus * Nur bei Modell Q320, Q400 Bitte lesen Sie vor Benutzung die Anleitung sorgfältig durch. Vermeiden Sie einen zu langen Betrieb des Speicherkartenlesers(MMP) mit gleichem Bildi...
Page 120 - Unterstützte Dateien
52 Speichereinstellungen DEUTSCH Unterstützte Dateien Unterstützte Mediadateitypen Unterstützte, komprimierte Jpeg/Bilddateiformate Mögliche Speicherkartenkapazität. USB HOST USB 1.1 HOST Sromversorg ung CompactFlash : 8MB ~4GBMicrodrive : 1GB, 2GB, 4GB / 2.5GB, 5GBSmartMedia : 8MB ~128MBxD-Picture ...
Page 121 - Verwenden einer Speicherkarte; Umschalten in den Speichermodus
53 Speichereinstellungen DEUTSCH Verwenden einer Speicherkarte 1. Eine Speicherkarte oder eine USB-Festplatte in Schlitz 1/2 oder in den USB-Port stecken. 2. Drücken sie auf , um einzuschalten. 3. Drücken Sie auf um den Speichermodus zu wählen. 4. Siehe nachstehende Liste mit den Symbolen auf dem Me...
Page 122 - Ansehen der gespeicherten Fotodateien.
54 Speichereinstellungen DEUTSCH Ansehen der gespeicherten Fotodateien. Fotos in ganzer Größe ansehen 1. Drücken Sie auf um eine Fotodatei zu markieren. 2. Drücken Sie auf ...... um das Foto auszuwählen. Für das Symbolmenü die Taste drücken. Bedientasten Aktuelle Seite/Alle Seiten. Voransicht Taste ...
Page 123 - Fotos in ganzer Größe ansehen; TIPP
55 Speichereinstellungen DEUTSCH Fotos in ganzer Größe ansehen Wenn Sie die Taste im aktuellen Bildschirm wählen, dann wird die Ansicht in der nachfolgenden Reihenfolge vergrößert 1.5X 2X 2.5X 1X (Originalgröße). Nach dem Vergrößern des Fotos, zum Markieren drücken. Drehen eines Fotos Zum Drehen des...
Page 124 - Ansehen der gespeicherten Musikdateien.
56 Speichereinstellungen DEUTSCH Ansehen der gespeicherten Musikdateien. Wenn Sie drücken, dann startet bei der Diaschau Die Musikwiedergabe je nach den im Fotomodus gewählten Optionen. Wiedergabe von Musikdateien 1. Drücken Sie auf um das Optionsmenü anzuzeigen. 2. Taste zur Wiedergabe drücken. Bei...
Page 125 - Anzeigen der gespeicherten Filmdateien
57 Speichereinstellungen DEUTSCH Anzeigen der gespeicherten Filmdateien Sie können die alle Dateien wiedergeben (Wiedergabesequenz) oder nur die gewählte Datei (Eine Datei)indem Sie nacheinander drücken. Wiedergabe von Filmdateien 1. Drücken Sie auf um eine Filmdatei zu markieren. 2. Drücken Sie auf...
Page 127 - Benutzen eines externen Gerätes mit der Fernbedienung; Videoeinstellungsnummern
59 Anhang DEUTSCH Benutzen eines externen Gerätes mit der Fernbedienung Wenn Sie ein Gerät eines anderen Herstellers mit der Fernbedienung benutzen, dann funktionieren einige der Tastenauf der Fernbedienung nicht oder andere Funktionen werden aktiviert oder das Gerät funktioniert gar nicht. MancheDV...
Page 128 - DVD-Einstellungsnummern
60 Anhang DEUTSCH DVD-Einstellungsnummern Satellite Receiver-Einstellungsnummern
Page 129 - Fehlerbehebung; Installationsprobleme
61 Anhang DEUTSCH Fehlerbehebung Installationsprobleme Symptom Bildprobleme Symptom Wie kann ich eine Antenne installieren? Die Fernsehanzeige ist nach der Installation einer Raumantenne nicht deutlich. Wie kann ich Kabelfernsehen sehen? Es gibt weder Bild noch Ton. Das Bild erscheint nach dem Einsc...
Page 130 - Tonprobleme
62 Anhang DEUTSCH Tonprobleme Symptom Allgemeines Symptom Das automatische Einschalten funktioniert nicht. Nach dem Einstellen der Uhrzeit habe ich den Fernseher aus- und eingeschaltet. Die programmierte Information wurde gelöscht. Es tritt zu viel Rauschen auf. Kein Ton beim Ansehen eines Kabelkana...
Page 131 - Technische Daten
63 Anhang DEUTSCH Technische Daten - Änderungen ohne vorherige Ankündigung vorbehalten. Q321 / Q320 1 (A/V) 1 (A/V) 1 (A/V Audio) 1 (Audio eingeschlossen) 2 (Audio eingeschlossen) 1 D-SUB 1366 X 768 bei 75 Hz L/R 1 Steckplatz 1, Steckplatz 2, USB (Nur bei Modell Q320) 1 (Audio eingeschlossen) 1 1 1 ...
Page 134 - Sommaire
FRANÇAIS Sommaire Informations générales Conseils importants ..............................................................1 Consignes de sécurité ..........................................................2 Contenu de l’emballage ........................................................6 Produits Ven...
Page 135 - * Ce phénomène n’est pas couvert par la Garantie.; image fixe Box; Conseils importants
1 Informations générales FRANÇAIS Effet rémanence (Image Sticking) 1. Cause : - L’effet Rémanence peut se produire en affichant un arrêt sur image pendant un certain temps et sur une même zone de l’écran, ce qui est une caractéristique d’un écran d’un téléviseur. Cela est dû à la dégradation de la l...
Page 136 - Consignes de sécurité
2 Informations générales FRANÇAIS Consignes de sécurité Le contenu de cette section est fourni pour la sécurité des utilisateurs et de leurs biens.Veuillez lire attentivement ces instructions avant utilisation. Ne branchez pas plusieurs appareilsélectriques sur une même prise. - Cela pourrait provoq...
Page 137 - Consignes de Sécurité
3 Informations générales FRANÇAIS Consignes de Sécurité ............................................................Suite de la page précédente Le contenu de cette section concerne la sécurité des utilisateurs et de leurs biens.Veuillez lire attentivement ces instructions avant utilisation. S’il y a...
Page 140 - Contenu de l’emballage
6 Informations générales FRANÇAIS Contenu de l’emballage Après avoir ouvert l’emballage, assurez-vous que vous disposez des accessoires suivants : Produits Vendus Séparément Si vous souhaitez acheter les accessoires suivants, contactez un centre d’assistance, un magasin d’articlesélectroniques ou un...
Page 141 - Comment Monter et Séparer les Haut-parleurs; Comment monter les haut-parleurs sur la base de l’unité; AVERTISSEMENT; 2” - Appuyer sur crochet de tension et ôter; Lors de la séparation des haut-parleurs
7 Informations générales FRANÇAIS Comment Monter et Séparer les Haut-parleurs - 26”/32” LCD TV Vous pouvez fixer les haut-parleurs à la base de l’unité ou bien les utiliser séparément. Comment monter les haut-parleurs sur la base de l’unité 1. Inclinez l’unité vers l’arrière jusqu’à ce qu’elle vous ...
Page 142 - Verrou Kensington antivol; disponible en magasins d’électronique.; Comment régler l’angle de vue
Verrou Kensington antivol - 26”/32” /40” LCD TV - Cet écran supporte le verrou de sécurité standard Kensington pour éviter le vol.- Vous devez acheter personnellement le verrou Kensington, si vous en avez besoin. Le verrou de sécurité est disponible en magasins d’électronique. - Pour plus d’informat...
Page 143 - Comment installer le support mural
9 Informations générales FRANÇAIS Comment installer le support mural - 42”/50” PDP TV 1. Placez le PDP sur une surface plane. Nettoyez préalablement cette surface afin d’éviter des rayures sur le produit.2. Alignez le support sur le corps du PDP et serrez les barres du support à l’aide des 4 boulons...
Page 144 - Tableau des pièces
10 Informations générales FRANÇAIS Utilisation des hauts-parleurs (verticaux) - 42”/50” PDP TV Tableau des pièces Méthode de montage et de branchement Insérez les supports dans les rainuresà l’arrière des hauts-parleurs, etserrez à l’aide des boulons.(Chacun à gauche et à droite) Attachez l’ensemble...
Page 146 - Noms et fonctions des touches; Vue avant
12 Informations générales FRANÇAIS Noms et fonctions des touches - 26”/32” LCD TV Vue avant Touches de volume Utilisez ces boutons pour régler les niveauxsonores. Ils servent aussi de curseur deSélection/Réglage en mode Menu. Touches Chaîne Utilisez ces touches pour changer de chaîne.Ces touches ser...
Page 147 - Vue arrière
13 Informations générales FRANÇAIS Vue arrière HDMI Option Interrupteur d’alimentation Borne d’entrée d’alimentation (CC) Borne d’entrée Vidéo DVI/HDMI Borne d’entrée D-SUB Borne d’entrée Audio DVI/D-SUB Borne d’entrée composant Audio 2 Borne d’entrée composant Vidéo 2 Borne d’entrée composant Audio...
Page 152 - Télécommande
18 Informations générales FRANÇAIS 1. MARCHE/ARRET/VEILLE 2. COUPURE SON Ce bouton sert aussi pour les réglages lors del’utilisation d’autres dispositifs externes. 3. FONCTIONS PIP (Picture in Picture) - PIP : Utilisez ce bouton pour activer/désactiver les fonctions PIP. - SOURCE : Utilisez ce bouto...
Page 153 - Autres boutons disponibles dans le Mode Mémoire; Comment mettre les piles dans la Télécommande; Utilisation des boutons en Mode Mémoire
19 Informations générales FRANÇAIS Fonction Économie d’Énergie pendant écoute de musique Réglage de lecture de Musique (Répéter 1, Répéter tout, Ordre)Sélectionner, Commencer, Pause/LectureSe déplacer entre listes de fichiers, Piste Précédente/PisteSuivante, Retour/Avance Rapide, Rotation d’ImageQui...
Page 154 - l’entrée antenne de votre téléviseur.
20 Connexions FRANÇAIS ✓ Lorsque vous introduisez un câble coaxial de 75-ohm dans la connexion d’entrée, assurez-vous que la pointe du câblen’est pas pliée. ✓ Si la réception du signal est mauvaise, nous vous recommandons l’achat d’un amplificateur de signaux pour unemeilleure qualité d’image. Anten...
Page 155 - La qualité d’image supérieure à l’extrême gauche.; Comment connecter un Récepteur DTV ou un Lecteur DVD
21 Connexions FRANÇAIS Avant de brancher des connexions Vidéo/Audio à des Appareils Externes... Lisez attentivement les informations suivantes pour profiter de la meilleure qualité d’image. La meilleure qualitéd’image est affichée dans l’ordre suivant. La qualité d’image supérieure à l’extrême gauch...
Page 156 - Comment Connecter à un PC; (Branchez les câbles aux bornes de la même couleur)
Comment Connecter à un PC 1. Connectez le câble de signal PC (D-SUB 15 broches) entre la borne de sortie de l’ordinateur et la borne d’entrée D-SUB du téléviseur. 2. Connectez le câble Audio entre la borne de sortie Audio du PC la borne d’entrée Audio du PC située à l’arrière du téléviseur. (Branche...
Page 157 - Connexion par prise Scart à entrée/sortie externe
23 Connexions FRANÇAIS Resolutions Supported in PC Fréquence verticale 70.00 - 72.8075.00 -- 70.0860.3275.0072.19 74.5560.0070.0775.0360.0274.99 Fréquence horizontale 31.47 - 37.8631.50 -- 31.4737.8846.8848.08 49.7348.3656.4860.0263.9861.27 Fréquence verticale 70.0985.0859.9472.8075.0085.0170.0860.3...
Page 158 - Connexion HDMI; telles que des DVD, des; Compatibilité au signal vidéo; - Cette interface n’est pas prévue pour l’usage des ordinateurs.
*1. HDMI, le logo HDMI et High-Definition Multimedia Interface sont des marques déposées de HDMI Licensing LLC.*2. EIA/CEA-861/861B est la norme conforme à la transmission de la vidéo numérique non compressée comprenant la protection numérique en haute définition.. Connexion HDMI (pour les modèles H...
Page 159 - Menu Différent d’Affichage à l’Écran; Comment régler l’affichage à l’écran
25 Connexions FRANÇAIS Menu Différent d’Affichage à l’Écran Vous pouvez confirmer le menu d’affichage à l’écran de trois façons différentes. Comment régler l’affichage à l’écran PC : Pour connexion à un PC. DVI* : Interface Visuelle Numérique pour l’utilisation de transmission TMDS, réduit la perte ...
Page 160 - Comment sélectionner le Mode Image
FRANÇAIS 26 Réglage de l’image Appuyez sur le bouton MENU.Les éléments du menu s’affichent sur l’écran. Appuyez sur le bouton pour sélectionner l’icône “IMAGE”. "IMAGE MODE” est en surbrillance. Appuyez sur les boutons / , puis le menu changera dans l’ordre suivant. ➛ STANDARD ➛ DYNAMIQUE ➛ FILM...
Page 161 - Comment Régler l’Image dans les Modes d’Entrée PC et DVI/HDMI
FRANÇAIS Appuyez sur le bouton MENU.Les éléments du menu s’affichent sur l’écran. Appuyez sur le bouton pour sélectionner l’icône “IMAGE”. “CONTRASTE” est en surbrillance. Sélectionnez l’option nécessaire en appuyant sur les boutons / , puis Appuyez sur les boutons / pour effectuer le réglage. Après...
Page 162 - Comment Régler l’Échelle d’Affichage; LARGEUR; Comment régler le réducteur d’interférences
FRANÇAIS 28 Réglage de l’image Comment Régler l’Échelle d’Affichage L’utilisateur peut régler l’échelle d’affichage selon ses préférences. Appuyez sur le bouton MENU.Les éléments du menu s’affichent sur l’écran. Appuyez sur le bouton pour sélectionner l’icône “IMAGE”. “IMAGE MODE” est en surbrillanc...
Page 163 - Comment Régler l’Image en mode PC; Appuyez sur les boutons
FRANÇAIS 29 Réglage de l’image Comment Régler l’Image en mode PC Appuyez sur le bouton MENU.Les éléments du menu s’affichent sur l’écran. Appuyez sur le bouton pour sélectionner l’icône ‘PC’. “POSITION H.” est en surbrillance. Sélectionnez l’option nécessaire en appuyant sur le bouton / , puis Appuy...
Page 164 - Comment Régler le Mode Audio souhaité
FRANÇAIS 30 Réglage du son Comment Régler le Mode Audio souhaité L’utilisateur peut régler le mode Son automatiquement comme il le souhaite. Appuyez sur le bouton MENU. Les éléments du menu s’affichent sur l’écran. Appuyez sur les boutons / pour aller sur l’icône “SON”. Appuyez sur le bouton pour sé...
Page 165 - Comment sélectionner le mode S
FRANÇAIS Appuyez sur le bouton MENU.Les éléments du menu s’affichent sur l’écran. Appuyez sur le bouton pour sélectionner l’icône “SON”. “MODE SON” est en surbrillance. Appuyez sur les boutons / pour aller sur "S.MODE”. Appuyez sur les boutons / pour choisir MONO/STÉRÉO . Appuyez sur le bouton E...
Page 166 - Comment régler la sortie du Subwoofer
FRANÇAIS 32 Réglage du son Comment régler la sortie du Subwoofer Vous pouvez régler cette fonction si vous souhaitez installer votre système de haut-parleurs pour le caisson de grave. Appuyez sur le bouton MENU. Les éléments du menu s’affichent sur l’écran. Appuyez sur les boutons / pour aller sur l...
Page 167 - Comment sélectionner EARPHONE
FRANÇAIS 33 Réglage du son Comment sélectionner EARPHONE L’utilisateur peur régler le volume du casque. Appuyez sur le bouton MENU.Les éléments du menu s’affichent sur l’écran. Appuyez sur les boutons / pour aller sur l’icône “SON”. Appuyez sur le bouton pour sélectionner l’icône “SON”. “MODE SON” e...
Page 168 - Recherche Automatique de Programme
FRANÇAIS 34 Réglage des Chaînes Appuyez sur le bouton MENU. Les éléments du menu s’affichent sur l’écran. Appuyez sur les boutons / pour aller sur l’icône “CHAINE”. Appuyez sur le bouton pour sélectionner l’icône “CHAINE”. “PR AUTOMATIQUE” est en surbrillance. Appuyez sur les boutons / pour aller à ...
Page 169 - Comment Régler l’Édition de Programme
FRANÇAIS Appuyez sur le bouton MENU.Les éléments du menu s’affichent sur l’écran. Appuyez sur les boutons / pour aller sur l’icône “CHAINE”. Appuyez sur le bouton pour sélectionner l’icône “CHAINE”. “PR AUTOMATIQUE” est en surbrillance. Appuyez sur les boutons / pour aller sur “MODIF PRG.”. Appuyez ...
Page 170 - Comment régler le Mode PIP/TWIN; Utilisation du LNA (amplificateur de signal)
FRANÇAIS 36 Réglage des Chaînes Comment régler le Mode PIP/TWIN Ce paragraphe vous indique comment régler le mode PIP (Picture In Picture) ou le mode Twin (Jumelage d’Image). Vouspouvez regarder deux programmes ou sources en même temps. Appuyez sur le bouton Menu. (Cette fonction peut être utilisée ...
Page 171 - Tableau PIP supporté; pour sélectionner le numéro de chaîne
FRANÇAIS 37 Réglage des fonctions Adjust the size in PIP PC DVI/HDMI COMP-1 COMP-2 S-Video Video FSCRT HSCRT Analog TV Memory PC X X X X O O O O O X DVI/HDMI X X X X O O O O O X COMP-1 X X X X O O O O O X COMP-2 X X X X O O O O O X S-Video O O O O X O O O O X Video O O O O O X O O O X FSCRT O O O O ...
Page 172 - Comment effectuer le verrouillage des touches
FRANÇAIS 38 Réglage des fonctions Appuyez sur le bouton MENU.Les éléments du menu s’affichent sur l’écran. Appuyez sur le bouton pour sélectionner l’icône “FONCTIONS”. "PIP/TWIN” est en surbrillance. Appuyez sur les boutons / pour aller sur “VERR. BOUTON”. Appuyez sur les boutons / pour régler “...
Page 173 - Choix de la Langue
FRANÇAIS 39 Réglage des fonctions Choix de la Langue Quand vous utilisez votre téléviseur pour la première fois, vous devez sélectionner votre langue pour l’affichage des menusprincipaux et secondaires, etc. Appuyez sur le bouton MENU. Les éléments du menu s’affichent sur l’écran. Appuyez sur le bou...
Page 174 - Sélectionner les Options d’Affichage du Télétexte en Mode ATV; BOUTON
FRANÇAIS 40 Réglage des fonctions Sélectionner les Options d’Affichage du Télétexte en Mode ATV Lorsque vous avez affiché une page télétexte, vous pouvez avoir plusieurs options selon vos besoins. BOUTON REVEAL REVEAL AGAIN SUB PAGE SUB PAGE AGAIN TAILLE - UNE FOIS- DEUX FOIS - TROIS FOIS HOLD HOLD ...
Page 175 - Comment Régler l’Horloge, l’Heure de Sommeil, l’Heure de Marche/Arrêt; Passez à l’étape 6 si vous voulez régler l’heure de DURÉE DE SOMMEIL.
41 Réglage des fonctions FRANÇAIS Comment Régler l’Horloge, l’Heure de Sommeil, l’Heure de Marche/Arrêt Appuyez sur le bouton Menu. Les éléments du menu s’affichent sur l’écran. Appuyez sur le bouton pour sélectionner l’icône “OSD”. “LANGUE” est en surbrillance. Appuyez sur les boutons / pour aller ...
Page 176 - Comment Rechercher Automatiquement
FRANÇAIS 42 Réglage des Chaînes DTV 10 Appuyez sur le bouton MENU. Les éléments du menu s’affichent sur l’écran. Appuyez sur les boutons / pour aller sur l’icône “DTV CHAINE”. Appuyez sur le bouton pour sélectionner l’icône “DTV CHAINE”. “AUTOBALAYAGE” est en surbrillance. Appuyez sur les boutons / ...
Page 177 - Comment Vérifier l’État du Syntoniseur
FRANÇAIS 43 Réglage des Chaînes DTV Appuyez sur les boutons / pour sélectionner “Largeur de bande”, et réglez la valeur correcte de la chaîne choisie. Appuyez sur les touches Haut et Bas pour aller sur “Blayage”. Appuyez sur les boutons pour mémoriser les données de la chaîne saisie. Vouspouvez alor...
Page 178 - Comment utiliser le Guide (EPG : Guide Électronique des Programmes)
FRANÇAIS 44 Réglage des Chaînes DTV Appuyez sur le bouton MENU.Les éléments du menu s’affichent sur l’écran. Appuyez sur les boutons / pour aller sur l’icône “DTV CHAINE”. Appuyez sur le bouton pour sélectionner l’icône “DTV CHAINE”.“BALAYAGE AUTO” est en surbrillance. Appuyez sur les boutons / pour...
Page 179 - Comment Sélectionner la Liste des Chaînes; Comment Régler une Chaîne Favorite
FRANÇAIS 45 Réglage des Chaînes DTV Comment Sélectionner la Liste des Chaînes L’utilisateur peut passer la chaîne en cours à une autre chaîne. Appuyez sur le bouton MENU.Les éléments du menu s’affichent sur l’écran. appuyez sur les boutons / pour aller sur l’icône “DTV CHAINE”. Appuyez sur le bouton...
Page 180 - Appuyez sur la touche; Comment utiliser le Mode Liste des Chaînes
FRANÇAIS 46 Réglage des Chaînes DTV Appuyez sur le bouton CH. LIST.La liste des chaînes apparaît sur l’écran. Appuyez sur le bouton ORANGE. Vous pouvez alors voir la fenêtre “Mode Listedes chaînes” (mode de liste des chaînes). Sélectionnez l’option nécessaire en appuyant sur les boutons / , puis app...
Page 181 - Comment Régler l’Ordre des Chaînes; Comment Éliminer des Chaînes
FRANÇAIS 47 Réglage des Chaînes DTV Comment Régler l’Ordre des Chaînes L’utilisateur peut classer le numéro ou l’ordre des chaînes. Appuyez sur le bouton CH. LIST. Le menu de la liste des chaînes apparaît surl’écran. Appuyez sur les boutons / ou / pour sélectionner la chaîne que vous souhaitez verro...
Page 182 - Comment Ajouter des Chaînes; Comment Rétablir les Réglages d’Usine
FRANÇAIS 48 Réglage des Chaînes DTV Comment Ajouter des Chaînes L’utilisateur peut ajouter des les chaînes qu’il souhaite. Appuyez sur le bouton CH. LIST.Le menu de la liste des chaînes apparaît sur l’écran. Appuyez sur le bouton BLANC.La fenêtre des chaînes ajoutée s’affiche. Sélectionnez les chaîn...
Page 183 - Comment passer de la Télévision à la Radio
FRANÇAIS 49 Réglage des Chaînes DTV Comment passer de la Télévision à la Radio L’utilisateur peut utiliser ce menu pour passer d’une chaîne de télévision à une station de Radio, et vice-versa. ➥ Appuyez sur le bouton "TV/RADIO” Évitez d’écouter la radio pendant longtemps sans changer l’image de ...
Page 184 - Comment Sélectionner les Chaînes / Informations
FRANÇAIS 50 Réglage des Chaînes DTV Comment Sélectionner les Chaînes / Informations De brèves informations sont affichées, telles que le type, le nom de la chaîne en cours, l’heure locale de début/fin, lesinformations de guide, l’heure actuelle, le mode fav/normal, le mode Audio et l’ID Audio. ➥ App...
Page 185 - Comment Utiliser le Mode Mémoire; Précautions à prendre lors de l’utilisation de la Carte Mémoire; Cartes mémoire disponibles dans le Commerce (Vendues séparément)
51 Réglage de la Mémoire FRANÇAIS SMC Fente pour Carte Mémoire 1 (MT) Fente pour Carte Mémoire 2 (CF) xD MMC SD MS/ MS Pro(Duo) (CompactFlash) (MD, Microdrive) (ST 1 drive) Comment Utiliser le Mode Mémoire * Pour le modèle Q320, Q400 seulement Veuillez lire attentivement ces instructions avant utili...
Page 186 - Fichiers Supportés
52 Réglage de la Mémoire FRANÇAIS Fichiers Supportés Types de Fichiers Media Supportés Format de Fichier Jpeg/Image Comprimée Supporté Capacité de la carte mémoire HÔTE USB HÔTE USB 1.1 Alimentation CompactFlash : 8MB ~ 4GBMicrodrive : 1GB, 2GB, 4GB / 2.5GB, 5GBSmartMedia : 8MB ~ 128MBxD-Picture : 1...
Page 187 - Commuter au Mode Mémoire
53 Réglage de la Mémoire FRANÇAIS Réglage de la Mémoire 1. Introduisez une carte mémoire ou une mémoire USB dans la fente 1 ou 2 ou sur le port USB. 2. Appuyez sur allumer. 3. Appuyez sur pour sélectionner le Mode Mémoire. 4. Reportez-vous aux illustrations sous l’écran de menu pour voir comment man...
Page 188 - Voir les fichiers photos stockés
54 Réglage de la Mémoire FRANÇAIS Voir les fichiers photos stockés Voir des photos à échelle 1. Appuyez sur pour déplacer le fichier photo souhaité. 2. Appuyez sur pour sélectionner. Sur les menus des icônes, appuyez sur le bouton . Boutons de manipulation Page en cours/Toutes les pages Aperçu Mode ...
Page 189 - Voir des photos à échelle; CONSEIL
55 Réglage de la Mémoire FRANÇAIS Voir des photos à échelle Si vous appuyez sur depuis l’écran en cours, l’agrandissement se fait dans l’ordre suivants : 1.5X 2X 2.5X 1X(taille originale). Après un zoom, appuyez sur pour vous déplacer. Rotation de photo Pour retourner la photo de 90 degrés dans le s...
Page 190 - Voir les fichiers de musique stockés
56 Réglage de la Mémoire FRANÇAIS Voir les fichiers de musique stockés Si vous appuyez sur , la fonction diaporama commencera à lire les fichiers de musique en fonction des options sélectionnées en mode photo. Lire des fichiers de musique 1. Appuyez sur pour afficher le Menu Option. 1. Appuyez sur p...
Page 191 - Vérifier les fichiers de film stockés
57 Réglage de la Mémoire FRANÇAIS Vérifier les fichiers de film stockés Vous pouvez régler de lire tous les fichiers (Lire dans l’Ordre) ou un fichier sélectionné (Lire 1). dans l’ordre en appuyant sur . Lire des fichiers de film 1. Appuyez sur pour vous déplacer sur le fichier vidéo souhaité. 2. Ap...
Page 193 - Comment Utiliser un Dispositif Externe avec la Télécommande; Tableau des Num
59 Annexe FRANÇAIS Comment Utiliser un Dispositif Externe avec la Télécommande Lorsque vous r é gler le produit d ’ un autre fabricant à l ’ aide de la t é l é commande, certains des boutons de la t é l é commande risque de ne pas fonctionner, ou d ’ activer des fonctions diff é rentes. Et certains ...
Page 194 - Tableau des Numéros de Réglage pour DVD
60 Annexe FRANÇAIS Tableau des Numéros de Réglage pour DVD Tableau des Numéros de Réglage pour Récepteur Satellite
Page 195 - Résolution de problèmes; Problèmes d’installation
61 Annexe FRANÇAIS Résolution de problèmes Problèmes d’installation Problème Problèmes d’image Problème Comment puis-je installer une antenne ? L’écran du téléviseur n’est pas net après l’installation d’une antenne interne. Comment puis-je voir une émission câblée ? aucune image et aucun son. L’imag...
Page 196 - Problèmes de son
62 Annexe FRANÇAIS Problèmes de son Problème Général Problème La mise en Marche automatique ne fonctionne pas. Après avoir réglé l’horaire, j’ai éteint et allumé le téléviseur. Les informations programmées ont été effacées Trop bruyant. Pas de son en regardant une chaîne câblée L’image est OK mais i...
Page 197 - Caractéristiques de l’appareil
63 Annexe FRANÇAIS Caractéristiques de l’appareil Q321/Q320 1 (A/V) 1 (A/V) 1 (A/V audio commun) 1 (Audio inclus) 2 (Audio inclus) 1 D-SUB 1366 X 768 @ 75 Hz L/R 1 Fente 1, Fente 2, USB (Pour le Modèle Q320 uniquement) 1 (Audio inclus) 1 1 1 PAL/SECAM L FM, NTCAM Composant, S-Vidéo, Composite, PC, D...
Page 200 - ITALIANO; Indice
ITALIANO Indice Informazioni Generali Suggerimenti importanti .......................................................1 Precauzioni per la sicurezza ..................................................2 Componenti della confezione ................................................6 Prodotti venduti separ...
Page 201 - Effetto di mantenimento immagine (Incollamento immagine); Finestra immagine ferma; Suggerimenti importanti
1 Informazioni Generali ITALIANO Effetto di mantenimento immagine (Incollamento immagine) 1. Causa: - L'effetto di mantenimento immagine può essere provocato dalla visualizzazione di un'immagine fissa per un periodo di tempo continuato in una zona fissa, come la funzione del pannello . Ciò può esser...
Page 202 - Precauzioni per la sicurezza
2 Informazioni Generali ITALIANO Precauzioni per la sicurezza Il contenuto di questa sezione viene fornita per la sicurezza degli utenti e della loro proprietà.Leggere attentamente le istruzioni prima dell'uso. Non collegare più di un’apparecchiaturaelettrica a un a singola presa. - può provocare in...
Page 203 - Precauzioni per la Sicurezza
3 Informazioni Generali ITALIANO Se sulla spina vi è un accumulopersistente di polvere o acqua, pulirebene con un panno asciutto. - può provocare incendi o scossa elettrica. Inserire saldamente il cavo dialimentazione in modo che non possaessere estratto. - Una connessione insicura può essere causa ...
Page 206 - Componenti della confezione
6 Informazioni Generali ITALIANO Componenti della confezione Una volta aperta la confezione assicurarsi della presenza dei seguenti accessori. Prodotti venduti separatamente Per acquistare gli accessori seguenti rivolgersi al centro di assistenza, negozio di elettronica o rivenditore dicomponenti. C...
Page 207 - Come montare e togliere gli altoparlanti; Come montare gli altoparlanti alla base dell’unità; posizionati in posizione verticale.; 2” - Premere gancio tension. e rimuovere; Rimozione degli altoparlanti
7 Informazioni Generali ITALIANO Come montare e togliere gli altoparlanti - 26”/32” LCD TV E’ possibile installare gli altoparlanti alla base dell’unità o usarli separatamente. Come montare gli altoparlanti alla base dell’unità 1. Inclinare l’unità all’indietro finché la base non sia di fronte a voi...
Page 208 - Regolazione dell'angolo di visualizzazione; è disponibile presso qualsiasi negozio di elettronica.
8 Informazioni Generali ITALIANO Regolazione dell'angolo di visualizzazione - 26”/32” LCD TV E’ possibile regolare il pannello verso il basso o verso l’alto con un’angolazione di 0~15 gradi. 15 O Dispositivo Blocco Antifurto Kensington - 26”/32” /40” LCD TV - L’unità supporta un dispositivo di sicur...
Page 209 - Installazione del supporto da tavolo
9 Informazioni Generali ITALIANO Installazione del supporto da tavolo - 42”/50” PDP TV 1. Posizionare il corpo del PDP su un tavolo o ripiano. Pulire la superficie del tavolo o ripiano per prevenire graffi sul prodotto. 2. Allineare il piedistallo con il corpo del PDP e serrare le barre del supporto...
Page 210 - Schema di configurazione dei componenti; AVVERTENZA
10 Informazioni Generali ITALIANO Uso degli altoparlanti (Tipo verticale) - 42”/50” PDP TV Schema di configurazione dei componenti Assemblaggio e metodo di connessione Inserire le staffe nelle scanalatureposte sul retro degli altoparlanti efissare con le viti di fissaggio.(Lato sinistro e destro) Fi...
Page 212 - Nomi dei componenti e funzioni; Vista fronte
12 Informazioni Generali ITALIANO Nomi dei componenti e funzioni - 26”/32” LCD TV Vista fronte Pulsanti volume Usare questi pulsanti per regolare i livelli delvolume. Questi pulsanti servono anche comecursore di Selezione/Regolazione quandoattivata la modalità Menu. Pulsanti canale Usare questi puls...
Page 213 - Vista Retro
13 Informazioni Generali ITALIANO Vista Retro Interruttore alimentazione Terminale ingresso alimentazione Terminale di ingresso DVI/HDMI Terminale di ingresso D-SUB Terminale di ingresso audio DVI/D-SUB Terminale d’ingresso audio componente 2 Terminale d’ingresso video componente 2 Terminale d’ingre...
Page 216 - Vista frontale
16 Informazioni Generali ITALIANO Nomi dei componenti e funzioni - 40” /50” PDP TV Vista frontale Tasto di accensione Questo tasto serve ad accendere e spegnere la TV. Tasti volume Usare questi tasti per regolare il livello del volume.Questi pulsanti servono anche come cursore diSelezione/Regolazion...
Page 218 - Telecomando; Selezione di altri dispositivi esterni(
18 Informazioni Generali ITALIANO Telecomando 1. ACCESO/STANDBY2. MUTO Questo pulsante viene anche utilizzato quando si utilizzanoaltri dispositivi esterni. 3. FUNZIONI PIP - PIP : Con questo pulsante attivare a disattivare la funzione PIP (On/Off) - SOURCE : Questo pulsante serve alla selezione del...
Page 219 - Inserimento delle batterie nel telecomando; I tasti seguenti sono utilizzati in maniera diversa in ogni menu.; Utilizzo pulsanti in Modalità Memoria
19 Informazioni Generali ITALIANO Funzione Risparmio Energia durante l’ascolto di musicaImpostazioni Riproduzione Musica (Ripeti 1, Ripeti Tutte, Sequenza)Seleziona, Start, Pausa/LetturaSpostamento nell’elenco dei file, Traccia Precedente/Tracciasuccessive, Indietro/Avanti, Rotazione FotoExit, Cance...
Page 220 - Selezione della modalità immagine
26 Impostazione immagine ITALIANO Premere il pulsante Menu.Le voci del menu vengono visualizzate sullo schermo. Premere il pulsante per selezionare l’icona “IMMAGINE”. “MODO IMMAGINE” è evidenziato. Premere i pulsanti / , il menu cambierà come di seguito. ➛ STANDARD ➛ DINAMICO ➛ VIDEO ➛ TENUE ➛ UTEN...
Page 221 - Selezione della temperatura colore
27 Impostazione immagine ITALIANO @ 50 50 505050 C O N T R A S T OL U M I N O S I T A T E M P C O L O R E U T E N T E - RU T E N T E - GU T E N T E - BS C A L A S P O S T A S E L E Z I O N A I M M A G I N E N O R M A L E 1 6 : 9 P R E C E . Premere il pulsante Menu.Le voci del menu vengono visualizz...
Page 222 - Impostazione delle regolazioni di visualizzazione; AMPIO; Premere; Impostazione riduzione disturbi
ITALIANO 28 Impostazione immagine Impostazione delle regolazioni di visualizzazione L’utente può regolare le impostazioni di visualizzazione a suo piacimento. Premere il pulsante Menu.Le voci del menu vengono visualizzate sullo schermo. Premere il pulsante per selezionare l’icona “IMMAGINE”. “MODO I...
Page 223 - Regolazione immagine nella modalità PC; Impostazione della modalità Film
ITALIANO 29 Impostazione immagine Regolazione immagine nella modalità PC Premere il pulsante Menu.Le voci del menu vengono visualizzate sullo schermo. Premere il pulsante per selezionare l’icona “PC”. “POSIZIONE O.” è evidenziato. Selezionare l’opzione desiderata premendo il pulsante / , poi premere...
Page 224 - Impostazione audio desiderata
30 Impostazioni audio ITALIANO Impostazione audio desiderata Gli utenti possono regolare la modalità audio automaticamente a piacimento. Premere il pulsante MENU.Le voci del menu vengono visualizzate sullo schermo. Premere / per spostarsi sull'icona “AUDIO”. Premere il pulsante per selezionare l’ico...
Page 225 - Selezione della Modalità Stereo
31 Impostazioni audio ITALIANO Premere il pulsante MENU.Le voci del menu vengono visualizzate sullo schermo. Premere per spostarsi sull'icona “AUDIO”. “MODO AUDIO” è evidenziato. Premere / i pulsanti per spostarsi su “MODALITÁ S”. Premere / i pulsanti per impostare MONO/STEREO. Premere il pulsante E...
Page 226 - Impostazione uscita Subwoofer; è un marchio commerciale della SRS Labs inc.
ITALIANO 32 Impostazioni audio Impostazione uscita Subwoofer Si può usare questa funzione quando si desidera aggiungere un subwoofer al sistema di altoparlanti. Premere il pulsante MENU.Le voci del menu vengono visualizzate sullo schermo. Premere / per spostarsi sull'icona “AUDIO”. Premere il pulsan...
Page 227 - Selezione CUFFIE
ITALIANO 33 Impostazioni audio Selezione CUFFIE L’utente può regolare il volume delle cuffie. Premere il pulsante MENU.Le voci del menu vengono visualizzate sullo schermo. Premere / per spostarsi sull'icona “AUDIO”. Premere il pulsante per selezionare l’icona “MODO AUDIO”. “MODO AUDIO” è evidenziato...
Page 228 - Ricerca Automatica dei Programmi
34 Impostazione canali ITALIANO Premere il pulsante Menu.Le voci del menu vengono visualizzate sullo schermo. Premere / i pulsanti per spostarsi sull’icona “CANALE”. Premere il pulsante per selezionare l’icona “CANALE”. Viene visualizzato “RICERCA AUTO.”. Premere / i pulsanti per passare a “RICERCA ...
Page 229 - Impostazione della Modifica Programmazione
35 Impostazione canali ITALIANO Premere il pulsante Menu.Le voci del menu vengono visualizzate sullo schermo. Premere / i pulsanti per spostarsi sull’icona “CANALE”. Premere il pulsante per selezionare l’icona “CANALE”. Viene visualizzato “RICERCA AUTO.”. Premere / i pulsanti per passare a “MODIF. P...
Page 230 - Impostazione del PIP/TWIN
ITALIANO 36 Impostazione canali Impostazione del PIP/TWIN Questo serve a impostare la modalità PIP (Picture in Picture) o modalità Doppio. E’ possibile visualizzare due programma o fonti allo stesso tempo Premere il pulsante Menu. (Funzione disponibile dirett. anche tramite MODE inalto a destra sul ...
Page 231 - Tabella PIP supportata; Come impostare direttamente il CAMBIO : Premere il pulsante SWAP.
37 Impostazione funzioni ITALIANO Regolare le dimensioni PIP P CD V Ii D T VC O M P - 1C O M P - 2 S - V I D E OV I D E OS C A R T FS C A R T HT V A N A L O G . P I P/ T W I N AT T U A L E T V A N A L O G . M O V I . S E L E Z . PC DVI/HDMI iDTV COMP-1 COMP-2 S-Video Video FSCRT HSCRT Analog TV PC X...
Page 232 - Solo per modello PDP); Impostazione blocco tasti
38 Impostazione funzioni ITALIANO Premere il pulsante Menu.Le voci del menu vengono visualizzate sullo schermo. Premere il pulsante per selezionare l’icona “FUNZIONI”. “PIP/TWIN” è evidenziato. Premere / i pulsanti per spostarsi su “BLOCCO”. Premere / i pulsanti per impostare ON/OFF. Premere il puls...
Page 233 - Scelta della lingua; Impostazione Teletext in ATV
ITALIANO 39 Impostazione funzioni Scelta della lingua Quando si utilizza l’apparecchio TV per la prima volta, selezionare la lingua di preferenza per visualizzare i menu principali, isottomenu, ecc. Premere il pulsante Menu.Le voci del menu vengono visualizzate sullo schermo. Premere il pulsante per...
Page 234 - Selezione delle Opzioni Teletext in Modalità ATV; FUNZIONE
ITALIANO 40 Impostazione funzioni Selezione delle Opzioni Teletext in Modalità ATV Una volta visualizzata una pagina teletext è possibile attivare varie opzioni per soddisfare le proprie esigenze. FUNZIONE • Testo Nascosto (risposte ai quiz ad esempio) • Schermo normale • Una pagina secondaria • Sch...
Page 235 - Premere il pulsante; PPremere il pulsante
ITALIANO 41 Impostazione funzioni Impostazione Orologio, Sveglia, Ora ON/OFF Premere il pulsante Menu.Le voci del menu vengono visualizzate sullo schermo. Premere il pulsante per selezionare l’icona “OSD”. “LINGUA” è evidenziato. Premere / i pulsanti per spostarsi su “ORA”. Premere il pulsante per s...
Page 236 - Ricerca Automatica
42 Impostazione Canale DTV ITALIANO Premere il pulsante Menu.Le voci del menu vengono visualizzate sullo schermo. Premere / per passare all’icona “DTV CANALE”. Premere il pulsante per selezionare l’icona “DTV CANALE”. “RICERCA AUTO” è visualizzato”. Premere / per passare a “RICERCA MANUALE”. Premere...
Page 237 - Controllo del sintonizzatore
ITALIANO 43 Impostazione Canale DTV Premere i pulsanti / per selezionare “Largh. Banda” ed impostare il giusto valore per il canale selezionato. Premere i pulsanti SU e GIÙ per spostarsi su "Scan". Premere il pulsante per ordinare tutti i dai dei canali inseriti. In tal modo si visualizza il...
Page 239 - Selezione dell’elenco canali; Impostazione dei canali preferiti
ITALIANO 45 Impostazione Canale DTV Selezione dell’elenco canali L’utente può cambiare il canale corrente con qualsiasi altro programma. Premere il pulsante Menu. (Vhannel List dispon. anche con tasto diretto - Pagina 13)Le voci del menu vengono visualizzate sullo schermo. Premere / per passare all’...
Page 240 - Alfabeto Mode : Visualizza i canali elencati in ordine alfabetico.; Utilizzo dell’elenco dei canali
ITALIANO 46 Impostazione Canale DTV Premere il pulsante CH. LIST.La lista dei canali appare sullo schermo. Premere il tasto ARANCIONE, la finestra “Modalità lista canali” apparirà. Selezionare l’opzione desiderata premendo il pulsante / , poi premere il pulsante / per la regolazione. Premere il puls...
Page 241 - Impostazione dell’ordine dei canali.; Cancellazione canali
ITALIANO 47 Impostazione Canale DTV Impostazione dell’ordine dei canali. L’utente può organizzare il numero o la sequenza dei canali. Premere il pulsante CH. LIST.La lista dei canali appare sullo schermo. Premere / o / per selezionare il canale che si vuol spostare. Premere il pulsante GIALLO. Preme...
Page 242 - Aggiunta canali; Impostazione di fabbrica.
ITALIANO 48 Impostazione Canale DTV Aggiunta canali L’utente può aggiungere i canali desiderati. Premere il pulsante CH. LIST.La lista dei canali appare sullo schermo. Premere il pulsante BIANCO.La finestra Add Digital Channel compare. Selezionare i canali con / o il tastierino numerico. Selezionare...
Page 244 - Selezione dell’elenco canali / informazioni
ITALIANO 50 Impostazione Canale DTV Selezione dell’elenco canali / informazioni Informazioni, come tipo di canale, nome, tempo locale di inizio/fine, informazioni guida, orario corrente, modalitàpref/normale, modalità audio e audio ID, saranno visualizzate. ➥ Premere il pulsante INFO.La barra delle ...
Page 245 - Utilizzo modalità memoria; Leggere attentamente le istruzioni prima dell'uso.; Precauzioni nell’utilizzo della Scheda Memoria.; Schede memoria in commercio (Vendute separatamente)
51 Impostazione Memoria SMC Memory Card Slot 1 (MT) Memory Card Slot 2 (CF) xD MMC SD MS/MS Pro(Duo) (CompactFlash) (MD, Microdrive) (ST 1 drive) Utilizzo modalità memoria - * Solo per modello Q320, Q400 Leggere attentamente le istruzioni prima dell'uso. Evitare di mantenere la modalità Memoria per ...
Page 246 - File supportati; Forati file compressi Jpeg/Immagine supportati
52 Impostazione Memoria File supportati Tipi di file media supportati Forati file compressi Jpeg/Immagine supportati Capacità scheda memoria disponile USB HOST USB 1.1 HOST Alimentazione CompactFlash : 8MB ~ 4GBMicrodrive : 1GB, 2GB, 4GB / 2.5GB, 5GBSmartMedia : 8MB ~ 128MBxD-Picture : 16MB ~ 512MB ...
Page 247 - Utilizzo della Scheda Memoria; Passaggio a modalità memoria
53 Impostazione Memoria Utilizzo della Scheda Memoria 1. Inserire una scheda memoria o memoria USB nello Slot 1/2 o porta USB. 2. Premere per accendere. 3. Premere per selezionare la Modalità Memoria. 4. Far riferiemtno alle icone elencate in basso al menu. ATTENZIONE ! Quando si rimuove la scheda m...
Page 248 - Visualizzazione dei file foto memorizzati
54 Impostazione Memoria Visualizzazione dei file foto memorizzati Visualizzazione foto a grandezza naturale 1. Premere per spostare il file foto desiderato. 2. Premere per selezionare. Per le icone del menu premere . Pulsanti controllo Pagina corrente/Tuttele pagine Anteprima Modalità Tipo scheda/ca...
Page 249 - Visualizzazione delle foto in dimensione naturale
55 Impostazione Memoria Visualizzazione delle foto in dimensione naturale Ogni volta che si premere , l’ingrandimento dell’immagine cambia in sequenza come segue 1.5X 2X 2.5X 1X(dimensione originale). Dopo aver ingrandito una foto, premere per spostarsi. Rotazione foto Per ruotare la foto di 90 grad...
Page 250 - Visualizzazione file musicali memorizzati
56 Impostazione Memoria Visualizzazione file musicali memorizzati Premendo comincia la funzione di lettura immagini a seconda delle opzioni selezionate in modalità foto. Lettura file musicali 1. Premere per visualizzare il menu Opzioni. 2. Premere per la lettura. Premendo è possibile impostare Ripet...
Page 251 - Controllo dei file video memorizzati
57 Impostazione Memoria Controllo dei file video memorizzati E’ possibile impostare la riproduzione di tutti i file (Leggi Sequenza) o selezionare i file (Leggi Uno) in sequenza premendo . Lettura film video 1. Premere per spostarsi sul file video desiderato. 2. Premere per selezionare un file video...
Page 253 - Utilizzo di un dispositivo esterno tramite telecomando; Tabella Numeri Impostazioni VCR
59 Appendice ITALIANO Utilizzo di un dispositivo esterno tramite telecomando Durante l’impostazione di apparecchi di altri costrutori tramite telecomando è possibile che alcuni pulsanti deltelecomando non funzionino o che si attivino funzioni diverse, o che tali apparecchi non funzionino affatto. Al...
Page 254 - Tabella Numeri Impostazioni DVD
60 Appendice ITALIANO Tabella Numeri Impostazioni DVD Tabella Numeri Impostazioni Satellite Receiver
Page 255 - Risoluzione dei problemi; Problemi di Installazione; Possibile soluzione
61 Appendice ITALIANO Risoluzione dei problemi Problemi di Installazione Problema Problemi d’immagine Problema Come va installata l’antenna? Le immagini non si presentano nitide dopo l’installazione di un’antenna all’interno. Come è possibile vedere una trasmissione via cavo? Non compare nessuna imm...
Page 257 - Caratteristiche tecniche del prodotto
63 Appendice ITALIANO Caratteristiche tecniche del prodotto - Le caratteristiche tecniche menzionate possono essere soggette a cambiamenti senza preavviso. Q321/Q320 1 (A/V) 1 (A/V) 1 (A/V audio comune) 1 (con Audio ) 2 (con Audio ) 1 D-SUB 1366 X 768 @ 75 Hz L/R 1 Slot 1, Slot 2, USB (Solo per mode...
Page 260 - ESPAÑOL; Contenidos
ESPAÑOL Contenidos Información general Consejos importantes ...........................................................1 Precauciones de seguridad ...................................................2 Contenidos del embalaje .......................................................3 Productos vendidos ...
Page 261 - Efecto de retención de la imagen (Image Sticking); Imagen fija en cuadro; Consejos importantes
1 Información general ESPAÑOL Efecto de retención de la imagen (Image Sticking) 1. Causa - El efecto de retención de la imagen se puede producir al mostrar una imagen fija durante un determinado período de tiempo en una zona concreta de forma continua, como función del panel. Esto se debe a la degra...
Page 262 - Precauciones de seguridad
2 Información general ESPAÑOL Precauciones de seguridad Los contenidos de esta sección se proporcionan para garantizar la seguridad para los usuarios y en la propiedad.Lea las instrucciones detenidamente antes de utilizar la televisión. No conecte varios aparatoseléctricos a una misma toma. - Podría...
Page 266 - Contenidos del embalaje
6 Información general ESPAÑOL Contenidos del embalaje Al abrir el embalaje, compruebe que contiene todos estos accesorios. Productos vendidos por separado SI desea comprar los siguientes accesorios, consulte con el servicio de asistencia técnica, tiendas deelectrónica o distribuidores de piezas. Cab...
Page 267 - PRECAUCIÓN; Montaje y desmontaje de los altavoces; Montaje de los altavoces en la base de la unidad; colocados hacia arriba.; Desmontaje de los altavoces; 6” - Retire los altavoces en el orden inverso.
7 Información general ESPAÑOL Los altavoces proporcionados están diseñados sólo para este producto. Se recomienda no conectarlos altavoces a ningún otro aparato. Si se conecta otro amplificador, la salida del amplificador debeestar comprendida entre los 10 W. Es posible que si la salida excede el in...
Page 268 - Ajuste del ángulo de visión; seguridad se encuentra disponible en tiendas de electrónica.
8 Información general ESPAÑOL Ajuste del ángulo de visión - 26”/32” LCD TV Puede ajustar el panel hacia arriba o hacia abajo a un ángulo de 0 a 15 grados. Dispositivo Kensington de bloqueo antirrobo - 26”/32”/40” LCD TV - Esta unidad es compatible con el bloqueo de seguridad estándar Kensington para...
Page 269 - Cómo instalar el soporte para el montaje mural
9 Información general ESPAÑOL Cómo instalar el soporte para el montaje mural - 40”/50” PDP TV 1. Coloque el cuerpo del PDP sobre una mesa o estantería planas. Limpie la superficie de la mesa o estantería para evitar rayar el PDP. 2. Alinee la base con el cuerpo del PDP y fije las barras de la base c...
Page 270 - Cómo utilizar los altavoces (tipo de suelo); Cuadro de configuración de partes
10 Información general ESPAÑOL Cómo utilizar los altavoces (tipo de suelo) - 40”/50” PDP TV Cuadro de configuración de partes Método de colocación y conexión Introduzca los soportes en las ranurasde la parte trasera de los altavoces yfíjelos con los tornillos.(Lado izquierdo y derecho de cada uno) A...
Page 271 - Cómo utilizar los altavoces (tipo de mesa)
11 Información general ESPAÑOL Cómo utilizar los altavoces (tipo de mesa) - 40”/50” PDP TV Cuadro de configuración de partes Método de instalación y conexión 2 altavoces (izquierdo y derecho) 2 bases para altavoces (izquierda y derecha) 8 tornillos de fijación 2 juegos de cable de altavoz (izquierdo...
Page 272 - Nombres de las partes y funciones; Vista frontal
12 Información general ESPAÑOL Nombres de las partes y funciones - 26”/32” LCD TV Vista frontal Botones de volumen Utilice estos botones para ajustar el nivel delsonido. Estos botones también se utilizan comocursores de selección y ajuste en el modo de menú. Botones de canal Utilice estos botones pa...
Page 273 - Vista trasera
13 Información general ESPAÑOL Vista trasera Interruptor de encendido Terminal de entrada de alimentación (CA) Terminal de entrada de vídeo DVI/HDMI Terminal de entrada D-SUB Terminal de entrada de audio DVI/D-SUB Terminal de entrada de audio del componente 2 Terminal de entrada de vídeo del compone...
Page 278 - Mando a distancia; AJUSTE / DESPLAZAMIENTO A IZQUIERDA Y DERECHA
18 Información general ESPAÑOL Mando a distancia 1. ENCENDIDO / STANDBY 2. SILENCIO Este botón también se utiliza para ajustar otros dispositivos externos 3. FUNCIONES PIP - PIP : Utilice este botón para activar o desactivar PIP - SOURCE : Utilice este botón para seleccionar la fuente de entrada de ...
Page 279 - Otros botones disponibles en el modo de memoria; Colocación de las pilas en el mando a distancia; Uso de los botones en el modo de memora; Uso de los botones en el modo de memoria
Función de ahorro de alimentación al escuchar músicaIAjustes para la reproducción de música (Repeat 1, Repeat All, Sequence)Selección, Inicio, Pausa / ReproducciónDesplácese por los listados de archivos, pistaanterior/siguiente, avanzado/retroceso rápido, rotación de fotosSalir, cancelarExpulsar tar...
Page 280 - Conexión de la entrada de antena a equipo externos; antena de la televisión.
20 Conexiones ESPAÑOL ✓ Al introducir una cable coaxial de 75 ohmios en la conexión de entrada, asegúrese de que el cable no se dobla. ✓ Si observa que la recepción de la señal es deficiente, recomendamos que compre un amplificador de señal para mejorarla calidad de la imagen. Conexión de la antena ...
Page 281 - Conexión a un receptor de DTV o reproductor de DVD
21 Conexiones ESPAÑOL Antes de realizar las conexiones de vídeo/audio a dispositivos externos... Asegúrese de leer la información siguiente para lograr una calidad mejor de la imagen. La mejor calidad de laimagen se muestra en el orden siguiente. La calidad de imagen superior comienza desde la parte...
Page 282 - Conexión a un PC
Conexión a un PC 1. Conecte el cable de señal del PC (D-sub de 15 patillas) entre el terminal de salida del PC y el terminal de entrada D-sub de la televisión.2. Conecte el cable de audio entre el terminal de salida de audio del PC y el terminal de entrada de audio para PC en la parte trasera de la ...
Page 283 - Resoluciones soportadas en PC; Conexión Scart a una entrada/salida externa
23 Conexiones ESPAÑOL Resoluciones soportadas en PC Conexión Scart a una entrada/salida externa Si tiene un VCR secundario y desea copiar cintas de casete, conecte el VCR fuente a “F Scart” y el VCR de destino a“H Scart” para que pueda redirigir la señal de “F Scart” a “H Scart”. * “F Scart” envía l...
Page 284 - (sólo para los modelos con interfaz de HDMI); Señal de imagen compatible; - La entrada HDMI no es compatible para el uso con las computadoras.
24 Conexiones ESPAÑOL *1. HDMI, La insignia HDMI y el interfaz de alta definición de las Multimedias son marcas registradas o marcas registradas depositadas de HDMI Licensing LLC. *2. EIA/CEA-861/861B define las caracteristicas para la transmisión de señal vídeo digital sin comprimir incluso la codi...
Page 285 - Menú OSD diferente; Puede confirmar el menú OSD de tres formas diferentes.; Ajuste de la pantalla OSD
25 Conexiones ESPAÑOL Menú OSD diferente Puede confirmar el menú OSD de tres formas diferentes. Ajuste de la pantalla OSD PC : se usa para poder soportar la conexión al ordenador personal. DVI* : interfaz visual digital para utilizar transmisiones TMDS y reducir la pérdida de señal. ➥ *Notas : “DVI”...
Page 286 - Selección del modo de imagen
ESPAÑOL 26 Configuración de la imagen Pulse el botón de menú.Aparecerán los elementos de menú de la pantalla. Pulse el botón para seleccionar el icono “IMAGEN” de imagen. “MODO IMAGEN” se mostrará resaltado. Pulse los botones / y a continuación el menú cambiará en el siguiente orden. ➛ ESTÁNDAR ➛ DI...
Page 287 - Ajuste de la imagen deseada en los modos de entrada de PC, DVI/HDMI; Selección de una temperatura de color
ESPAÑOL Pulse el botón de menú.Aparecerán los elementos de menú de la pantalla. Pulse el botón para seleccionar el icono “IMAGEN” de imagen. “CONTRASTE” se mostrará resaltado. Seleccione la opción deseada pulsando / y, a continuación, pulse / para realizar el ajuste. Después de seleccionar COLOR TEM...
Page 288 - Ajuste de la escala del display; Pulse; Ajuste de la reducción de ruido
ESPAÑOL 28 Configuración de la imagen Ajuste de la escala del display Los usuarios pueden ajustar la escala del display como deseen. Pulse el botón de menú.Aparecerán los elementos de menú de la pantalla. Pulse el botón para seleccionar el icono “IMAGEN” de imagen. “MODO IMAGEN” se mostrará resaltad...
Page 289 - Cómo ajustar el modo de películ; Ajuste de la imagen en el modo de PC; Selección directa del ajuste automático : Pulse el botón PC-AUTO.
ESPAÑOL 29 Configuración de la imagen Pulse el botón de menú.Aparecerán los elementos de menú de la pantalla. Pulse el botón para seleccionar el icono “IMAGEN” de imagen. “MODO IMAGEN” se mostrará resaltado. Pulse / los botones para desplazarse a “MODO PELÍCULA”. Pulse los botones / para ajustar el ...
Page 290 - Ajuste del modo de audio deseado; Selección del modo de audio
ESPAÑOL 30 Configuración de sonido Ajuste del modo de audio deseado Los usuarios pueden ajustar el modo de sonido automáticamente según lo deseen. Pulse el botón de menú.Aparecerán los elementos de menú de la pantalla. Pulse / los botones para desplazarse a “SONIDO”. Pulse el botón para seleccionar ...
Page 291 - Selección de AVL
ESPAÑOL 31 Configuración de sonido Pulse el botón de menú.Aparecerán los elementos de menú de la pantalla. Pulse el botón para seleccionar el icono “SONIDO”. “MODO DE SONIDO” se mostrará resaltado. Pulse / los botones para desplazarse a “MODO S”. Pulse los botones / para ajustar MONO/ESTÉREO. Pulse ...
Page 292 - Ajuste de la salida del subwoofer; Selección de TRUSURROUND XT; es una marca de SRS Labs Inc.
ESPAÑOL 32 Configuración de sonido Ajuste de la salida del subwoofer Puede ajustar esta función si desea instalar el sistema de altavoz subwoofer. Pulse el botón de menú.Aparecerán los elementos de menú de la pantalla. Pulse / los botones para desplazarse a “SONIDO”. Pulse el botón para seleccionar ...
Page 293 - Selección del modo de auriculares
ESPAÑOL 33 Configuración de sonido Selección del modo de auriculares Los usuarios pueden ajustar el volumen de los auriculares. Pulse el botón de menú.Aparecerán los elementos de menú de la pantalla. Pulse / los botones para desplazarse a “SONIDO”. Pulse el botón para seleccionar el icono “SONIDO”. ...
Page 294 - Búsqueda automática de programas
ESPAÑOL 34 Configuración de canales Pulse el botón de menú.Aparecerán los elementos de menú de la pantalla. Pulse / los botones para desplazarse a “CANAL”. Pulse el botón para seleccionar el icono “CANAL”. “PR AUTOMÁTICA” se mostrará resaltado. Pulse / los botones para desplazarse a “PR MANUAL”. Pul...
Page 295 - Ajuste de la edición de programación
ESPAÑOL Pulse el botón de menú.Aparecerán los elementos de menú de la pantalla. Pulse / los botones para desplazarse a “CANAL”. Pulse el botón para seleccionar el icono “CANAL”. “PR AUTOMÁTICA” se mostrará resaltado. Pulse / los botones para desplazarse a “EDITAR PROG”. Pulse los botones para selecc...
Page 297 - Tabla PIP de compatibilidad PIP
37 Configuración de funciones ESPAÑOL Pulse / los botones para desplazarse a “FUENTE”. Pulse los botones / y, a continuación, cambie la fuente. ➟ Consulte la tabla PIP de compatibilidad. ➥ Cambio directo de la fuente secundaria : pulse el botón FUENTE. En el modo PIP, vaya al paso 8Si necesita ajust...
Page 298 - Ajuste del bloqueo del teclado
ESPAÑOL 38 Configuración de funciones Pulse el botón de menú.Aparecerán los elementos de menú de la pantalla. Pulse el botón para seleccionar el icono “FUNCIÓN” de función. “PIP/TWIN” se mostrará resaltado. Pulse / los botones para desplazarse a “BLOQ. TECLAS”. Pulse los botones / para ajustar el en...
Page 299 - Ajuste del teletexto en ATV
ESPAÑOL 39 Configuración de funciones Ajuste del teletexto en ATV En el modo de televisión analógica podrá utilizar el servicio de teletexto,si está incluido en los canales que se reciben. Pulse el botón “TTX/MIX” y espere.Si el símbolo “*” aparece en la parte superior izquierda de la pantalla como ...
Page 300 - BOTÓN
ESPAÑOL 40 Configuración de funciones Selección de las opciones de la pantalla de teletexto en el modo de ATV Cuando se muestra una página del teletexto, el usuario podrá seleccionar varias opciones para ajustar sus preferencias. VISUALIZACIÓN (ACCIÓN) • Texto oculto (respuestas a juegos, por ejempl...
Page 301 - Pulse el botón; Pulse los botones
ESPAÑOL 41 Configuración de funciones Ajuste de la hora del reloj, apagado automático y encendido y apagado Pulse el botón de menú.Aparecerán los elementos de menú de la pantalla. Pulse el botón para seleccionar el icono “OSD”. “IDIOMA” se mostrará resaltado. Pulse / los botones para desplazarse a “...
Page 302 - Búsqueda automática
ESPAÑOL Pulse el botón de menú.Aparecerán los elementos de menú de la pantalla. Pulse los botones / para desplazarse a “DTV CANAL”. Pulse el botón para seleccionar el icono “DTV CANAL”. “ESCANEO AUTO” se mostrará resaltado. Pulse los botones / para desplazarse a “BÚSQUEDA MAN.”. Pulse los botones pa...
Page 303 - Comprobación del estado del sintonizador
ESPAÑOL 43 Configuración de los canales DTV Pulse los botones / para seleccionar “Ancho de banda”, y ajuste el valor adecuado para el canal seleccionado. Pulse los botones de desplazamiento hacia arriba o hacia abajo para desplazarse a “Explorar”. Pulse los botones para memorizar todos los datos de ...
Page 305 - Selección de la lista de canales; Ajuste de los canales favoritos
ESPAÑOL 45 Configuración de los canales DTV Selección de la lista de canales Los usuarios pueden cambiar del canal actual a otro canal que deseen. Pulse el botón de menú.Aparecerán los elementos de menú de la pantalla. Pulse los botones / para desplazarse a “DTV CANAL”. Pulse el botón para seleccion...
Page 306 - Utilización del modo de lista de canales
ESPAÑOL 46 Configuración de los canales DTV Pulse el botón CH. LIST.La lista de canales aparecerá en pantalla. Pulse el botón naranja y podrá ver la ventana del modo de lista de canales. 7Seleccione la opción deseada pulsando los botones / y, a continuación, pulse / para realizar la selección. Pulse...
Page 307 - Ajuste del orden de canales
ESPAÑOL 47 Configuración de los canales DTV Ajuste del orden de canales Los usuarios pueden organizar el número o la secuencia de los canales. Pulse el botón CH. LIST.El menú de la lista de canales aparecerá en pantalla. Pulse los botones / o / para seleccionar el canal que desee mover. Pulse el bot...
Page 308 - Agregación de canales; Ajustes de fábrica
ESPAÑOL 48 Configuración de los canales DTV Agregación de canales Los usuarios podrán agregar los canales que deseen. Pulse el botón CH. LIST.El menú de la lista de canales aparecerá en pantalla. Pulse el botón blanco.La ventana de agregación de canales digitales se mostrará. Seleccione los canales ...
Page 309 - Cambio entre TV y RADIO
ESPAÑOL 49 Configuración de los canales DTV Cambio entre TV y RADIO Los usuarios pueden utilizar este menú para cambiar de los canales de TV a los canales de radio y viceversa. ➥ Pulse el botón de “TV/RADIO”. Intente no escuchar la radio durante períodos prolongados de tiempo sin cambiarla imagen en...
Page 310 - Selección de canales / Información
ESPAÑOL 50 Configuración de los canales DTV Selección de canales / Información Se mostrará una breve información, como el tipo de canal actual, nombre, hora de inicio y finalización, información de guía,hora actual, modo fav/normal, modo de audio e ID de audio. ➥ Pulse el botón INFO.Se desplegará la...
Page 311 - Utilización del modo de memoria; Lea detenidamente estas instrucciones antes de su utilización.; Precauciones a seguir antes de utilizar la tarjeta de memoria
51 Configuración de la memoria ESPAÑOL Tarjeta de memoria de ranura 1 (MT) Tarjeta de memoria de ranura 2 (CF) Utilización del modo de memoria * Sólo para el modelo Q320, Q400 Lea detenidamente estas instrucciones antes de su utilización. Intente no permanecer demasiado tiempo en el modo de memoria ...
Page 312 - Archivos compatibles
52 Configuración de la memoria ESPAÑOL Archivos compatibles Tipos de archivos media compatibles Formato de archivo JPEG / de imagen comprimido compatible Capacidad de la tarjeta de memoria PUERTO USB PUERTOUSB 1.1 Alimentación CompactFlash : 8 MB ~ 4 GBMicrodrive : 1 GB, 2 GB, 4 GB / 2.5 GB, 5 GBSma...
Page 313 - Uso de la tarjeta de memoria; Cambio al modo de memoria
53 Configuración de la memoria ESPAÑOL Uso de la tarjeta de memoria 1. Introduzca una tarjeta de memoria o memoria USB en la ranura 1/2 o puerto USB. 2. Pulse para encender. 3. Pulse para seleccionar el modo de memoria. 4. Consulte los iconos enumerados bajo la pantalla de menú para poder operar. PR...
Page 314 - Visualización de archivos de fotos almacenados
54 Configuración de la memoria ESPAÑOL Visualización de archivos de fotos almacenados Visualización de fotos a tamaño completo 1. Pulse para mover el archivo de fotos que desee. 2. Pulse para seleccionarlo. Para los menús de iconos, pulse el botón . Botones de funcionamiento Página actual/Todas las ...
Page 315 - Visualización de fotos a tamaño completo
55 Configuración de la memoria ESPAÑOL Visualización de fotos a tamaño completo Al pulsar en la pantalla actual, la imagen aumentará siguiendo esta secuencia 1.5X 2X 2.5X 1X (tamaño original). Tras realizar el aumento o disminución de la foto, pulse para desplazarse. Rotación de una foto Para rotar ...
Page 316 - Visualización de archivos de música almacenados
56 Configuración de la memoria ESPAÑOL Visualización de archivos de música almacenados Al pulsar , la función de visualización de diapositivas iniciará la reproducción de archivos de música dependiendo de las opciones seleccionadas en el modo de foto. Reproducción de archivos de música 1. Pulse para...
Page 317 - Comprobación de los archivos de películas almacenados
57 Configuración de la memoria ESPAÑOL Comprobación de los archivos de películas almacenados Puede ajustar la reproducción de todos los archivos (secuencia de reproducción) o archivo seleccionado (reproducción de uno) en la secuencia que desee pulsando . Reproducción de archivos de películas 1. Puls...
Page 319 - Uso de un dispositivo externo con el mando a distancia; Tabla de números de ajuste de VCR
59 Apéndice ESPAÑOL Uso de un dispositivo externo con el mando a distancia Al definir otro fabricante del producto para el mando a distancia, es posible que algunos de los botones nofuncionen o funcionen de forma diferente. También es posible que los productos de otros fabricantes nofuncionen. Se pe...
Page 320 - Tabla de números de ajuste de DVD
60 Apéndice ESPAÑOL Tabla de números de ajuste de DVD FABRICANTE FABRICANTE NÚMERO DE AJUSTE NÚMERO DE AJUSTE Tabla de números de ajuste de Satellite Receiver FABRICANTE FABRICANTE NÚMERO DE AJUSTE NÚMERO DE AJUSTE
Page 321 - Resolución de problemas; Problemas de instalación; Solución posible
61 Apéndice ESPAÑOL Resolución de problemas Problemas de instalación Síntoma Problemas de imagen Síntoma Cómo puedo instalar una antena? La pantalla de la televisión no es clara tras instalar una antena interior. Cómo puedo ver televisión por cable? No hay imagen o sonido La imagen se enciende lenta...
Page 323 - Especificaciones del producto
63 Apéndice ESPAÑOL Especificaciones del producto - Las especificaciones pueden estar sujetas a cambios sin previo aviso. Q321 / Q320 1 (A/V) 1 (A/V) 1 (A/V de audio común) 1 (audio incluido) 2 (audio incluido) 1 D-SUB 1366 X 768 @ 75 Hz L/R 1 Ranura 1, Ranura 2, USB (Sólo para el modelo Q320) 1 (Au...


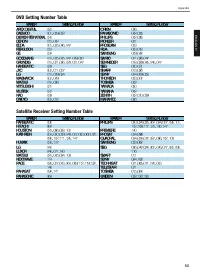


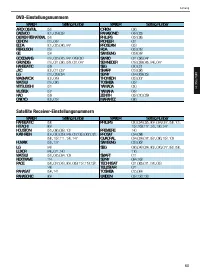


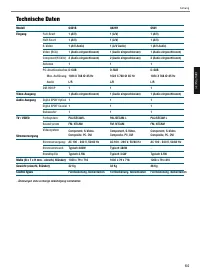

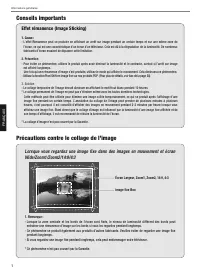
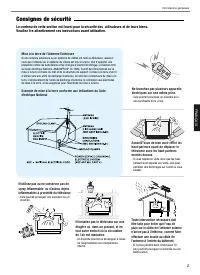
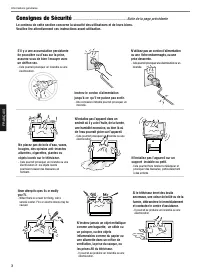
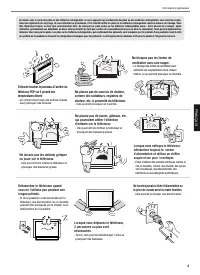
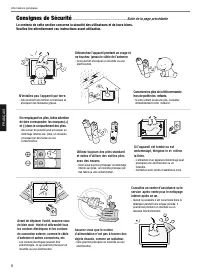
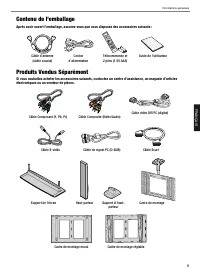
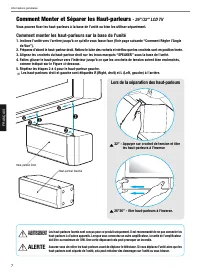
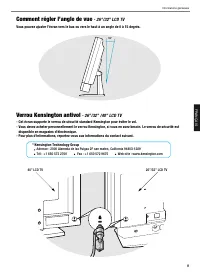
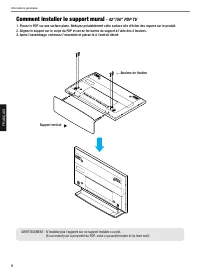
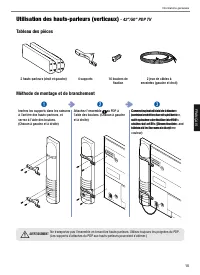
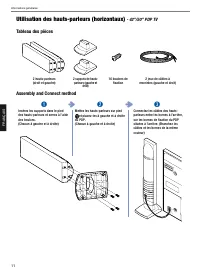
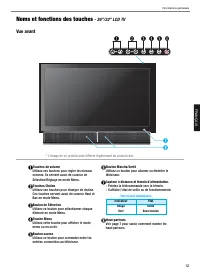
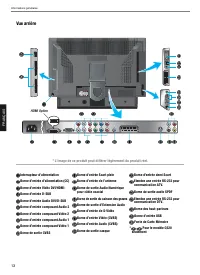
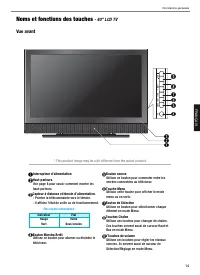
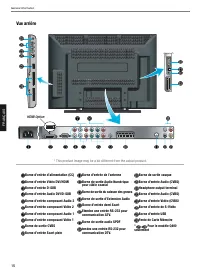
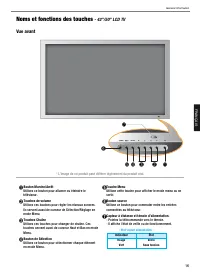
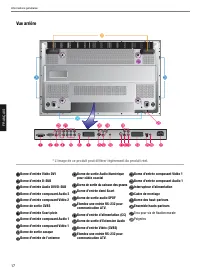
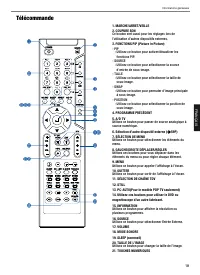
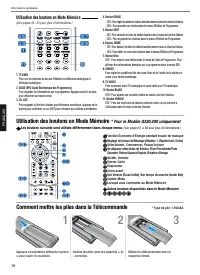
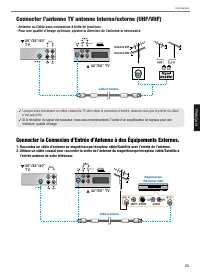
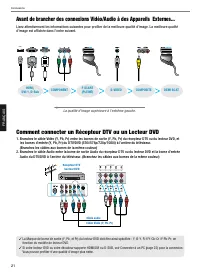
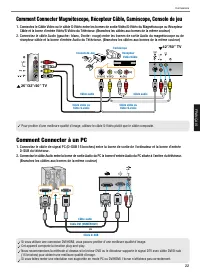
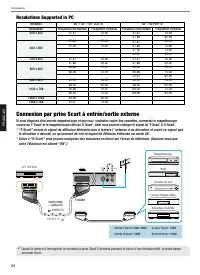
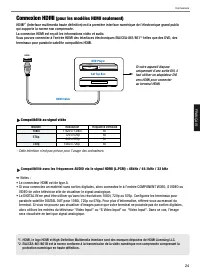
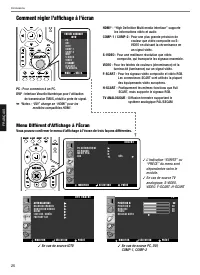
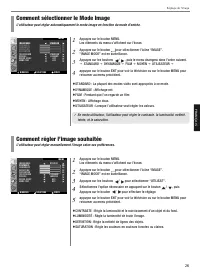
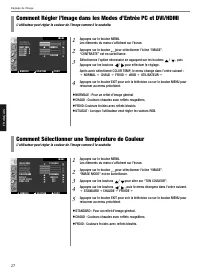
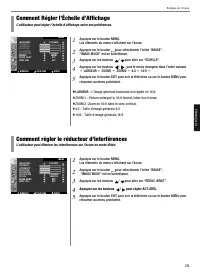
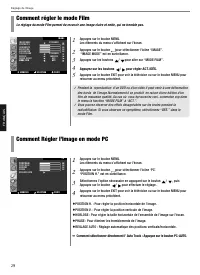

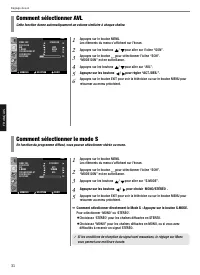
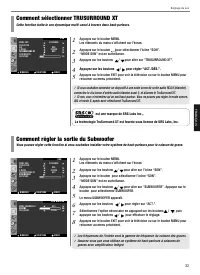
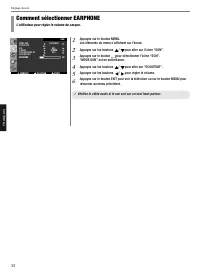
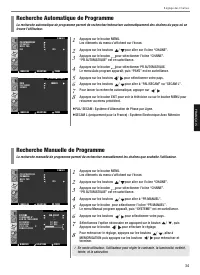
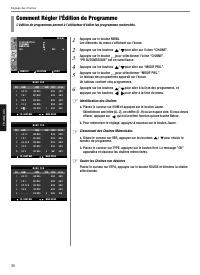
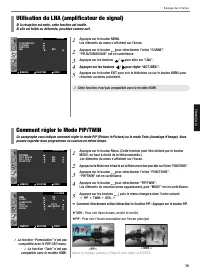
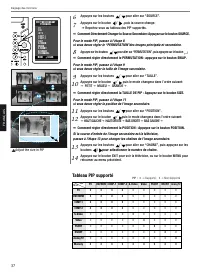

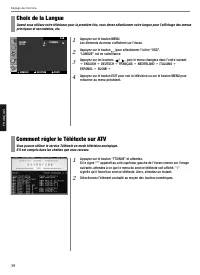

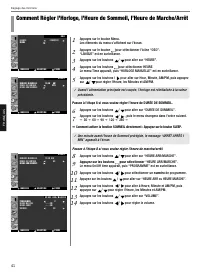
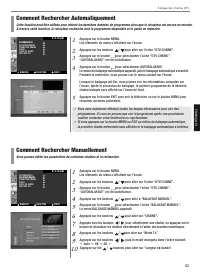
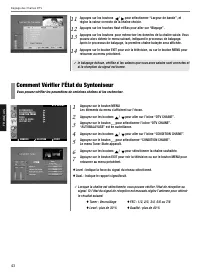
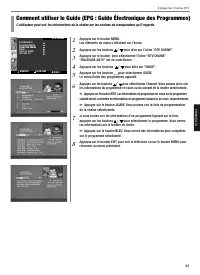
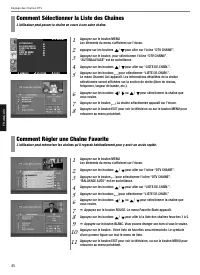
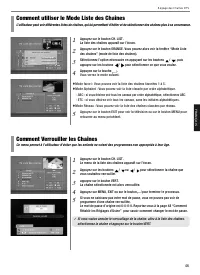

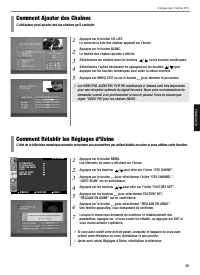
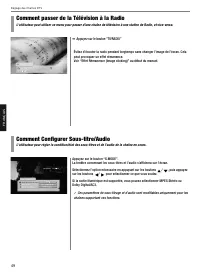
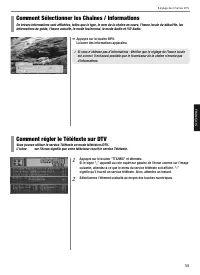
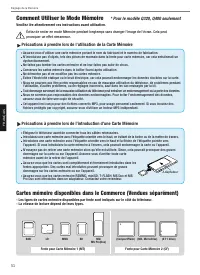
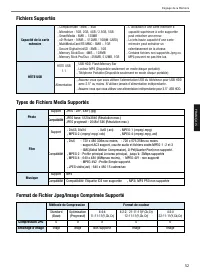
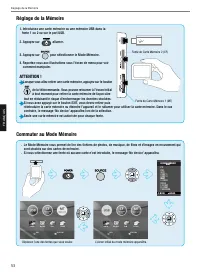
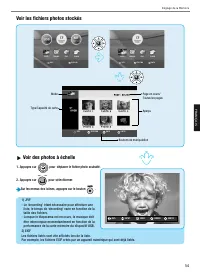
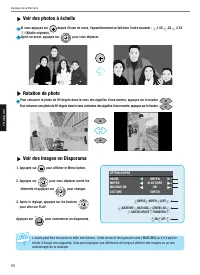
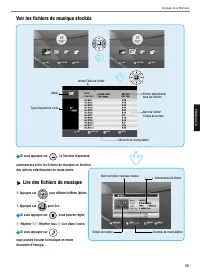
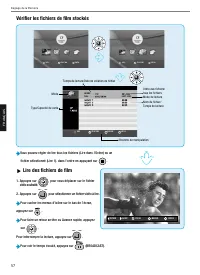
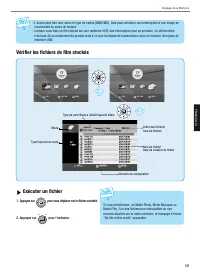
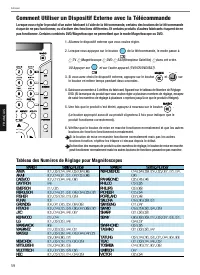
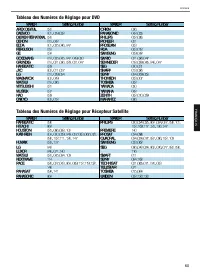
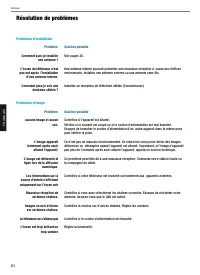
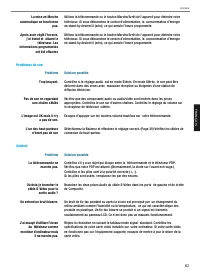
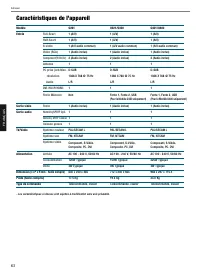
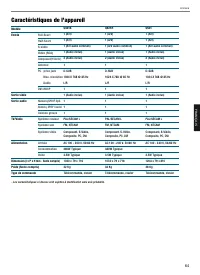
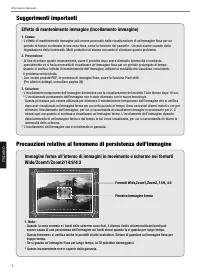
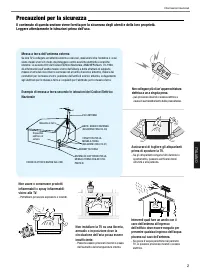
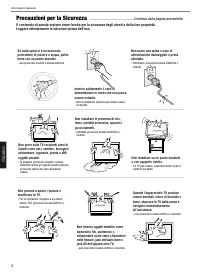
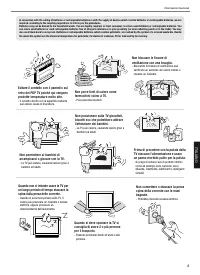
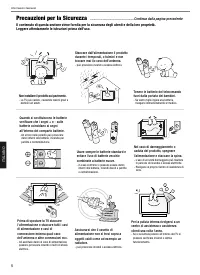

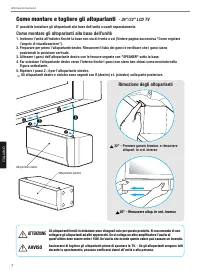
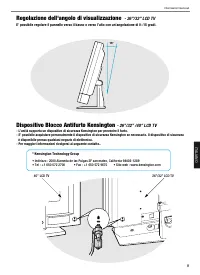
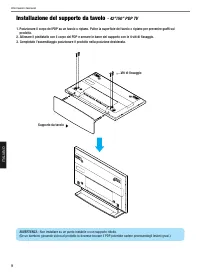
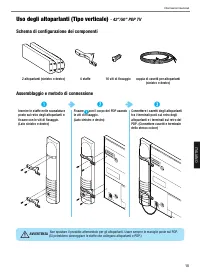
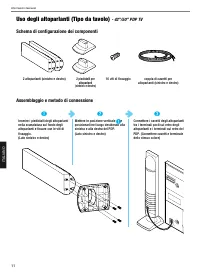
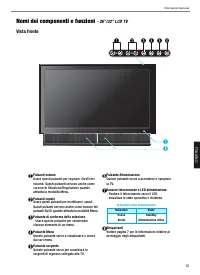
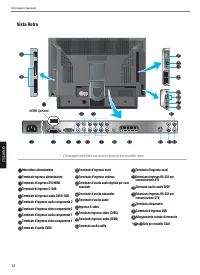

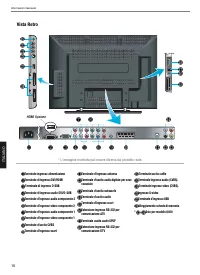
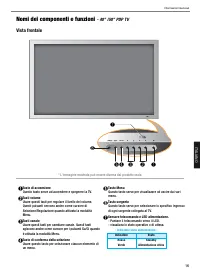
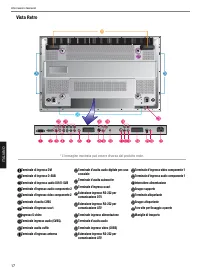
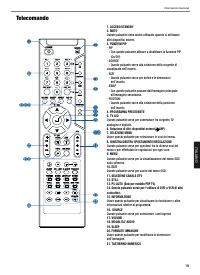
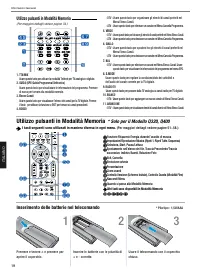

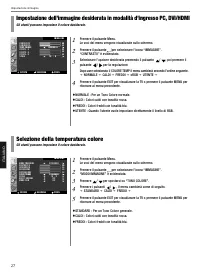
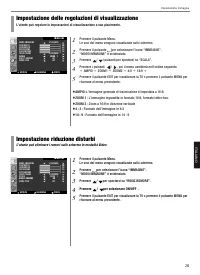
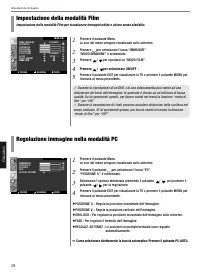

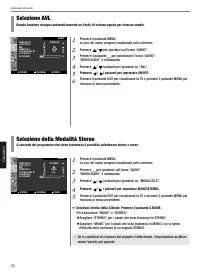
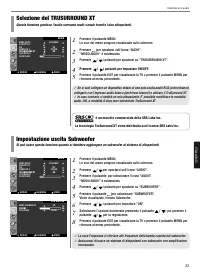
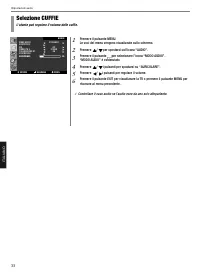
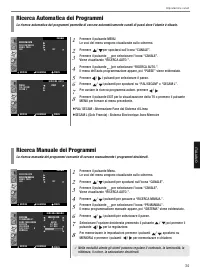
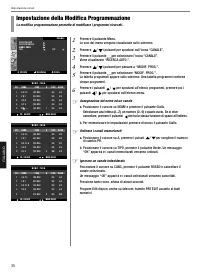
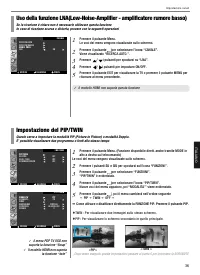
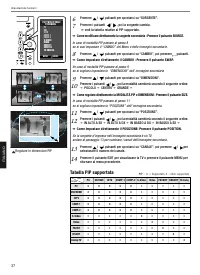
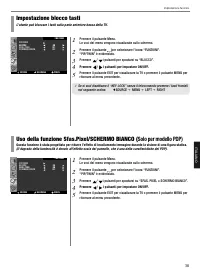
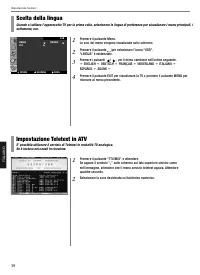
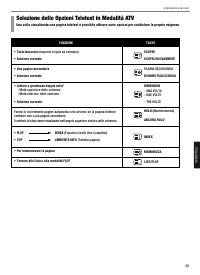
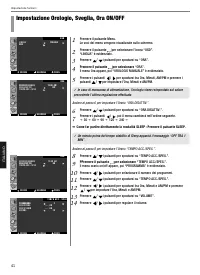
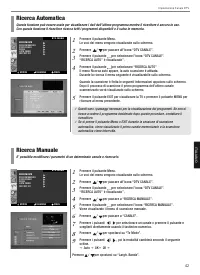
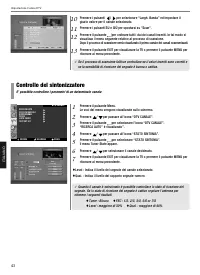
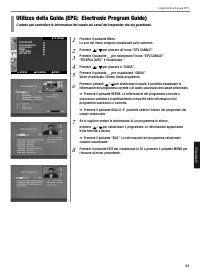
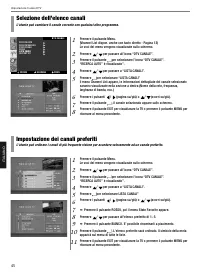

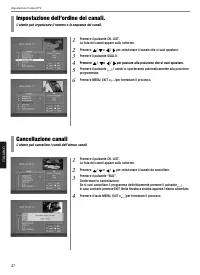
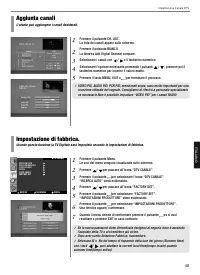
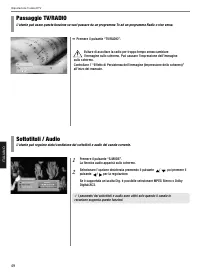
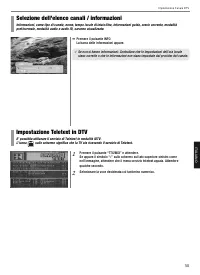
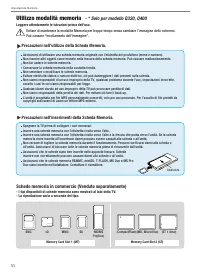
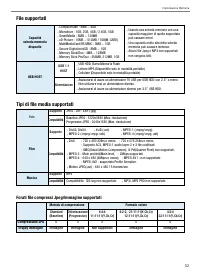
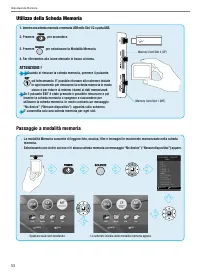


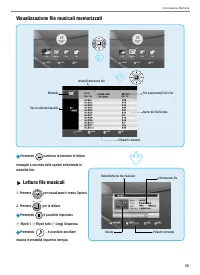

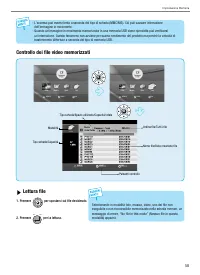
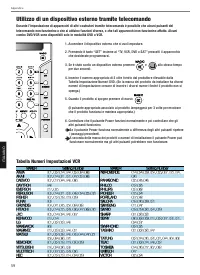
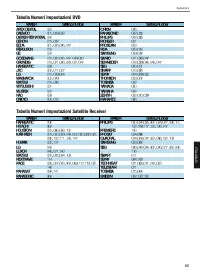
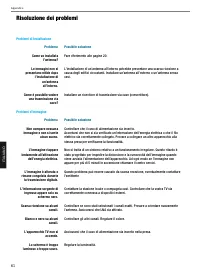
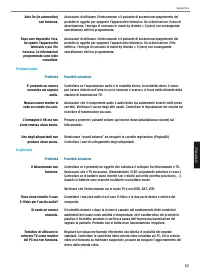
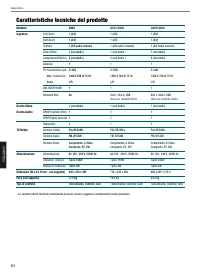
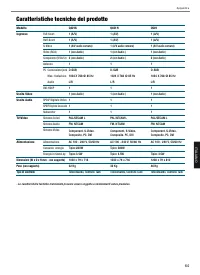


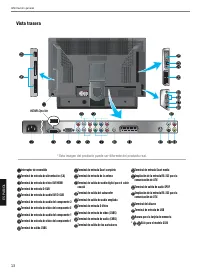

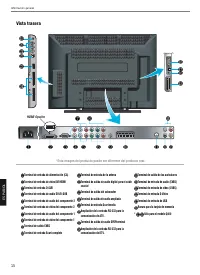

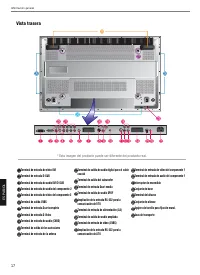


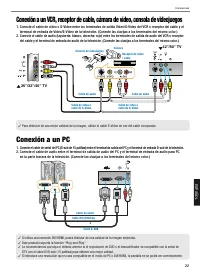


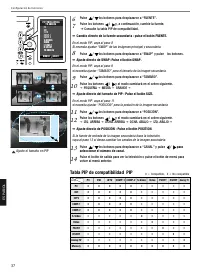


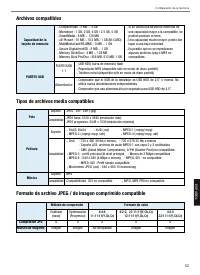


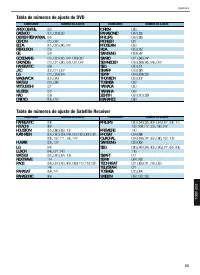


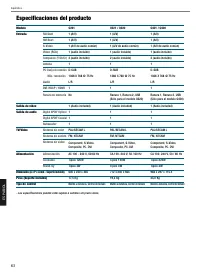
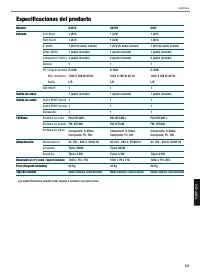


 Hyundai 2006 Elantra
User Manual
Hyundai 2006 Elantra
User Manual
 Hyundai 2008 Santa Fe
User Manual
Hyundai 2008 Santa Fe
User Manual
 Hyundai 2009 Sonata
User Manual
Hyundai 2009 Sonata
User Manual
 Hyundai 2010 Elantra
User Manual
Hyundai 2010 Elantra
User Manual
 Hyundai 2008 Elantra
User Manual
Hyundai 2008 Elantra
User Manual
 Hyundai 2011 Accent
User Manual
Hyundai 2011 Accent
User Manual
 Hyundai 2011 Sonata
User Manual
Hyundai 2011 Sonata
User Manual
 Hyundai 2010 Santa Fe
User Manual
Hyundai 2010 Santa Fe
User Manual
 Hyundai 2012 Accent
User Manual
Hyundai 2012 Accent
User Manual
 Hyundai 2011 Tucson
User Manual
Hyundai 2011 Tucson
User Manual
 Hyundai 2012 Elantra
User Manual
Hyundai 2012 Elantra
User Manual
 Hyundai 2012 Santa Fe
User Manual
Hyundai 2012 Santa Fe
User Manual
 Hyundai 2012 Sonata
User Manual
Hyundai 2012 Sonata
User Manual
 Hyundai 21 Series
User Manual
Hyundai 21 Series
User Manual
 Hyundai 2D/3D
User Manual
Hyundai 2D/3D
User Manual
 Hyundai 95-7333
User Manual
Hyundai 95-7333
User Manual
 Hyundai 99-7300
User Manual
Hyundai 99-7300
User Manual