Page 3 - WARRANTY
TABLE OF CONTENTS 344 55 6 8 7 9 2 13 Draining the Air Conditioner(non-Heating models) 11 I D E N T I F I C AT I O N O F PA RT S A I R C O N D I T I O N E R S A F E T Y 3 I N S TA L L AT I O N R E Q U I R E M E N T S 3 To o l s a n d P a r t s E l e c t r i c a l R e q u i r e m e n t sL o c a t i o...
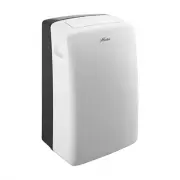
Page 4 - Front
11 12 The figures in this manual are based on the external view of a standard model. They may differ from that of the air conditioner you have selected. Control panel Cool air outlet Signal receptor Remote control Transport handle Air outlet hose Evaporator air intake Secondary drain port Primary dr...
Page 5 - Tools; DANGER; Your safety and the safety of others is very important.
Tools and Parts Gather the required tools and parts before starting installation . Read and follow the instructions provided with any tools listed here . Tools needed Parts supplied Check that all parts are included in parts package . ■ Phillips screwdriver ■ Pencil ■ Scissors ■ Cordless drill and ¹...
Page 6 - 5 A time-delay fuse or circuit breaker; Electrical; NOTE
4 Location Requirements U p t o 1 5 ' x 2 0 ' R o o m U p t o 2 0 ' x 2 0 ' R o o m U p t o 2 0 ' x 2 5 ' R o o m U p t o 1 0 ' x 2 0 ' R o o m A r e a t o b e c o o l e d 2 0 0 s q f t . 4 0 0 s q f t . 3 0 0 s q f t . 5 0 0 s q f t . U p t o 2 0 ' x 3 0 ' R o o m 6 0 0 s q f t . D O E C a p a c i ...
Page 7 - INSTALLATION; Unpack; Remove; air
WARNING T h e l e n g t h o f t h e e x h a u s t h o s e i s s p e c i a l l y d e s i g n e d a c c o r d i n g t o t h e s p e c i f i c a t i o n o f t h e p r o d u c t .D o n o t r e p l a c e , o r e x t e n d , o r o t h e r w i s e m o d i f y t h e h o s e . NOTE : ■ For best performance, ...
Page 8 - : P r o d u c t m u s t b e u s e d w i t h i n c l u d e d D u c t
6 Install The Portable Air Conditioner 5 . C o n f i r m t h e h o s e i s l o c k e d i n p l a c e b e f o r e o p e r a t i n g . Window Installation Install Exhaust Hose and Adapter A. Outer slider sectionB. Window exhaust adapter 3 . Insert the coupling into the slot on the back of the air cond...
Page 11 - PORTABLE AIR; A l i g n t h e t a b s o n t h e
S l o t I n s e r t 5 9 PORTABLE AIR CONDITIONER USE Operating your portable air conditioner properly helps you to obtain the best possible results . This section explains proper air conditioner operation . NOTE : In the event of a power failure , your air conditioner will operate at the previous se...
Page 12 - P o w e r O n o r O f f
1 0 s p e e d s s p e e d s H e a t i n g i s N OT a va i l a b l e f o r c o o l i n g o n l y m o d e l s . P o w e r O n o r O f f M o d e Fan Speed
Page 13 - CAUTION
11 I n t h e C o o l i n g m o d e , t h e t e m p e r a t u r e c a n b e s e t b e t w e e n . 6 1 ° F a n d 8 6 ° F (1 6 ° C a n d 3 0 ° C ) I n F a n O n l y m o d e , t h e t e m p e r a t u r e c a n n o t b e s e t . T h e u n i t L E D s h o w s t h e t a r g e t t e m p e r a t u r e f o r ...
Page 14 - Indication symbols; Remote control; Button and Function; N O T E
12 Indication symbols Remote control may differ in appearance . NOTE : Remote control Button and Function MODE ON/OFF SWING DOWN UP FAN FAN SWING Timer On/Off TIMER DIMMER or Sleep N O T E : P r e s s a n d h o l d t h e M O D E b u t t o n o n t h e r e m o t e f o r 5 s e c o n d s t o s w i t c h...
Page 15 - DIMMER; TIMER; Normal; SWING
1 3 Sleep mode 1. Press MODE to select COOL, Heating or DRY . NOTE : Sleep control cannot be selected in Fan mode . 2. Press the UP or DOWN button to set the temperature . 3. ■ In Heating mode, the set temperature will decrease by 6°F(3°C)at most, during 3 hours, and continues running at thattempera...
Page 16 - Draining the Air Conditioner(Heating models); Cleaning
A B I f t h e a i r c o n d i t i o n e r w i l l n o t b e u s e d f o r a n e x t e n d e dp e r i o d o f t i m e : 1 4 Draining the Air Conditioner(non-Heating models) Draining the Air Conditioner(Heating models) Cleaning the Outside 1. Press ON / OFF to turn off the air conditioner . 2. Unplug ...
Page 18 - If the unit displays error code E5, the water container is full.
■ If the unit displays error code E5, the water container is full. If the unit display error code E1/E2/E3/E4/E6/E7/EA Drain the water, see Draining the air " " conditioner . After draining, the unit can be operated again. ■ please contact customer service. 1 6 Air conditioner runs , but doe...
Page 19 - YEAR LIMITED WARRANTY; accordance with the provided instructions.; Exclusions; should be properly packaged to avoid damage in transit since
1 YEAR LIMITED WARRANTY Your appliance is covered by a limited one-year warranty and a limited 2-5 year warranty on the sealed system (the compressor, condenser, evaporator and tubing). For one year from your original date of purchase, Mindful, LLC will pay all costs for repairing or replacing any p...