Page 2 - Humidex; Table of Contents; Return and Exchange Policy
Humidex 1 Table of Contents Table of Contents ....................................................................................................................................1 Service and Warranty ......................................................................................................
Page 3 - Service; Please contact us by:; Service and Warranty; For Customer Assistance; Date of Manufacturing:; Please Note; the above information before contacting us.
Humidex 2 For the Following Inquiries: - Service - Parts - Accessories - Additional Customer Information Please contact us by: Phone: 1-888-533-1348 Email: [email protected] Website: www.humidex.com Service and Warranty For Customer Assistance To aid in answering questions if you call for service or...
Page 4 - Consumer Limited Warranty; Warranty Period for this product:; Refer to Page 2; To obtain supply, accessory or product information, contact us.; Refer to Page 2 for Contact Information.
Humidex 3 Consumer Limited Warranty ClairiTech Innovations Inc. warrants to the first consumer that this product, when shipped in its original container, will be free from defective workmanship and materials, and agrees that it will, at its discretion, either repair the defect or replace the defecti...
Page 5 - Included Components
Humidex 4 Pre-Installation Included Components Before installing your Humidex, make sure that you have the right model and accessories. The following items should be included in the accessory box. If parts are missing, contact our customer service at US 1-888-533-1348, Can. 1-800-416-9111. 1x Owner’...
Page 6 - Combustion Appliance Present in Dwelling; Read this Section Carefully; may be drawn into; Ideal location of the Unit; Install unit in dampest, coolest and lowest part of basement.; It
Humidex 5 Warning!!! Combustion Appliance Present in Dwelling Read this Section Carefully With the presence of appliances evacuating air outside the building envelope (such as range hood, bathroom fan, dryer, Humidex, etc.) a negative pressure could be created inside the building. As the pressure in...
Page 7 - Replenishment air to Basement from Upstairs; then install a grille 8” x 10” (or other; Note; Ducting
Humidex 6 Replenishment air to Basement from Upstairs The damp air exhausted by the Humidex must be replaced by the warmer/drier air from the upper levels. If there is no open stairwell, the airflow is restricted from coming down; then install a passive return grille with 100 sq. inches either in th...
Page 8 - Installation; Factors to consider; a 61⁄4” exit to the exterior of t; Make sure that you do not install the unit in a boiler room.; Selecting the Duct Location; Now that you’ve decided where to insta
Humidex 7 the outdoors. The outside louver should be high enough to avoid infiltration of snow, flooding and rodents, etc. All necessary parts and outside louvers are included. In cases where the basement height clearance is too low, the top portion of the bottom section can be cut down by a maximum...
Page 9 - Preparing the Humidex for Installation; Models can allow for up to 12”); Brick or Concrete Wall:; the hammer drill 1” apart
Humidex 8 Preparing the Humidex for Installation Measure the required Unit height. Remember that the units cannot be higher than 3” to 6 ” off the ground. This is crucial for the DVS-CS/CH and DVS-HW models as they are not adjustable in height like the DVS-BS/BH model is. (DVS-CS/CH Models can allow...
Page 10 - Attaching the Flex, Pipe and Vent; Attach the flex to the vent with the provided screws.; Cut off the excess flex.; If this is; efficiency of the unit will diminish
Humidex 9 Attaching the Flex, Pipe and Vent Attach the flex to the vent with the provided screws. From the outside, push the flex through the 6 ¼” hole. Make sure the vent is not twisted by inserting the screws too tight and that the flaps are working properly. Attach the vent to the outside wall wi...
Page 11 - Fasten Unit to the Wall; Flex should not be kinked in any way.; two) drill 1⁄4” pilot holes through the lips
Humidex 10 Fasten Unit to the Wall Now that the flex is tight, it can be attached to the elbow with the tie wrap. Flex should not be kinked in any way. Leaving a 1-inch gap between the top of the unit and the ceiling (In case of a finished ceiling, leave a 1/8-inch gap between the top of the unit an...
Page 12 - Unit Operations; How a Humidex Work; Humidex is a mechanical ventilation appliance installed in the; lowest; The expelled air is replaced with a flow of fresh,; Vacant Homes
Humidex 11 Unit Operations How a Humidex Work Humidex is a mechanical ventilation appliance installed in the lowest level of a home, (basement or crawlspace), engineered to expel moisture-laden air that stagnates due to poor air circulation. Cool, moist air will gravitate to the lowest point of the ...
Page 13 - The Control Panel; Maximum fan speed and Humidity level.
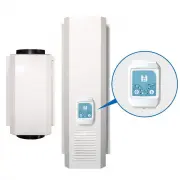
Humidex 12 The Control Panel The following section will refer to the control panel and its function. The user interface consists of: 1- Change Max Fan Speed Button 2- Current Fan Speed Mode Light 3- Change Desired Relative Humidity Button 4- Relative Humidity Setting Light Maximum fan speed and Humi...
Page 14 - desired humidity setting.; Changing maximum fan speed and desired humidity level.; New Installations in the Summer
Humidex 13 Fan Speed lights and Humidity Level lights The control panel is equipped with blue LED lights to indicate the current fan speed on the left and the desired RH Setting on the right. When the Fan Speed light is on the house icon, it indicates the humidity level is at or below the desired hu...
Page 15 - Maintaining your Humidex; at the intake grilles or louvers located at the bottom of the unit.
Humidex 14 Maintaining your Humidex Do not store anything within a radius of 4 feet around the base of the Humidex. Make sure the basement or crawlspace has adequate replenishment air from upstairs, from a location as far from the Humidex as possible. The only maintenance needed for your Humidex is ...
Page 16 - Most Common Issues; Mold, Mildew and Musty Smell; Follow the Recommendations on; please
Humidex 15 Most Common Issues Mold, Mildew and Musty Smell If mold or mildew is present prior to installing a Humidex, please have the contaminated area cleaned. Not doing so could cause the Humidex to spread that mold to other locations in the basement or crawlspace. To avoid Mold, Mildew or Musty ...
Page 17 - Specifications; Technical Data; All Units require a 115 VAC electrical outlet; Dimensions
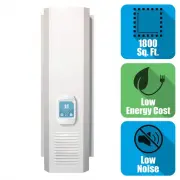
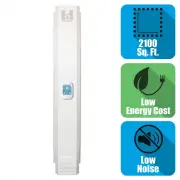
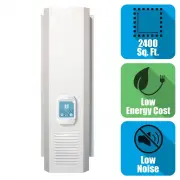
Humidex 16 Specifications Technical Data Model Amps (A) Watts (W) Airflow (CFM) Capacity (Sq. Ft.) DVS-CS 0.26 31 180 1800 DVS-HW 0.26 31 180 1500 DVS-BS 0.26 31 180 1500 DVS-CH 0.30 34 230 2400 DVS-BH 0.30 34 230 2100 All Units require a 115 VAC electrical outlet Dimensions Model Height* (In.) Widt...
Page 18 - Return period of 30 days for unused products and accessories:; Fees; or Email Us
Humidex 17 Return and Exchange Policy Clairitech Innovations Inc. values its relationship with you and offers you the option to return most products you purchase directly from Clairitech Innovations Inc., as set forth in detail below. Policy Return period of 30 days for unused products and accessori...
Page 19 - For any questions regarding warranty terms please call
Humidex 18 3. Insert all the documents received concerning the order to be returned. Remember to keep a copy of all the documents provided. 4. To obtain a full refund, the products must be returned in perfect condition, in their original packaging and with all documents, parts and accessories. 5. Th...