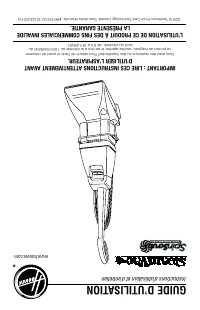
Page 2 - OWNER’S MANUAL; Operating and Servicing Instructions; IMPORTANT: READ CAREFULLY BEFORE ASSEMBLY AND USE.
www.hoover.com OWNER’S MANUAL Operating and Servicing Instructions ©2015 Techtronic Floor Care Technology Limited. All rights reserved. #961151012 ID103222-R4 IMPORTANT: READ CAREFULLY BEFORE ASSEMBLY AND USE. Questions or concerns? For assistance, please call Customer Service at 1-800-944-9200 Mon-...
Page 3 - CONTENTS; Thank you for choosing a HOOVER; MANUFACTURING CODE
2 CONTENTS Thank you for choosing a HOOVER ® product. Please enter the complete model and Manufacturing Code in the spaces provided. MODEL MFG. CODE Hint: Attach your sales receipt to this owner’s manual. Verification of date of purchase may be required for warranty service of your HOOVER ® product....
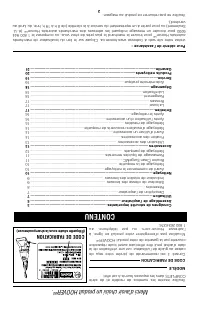
Page 4 - CODE DE; CONTENU
Merc i d ’av oir cho isi u n p rod uit HOO VER MD . V euillez inscrire les numér os de modèle et de série COMPLETS dans les espaces fournis à cet effet MODÈLE CODE DE F ABRICA TION Conseil: Il est r ecommandé de joindre votre reçu de caisse au guide de l’utilisateur , car une vérification de la date...
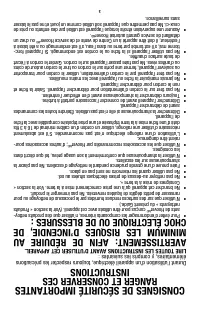
Page 5 - LIRE TOUTES
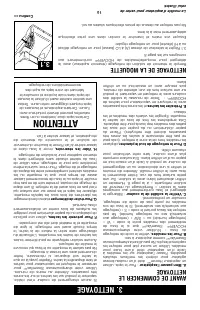
CONSIGNES DE SÉCURITÉ IMPORTANTES RANGER ET CONSERVER CES INSTRUCTIONS Durant l’utilisation d’un appareil électrique, toujours respecter les précautions élémentaires, y compris les suivantes : LIRE TOUTES LES INSTRUCTIONS AVANT D’UTILISER CET APPAREIL. AVERTIS SEMENT: AFI N DE RÉD UIR E AU MIN IM UM...
Page 6 - IMPORTANT SAFETY INSTRUCTIONS; SAVE THESE INSTRUCTIONS; READ ALL INSTRUCTIONS BEFORE USING THIS APPLIANCE.; ELECTRIC SHOCK OR INJURY:
3 IMPORTANT SAFETY INSTRUCTIONS SAVE THESE INSTRUCTIONS When using an electrical appliance, basic precautions should always be followed, including the following: READ ALL INSTRUCTIONS BEFORE USING THIS APPLIANCE. WARNING: TO REDUCE THE RISK OF FIRE, ELECTRIC SHOCK OR INJURY: • To avoid internal comp...
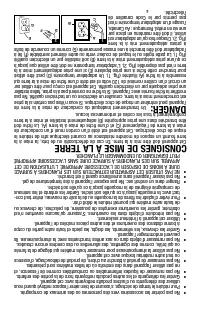
Page 7 - GROUNDING INSTRUCTIONS
4 • Avoid picking up hard, sharp objects with the carpet cleaner. They may damage the machine. • Keep hair, loose clothing, fingers, feet and all parts of body away from openings and moving parts. • Use indoors only. • Do not put any object into openings. Do not use with any opening blocked; keep fr...
Page 9 - ATTENTION
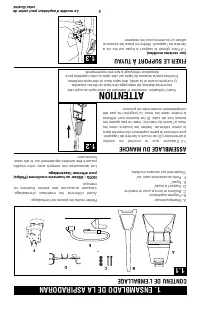
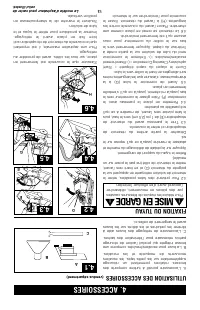
1. ENSAMBLADO DE LA ASPIRADORAN CONTENU DE L ’EMBALLAGE A. Shampouineuse B. Poignée supérieure C. Bo ulo ns et éc ro us po ur le m an ch e D. Suppor t à tuyau* E. Tuyau* F . Po rte -a cc ess oire s a ve c v is* *Seulement sur certains modèles. 1.2 S’a ss ure r qu e le cro ch et du co rd on d’a lim e...
Page 10 - ATTACH HOSE HOLDER
1. CLEANER ASSEMBLY A. Carpet cleaner bodyB. Upper handleC. Handle bolts and nuts D. Hose Holder*E. Hose*F. Tool Holder with Screw* *Available on select models only 1.2 With cord hook to back of carpet cleaner, push upper handle down onto lower handle. Push bolts into holes on front of handle, but d...
Page 11 - STORE HOSE; STORE TOOL; Cleaning Tool; ATTACH TOOL HOLDER
6 1.5 STORE HOSE (Available on select models only) 1.5 Start with converter end of hose (H). Fit converter over tab near tool holder (I). Press converter firmly to snap in place. Press solution tube (G) into clip next to converter as shown. 1.6 Wrap hose around hook on upper handle (K). Press hose i...
Page 12 - Accessoire pour le nettoyage; FIXER LE
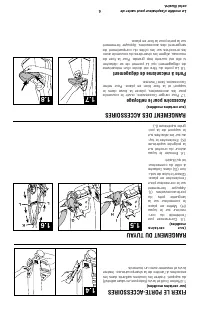
6 1.5 RANGEMENT DU TUYAU (s ur ce rta in s modèles) 1.5 Co mm en ce r pa r l’extrémité du con- ne cte ur su r le t uya u (H ). Me ttr e en p la ce le c on ne cte ur su r la la ng ue tte prè s du po rte -a cc ess oire s (I) . Ap pu ye r fe rm em en t su r le c on ne cte ur po ur l’e nc le nc he r e n...
Page 13 - TION; MISE EN
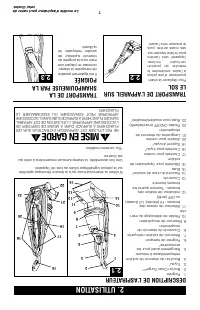
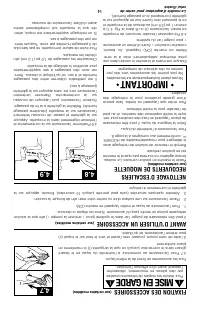
7 1. Poignée 2. Bouton Clean Surge MC * 3. T uy au * 4. Bo uc ho n d u r ése rvo ir de so lu tio n nettoyante/tasse à mesurer 5. Ra ng em en t a va nt po ur le s accessoires* 6. Poignée de transport 7. Réservoir de solution nettoyante 8. Co uve rc le d u r ése rvo ir de réc up éra tio n 9. Réservoir...
Page 14 - CLEANER DESCRIPTION; TRANSPORTING CLEANER; CAUTION
7 2. HOW TO USE CLEANER DESCRIPTION 1. Hand Grip2. Clean Surge ® Button* 3. Hose*4. Clean Water Solution Tank Cap/ Measuring Cup 5. Front Tool Storage*6. Carry Handle7. Clean Water Solution Tank 8. Dirty Water Tank Lid9. Dirty Water Tank10. Handle Release Pedal11. Brush Speed Selector: HI, LO, or OF...
Page 15 - CLEAN WATER SOLUTION TANK; Tank Measuring Chart; For Heavy Traffic Areas; Automatic Shut Off; DIRTY WATER TANK; How to Empty
8 THE TANKS: CLEAN WATER SOLUTION TANK 2.4 The Clean Water Solution Tank holds the cleaning solution that is to be dispersed onto the surface to be cleaned (see “Cleaning Products” on p.20 for details). 2.5 2.6 5 OUNCES/150 ml A Tank Measuring Chart For carpet, carpeted stairs and upholstery: Fill c...
Page 16 - T ableau; RÉSERVOIR DE
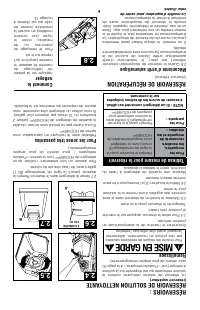
8 RÉSERVOIRS : RÉSERVOIR DE SOLUTION NETTOY ANTE (réservoir supérieur) 2.4 Le r ése rvo ir de s olu tio n ne tto ya nte c on tie nt la so lu tio n n ett oya nte q ui e st dis pe rsé e s ur la su rfa ce à n ett oye r ( vo ir « P ro du its ne tto ya nts » à la p ag e 2 0 po ur ob te nir d e p lu s a m...
Page 17 - IMPORTANT
9 2.10 2.9 T ou rn er le s la ng ue tte s du ré se rv oir de ré cu pé ra tio n ( E) ve rs l’e xté rie ur (u ne s ur ch aq ue cô té d u r ése rvo ir) . So ule ve r le ré se rv oir et le re tir er de la sh am po uin eu se , pu is le t ra nsp ort er ju sq u’à u n évi er ou u n la va bo . Po ur re me tt...
Page 18 - BRUSH SPEED SELECTOR; BRUSH INDICATOR
9 2.10 2.10 Unlatch back part of tank lid and remove lid.Empty tank. Pour dirty water out from the rear of the tank (F). The lid replaces in a hinge-like manner. Position the front of lid under tabs (G) on front of tank. Rotate lid down onto tank. Make sure that the lid is secure on all sides before...
Page 19 - BEFORE YOU BEGIN CLEANING; CARPET CLEANING
10 BEFORE YOU BEGIN CLEANING A. Vacuum thoroughly - For carpet, use a Hoover ® vacuum cleaner with an agitator for best results. Vacuum upholstery with a vacuum cleaner with cleaning tool attachments. Use a crevice tool to reach into tufts and folds. Do not use the SteamVac ® carpet cleaner as a dry...
Page 20 - AGE
10 AVANT DE COMMENCER LE NETTOYAGE A. Bien passer l’aspirateur - Po ur le ta pis , u tili se r un aspirateur Hoover MD d oté d ’u n r ou le au -b ro sse ag ita te ur po ur ob te nir le s me ille urs ré su lta ts po ssi ble s. Pa sse r l ’a sp ira te ur su r l es me ub le s à l’a id e d’u n asp ira t...
Page 21 - BOUTON CLEAN; RAMASSAGE DE
11 Nettoyage de la moquette (continu) Po ur évi te r d e m arc he r s ur un e m oq ue tte h um id e, co mm en ce r p ar ne tto ye r l a z on e l a p lu s é lo ig né e de l a po rte o u du c he min v ers l ’é vie r où l es rése rvo irs se ron t v id és et rem plis . Pe se r s ur la p éd ale d e d éb ...
Page 22 - CLEAN SURGE; PICKING UP SPILLS
11 Continue to squeeze trigger and slowly pull carpet cleaner back toward you (second wet stroke). Release trigger and slowly push carpet cleaner forward over area just sprayed with solution (dry stroke). Then slowly pull carpet cleaner back toward you without squeezing trigger (dry stroke). If clea...
Page 23 - CLEANING BARE FLOORS; How to attach bare floor attachment; TO CLEAN BARE FLOORS
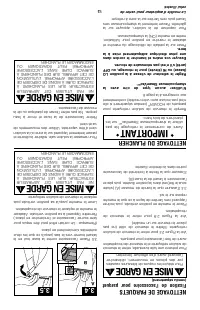
CAUTION ! ! To reduce the risk of injury from moving parts, unplug cleaner. To prevent possible leaking, remove Clean Water Solution Tank and Dirty Water Tank before positioning bare floor attachment. Refer to Fig. 2.4 to remove Clean Water Solution Tank. Set tank aside (do not set tank on furniture...
Page 24 - Fixation de; NETTOYAGE
Po ur pré ve nir un e fu ite é ve ntu elle , r etir er le ré se rvo ir de so lu tio n n etto ya nte et le ré se rvo ir de ré cu pé ra tio n avant de fixer l’accessoir e pour parquets. V oi r la F ig ure 2 .4 p ou r r etir er le ré se rvo ir de so lu tio n ne tto ya nte . Me ttr e le r ése rvo ir de ...
Page 26 - USING THE TOOLS; HOW TO ATTACH HOSE
13 4. TOOLS CAUTION ! ! To reduce the risk of injury from moving parts, unplug cleaner. A A. Powered Hand Tool has rotating brushes for extra scrubbing action on small carpet areas, carpeted stairs and upholstery. B. Stair/Upholstery Nozzle has a built-in brush to help provide the scrubbing action s...
Page 27 - CLEANING CARPETED STAIRS
14 All tools connect to the hose in the same manner. 4.7 Attach tool to connector end of hose by sliding it onto connector until the tab (I) locks it securely. Using your thumb, push forward and up on the latch (J) to remove tool as shown. I 4.7 HOW TO ATTACH TOOL BEFORE USING TOOL It may be necessa...
Page 29 - NETTOYAGE DE MEUBLES
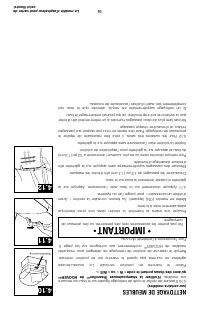
4.1 0 S ’a ssu rer d e v érif ie r le c od e d e n etto ya ge fig ura nt su r le tis su q ui r ec ou vre vos meubles. N’utiliser la shampouineuse SteamV ac MC d e HO O VE R MD qu’avec des tissus portant le code « W » ou « W/S ». Pla ce r le ma nc he en po sit io n ve rti ca le . Le ro ule au -b ro s...
Page 30 - CLEANING UPHOLSTERY
4.10 Be sure to check the cleaning code on your upholstery. Use your HOOVER ® SteamVac ® carpet cleaner only on upholstery marked “W” or “W/S”. Place handle in upright position. Agitator brushes will not rotate while handle Is In upright position. Fill Clean Water Solution Tank with HOOVER ® Deterge...
Page 31 - AFTER USING TOOL
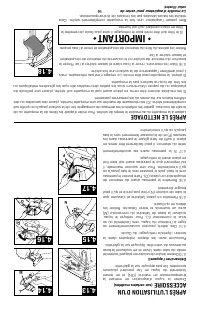
16 Drain suction hose by turning carpet cleaner ON and holding end of hose up for several seconds. Do not press trigger. Disconnect carpet cleaner from electrical outlet. 4.13 Drain solution tube by placing round end in sink and raising nozzle above your head. Press the trigger. Proceed with steps i...
Page 32 - APRÈS L ’UTILISA; APRÈS LE NETTOYAGE
16 Drainer le tuyau d’aspiration en mettant la sh am po uin eu se e n ma rc he ( ON ) et en t en an t l’e xtr ém ité d u tu ya u en l ’a ir pe nd an t plu sie urs secondes. Ne pas appuyer sur la gâchette. Débrancher l’appareil. 4.1 3 D ra in er l e tu be de so lu tio n e n p la ça nt l ’e xtr ém ité...
Page 34 - How to Clean; How to Change and Clean; How to Remove
17 NOZZLE: How to Clean If lint or other debris becomes lodged in nozzle, do not attempt to remove nozzle cover. Pour one to two cups of clear water on a non-carpeted floor Do not pour water onto a wood floor. Pick up water with your SteamVac ® carpet cleaner. Repeat as necessary until debris is flu...
Page 35 - WARNING; LUBRICATION; PROBLEM
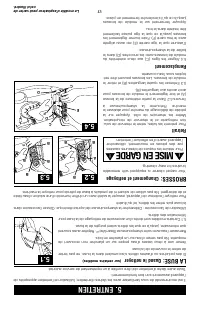
6. TROUBLESHOOTING If a minor problem occurs, it usually can be solved quite easily when the cause is found by using the checklist below. Any other servicing should be done by an authorized service representative. WARNING ! ! To reduce risk of personal injury - unplug cleaner before servicing. LUBRI...
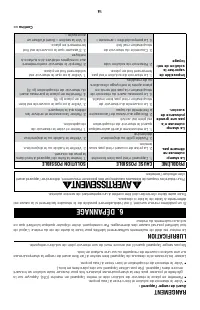
Page 36 - ANNAGE; AVERTISSEMENT; PROBLÈME
18 LUBRIFICATION Le m ote ur est d oté d e r ou le me nts s uffi sa mm en t lu bri fié s p ou r t ou te la d uré e d e v ie d u m ote ur. L ’a jo ut de to ut lu bri fia nt po urr ait ca use r d es do mm ag es. P ar co nsé qu en t, évi te r d ’a jo ute r q ue lq ue lu bri fia nt qu e c e soit aux rou...
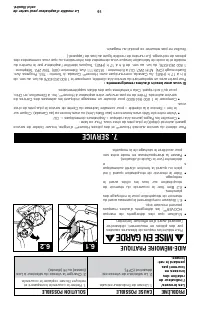
Page 37 - AIDE-MÉMOIRE PRATIQUE
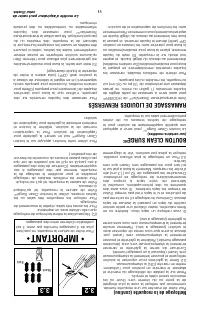
6.1 6.2 AIDE-MÉMOIRE PRATIQUE • N’u tili se r qu e de s dé te rg en ts de ma rq ue HOOVER MD ; le s dé te rg en ts d’a utr es ma rq ue s peuvent mousser trop. • 6 .1 A ba iss er co mp lè te me nt l e p an ne au a va nt d u ré se rvo ir de ré cu pé ra tio n p ou r l e n ett oya ge d es planchers. • 6...
Page 38 - HELPFUL REMINDERS
6.1 6.2 To obtain approved Hoover ® service and genuine Hoover ® parts, locate the nearest Authorized Hoover ® Warranty Service Dealer (Depot) by: • Checking the Yellow Pages under “Vacuum Cleaners” or “Household”. • Visit our website at hoover.com (U.S. Customers) or hoover.ca (Canadian customers)....
Page 39 - Expert Carpet Solutions: Professional Grade; CLEANING SOLUTIONS
8. CLEANING PRODUCTS 20 Hoover ® Cleaning Solution Guide For best results, use your Carpet Cleaner + Spot Treatment + Solutions. Use only HOOVER cleaning solutions to prevent potential harm to your Carpet Cleaner and keep your warranty. Hoover has a full line of Detergents and Spot Treatments to com...
Page 40 - NETTOYANTS; Guide des solutions nettoyantes Hoover; Solutions expertes pour tapis :; Solutions Plus Carpet; SOLUTIONS NETTOYANTES
20 8. PRODUITS NETTOYANTS Guide des solutions nettoyantes Hoover ® Utilisez votre shampouineuse à tapis + le traitement de taches + une solution afin d’obtenir des résulta ts optimaux Utilisez les solutions de nettoya ge de HOOVER pour éviter d’endommager votre shampouineuse à ta pis et éviter l’ann...
Page 42 - LIMITED ONE YEAR WARRANTY
LIMITED ONE YEAR WARRANTY (Domestic Use) WHAT THIS WARRANTY COVERS When used and maintained in normal household use and in accordance with the Owner’s Manual, your HOOVER ® product is warranted against original defects in material and workmanship for a full one year from date of purchase (the “Warra...
Page 46 - IMPORTANTE: LEA ATENTAMENTE ANTES DE ENSAMBLAR Y USAR.; MANUAL DEL PROPIETARIO; Instrucciones de Funcionamiento y Servicio; ESTA ASPIRADORA PARA ALFOMBRAS ESTÁ DISEÑADA
©2015 Techtronic Floor Care Technology Limited. Todos los derechos reservados. #961151012 ID103222-R4 IMPORTANTE: LEA ATENTAMENTE ANTES DE ENSAMBLAR Y USAR. ¿Tiene alguna pregunta o inquietud? Para obtener asistencia, llame al Servicio de atención al cliente al 18009449200, de lunes a viernes, de 8 ...
Page 47 - Gracias por haber elegido un producto HOOVER; CÓDIGO DE FABRICACIÓN; ÍNDICE
E2 Gracias por haber elegido un producto HOOVER ® . Anote los números completos de Código de fabricación en los espacios provistos. MODELO CÓDIGO DE FABRICACIÓN Consejo: Adjunte su recibo de compra a este Manual del propietario. Para obtener el servicio de garantía de su producto HOOVER ® puede requ...
Page 48 - GARANTIE LIMITÉE DE UN AN
E21 9. GARANTÍA GARANTIE LIMITÉE DE UN AN (Para uso doméstico) QUÉ CUBRE ESTA GARANTÍA Siempre que el uso y el mantenimiento de su producto HOOVER ® se realicen en condiciones de uso doméstico normales y según el Manual del usuario, el producto estará garantizado con - tra defectos originales en el ...
Page 49 - PRODUCTOS DE LIMPIEZA; Guía de soluciones para limpieza Hoover; Soluciones para alfombras Expert: Calidad profesional; SOLUCIONES PARA LIMPIEZA
8. PRODUCTOS DE LIMPIEZA E20 Guía de soluciones para limpieza Hoover ® Para obtener mejores resultados, use su limpiador de alfombras junto con el tratamiento para manchas y las soluciones. Use únicamente las soluciones para limpieza HOOVER y evite potenciales daños en su lavadora de alfombras y con...
Page 50 - SALVAGUARDIAS IMPORTANTES; ¡GUARDE ESTAS INSTRUCCIONES!; LEA TODAS LAS INSTRUCCIONES ANTES DE USAR ESTE APARATO; ADVERTENCIA: PARA REDUCIR EL RIESGO
E3 ¡ SALVAGUARDIAS IMPORTANTES ! ¡GUARDE ESTAS INSTRUCCIONES! Al usar un aparato eléctrico, observe siempre las precauciones básicas, incluyendo las siguientes: LEA TODAS LAS INSTRUCCIONES ANTES DE USAR ESTE APARATO ADVERTENCIA: PARA REDUCIR EL RIESGO DE INCENDIOS, CHOQUES ELÉCTRICOS O LESIONES: • P...
Page 51 - INSTRUCCIONES DE CONEXIÓN A TIERRA
E4 • Para ayudar a reducir el tiempo de secado, asegúrese de que el área esté bien ventilada al usar detergentes y otros limpiadores con esta máquina. • Mantenga los detergentes y otros limpiadores fuera del alcance de los niños. • No use este aparato para aspirar líquidos inflamables o combustibles...
Page 52 - RECORDATORIOS ÚTILES; PRECAUCIÓN
E19 PROBLEMA CAUSA POSIBLE CAUSA POSIBLE Las escobillas/el indicador de escobillas no giran durante la limpieza del piso. 1. La pantalla del indicador está sucia. 1. Retire la tapa transparente sobre el indicador y limpie la pantalla; vuelva a colocar la tapa. 2. El selector de velocidad está en la ...
Page 53 - PROBLEMA; SOLUCIÓN DE PROBLEMAS; ADVERTENCIA
LUBRICACIÓN El motor tiene cojinetes que cuentan con suficiente lubricación para la vida útil del motor. La adición de lubricantes podría causar daños. Por lo tanto, no añada lubricante a ningún cojinete del motor. ALMACENAMIENTO Antes de guardarlo: • Vacíe el tanque de solución y enjuáguelo bien co...
Page 54 - ENSAMBLADO DE LA ASPIRADORA; CONTENIDO DE LA CAJA; ATENCIÓN
1. ENSAMBLADO DE LA ASPIRADORA CONTENIDO DE LA CAJA A.Cuerpo de la limpiadora para alfombrasB. Mango superiorC. Pernos y tuercas D.Sujetador para la manguera*E. Manguera*F. Sujetador del mango con tornillo del mango* *El accesorio varía según el modelo. 1.2 Con el gancho para el cordón en la parte p...
Page 55 - Accesorio de limpieza; Puerta desprendible
E6 1.5 PARA GUARDAR LA MANGUERA (en algunos modelos) 1.5 Comience con el extremo del convertidor de la manguera (H). Coloque el convertidor sobre la lengüeta cerca del sujetador de accesorios (I). Presione el convertidor con fuerza para que encaje en su lugar. Presione el tubo de solución (G) en el ...
Page 56 - Cuándo limpiarlo; Cómo cambiarlos y
BOQUILLA: Cuándo limpiarlo Si se depositan pelusas o cualquier otro residuo en la boquilla, no intente retirar la tapa de la boquilla. Vierta entre una y dos tazas de agua limpia en un piso sin alfombras. No vierta agua en un piso de madera. Aspire el agua con su limpiadora para alfombras SteamVac™....
Page 57 - IMPORTANTE
E16 Drene la manguera de succión encendiendo la limpiadora para alfombras levantando el extremo de la manguera durante algunos segundos. No presione el gatillo. Desconecte la limpiadora para alfombras de la toma de corriente eléctrica. 4.13 Drene el tubo de solución colocando el extremo redondo en e...
Page 59 - TANQUE DE SOLUCIÓN LIMPIA; Cuadro de medición del tanque; Para áreas de alto tránsito; TANQUE DE RECUPERACIÓN; Como vaciarlo
E8 LOS TANQUES: TANQUE DE SOLUCIÓN LIMPIA (tanque superior) 2.4 El tanque de solución limpia contiene la solución de limpieza que se dispersará sobre la superficie que se desea limpiar (vea “Productos de limpieza” en la página 20 para obtener detalles). 2.5 2.6 5 OUNCES/150 ml A Cuadro de medición d...
Page 60 - LIMPIEZA DE TAPIZADOS
4.10 Asegúrese de consultar el código de limpieza en su tapizado. Use su limpiadora para alfombras SteamVac ® HOOVER ® únicamente en tapizados marcados con “W” o “W/S”. Coloque el mango en posición vertical. Las escobillas del agitador no giran mientras el mango se encuentra en posición vertical. Ll...
Page 61 - LIMPIEZA DE ESCALERAS ALFOMBRADAS
Todos los accesorios deben conectarse a la manguera de la misma manera. 4.7 Conecte el accesorio al extremo de la manguera con el conector deslizán-dolo sobre el conector hasta que la lengüeta (I) lo trabe con seguridad. Con el pulgar, empuje hacia adelante y hacia arriba sobre la traba (J) para ret...
Page 62 - SELECTOR DE VELOCIDAD DE; INDICADOR DE ESCOBILLAS
2.10 2.10 Desenganche la parte posterior de la tapa del tanque y retire la tapa. Vacíe el tanque. Vierta el agua sucia de la parte posterior del tanque (F). La tapa se vuelve a colocar con un mecanismo de bisagra. Coloque la parte delantera de la tapa debajo de las lengüetas (G) en la parte delanter...
Page 63 - ANTES DE COMENZAR A LIMPIAR; LIMPIEZA DE ALFOMBRAS
ANTES DE COMENZAR A LIMPIAR A. Aspire bien - En el caso de alfombras, use una aspiradora Hoover ® con un agitador para obtener los mejores resultados. Limpie los tapizados con una aspiradora que tenga accesorios de limpieza. Use un accesorio para hendiduras para limpiar nudos y pliegues. No use la l...
Page 64 - USO DE LOS ACCESORIOS; CÓMO CONECTAR LA MANGUERA
A A. El accesorio de mano turboaccionado tiene escobillas giratorias para una acción de fregado adicional en áreas pequeñas de alfombras, escaleras alfombradas y tapizados. B. La boquilla para escaleras/tapizados tiene una escobilla incorporada que ayuda a proporcionar la acción de fregado que puede...
Page 65 - CÓMO LIMPIAR SUELOS DUROS
Para evitar posibles fugas, retire el tanque de solución limpia y el tanque de recuperación antes de colocar el accesorio para pisos sin alfombras. Consulte la Fig. 2.4 para retirar el tanque de solución limpia. Coloque el tanque a un lado (no apoye el tanque sobre un mueble). Consulte la Fig. 2.9 p...
Page 66 - BOTÓN CLEAN SURGE
3.2 3.2 Oprima el gatillo (B) para liberar la solución de limpieza y empuje lentamente la limpiadora para alfombras hacia adelante (equivale a una pasada húmeda).Continúe oprimiendo el gatillo y tire lentamente de la limpiadora para alfombras hacia atrás en dirección a usted (segunda pasada húmeda)....


 Hoover UH40020
User Manual
Hoover UH40020
User Manual
 Hoover U5471-900
User Manual
Hoover U5471-900
User Manual
 Hoover U5465-970
User Manual
Hoover U5465-970
User Manual
 Hoover UH70200
User Manual
Hoover UH70200
User Manual
 Hoover FH50150
User Manual
Hoover FH50150
User Manual
 Hoover F4300
User Manual
Hoover F4300
User Manual
 Hoover S2200
User Manual
Hoover S2200
User Manual
 Hoover UH20020
User Manual
Hoover UH20020
User Manual
 Hoover UH70086
User Manual
Hoover UH70086
User Manual
 Hoover FH50020
User Manual
Hoover FH50020
User Manual
 Hoover SH80005CA
User Manual
Hoover SH80005CA
User Manual
 Hoover SH40055
User Manual
Hoover SH40055
User Manual
 Hoover UH70809
User Manual
Hoover UH70809
User Manual
 Hoover S3755
User Manual
Hoover S3755
User Manual